
All Activity
- Past hour
-
A superb set of photos, thanks for sharing them, a pity this is as close as I'm ever likely to get, it's the sort of place I'd love to have a prowl around. Steve.
-
Ahh, a man after my own heart. Welcome aboard would be/will be shipmate. 🙂 I'm into model ships myself, mainly 1/600 scale (yeah, I know, archaic) and done to a rather average standard, but I enjoy them. I can relate to that, although my return was about 25 years ago, and at the time not knowing it would be permanent. Have you done any ships yet? And if so, do we get to see them? Regards, Jeff.
-
Does the GB have to include a vehicle, aircraft, ship or other means of transport? What about a situation or event that had a memorable impact which might not involve vehicles? cheers, Mike
-

No. 226 Sqn. Mitchell Mk II, FW130 'MQ-A'
Karearea replied to Karearea's topic in World War 2 Twins Mega GB
It was nacelles day today. Airfix have you cement the main landing gear legs first, into the underside of the wing using the outer nacelle halves as a jig. The next step is to wait for the legs to dry, remove the jig half, then build up the entire nacelle and glue that over the legs. Because the firewall at the front of each nacelle covers quite a bit of the wing leading edge as well, I elected to leave them off until the main nacelle was attached: Note that after documenting this step, I also clamped the front half of each to ensure a good join right across the parts. One of the other benefits I discovered by doing things this way is that it’s easy to add a little dab of cement to where the leg fits into the inner nacelle surface after joining, using a Revell Contacta needle applicator. Half an hour or so later, after manipulating the parts into a flush alignment, I flipped the Mitchell over and cemented the firewalls in place. Fit was great, perhaps it would have been fine to just join them to each nacelle anyway. There’s a step at the upper rear join of each nacelle, and the perimeter of the entire join will need some light remedial work. But overall the fit is good, and I still haven’t needed filler. I can also assess the nose weight now- it’s pretty securely nose down thankfully. I do need to add the turrets aft of the C of M, but then the engines and cowls will also be added ahead of the wheels. I’m not worried anymore… -

1/48 Mirage IIIR, Swiss Air Force (Kinetic)
Electric Indigo replied to Bjorn's topic in Ready for Inspection - Aircraft
Beautiful work, I think you effort paid off big time. Love the colors & the photography. -

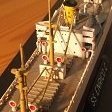
ORP Błyskawica - Mirage Hobby 1:400
Andy H replied to Ivandrago's topic in Work in Progress - Maritime
Off to a good start. Very interested to see how this one turns out. 😎👍 -

British Airways Fairey Rotodyne! Airfix 1/72
heloman1 replied to woody37's topic in Ready for Inspection - Aircraft
I'm with you on that Neil. Politicians, who have any of them? Keith, I too have a stalled Rotordyne build. I think having seen what it can look like i skilled hands, I may just resurrect it! Colin -
Great to see! Just a bit each day keeps me sane. Well, mostly . Keep it up. Charlie
-
Great piece - and lovely simple presentation as well.
-
... and a very impressive display it was. John
-
 Yes. A sturdy and useful aircraft for sure. I was up early so I explored the sprue... These are for my aircraft. This sprue is all for the floatplane version. I'll be saving these! A bit of glass... --John
 -
Italian AF Bell AB-47, 1954...1/72nd, Italeri...
John Masters replied to John Masters's topic in NATO 75th Anniversary GB
I think I will wrap this one up today. I woke up suddenly at 03:00 and couldn't go back to sleep so the modelling bench seemed like a good place to be... I need to clean up the lins on the glass... I think I'll add some harness/seat belts to the interior. --John -
British Airways Fairey Rotodyne! Airfix 1/72
Donald replied to woody37's topic in Ready for Inspection - Aircraft
Very imaginative bit of modelling of what Fairey's noisy tip-jet creation might have looked like in service. I like it. Well done. -
Great show, congratulations to all involved. As I may have been heard to say in the past... "ma feet are killin' me"... 😀 John
-

Cry HAVOC and let slip the dogs of war
FortyEighter replied to FortyEighter's topic in World War 2 Twins Mega GB
I was planning on a few finishing touches to meet today's deadline but then noticed the GB had been extended. Just aerials, machine gun and cockpit hatch to put in place and a bit of research on the rear fuselage light shape before masking and painting its surround: So I'll concentrate on Baby Boomers this week and then come back to the Havoc. Mike -

Australian Centurion Mk 5/1 (Vespid 1/72 scale)
SimonL replied to SimonL's topic in Work in Progress - Armour
Thanks John and Keith. Before tackling the tracks, I thought I would work on the turret first. Parts for the commanders cupola, I fashioned a handle from some copper wire rather than the provided etch as that looked to one-dimensional. And completed (finger for scale). And added (with other bits) to the turret. Also sanded off these markings, for the placement of the smoke launchers, as after awhile in the jungle these were removed. And after the application of a little putty to fix the minor gap between the mantlet and turret - still needs a little work. Then on to the tracks. I always find link and length a challenge - even at 1:35 scale. And this was also rather fiddly. That being said, the worst of it will be hidden once I’ve added some paint touch ups. The tracks were painted in Vallejo Track Primer. An example of what’s in the kit in terms of options. Vespid provide two different front glacis - one with mud guards and the one I’m going to use, with the mud guards “cut down”. This was a modification (along with removal of the bazooka plates) for dealing with the conditions in the jungle. -
A-ha....thanks for that. Looks like what I need is a throttle pedal hanging down and my 2 floor-mounted pedals to complete.
-
In my opinion is the recce version of Mirage III one of the best-looking aircraft ever. If Lotus 72 had been an aircraft, it would have looked something like this. The Kinetic kit looks great in the box with lovely details. However, fit is pretty bad. I built the Mirage IIIE years ago, remembering that as a far from enjoyable build. But the will to build the R version was strong, so I decided to go through this again. I am not so fond of special markings, but the Swiss Air Force dark grey farewell scheme with the hawk (?) head was hard to resist. In order to make this an even more difficult build, I used the SBS Model cockpit set. As with the rest of the kit, it has lovely details but bad fit. Another irresistable thing is the Soviet style colurs that the licence built Swiss Mirages sported. bril Fit was bad, but the decals (designed by Syhart and printed by Cartograf) was brilliant. Such large decals can be a true challenge - and so they were. But finally I made it, with no silvering at all. However, when decals were in place, I decided to cut the large transparent decal film areas, extremely carefully with a new scalpel blade, to avoid the risk of silvering. It could have been an extremely stupid decision, but it turned out nice. And if the decals on the upper surfaces was a challenge, still they were nothing compared to the underside... Much complaining here, I know. But even though it was a challenging build and many times during it, I was ready to throw it away, it was still pretty enjoyable after all. Probably I suffer from the Stockholm syndrome. I did not bother to fix all mistakes, but anyway I am very pleased with the result. Probably a combination of being proud of the effort to manage to build this at all, and the lovely appearance of this amazing aircraft. Thanks for watching!
- 1 reply
-
- 2
-

-

-
There was also Stinson Reliant. althought the majority of them were in Royal Navy
-
I can remember seeing your model all those years ago at those 1981 IPMS Nationals as it was known back then. Probably when they were held at Stoneleigh. I think I can remember your model being named ' Nantucket Sleigh Ride' I went back there a few years ago for an event. The halls look tiny compared to what IPMS SMW is today.
-

1:72 Kittyhawk Mk.I, 3 Sqn RAAF, North Africa, 1942
Andrés S. replied to Dunny's topic in Ready for Inspection - Aircraft
👍🏻👍🏻👍🏻 Andrés.- 5 replies
-
- 1
-
-
- Special Hobby
- WWII
- (and 1 more)
-
Thanks very much Chris - jeez, got there in the end!
- Today
-
Origin of name "Aldon" for Bf 108 in R.A.F. service
vildebeest replied to dalea's topic in Aircraft WWII
According to Bill Gunston, a contraction of Aldington, Bfw's UK sales agent. Paul- 1 reply
-
- 1
-
-

Boeing 727-30 Lufthansa Delivery Scheme
CliffB replied to nimrod54's topic in Baby Boomers GB 1946-1964
That’s good news indeed John 👍 -
Cheers. Definitely had its challenges. I didn’t include a picture of the interior. The colours are a bit bright (flash didn’t help) but it’s pretty dark in there


-
Forum Statistics
239.5k
Total Topics4.1m
Total Posts -
Member Statistics
34,567
Total Members3,626
Most Online
-
Who's Online 172 Members, 4 Anonymous, 767 Guests (See full list)
- LimaOperator
- Robert
- Jeepboy
- Bullbasket
- Lanmi
- Elias
- Fissionchips
- Eric B.
- BrianK
- Redcoat2966
- Jagdtiger1
- kiseca
- Baggers
- PhantomBigStu
- davecov
- Skodadriver
- MACALAIN
- Planebuilder62
- Kingsman
- Andy H
- cobraleader
- merlin101
- mullac2001
- cmatthewbacon
- rafalbert
- ScanmanDan
- CT Modeller
- Latinbear
- Alpha Delta 210
- R T Fishall
- SimonL
- Jon020
- Vadasz
- Alex Gordon
- javi.vt
- Paul Lucas
- BillF67
- 825
- Marco F.
- Pin
- bootneck
- Paolo Tarantino
- Mpfiend
- Szymon
- ArnoldAmbrose
- Fanakit
- John R
- triumphfan
- aircraftkit
- Nigel_A
- SilverWings
- franky boy
- Jo NZ
- TallBlondJohn
- RevDWC
- marky sparky
- Fido996
- Xspace
- ColinChipmunkfan
- DeepSea
- membrillo
- StuartH
- Riksbar
- Reini78
- Jouko
- PTee
- demiles
- drake122
- Johnson
- Ventora3300
- gingerbob
- AndyK2479
- heloman1
- Warbird78
- Ferguson
- Paul J
- Pig of the Week
- Dave Swindell
- Ben Brown
- Bozothenutter
- Aardvark
- JohnT
- BritJet
- luis pacheco
- stevehnz
- The_Lancaster
- Buridean
- SteveMc
- NavyWessex
- warhawk
- JRS-AU
- SteveR
- John
- rod mcq
- Fnick
- 85sqn
- Starfighter
- Electric Indigo
- TimK
- Serkan Sen
- Rui Silva
- bobsyouruncle
- RJP
- Macki
- Dads203
- dalea
- Pete in a shed
- Our Ned
- S48
- Angus Tura
- Tegethoff
- Nenad Ilijic
- Wings unlevel
- jhutchi
- tonyh
- Vojtěch Veselý
- cicarista
- Francis Macnaughton
- Mal_Belford
- AdrianMF
- Sebastian _SJM
- Jb65rams
- RCI
- mark.au
- prowler93
- malpaso
- theplasticsurgeon
- Farmer matt
- janneman36
- gunzo
- geoawelch
- Rafwaffe
- kapam
- Karearea
- Silver Seraph
- vildebeest
- rmedtr6
- SNAFU
- Carl V
- voozet
- cherisy
- Davek72
- Ards664
- Deve
- robstopper
- bianfuxia
- Lex Jassies
- Phil Evans
- Stef N.
- John Masters
- delis
- Resin001
- john224
- Bandsaw Steve
- Gatesy64
- Swamp Donkey
- elger
- Cheshiretaurus
- ceeb555
- Sabrejet
- Sebastien
- Ratch
- SouthEastAviation99
- Neil Patrick
- klr
- Simon
- brianthemodeller
- batcode
- Heather Kay
- dimaADA
- TrevorT
- dragonlanceHR