All Activity
- Past hour
-
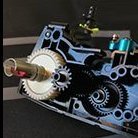
 Hot off the printer ! I haven’t been ignoring this build, I’ve been sitting in front of my computer designing and redesigning. It’s looking promising. Let’s see how they fit together.
 -

Lindberg Hellcat
jean replied to Enzo the Magnificent's topic in Lesser Known Manufacturers Classic GB
Way to go Enzo. Some kits are not worth rectifying and procure more pleasure being built as nostalgia kits. So enjoy! I have never seen a Lindberg kit "'in the flesh"', but looking at this one, I think I can keep on giving Mrs Lindberg a miss. Cheers. JR -
Polishing - I couldn’t help myself, it’s a skill I want to improve. All facets of building for that matter. This has always been one to get one day a mirror finish. The finish I had was a great base, no runs, no imperfections or dust, ample clear, but not 100% CLEAR to look through and see a high resolution reflection back. I am sort of blown away by the dspiae rotary tool and the right combination of pressure, compound, and a decent amount of clear on a nicely painted surface. It took some experimenting to find the right set of steps but here are photos of a dry surface. It is a first for me very happy! The learning curve will continue as I try to get more surfaces done and more do more complex surfaced. Moments earlier This came up in my feed and I list say o am intrigued by a grey / gunmetal police themed finish. Wether its 100% accurate to reality or not it did look cool. I do believe this was accurate.
-
XV406 started life as a recce trials aircraft with A&AEE/MoD(PE). It was issued to the front line at some point before 1976, to 111: there's photographic evidence of it at Malta on an APC in 1976, wearing the letter D. It also appeared at the 1977 Silver Jubilee royal review, but was wearing tail letter 'M' My assumption would be that some trial for the EMI pod needed to be carried out before 1977 (hence letter 'D') and probably in 1976 - 2 and 41 both still had Phantoms in 1976; the way the transition from Phantom to Jag was done was to set up a new Jaguar unit and give it the same numberplate as the Phantom squadron - thus we had 2 Squadron, 2 (Designate) Squadron, 41 Squadron and 41 (Designate) Squadron [the same approach had been adopted with the transition of 19 and 92 from Lightning F2A to Phantom, for example] The 'designate' squadron would reach operational capability at a certain date; at 23:59:59 hours that day, the 'old' squadron would disband and the 'designate' unit drop that suffix, so at 00:00:00 hours, the squadron would've re-equipped - at a different location with completely a completely different group of personnel. My guess is that as there was a declining need for Phantom recce trials, XV406 was issued to 111 Sqn on the presumption that if any trials were required in the closing months of Phantom FBSA/Recce operations, a trials aircraft which had gone onto squadron service would be borrowed to conduct the necessary test(s); the ability to use a 'known' airframe for the tests providing a degree of consistency that could be assumed from previous use rather than wondering whether the randomly-borrowed XV999* from 41 Sqn had any foibles which might affect the outcome of the test being preferred if this were possible to achieve. As I say, a guess, but I don't think it's an unreasonable one. (*there was no XV999)
-
There was, but I couldn't get a clear photo. Thanks, Matt. I'll have to edit the post to provide the correct captions.
-
Thanks for a great show today. One of the highlights in the calendar. Regards Robert
-
 Not much of an update, but the wheels are on the Leyland now. I think most of the six wheels are on the ground, which is nice.
 -
@Lord Riot you're welcome. Like @canberra kid I've accumulated a lot of information (but nowhere near as much as he has) on one of Mr Petter's fine aeronautical creations. I've just remembered, having seen your images, that the Airfix kit has an entirely spurious access panel on the starboard side just aft of the sloping pressure bulkhead panel line: maybe you can deal with that while you attend to the scratches round you lovely new window. (On the B. Mk. 2 and its derivatives that panel's on the fuselage spine just abaft the nav's escape hatch.)
-
A tip.Only when dark. Saluti Giampiero
-

**Finished** Mosquito FB Mk. VI in glorious 1/48
Stef N. replied to Keeff's topic in DH Mosquito STGB
Brilliant Mossie Keith. Impressive work on a wonderful plane.- 59 replies
-
- 1
-

-
- Another mossie
- 1/48
- (and 1 more)
-

Revell 1/25 Mercedes Benz 1628s Skip Loader Conversion
Richard E replied to JeroenS's topic in Work In Progress - Vehicles
And as they are not the best cared for pieces of hardware some heavy weathering..? As usual very clean and crisp scratch building Jeroen -
Believe me, watching means nothing comes. The best way to make sure something really good turns up is to have a boiling kettle or plate of hotfood in my hands, and just to make sure, the battery out of the camera and charging. Because the lights have a long sequence, as long as the car stops I can usually catch it. That is why there are so many rear views. Coming up the hill there is a quarter mile clear view which helps. Matt
-

Osprey V-22B in 1/48 from HobbyBoss
Parabat replied to dov's topic in Ready for Inspection - Aircraft
Very impressive model, I think that looks great! Good luck with your studies. -
In addition to the EMI Recce pod in the recent Airfix 1/72 FGR.2 kit others have mentioned, Air-Graphics Models produce a resin 1/72 EMI Recce pod carried by RAF Phantoms; they also produce a shed load of other RAF Phantom stuff. Having said that postage is not cheap even here in the UK... for Oz its probably cheaper to get an Airfix kit locally... Rich
-
I built this one. No problems with it.
-

Revell 1/25 Mercedes Benz 1628s Skip Loader Conversion
JeroenS replied to JeroenS's topic in Work In Progress - Vehicles
So here are the dolls, eh bins. It's really a pity that only one of them is wide enough to hold one of the other bins. Yesterday I saw a truck with 4 empty bins stacked on it. And no I'm not going to build more 🙂 Here's some detail on the bin. The stacking does work. I've decided to leave the smaller bin out and go for this look. Looks nice and full. Now I just need to clean them up a little and they're ready for paint. -
On the tube I've been watching an Artist who goes by the name of Matteline. His video's are mostly about The Gerry Anderson puppet shows and the kit bashing that went on to produce the models. He's been using his skills to make pictures of 'what if ' kit boxes featuring those models seen on the shows. A short while ago I (and others apparently) suggested that actual boxes featuring his art might sell. So here's a link to his latest video in which he shows boxes that he intends to sell. How about that for your man cave? I have no connection to the sales etc. I just thought it was cool and want to spread the word. Cheers, Pete https://youtu.be/dsKhNDQCBgA
-
Lovely build. I always thought the Barchetta was a good looking car. It did its role as a boulevardiere, and far more attractive than some of the other competitors of the day, MGF or M100 Elan and so on.
-
I never in a million years would have thought this is a paper model and the rigging is fantastic. Alan.
-
And a test fit before clear coating and weathering the open parts and engine. I think I have to tidy up a seam which cracked open on the port wing root. Shoupd be an easy fix, as the exhaust streak covers it...
-
One of my favourite things about BM is that the rules maintain respectable conversation between posters, which means that BM avoids the personal attacks and just plain nasty tone that often saturates so many web forums. I'm surprised to find I've overstepped the mark. No disrespect was intended by my post to anyone either on or off BM and I apologise to anyone who found my post offensive or disrespectful.
-
Monty’s caravan is currently viewable in H5 the conservation hangar at Duxford
-
1/72 Saab Draken J-35 missile pylons
billyharry2000 replied to billyharry2000's topic in Aircraft Cold War
Thank you that's excellent. Many Thanks Craig -
 If you are asking about the MiG-19, then the decision regarding its production in 1/48 has not yet been made.
 -

de Havilland Mosquito STGB - The Wooden Wonder - Chat
The wooksta V2.0 replied to Johnson's topic in DH Mosquito STGB
Another decal sheet, another glaring error after checking references. Eagle Strike 72076 has several Mosquito bombers, including mk IX ML907. They claim it's 105 sqn but Combat Colours say it's 109 Sqn and the Form 78 agrees. So 109 Sqn it is. Handy, because I have a mk IX on the go that must have black undersides.


.thumb.JPG.761f7f0f11b1272b11a79005d3e368c4.JPG)


-
Forum Statistics
254.8k
Total Topics4.4m
Total Posts -
Member Statistics
36,900
Total Members5,082
Most Online
-
Who's Online 174 Members, 2 Anonymous, 2,019 Guests (See full list)
- Wez
- Vultures1
- Keeff
- Piet1961
- airbus320
- keefr22
- jean
- Delta Tango
- HAMP man
- JonFlim2
- bootneck
- Harry Lime
- Bozothenutter
- Unpeeled4937
- Logan181
- Mycapt65
- delide
- Toftdale
- Urshimato
- Robin-42
- junco
- Linus
- Jack Torrance
- fubar57
- PhantomBigStu
- bobsyouruncle
- Uncle B
- billyharry2000
- Fin
- R T Fishall
- bigbadbadge
- Alex Gordon
- dnl42
- XV571
- johnlambert
- CharlieGolf2009
- XV107
- Glen10k
- Chaotic Mike
- Andrew Johnson
- Seboo
- Creepy Pete
- SnøMotion
- JWM
- Toryu
- RossFMJ
- Angell328
- John
- cpoud117
- Jeff.M
- Robert
- Tim R-T-C
- cmatthewbacon
- vs322
- Peter W
- mgleslie
- Rabbit Leader
- TEXANTOMCAT
- FinnN
- RupertTheBear
- iaf-man
- Kusti
- Heather Kay
- Shotandshell
- Drakendk
- Smudge
- zebra
- Massimo
- danielwood5
- Nachtwulf
- Parabat
- Garuda
- Brigbeale
- Mals Way
- Pete_W
- Morantbay
- Phew7410
- Tbolt
- Phil Evans
- ColonelKrypton
- rayprit
- GROWLER
- Botan
- Alpha Delta 210
- gamevender
- marvinneko
- GiampieroSilvestri
- Dmitry Stelmakh
- Ben Brown
- hakkikt
- Farmer matt
- Marcel
- IT_Man
- MBM
- Matt B
- Bonhoff
- ROB61
- Janner-Al
- Stef N.
- Robert Shedd
- Gene K
- bar side
- RockRiver
- Enzo the Magnificent
- sniperUK
- TR6RJA
- Nymond
- Mark Postlethwaite
- JTninja
- TheKinksFan
- Topcat42
- John Thompson
- Jose Luis
- iang
- Runscott
- Anakinbsas
- voozet
- bobster
- roks
- wellsprop
- aka1878
- Buridean
- Fritag
- David Mooney
- REMEAAC
- Richard E
- jhutchi
- Gooney Fan
- Noel Smith
- kiseca
- RichG
- Latinbear
- bentwaters81tfw
- JCH
- Bombbay
- franky boy
- scautomoton
- TJJ
- gwyndaffandy
- Supercuber
- Technics
- UC880
- Matt P
- Modelholic
- vangos
- JoshWilson
- Hook
- SNAFU
- PinguinoVolante
- Adam Poultney
- rudi
- Pete in Lincs
- Wolfik
- Mark Harmsworth
- Rustyguts257
- brianthemodeller
- amason61
- nheather
- ivan-o
- Helen57
- Dave WG
- Seamus
- George Norman
- Max Headroom
- wmcgill
- Specter1075
- tail_lamp
- JeroenS
- Ka-Efka
- IanC
- stever219
- Pat55
- GaryShwod
- Nesdu