All Activity
- Past hour
-
I'm returning to this small project. Completed painting all the interiors. Dry fitting to see the future look I already started assembling the cabin yesterday (no photoes yet). But on the other hand I'm not fully okay with the grey colour in the engine area. I used more or less generic H57 Aircraft Grey but that is too light to my taste. And glossy. I think I will take another run to repaint that into darker grey.
-

1/72 Zvezda Mi-26, UT-Air "Helicopter of Russia"
Jackman replied to CMSCHLOM's topic in Ready for Inspection - Aircraft
Wow! Really nice build. Love that base, too -
https://crecy.co.uk/product/the-f-86-sabre-and-its-variants
-

Not Your Usual Colour Scheme
Rabbit Leader replied to Roland Pulfrew's topic in Groupbuild Proposals 2026
Considering you’ve sited my ‘Aussie’ Mossie in your initial post, I think this GB proposal sounds quite interesting. I’m currently researching Drone Fairey Firefly’s and Gloster Meteors so they may qualify in their Red & Yellow / Cream schemes? Cheers.. Dave -

P-51D in British Scheme [1/48 Eduard]
fubar57 replied to Rémi's topic in Work in Progress - Aircraft
See it now. I was on my iphone before but perfectly clear on the laptop -
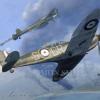
1/72 Early Merlin Spitfire Family - IBG Guessing Game Round 2
DominikS replied to Adam Poultney's topic in The Rumourmonger
As far as I remember, Eduard got money for investment in the tooling shop from the EU. So, the cost of developing the workshop was lower for them. And yes, if you have your own tooling workshop it's cheaper. On the other hand, the main source of Eduard's income are not their models but aftermarket stuff. People buy their masks, PE frets, resin or 3D stuff a lot. Clear Prop makes short run kits, although of much better quality than old MPM (or other Czech companies), but these are still short run kits. And by definition they are expensive. They have always been. As for Arma Hobby. They have to rely on outsourcing when making forms and it's not a cheap business. Especially (sorry for a bit of politics) after the EU has been implementing some idiotic regulations about energy and CO2. The company that makes forms has to have a profit. Arma too. However, very often Arma organise special offer actions that you can buy their kits cheaper. One more thing. Remember that if you live outside the EU your importer has to pay different duty fees and cost of freight (which is not low). All of this has the impact on the final price. Remember that living "Down Under" will make your importer paying duty and freight fees. And they are not low, as I mentioned earlier. But I completely understand your point of view for buying Tamiya 1/72 BF 109G-6 or Ki-61d is not the cheapest deal (although thanks to low exchange rate for Yen they are cheaper than they used to be). To give you a good example. Last October I was in Japan and, as a modeller, I bought some Japanese stuff. I paid, usually, half the price I would have to pay in Poland for the same things. Sometimes, when I was lucky, I paid one third. You mentioned Zvezda. Their kits are cheaper as the cost of work, energy (they don't have idiotic regulations) and materials are cheaper. And they have their own tooling shop. -
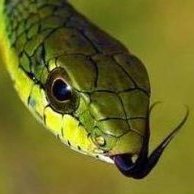
on my life there was a wild Cougar in Cheadle Cheshire 2005... i have no photos to prove so just my word on what i observed.
-
Hi Fubar Il you talk of plate on the engine side, Eduard give the correct plate like you see on the real plane You can see the exhaust il aluminium too so Eduard paint it
-
only occasionally, on Thursdays
-

DeHavilland Sea Vixen
MACALAIN replied to GiampieroSilvestri's topic in Ready for Inspection - Aircraft
Well done Giampiero. Alain -
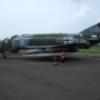
 I’m pleased to announce that Building the Italeri CF-104 Starfighter in 1/32 Scale has just been updated to v2.0, with 10 new photos from Mark Proulx, and some additional reference titles. And for the next 7 days, it’s on sale for just 12 Australian dollars! This update also includes the usual raft of minor layout and typographical improvements, along with adding the current version number to the cover. We consider this an important update, as the improvements are many! This is free for all existing purchasers. And of course, new purchasers will always receive the latest version of any of our books. You can check the version number of your previously-purchased copy at the bottom of the Copyright page (iii), or on the front cover to the right of the author’s name. In order to obtain your free update, simply re-download the book using either the original download link in your Order Confirmation email, or log in to your KLP account and download it from the Downloads section of your profile. If you don’t have either, please contact me and we’ll sort it out. Kev
 -
Looking really good. Very nice clean work on the paintjob and the decals! Also, great to see something non-military in this GB! Cheers Thomas
-
 A wonderful conversion that uses so many modelling skills. Well done and thank you for sharing. Regards Toby
 -

Hawker Tomtit / Early Avro 621 / A W Mongoose Engine question
TeeELL replied to TonyTiger91's topic in Aircraft Interwar
Rory, hope you are continuing to recover well? How does the exhaust ring compare to that seen in the labelled diagram you sent me back on May 7? Everything will be on hold for a little while as my ‘better half’ is undergoing double eye laser treatment later this morning, so I shall be undertaking the duties of carer for a little while. Tony -
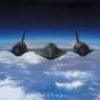
Below are some notes I collated when I built my Mk 40 - covers 1944 in particular. The notes are drawn from a number of sources for my own use and I hope they assist? There's a lot of info available on line (including BM) if you seek using the below references/serials. DH98 Mosquito Agreement between De Havilland Aircraft Company and the Australian Government had been reached to manufacture the Mosquito FB40 for the RAAF at Bankstown but serious delays in production meant that the first Mosquito was not delivered until 23 Jul 1943, entering service in Mar 44. Six FB40s were converted into the photo reconnaissance role and delivered as PR40 model, retaining their original serials: A52-2, 4, 6, 7, 9, 26. All went to 1PRU with the first delivered in May 44 (A52-2). Operations soon commenced with nine sorties in Jun by A52-2 completing the longest mission so far to Balikpapan in Borneo (2,235 miles round trip). A second Mosquito A52-4 arrived in Aug 44. These aircraft operated so effectively that a further 28 FB Mk 40s were converted to PR Mk 41s and renumbered A52-300/327 (ex A52-90, 192/211, 41, 45, 49, 62, 64, 83, 36 respectively). On 10 Sep 44, 1PRU ceased to exist and was reformed as 87 Photo Reconnaissance Sqn. PR Mk 40 A52-2 Old Faithful Hasegawa 1/72nd Mosquito FB.VI AND PR.40,..... RAAF **FINISHED** - Australian and New Zealand Group Build - Britmodeller.com 29/05/44 1 PRU Coomalie Creek NT. Flew nine PR missions during August. 01/06/44 AWM photo P002448.075 shows A52-2 landing at Broome WA after this flight. It captions the crew (FOFF Ken Boss-Walker and Nav POFF Jeff Love) as also having been the first to complete an operational flight in a RAAF Mosquito to Ambon on 25/06/44 Pilot FOFF Ken Boss-Walker suffered an engine failure over Surabaya NEI (Netherlands East Indies) and flew the 10.5 hour return trip to Australia of 1450km on one engine. Presumably, this is the rationale of the name of ‘Old Faithful’ painted on the port nose along with thirty-eight mission marks (Photo: Pentland Vol2 P.100). A52-2 was also detached to Leyte in the Philippines where it suffered hail damaged to the wing leading edges (Wilson p.184). 23/08/44 14 ARD for repairs. 02/09/44 1 PRU. 09/09/44 1 PRU disbanded and absorbed into 87 Sqn. 04/02/45 2 AD. 27/02/45 De Havilland factory for inspection of mainplane. 12/06/45 Converted to components. PR Mk 40 A52-6 Old Faithful II 19/08/44 2 AP. 21/08/44 2 AD Converted to PR40 of which six were built (A52-2,4,6,7,9 and 26). 27/09/44 87 Sqn. 05/04/46 Survey Flight. 01/08/46 3 AD Archerfield QLD. Stored. 02/02/54 Sold. Photo No 127920 at AWM website taken at Archerfield in 1954 shows aircraft in overall silver with WW2 mission markings still on the nose. It is captioned as holding the Sydney to Brisbane air speed record. 13/06/54 Aircraft dismantled and removed by purchaser. Date: 01-AUG-1945 Time: 11:30 Type: de Havilland DH.98 Mosquito FB Mk 40 Owner/operator: 87 (PR) Sqn RAAF Registration: A52-6 Aircraft damage: Minor Location: RAAF stn Coomalie Creek, Northern Territory. - Australia Phase: Landing Narrative: Mosquito A52-6 (87 Sqdn RAAF) Took off at 6:30 hrs for Photo Rec. mission. 01/08/1945 Returned due engine failere. Landing Ok at 11:30 hrs. Crew: F/Lt (Aus.408947) Keith Frank BAILEY (pilot) RAAF - Ok P/O (Aus.49128) John GIBBONS (nav.) RAAF - Ok Sources: 1.http://www.adf-gallery.com.au//2a52.shtml 2.http://www.airhistory.org.uk/dh/_DH98%20prodn%20list.txtt 3.ORB 87 RAAF
-
-
Agree with @Biggles81, early Australian production FB.40 (similar to FB. VI) of which six were converted to PR.40 standard. Painted overall PRU Blue, serials were A52-2, 4, 6, 7, 9 & 26. DK decals show A52-6 as option #6. Cheers.. Dave
-
It’s pretty simple, if people are willing to pay these types of prices, companies will keep charging them that way. I have only bought one Arma kit and although it’s nice, I have doubts I’ll buy anything else from this manufacturer unless it’s something new and quite unique. At 27 GBP, that’s around or over $60 AUD for a 1/72 Spitfire and for a few sheckles more, I can walk out of my local Hobby store with a 1/72 Zvezda Hercules….. not hard to work out what’s better value for my hard earned money! Cheers.. Dave
- Today
-
Looked sort of messy until the very end, but there she is, all nice and pretty! A good build, the walkways in particular!
-
Thank you The numbers and overpainted KFOR lettering were cut as masks and sprayed while the flags were printed on a green stuff world white decal paper for a laser printer.Its a lovely decal paper highly recommended.Super thin and easy to use.Responds great with decal solutions
-
That’s turned out wonderfully well Patrice. An excellent early Aussie Mirage, always so nice to see. Cheers and well modelled.. Dave
-
I'm going to give the Eduard Mig21PFM a go, PE parts that came with the kit. I don't like PE parts was never good at it.
-
Fun fact: the cockpit canopy has its hinge at the front on all varients, because of the presence of the lift fan on the B model.
-
 Phantastic work...as usual 😁 Alex
 -

1/72 Mirage III C - NMF experiment
tomthounaojam replied to Drakendk's topic in Ready for Inspection - Aircraft
It is a great result, natural metal needs natural sunlight. If you could click some outdoor pictures, it will surely look impressive.

.thumb.jpg.cfc129272ffec824439b15e6013d5952.jpg)


-
Forum Statistics
255.1k
Total Topics4.4m
Total Posts -
Member Statistics
36,945
Total Members5,082
Most Online
-
Who's Online 91 Members, 1 Anonymous, 2,622 Guests (See full list)
- Foghorn Leghorn
- Hamden
- Tamiya boy
- cpoud117
- Phil1960
- Malc2
- Allan-uk
- Dennis_C
- Bullbasket
- mhaselden
- Sebastien
- Chrisj2003
- Alan P
- lesthegringo
- icantsignin
- junco
- mackem01
- Shuntai
- Dunny
- Nick Nichols
- socjo1
- daniele0865
- aldo59
- raider of the lost part
- Rakovica
- Laurent
- R T Fishall
- Nenad
- silberpferd
- vs322
- MODeller
- Garuda
- Jeff.M
- Tea Taster
- JWM
- exdraken
- Marklo
- jenko
- Romeo Alpha Yankee
- Stef N.
- Robert Shedd
- ScanmanDan
- Joan Van der steenhoven
- Rabbit Leader
- SimonT
- Dave888
- Sabrejet
- hakkikt
- Vitaly
- elger
- Angus Tura
- bigfoot
- HarryHobbyin
- Anders E
- Josip
- Tommy Liu
- ajmm
- fubar57
- Phantom726
- Parabat
- Ngantek
- dov
- Farmerboy
- tonyh
- Jabba
- Andrew
- Albatross A
- loloskymaster
- rudi
- Hzet
- MarcoVanBasten
- KiwiBob
- posh boy
- Planebuilder62
- Brian C.
- neil5208
- Delta Tango
- PinguinoVolante
- Admiral Puff
- Rémi
- Rob Sutto
- Drakendk
- canberra kid
- Gmat
- bwilt
- Bravo52
- Phew7410
- Toryu
- dad's lad
- Volunteer
- JoshWilson