
Sci-Fi Content
Showing topics in Science Fiction Discussion, RealSpace Discussion, Work In Progress - SF & RealSpace, Ready for Inspection - SF & RealSpace and Sci-fi & Real Space Reviews and articles posted in for the last 365 days.
- Today
-
AMT-ERTL 1:1400 USS Enterprise D Fibre Optic
Theb replied to Jasonb13's topic in Work In Progress - SF & RealSpace
Arrrrrrrgh! Need more input! watching some Next Gen tonight because of this thread. cant wait for more… think I had this same kit too but don’t remember lighting so it may have been an earlier one. to be honest! Wasn’t really a fan of the D but need to start thinking about building my A and also grabbing the OST version from Polar Lights… the 350th one. Got the Klingon Cruiser too as for me STTMP was the better movie! Sorry for all the Khaaaaaaaaaaaaan! Lovers! - Yesterday
-

AMT-ERTL 1:1400 USS Enterprise D Fibre Optic
81-er replied to Jasonb13's topic in Work In Progress - SF & RealSpace
Could it be worth trying a light coat of matt varnish on the inside of the nacelle parts? It's only matt because it diffuses the light, so it might do the trick. I'd suggest trying on a spare bit of transparency though James -

what scifi stuff has the postman delivered to you today?
Dermo245 replied to TimMather's topic in Science Fiction Discussion
Thought I would try one of these for a change 😎 Hasegawa_VF-1_Valkyrie by Dermot Moriarty, on Flickr -
[Ma.K] 1/20 SER Seapig
Yg Models replied to Yg Models's topic in Ready for Inspection - SF & RealSpace
thx rockpopandchips come join me, don't just keep printing 3d kits. 🤭 -
AMT-ERTL 1:1400 USS Enterprise D Fibre Optic
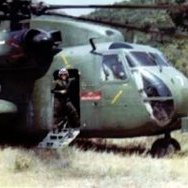
CH-53D replied to Jasonb13's topic in Work In Progress - SF & RealSpace
Would strips cut from flat car backup light lenses work to diffuse the light? The kind with all the little pyramid shapes on the inside. My other hobby is restoring old 1/1 scale military trucks, and I have used those type lenses in amber and red to turn the tiny blackout lights into usefully bright turn signals and tail lights. -
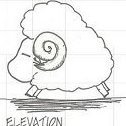
1:35 Four-Legged Scout Walker
Uncle Monty replied to Photon's topic in Work In Progress - SF & RealSpace
I really like this, it's like something H G Wells imagined. The legs really set it off. -
Another epic build, I can't wait to see where this goes
-

AMT-ERTL 1:1400 USS Enterprise D Fibre Optic
Bobby No Mac replied to Jasonb13's topic in Work In Progress - SF & RealSpace
My only suggestion would be to go down to the holodeck and get working with Leah Brahms on the problem Seriously though, it's looking great -
Optimus Prime - Trumpeter
Yg Models replied to colossusfr's topic in Ready for Inspection - SF & RealSpace
nice weathering. btw, i prefer mechanical designs in anime or game more than films.😝 - Last week
-

AMT-ERTL 1:1400 USS Enterprise D Fibre Optic
Jasonb13 replied to Jasonb13's topic in Work In Progress - SF & RealSpace
Another little bit done! Some test diffusion on one side of the nacelle, it's better but still not as good as I want it. The LEDs are fully bright in this pic unfortunately, so it's hard to see, but you can still make out five brighter areas... I also got the top of the stand tested, drilled out a hole, and used a temp connector to hold it in place. The rod only rotates in one plane, but by twisting it when attached to the model so that the "hinge" is diagonal to the centre line of the model, I can tilt the model to the back and to the side at the same time... Next is more work on diffusion on the Nacelles. The ideal solution is putting a strip of closely packed LEDs in there, like 15 LEDS in the Nacelle, but as I am working with a limit of 30 LEDS in total for the Model, that's not an option for me. But I do think a bit more diffusion will do the trick. Once I have it sorted I can then start on the other Nacelle. -
Hi My latest achievement. A very nice model. Very fine, perfect assembly. And then it's an easy way to have fun with paints, and weathering. A real pleasure. I hope you like it. Alain
- 1 reply
-
- 6
-

-
Very nicely done. The camo looks good.
-
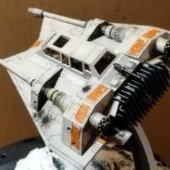
...and done! This was a fun build! I decided to put some 'splinter' snow camo on the AT AT just to be differnt and then dirtied it all down appropriately. I'm happy with the result! Need to give the edges of the base a bit of a clean I think now having seen these pics
-
 Looking great
 -
 looks brilliant - I'd love to see the end result for real
 -
 They arent too bad those small kits. I got a few of them when there was a deal on at Hobbycraft Revell R03600 Star Wars -Millennium Falcon Film - Science Fiction-1:241 Revell R03601 Star Wars - X-Wing Fighter Film - Science Fiction-1:112 Revell R03602 Star Wars - Darth Vader's Tie Fighter Film - Science Fiction-1:121 Revell R03604 Star Wars - Snowspeeder Film - Science Fiction-1:52 Revell R03605 Star Wars - Tie Fighter Film - Science Fiction-1:110 Revell R03609 Star Wars - Imperial Star Destroyer Film - Science Fiction-1:12300 They didnt have the other tie fighter (03603) in stock at either HC in Leeds. Maybe I will pick it up at some point to complete the set.
 -
what scifi stuff has the postman delivered to you today?
ConorC replied to TimMather's topic in Science Fiction Discussion
That is actually a surprisingly nice little kit. -
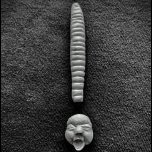
Halcyon Alien Space Jockey TheB version
81-er replied to Theb's topic in Work In Progress - SF & RealSpace
What you're doing is working, Brian. I prefer to weather with oils as well, for the same reasons. James -

GLADIUS spaceship. Scale unknown, but it will be big.
voozet replied to voozet's topic in Work In Progress - SF & RealSpace
Thanks for your interest and comments, gentlemen. The initial stage of work on the bow is not very visually impressive, but it has to be done. First of all, I had to thicken the upper hull plating. The edges need filler, but it's a stinking job. I'll wait until there's more of it and then I'll do it all together. I'm not good at planning and calculations, so each larger element is created in small steps: I add subsequent pieces and assess whether it looks good. If so, I add another HIPS piece to match the previous ones. You are looking at the underside of the front of the ship. Let's say this is the underside of the flight deck. The black oval element is probably a piece of headphones. It had a lot of holes arranged in a circle that spoiled the look, so I covered them with a HIPS circle. The three holes in the middle seemed cool to me, so I left them visible. It looks pretty good in my opinion. Now I have to think about the design of the upper part of the bow. I would like the bow to consist of three separate, elongated elements: a flat, wide flight deck at the bottom and two narrow split structures at the top. Be warned: trying to imagine what it will look like is doomed to failure. With this way of working, even I can't imagine it now 🤣. Thanks for looking. Wiesiek. -
Halcyon Alien Space Jockey TheB version
Theb replied to Theb's topic in Work In Progress - SF & RealSpace
been messing around with all kinds of washes and stuff on the turntable mostly and I've concluded that my comfort zone is def with mixing oil paints and then thinning with a ridiculous amount of white spirit and then brushing, the way for me to go. I have greater control and mix the shades on the fly. Will still use some of the AK products but I feel better when doing it my way! Sorry! -
Halcyon Alien Space Jockey TheB version
Theb replied to Theb's topic in Work In Progress - SF & RealSpace
-
Halcyon Alien Space Jockey TheB version
Theb replied to Theb's topic in Work In Progress - SF & RealSpace
I always used to use the excuse for bad CGI as it being a new format and that in years to come (Alien 3, The Relic and countless others at the time) it would get to a point where you couldn't tell the difference. Then we had the Phantom Menace (everyone seemed to float on a landscape that wasn't there because they hadn't quite done the homework on 'grounding a subject' amongst many other things at ILM) and still I would say that one day you'll never be able to tell. Still waiting,,, patiently but to be fair, some of the best use of CGI isn't a monster or a space battle but the subtle things that you didn't realise are CGI like a change in the environment, rolling plains of lush green stuff. I think the problem with CGI is that we as a species know what isn't real when we see it but we accept it and we all talk about how good the CGI was in a movie. Personally I would love to make a movie that is reliant on CGI but no one talks about it, that's the moment I can stop saying one day, you'll never be able to tell! And I'm tired of the usual excuse for bad CGI being that it didn't fit in with the budget... if that's the case, then when you make a movie, lower your expectations! Jurrassic Park in my opinion was the first real attempt and they nailed it. The likes of Tron and The Last Starfighter worked because they transcended the CGI by being great movies with bad CGI. Guessing that using marketing campaigns that try to sell you what you know to be rubbish in the first instance really is setting up the providers for a fall... e.g. 'You'll believe a man can fly" and 'Is it real or is it Memorex' No to the first and unsure about the other question as it doesn't really allow for any tolerance in the answer which would be undecided as both are crap'! The main problem with CGI characters was always the eyes for me... They looked like the eyes of Bruce from Jaws ( the Carcharodon carcharias thingy!) Cold, Dead and souless but years later they would nail this (IMHO) with the work done on Grand Moff Tarkin in Rogue One... but because of this being really good it drew my attention to the lips and how they moved but maybe it was just my brain telling me that this was CGI because Peter Cushing had been dead for years It will get there but for now Brad Pitt and many others can sleep safe in the knowledge that they will still be required on set. only my 1 cent worth! P.S. I used AI to type all this because I'm too busy cooking chicken wings (see below) and confident that AI can do what I need as required but in case it doesn't and purely as a disclaimer... Please bear with me as one day, you'll never be able to tell the difference! -
AMT-ERTL 1:1400 USS Enterprise D Fibre Optic
Jasonb13 replied to Jasonb13's topic in Work In Progress - SF & RealSpace
Thanks, much appreciated! An update that doesn't involve the actual model. The tilt-adjustable lighting mounts arrived from China... And guess what, they *are* drilled through... So that looks very promising. And not only that, but to bulk out the order so it hit their €10 minimum, I bought some metal connecting tubes... and to add to my luck, they actually fit the Light fitting, which I wasn't expecting... So I think I might have my stand, hollow all the way through for the wires. Not bad for a gamble I took from a dodgy Chinese website! I just realised I have already taken over 70 photos and I still haven't built or painted anything! 🙄 -

what scifi stuff has the postman delivered to you today?
FG2Si replied to TimMather's topic in Science Fiction Discussion
I picked up a couple older kits at the LHS. They were all a great price as they're having a sale on Bandai kits. This was probably the deal of the three: -

GLADIUS spaceship. Scale unknown, but it will be big.
HK-500 replied to voozet's topic in Work In Progress - SF & RealSpace
I like it a lot , the general shape remembers me of the racers in a Playstation game : WipeOut 👍


-
Forum Statistics
246.2k
Total Topics4.2m
Total Posts -
Member Statistics
35,502
Total Members3,626
Most Online
-
Who's Online 56 Members, 3 Anonymous, 818 Guests (See full list)
- KevinK
- marvinneko
- Grant R
- rholland
- Flt Sgt FishCat
- FLCH
- Finn
- Alain76
- Jo NZ
- Michael Taylor
- Ad-4N
- Corsairfoxfouruncle
- Urshimato
- Paul E
- Casey
- Ozhawk40
- Giorgio N
- FloydWerner
- MarkoZG
- Jeff G
- Terance Wong
- Tweener
- Tail-Dragon
- firefly7
- XV107
- TheyJammedKenny!
- Enzo the Magnificent
- dalea
- Matt B
- Wlad
- Rafwaffe
- PF Naughton
- ColonelKrypton
- The Unknown Modeller
- Hornet133
- Admiral Puff
- Rabbit Leader
- Rob K.
- NickC75
- dobk
- Ray_W
- Toyota_GR010
- Karearea
- Ranger822
- Dunny
- jimmaas
- Misterfriend
- SimonL
- Nick Nichols
- Angell328
- Ka-Efka
- Jim Barr
- Foxtrot21
- CarLos
- mstares
- hendie