Diorama Content
Showing topics in Diorama Chat, Work In Progress - Dioramas and Ready For Inspection - Dioramas posted in for the last 365 days.
- Yesterday
-
Pete In Lincs. Thank you for your comments. This is my next practice step in taking photos. Grumpy n old. Many thanks The back drops I got though Noy's Miniatures
- Last week
-

‘Got the Focke!’ - FW190 Crashed Vignette
Janner-Al replied to 45DegreesModelling's topic in Ready For Inspection - Dioramas
This is a really great idea and brilliantly executed. Alan. -
No progress on anything just lately and another busy week coming up. But I decided I needanothe air aft kit too. Deliberations included an ESCI Mirage 2000. This one needs a cockpit upgrade and I don’t have the bits, so it will have to wait. I toyed with a Revell Mosquito kit but the last two builds have been prop planes. So a jet. I found this Falcon 10 kit with French military markings so this looks like the next project
-

Testing some back drops
grumpy n old replied to Crown Rn7's topic in Ready For Inspection - Dioramas
Very nice! Where did you get the backdrops from if you don't mind me asking? Grumps -

Testing some back drops
Pete in Lincs replied to Crown Rn7's topic in Ready For Inspection - Dioramas
Both backdrops and models look good to me -
I found some back drops I ordered a few years ago. I found them as I was still unpacking my shop stuff. testing my photo skills too.
-
Cheers @Fred piket it’s years now of playing with card & lights and seeing what works. I have a model rail layout and the buildings and vehicles add just as much as the trains so same logic here really
-

Chornobyl Boneyard Diorama
Fred piket replied to GourmetPigeon's topic in Work In Progress - Dioramas
Beautiful!! -
@bar side: I'm trying to catch up with reading this topic, and I'm in aw of your building qualities with cardboard.. You Sir are the grand daddy of building shelters hangars and other buildings.. the cars, planes, lighting, all beautiful and far beyond something I can achieve.. I'm following!
-
Trying to get an idea what to do next. Got a double F-15C build to start, or even a pair of B-17s - one will be Sally B. Loads of others (F-14, Mirage 2000 etc) but a pile of ground equipment stuff too. Found this left behind Landy looking at me Need some new resin bits cast but worth finishing. And these sets Another Hallam tug (the set had 2), most of two Hasegawa sets, bits from an ESCI set. Oh and the Landy needs a trailer. So I think I will start on these. I know the F-15s are calling…
- Earlier
-

1/48 scale dioramas 'staged' for photographs.
ScanmanDan replied to ScanmanDan's topic in Ready For Inspection - Dioramas
Thanks Adrian! Davi - Yes, going outside in natural light would work. But for me too things work against doing it. One is I have no natural horizon to work with living in a beautifully hilly and green suburb. and two is I'm terminally lazy. Going outside is too much work, and either too cold and wet or hot and windy. I like just being able to go to the display cabinet and pull out some models and props/background boards and pose my scene. Working inside lets me control all the light too as I usually do my photos late at night after work. That said I have seen heaps of neat photos of dioramas taken outside with natural backgrounds and they do look cool. -
That’s her done. Going to do an RFI at some point Still haven’t done an RFI for the Dak My plan of building Cold War jets seems to have got a bit off track!
-
 Nicely done and quite realistic. The 251s look particularly good. Cheers....Rich
 -
Very nice work on everything. I really like the street surface as well. Finish on the tank is great too. Well done!! Cheers...Rich
-
Put the stripes on the arrestor hook with an acrylic paint pen. Not deal but it saves a load of hassle. Put it on some wire and spun it in my cordless drill and the smoke generators are painted & blutaced in place. I will give them a bit longer to fully dry. Then I think she is done. Might set up the hangar and do some G-FIRE and G-FURY together shots
-
.thumb.JPG.10b411b8c3e1481eb3f7765bfeb3c723.JPG)
1/48 scale dioramas 'staged' for photographs.
Davi replied to ScanmanDan's topic in Ready For Inspection - Dioramas
Really nice idea to play around with these elements indeed. Creates very convincing pictures. I think it becomes perhaps even more convincing if you would use natural light outdoors. I'm always surprised with the pictures people seem to be able to produce in an outdoor environment. Playing around with your elements would also work outside, right? -
Nice work, good weathering and impressive how realistic eg the street looks. Nice!
-
Scratch built the wing tip smoke generators last night. Also got the yellow broken strip on to the cockpit and painted the arrestor hook yellow. Those red bans will be fun!
-

Trucks around the yard 1/35 scale lumber yard dio
Steadfast replied to Stickframe's topic in Work In Progress - Dioramas
Thanks for the explainer Nick, more great progress too! Jo -

Trucks around the yard 1/35 scale lumber yard dio
Stickframe replied to Stickframe's topic in Work In Progress - Dioramas
@Steadfast, yes! a guy can learn a lot from model railroaders. I have seen the work of Boomer Diorama, and it is very good, and presented in a helpful/useful way. -And as I mentioned, the models of Chuck Doan, if you are interested take a look at his work, as it's also very inspiring to see. The Boomer also suggests using cooler shades of grey and blue than I used on other dios, which are 1) lt grey, 2) barley grey, and 3) anthracite, which are warmer tone. The results are that the cooler shades seem to be a bit crisper, which is nice for this, as the buildings are various shades of white. Another source of ideas, which may sound a bit out there, comes from chatting with folks working at the local art store. They introduced me to various acrylic mediums - which was quite a revelation as they can be sued to make such a variety of textures. As they use these materials for their intended purpose, they have provided all sorts of general guidance on their uses/process and properties - same with the idea of blending India ink with Isopropyl Alcohol for washes, and using grounds from pastel sticks. All cool stuff, but not things I intuitively stumbled across. That said, with some basic knowledge, it's not hard to see other opportunities for things to try. As far as the project, I continued to ponder the appearance of asphalt, so while riding on the bike, I took some more photos, illustrating larger areas of cracked asphalt: I should have thought of the street directly above sooner, as I ride it about four times a week, every week, and I can tell you with clarity, it is awful to ride on. This is not the worst stretch of this miserable 1.25 mile ride of rattle and bounce, even on a chromoly frame, with front shock, and big fat, fast rolling tires - it's awful. And a couple more images: Riding around, things like low quality, rough road surfaces are easy to spot - lol - hard to ignore actually. There are road sections I genuinely dislike riding, but they are part of the routes I ride, so there you go. Bad for cycling and good for dio ideas and building. And a few images of the pavement in the dio, from similar (scale) eye-level perspective: @Steadfast, I can't remember if the Boomer Builder uses cork for the base or not (see above a few posts)? I like using it because while it provides some depth, you can also cut areas out, and rough it up, allowing the use of coarse pumice gel for making really rough spots that are not taller than the surrounding road surface (as it is installed below the top of the asphalt) A few more views at eye level, which I like. You can also see in the foreground of the lower picture, some perimeter landform. This is rigid, pink insulating foam, cut to form little hills and ground form irregularities, then coated with gesso, and various pumice gels, and various acrylic washes. I used the foam in this subtle application because I want a permeable surface, that I can stab clumps of grass into, yes, like hair plugs!! 😄 What do I mean you ask? well: As exciting as watching the grass grow??? 😄 not yet - I can make bundles of 45 or so at a time before I need to do anything else. Still making grass Cheers Nick -
 now that looks really cold, and tiny - jolly good show and very convincing. I knew it would be worth a visit to the Diorama pages of the site to catch up on what's afresh over here.
 -
Trucks around the yard 1/35 scale lumber yard dio
Steadfast replied to Stickframe's topic in Work In Progress - Dioramas
Lovely progress on the diorama Nick, it'll be fantastic scene for your vehicles to display on. Interesting you mention the model railroad influence, as soon as you mentioned crackle paste, pumice etc I thought of Boomer Diorama on YouTube, is he an inspiration for you? All the best Jo -
 16th September 1939, near Łuków Poland - the leading vehicles of Panzer Division Kempf stop to exchange information with a horse mounted reconnaissance unit. This gives the panzer crew a chance to admire the museum piece left abadoned at the side of the road... This project began as an eye catcher for the SIG 144 display at Scale Model World 2024, part of a series of 144th scale armoured vehicle vignettes. I was also motivated by a desire to use some of the many whitemetal and Gashapon vehicles and figures that I have accumulated. Until the recent improvement in resin 3d printing, these were by far the best way to get figures and vehicles in 144th but the figures in particular are now showing their age compared to the lovely delicate 3d models available, so it seemed like a good excuse to clear out some of the stash. This scene was inspired by a book I have on Polish use of the famous French FT (or FT-17) tank. I like, where possible, to make vignettes based as closely as possible on real events. With some reading I was able to find reference to the 111 Light tank company of the Polish Army who still operated the long outdated FT-17 and in mid-September were being rail moved eastwards to the fortress at Brest when due to track damage they were forced to attempt to drive until, unsupported, they had to abandon the vehicles. The whitemetal vehicles come without instructions, but are quite easy to assemble with superglue. The small size of these early war vehicles is very evident compared to the other vehicles I was putting together for parallel projects. I decided to go with the brown camo scheme for the Panzers, if nothing else, as an excuse to try the new AK paint pens. For this role, they worked perfectly - very easy to achieve a sweeping camo line, even across the raised details. The scene was put together with cork sheet, blended with Duluxe Materials Create and Sculpt paste and various texture paints. The railway line was 3d printed from Butlers Printed Models and formed the curvature of the scene. Then came the figures. These are all from Arrowhead whitemetal castings, which come with bases, so lots of careful cutting was required so they could blend into the scene, without losing their feet! A name plate was added, produced by Name it Plates. I added more detail than normal to convey the interesting story represented and as respect to the brave Polish tankers still persisting in these long outdated vehicles. The final touches were added just minutes before we started loading the car for Telford for the display. Thanks for reading - this model and its cousins will be on the SIG144 IPMS UK tour this year, do come and see them in person.
-
- 6
-

-
Stalingrad, December 1942, the shattered remains of the great city on the Volga are covered by a thick layer of snow. The largely encircled survivors of the 6th Army make desperate attempts to punch through the increasingly well organised and equipped Soviet forces, but to no avail... This project began as an eye catcher for the SIG 144 display at Scale Model World 2024, part of a series of 144th scale armoured vehicle vignettes. I was also motivated by a desire to use some of the many whitemetal and Gashapon vehicles and figures that I have accumulated. Until the recent improvement in resin 3d printing, these were by far the best way to get figures and vehicles in 144th but the figures in particular are now showing their age compared to the lovely delicate 3d models available, so it seemed like a good excuse to clear out some of the stash. This scene was inspired by the availability of this 3d print from Highland 3d prints on eBay, with the iconic profile familiar from books and films on the urban battle. The building print is 10mm wargame scale (roughly 1/160) so a little small, particularly the door, compared to my figures. So I added a layer of cork beneath it to raise the door higher. Cork offcuts were also placed into piles and I used Duluxe Materials Create & Sculpt paste to blend the areas which will represent snow covered debris. I wanted to take advantage of the smaller scale and include a convoy of vehicles, so this became the layout, following several hours of reference book inspection to get a plausible mix of types. The lead Panzer II and trailing Stug A are Arrowhead whitemetal models, the Hanomags are injection kits from Victrix. The Grant was an early 3d print I picked up several years ago which was filament with unusable amounts of stratification. But covered in forgiving snow paste it made an interesting visual reference. Although I don't have any shots of the Hanomags under build, these are two others I made up for a parallel project. The detail is lovely and they come with a selection of accessories which provide nice variation of detail. Unusually for this scale they, even include decals. Paint was very straight forward. Panzer Grey was still de rigeur at this time and varied amounts of whitewash were added. Figures painted in a mix of winter camo and uniform to represent the chaos of this later stage of the battle. With that it was just a case of careful blending of the snowy texture paints and some additional debris to give a suitable look to the scene. A name plate was added, produced by Name it Plates. The title for the scene comes from the 1959 German film of the battle, summing up what must have been a 'do or die' attitude of the last German survivors. The final touches were added just minutes before we started loading the car for Telford for the display. Thanks for reading - this model and its cousins will be on the SIG144 IPMS UK tour this year, do come and see them in person.
- 2 replies
-
- 10
-
-
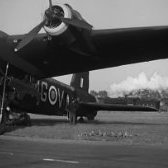 Idea's and purchasing coming together! Have decided to go with a 9mm Plywood base and 20mm high density foam, to be glued to the Plywood. It will be cut to take the form of a Trapezius shape, 50cm wide at the front, 70cm wide at the back and 60cm from the front to the back. PVA glue to secure foam to base, with both cut to shape prior to gluing together. I'll edge the foam with Balsawood, that'll be 3 or 4mm higher than the top of the foam, to create a surround to "catch" the concrete and grassy areas and railway line! I'll leave a 4mm surround of Plywood extending out from the Balsawood edging as that will support a Perspex cover that'll have made once the foam and Balsawood are in place. Ply and Balsa will be painted black. The concrete hard standing will have 50% of the width of the concrete taxiway included, allowing the Stirling to sit further forward on the diorama. This will not move quickly, as lots to plan out and start to build! The Locomotive and carriage will have a coat of gloss soon too, ready for some weathering and cotton wool, for smoke, fashioned onto the Chimney too. It'll be the detailed components that will take time concrete, grass, railway, fencing, powerlines...... 🙃
- 1 reply
-
- 5
-
-
- Short Stirling
- 1/72
- (and 1 more)


-
Forum Statistics
254.8k
Total Topics4.4m
Total Posts -
Member Statistics
36,910
Total Members5,082
Most Online
-
Who's Online 66 Members, 2 Anonymous, 1,558 Guests (See full list)
- Farmer matt
- Seboo
- Anders E
- hakkikt
- rudi
- Bell209
- TheFlyingDutchman
- dora
- Pete Field
- Paul Lucas
- AdrianMF
- Stefanoff
- adrianm2
- vs322
- makeshiftwings
- SimonT
- MattC
- heliofly
- KevinK
- Centollaman
- bjohns5
- tomthounaojam
- DarrenH
- Marshbunyip
- Supercuber
- Jbourne124
- Saso Krasovec
- Jack Torrance
- Elias
- Nachtwulf
- Cklasse
- Jeff.M
- Rabbit Leader
- dov
- Angus Tura
- RunRookieRun
- Robj
- dalea
- sinistervampire319
- Galligraphics
- Zorglub
- Mick Clarke
- Morantbay
- Cheekykiwi
- Albatross A
- Patton gunner
- marvinneko
- Patrik
- elger
- RobL
- srkirad
- Ultra
- Zulu Lima
- HarryHobbyin
- A6Intruder
- fubar57
- MattB17
- Mynimal
- Col.
- Paddleriver
- Eran Kaufman
- TGC
- Faraway
- Enzo the Magnificent
- Rakovica
- Nick Nichols