
Leaderboard


Popular Content
Showing content with the highest reputation on 02/03/22 in all areas
-
To borrow from a previous Phantom build, I have a confession to make: I hate all-grey schemes on jets. Really. But I like pointy planes that go fast. What to do? Find colourful prototype, retirement or anniversary schemes and just say no to low viz! Besides, it's my favourite subject in my favourite scale and my favourite scheme. Of course it's a Phantom and of course its Raspberry Ripple. Yee-ha! The build process is detailed in the WIP thread here. Project: McDonnell Douglas FG.1 Phantom II Kit: Fujimi Kit No. 34001 Royal Collection Scale: 1:72 (as revealed in scripture) Decals: Xtradecal X72296 (kit decals were "unusable due to age", an expression I hear often from wifey) Resin: CMK cockpit set no. 7441; Aires exhaust no. 7179; ResKit wheel set no. RS72-0067 Photoetch: From the kit for canopy details and gear door actuators; from the CMK cockpit set for HUD, instrument panels, and cockpit details Canopy Masks: Made by hand! With a pencil and a pair of scissors! Paint: MRP 183 Oxford Blue, 184 Signal Red, 125 Super Clear Semigloss, 048 Super Clear Gloss; Gunze H11 Flat White, H12 Flat Black, H20 Flat Clear, H77 Tire Black, H90 Clear Red, H94 Clear Green, H317 FS36231 Dark Gull Gray; Tamiya XF-69 NATO Black; Alclad ALC101 Aluminum, ALC103 Dark Aluminum, ALC111 Magnesium Weathering: I hate weathering. Improvements/Corrections Scratchbuilt intake FOD covers decorated with decals printed on inkjet at home Replaced kit cockpit and ejection seats with CMK resin set Instrument panels, rudder pedals and HUD detailed with CMK photoetch Cockpit sidewalls, canopies, mirrors, and canopy sills detailed with kit photoetch Replaced vertical fin pitot probes with hypo needles With a great deal of effort, replaced kit exhausts with resin set from Aires Replaced kit tyres with ResKit resin wheel set How about some photos? Here is what the cockpit looks like (hard to get a good picture after assembly): This CMK cockpit set is designed for the new tool Airfix kit, but works well in the old Fujimi kit with minor modifications to the kit plastic. Good to know, because... ...I have another Fujimi kit in my stash - and the Xtradecal sheet for Alcock & Brown. Should it be a future project? Vote early and vote often! Cheers, Bill47 points
-
Finished this one over the weekend, I must say I am pleased this one is off the workbench as I didn’t particularly enjoy this build, it wasn’t the subject, so I’ll put it down to the kit. It’s not that the Airfix kit is a bad kit to build, because it isn’t, it just a bit blah! WIP is here For this build I used Eduards cockpit pe set & mask, CMK wheels and flaps, Quickboost seat, Master pitot probe, Flightpaths Matra rocket pods and Aerocraft’s drop tanks and pylons. Ladder is from Brengun. Decals came from Airfix, Xtradecal and roundels were from Flightpath. Paints were mainly GSI Aqueous. Cheers27 points
-
Dear all, this is the final post of my build of the new Airfix 1:72 Beaufighter TF-X. I built the torpedo bomber version which is one of the two proposed by the kit. The paint scheme is for a torpedo bomber of the No. 404 Squadron, Royal Canadian Air Force. The upper surfaces are painted Extra Dark Sea Grey (Mr. Color 333). The lower surfaces are painted Sky (Tamiya XF-21 + XF-2): The finished model is not very large, but it is quite nicely done: I found that the kit was a pleasure to build and only a couple of points need some special care (engine cowlings and landing gear assemblies). I replaced the kit wheels, the exhaust tubes and the barrel of the dorsal gun. I also used the Eduard's masks for the transparent parts. I hope you like my final pictures. Best regards, Dan23 points
-
Pretty much finished the Revell 1/32 Mosquito. Made up as a MKIV of 105 squadron in 1942. The alternative from '44 had invasion stripes and I couldn't countenance those! I don't have anywhere near the skills of people here but I thought I'd post up my latest concoction for your delectation. The transfers went on well except those warnings on the wing tops which silvered horribly. No laughing at the back there. 😜21 points
-
Hello guys, I finished this plane two days ago. It was a trouble free build, with the only sizable gap being located just in front on the windscreen. Speaking of windscreens, it was too big, and had to be trimmed and sanded down for it to fit into the canopy opening.19 points
-
This build came about by converting and scratch building, the old Italeri Volvo F6 Fire ladder kit. I had bought this a couple of years ago at a exhibition together with other second kits. I did not know what to do with the kit, until recent. So, it is no more a fire truck but an old beavertail machine transport carrier. I see many most enthusiast convert old and sometimes new trucks into other types of themes to suit their intensions. This might carry a lot of load but ,we'll consider this a private farmer or truck company wanting to have easy access to transport small and medium size machinery to their destination without renting. I was thinking of adding a Volvo F16 but not too sure. I used the Volvo italeri kit. But now I see there is an Iveco kit as well, which are very similar to each other. Almost identical. https://images46.fotki.com/v1671/photos/0/3821280/16437532/volvo_f6_beavertail12-vi.jpg18 points
-
hi all, I recently had a fabulous trip to the States for some aviation photography, so i thought i'd share some images here. They are mainly taken at Nellis AFB during Red Flag 22/1 or NAS Fallon whilst standing next to the runway 🙂. And yes, it is a real Mi-24. It is used by a contractor for adversary training. Hope you like them Andy18 points
-
Progress is fairly slow on this build at the moment due to various other commitments, but I've got a little more done over the last week. Firstly the two main guns needed some refinement. The basic mouldings are pretty good, although some of the details are quite messy and need cleaning up. Like the rest of the kit, there's some texturing in places along with some heavy mould lines. As the mould lines tend to cross a lot of the smaller details, these's a bit of re-shaping required. The muzzle is moulded with a simple horizontal slit, but this also needs drilling out. I guess this would have needed a slide mould to do properly, which would have cost more to tool, and it's easy enough to drill so not a big deal. Further back, where the barrel extends from the main gun casing, there are two half-round indentations above and below the barrel. These should be open, and need to be carved out. Towards the back, there's a tube that sits abover the gun housing, or at least there should be. Revell have moulded the front and rear ends of it, along with the two support brackets, but the centre section is an open void. This area is partly covered with an armoured panel, but you can still see the empty space from above, so it needs dealing with. The muzzle was easy enough to correct, and in fact the heavy mould line here was a benefit, as I could use it to mark a pilot hole so I didn't drill the barrel off-centre. The openings at the back of the barrel were a little harder to fix as the plastic there is solid, and the openings needed to be carved out with a micro chisel. The original moulding is quite messy, as you can see from the gun on the right, which didn't help. On the studio model these holes are a single opening that the barrel sits inside. It wasn't really practical to replicate that, so this is as good as I could get it. The main round casing that forms the back of the gun assembly should also be an open ended tube that has the main gun sitting inside it. Again, it wasn't really practical to do that, as I would have needed to rebuild almost the entire gun from scratch, but as the guns are only push fitted to the fuselage, I might look at designing and printing something better down the line. For the tube that sits above the barrel, I cut away the two ends and carved out the brackets to take a length of styrene tube, which in turn had a short length of a smaller diameter tube glued into the front end. Since the photo was taken, the rear end has also been capped off. With the guns sorted, I got back to painting. The fuselage was base coated in gloss black, then finished with the same polished aluminium as the engines. I felt that the straight polished alu on the engines had looked a little too dark, so the fuselage also had a patchy over-spray with some Vallejo aluminium, along with a coat of satin varnish to protect the slightly delicate AK polished alu. That's why is look a lot lighter, and less shiny that the engines. That won't matter in the long run, as the amount of weathering needed will darken everything anyway. I did briefly consider using the supplied decals for the yellow stripes, but they looked a bit thick, and the pattern of wear on them is a little simplified compared to what's seen on screen, so I've made a start on painting them instead. This needed a combination of tape and masking fluid to block off the main areas, followed by a coat of hairspray to allow me to do the finer chips after painting. I'm doing this section-by-section, as getting it all masked in one go would have been quite tricky, and made handling harder. I wanted to use a colour straight from the bottle for the yellow to avoid having to re-mix the same shade several times. The closest match I'd got was AK Dirty Yellow, which looked pretty good once the masking was removed, but wasn't the best choice for the hairspray chipping. AK gen3 paints don't seem to like that technique much, and the results weren't as good as I'd hoped. I may have to sharpen up the fine chipping with some brush painted silver. That's as far as I've got with the stripes so far, but I should get the rest done over the next week. In the meantime I've started weathering the engines, as I expect the weathering in general will be the longest aspect of the build. I started off with the exhaust nozzles, which I'd left separate for painting. The studio model has quite a lot of heat discolouration on the petals which I've recreated with some over-sprays of Tamiya clear shades. the nozzles were then finished off with some oil and enamel washes to dirty them up. The nozzles, together with the front cowls, were then glued in place on the engine nacelles, and the main weathering started. The engines on screen are very streaked and dirty, and I've been slowly building this up with layers of oils, enamels and acrylics. This is taking some time, as I have to let each layer dry, particularly the oils, before applying the next layer. At this point I'd say they'er about half finished. So, the rest of the week's going to be about painting yellow stripes and smearing oils. Hopefully I should get at least the stripes finished for the weekend, then the main painting will be done, and it'll be all about the weathering from then on. Andy18 points
-
I love wandering around the smaller stalls at model shows - you know the ones where there are many kits (usually vacforms and limited run offerings) often dropped loosely into boxes or lying around in heaps on tables. Very often they are aircraft types that few have heard of - the products of a once-thriving cottage model production industry. “Roll up, roll up, one kit for a tenner, two kits for fifteen, etc.” Well, one year at Telford I bought a vacform then I saw a nondescript bag with some olive green parts and a cover sheet stuck on proclaiming it to be an ‘Epoxy-resin kit’ of a Blackburn B-37 Firebrand. "Give us a fiver, mate and it's yours..." Not having built a resin kit I proceeded carefully, but ended up shelving the project two or three times. In the meantime I built Rareplane’s vacform of the aircraft - carrying a torpedo, and finishing it in the extra dark sea grey and dark slate grey camouflage with sky undersurfaces. Then I bought the beautiful CMR Firebrand kit, and, intending to build it with the torpedo, I had the idea to use its bombs and rockets to build this kit as an air-to-surface attack version. I managed to buy a set of decals from CMR, which came with all of the placement instructions. It was a good fun build although I had to scratch build the cockpit (not that you can see anything at all!), and use one of the two CMR kit vacform canopies as the bargain bin model’s canopy was almost a tangerine colour! I got around the problem of cutting the underwing serial letters and numbers by placing the landing gear doors in position and decalling over them. 24 hours later I used a razor blade to carefully cut the decals and with a bit of Micro Set and Sol the rest was, as they say, history. So, here is my Blackburn Firebrand TF Mk 5, ‘EK773/CW’ of 738 Naval Air Squadron of the Naval Air Fighter School, Royal Naval Air Station Culdrose, Cornwall, UK, as seen at Royal Air Force North Front, Gibraltar in July 1950. It is armed with two 500 lb Semi Armour Piercing bombs and eight 60 lb practice rocket projectiles. Of note is the use of a camouflaged engine cover, and the replacement cowling panel with the incoming predominantly Sky finish for Fleet Air Arm aircraft. Which points me nicely towards the scheme I will use on the CMR kit when I build it with a torpedo! Thanks for stopping by. Mike17 points
-
Hi all. This is Tamiya's excellent 1/48 F-16C with some added aftermarket goodies. The cockpit, wheelbays and exhasust are from Aires, the wheels from Wheeliant, the pitot tube from Master and the decals are from Speed Hunter Graphics. The kit went together very well as you might expect and even the Aires cockpit didn't fit all too bad, considering the reputation of this brand. The model was painted with MrHobby acrylic paints, which was airbrushed in very thin coats over a black primer from Alclad. Washes made from Abteilung 502 oilpaint and white spirit were brushed over the whole model and excess wash was wiped off after a few minutes, giving the model a nice, dirty look. Thanks for watching.14 points
-
My latest Lightning Ready for inspection (details on Work in Progress thread) Upper surface camouflage pattern mainly guesswork and continuation of fuselage side pattern as there are no known photographs apparently (unless you know different!!) Upwards and onwards with Lightning T4 XM995 of 92 Sqn now... (Work in Progress thread) lightningBoy12 points
-
Here's one of my favourite WW2 fighters. This was my first aircraft model purchased and built since re-entering the world of scale modeling a couple years ago. Built straight from the box and painted with Tamiya acrylics. I was still learning with my airbrush, so the paint job has some spatters, but overall I still love her. Enjoy!12 points
-
Another one for my Falklands collection - 1:72 Westland Lynx Mk.23, Argentine Navy, Falkland Islands, April 1982. Slightly converted Hobby Boss Lynx HAS.2 kit with Eduard PE parts and some scratch details. Decals are mix of DP Casper, Xtradecal, HB and spares. Thanks for watching!11 points
-
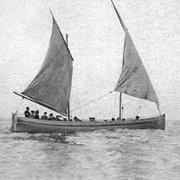
As I've been promising, this new thread follows on very quickly from the MTB, it is intended as a companion model and will cover the larger BPB boat before the addition of torpedo tubes. I've been working on the drawings while competing the MTB and so here we are ready to start building. For those who are not familiar with the type, this illustration from the Osprey British Motor gunboat publication gives a great idea of what the model should end up looking like I've managed to source about 10 high quality images of this class on-line, here are a couple of the better ones, MGB 75 and MGB 107 I've searched hard but can't find any commercially available model drawing sets, but the Haynes workshop manual featuring MGB81, the historic preserved MGB, is a great source of information and contains two extremely good drawing sheets that scale rather well and provide accurate lines. I've been able to scan, re-align and re-scale these and had them printed as A1 pdf's. They are based on drawings held by the IWM archive and to my delight, a number of the builder's drawings have been scanned and are available to purchase as art prints. Screen grabs of these provide useful back-up information and additional detail which is great. As It seems a shame that commercial model drawings are not available, this time, I really intended to completed a model markers set of plans that others could use. I'll make these available at both 1:48th scale and 1:72nd scale, more on that at the end of the build. The model will be 18 inches long, a nice size to work with. Here are some of the refence material I'll be using, the pdf reproduction of the Haynes drawings included below I'm not sure I should post a copy of the Haynes manual drawings here, but as a teaser, here is one of the IWM art prints you can buy (full size copies of original drawings, would look great framed) So, overall I'm happy there is enough detail for me to build a decent model of these vessels, one of the key criteria for me to start a project. If you are wondering why I've included the Anatomy of the ship Fairmile D book, it actually has the best drawings of the twin Oerlikon power turret which was shared with the dog boats. The Vickers 2prd turret on the bow is identical to that fitted on the SGB so I've already built one of those and have the etching drawings of the mount, the props look the same (as far as I'm concerned) as the MTB, I have a 3d model of Holman projector and the right smoke machine so this should be easy eh... I didn't have a drawing of the twin Oerlikon, but I do now This, together with the 2 pdr and the props are being cast by Shapeways and should be here in a couple of weeks, the guns in brass and the props in bronze, £80 for all 5 pieces inc shipping. So, progress to date, I've re-drawn the times and checked the gunwale, and chine alignments, that Haynes manual drawing is really good.. The whaleback deckhouse was slightly off, but I used the IWM construction drawing to correct it, think I have it right. Here is my outline lines drawing, the starting place for the frame drawing. On interesting point is the outer rudders are angled at @10 degrees to the vertical, that's a little challenge to get right. For this hull, I'm reverting to balsa infill hull construction which is then covered in diagonal planking. The MTB wasn't a great success in my mind as the inner curvature of the lower hull really didn't work well because the planking had no intermediate support. Also, the simple balsa infill I used on the S-boote actually leaves you able to see the frames in some lights which is bad. This combination approach should solve both these issues, it is what I used on the Fairmile B but that all happened before I started posting so I'll cover this in full detail here. This sectional drawing shows how the hull and deck house will be constructed. The deck-house top box stringers are deliberately composite as they curve in 2 directions and a single piece of wood would be too stiff and might actually warp the hull. The chine stringer is horizontal to allow the balsa blocks to be slid in, I'll show all this in the build. The vertical slot in this frame at the top is there to receive the open bridge side piece which connects frame 6 and 7. Frame 6 was moved forward a small amount to form the forward bulkhead of the open bridge, details details.... A new thing I'm trying on this project is the two locking bars, we'll see if they work. As I've said before, bent hulls are not good and using 1.6 mm ply for a keel is easily bent by the gluing process. Before I've dropped the deck-house into an open box structure on the lower hull and this box helps keep everything straight. With this whale-back deckhouse which curves in 3 dimensions, that isn't possible (well anything is possible, its just not easy) so I've drawn two side bars in the plan which will (I hope) slot through all the frames and then slide towards the keel to lock them and the frames in place to make sure it is all straight. Stick with me and you see what I mean From the lines above, each frame then needs splitting out, re-drawn to allow for the outer planking and the slots set in for the longitudinal timbers. The result is the following cutting plan, locking side bars at the bottom This was then turned into cutting artwork (colour changes and re-grouping) for cutting from a 1 ft x 2ft sheet of 1.6 mm ply (I just love mixing units, keeps the brain active...). 2 days later, this arrived in the post from 4D for a very reasonable £55, I'm getting so lazy in my old age...🧑🦼 Add some balsa from SLEC and strip-wood from Cornwall Model boats and you have a wooden hull kit in the making The outer planking will be done in pear wood, it will look fantastic and be such a shame to paint it... Build starts tomorrow Cheers Steve10 points
-
Here's one that I started building a couple decades ago before taking a hiatus from model building. It's a Hobbycraft Canada kit, if I recall correctly. I dug it out of storage and cleaned it up, and then I decided that the tragedy of the Avro Arrow need not be the end of the story. I wanted to do the beast up as though it had enjoyed a long career defending the West, so I painted it up to look like it was still flying in the late sixties, maybe based in Germany with a three-colour scheme and the old Canadian roundels. I modified it with some external pylons and some better ordnance than what it was originally designed for. It's finished with Tamiya acrylics and weathered with Abteilung oils. Enjoy!10 points
-
PK410 Grumman EA-6B Prowler OOB, Kit purchased at least 37 years ago...Decals worked!!! (different lighting for last pic.)10 points
-
The question: can you enjoy a quick build of a 1/700 kit without PE? The answer: I believe so! I made this one over the course of three nights. I really enjoyed it, especially painting the "Measure 12 - modified" paint scheme (doing my best for the colours). It's the Tamiya kit. It would certainly look more realistic with PE and rigging...but lots of fun without. Thanks for looking!8 points
-
An update with figures included and additional pre-diorama weathering... Just completed a Horch conversion to depict Rommel's Kfz. 21 used in North Africa. It was based on an Italeri Horch. I used the Plus Model conversion but this needed converting itself as Rommel's car had some differences to the interior and exterior. The only other example I have seen of this conversion is in Landscapes of War, Vol. II, but this vehicle is incorrect in some areas, such as the jerry can position on each side. The original vehicle was found and has been restored. This link tells the story - https://www.erwinrommel.info/headquarter-vehicles Here are a few of the references I used... The model, which is for a diorama with figures under construction...8 points
-
I can't remember if I have already shown this when I was here before, but surely you wont mind seeing it again? The decals had to be replaced because they all went wrong once on the model. I bought a set of Techmod decals for it and while they were better I found them to be a bit thin and they started ripping on the wing corrugations; I wish I'd known more about Decalset and Decalsol because they would have made the decals conform to the surfaces perfectly. Still, never mind, its all a journey of experience isn't it? I stopped using that Humbrol decalfix because it tended to go a bit sticky and at times it dried white; I watched a video on Youtube about using Decalset and Decalsol and was converted, have never looked back since! I was apprehensive at first because Humbrol used to have two little bottles of stuff for decals, I'm not sure it was much good tbh, but I watched further videos and saw the job Decalset/sol make! I can't remember what models I have put on here before and was thinking of showing them steadily, one at a time while I get started building aircraft again, so dont be surprised if some models you might have seen already. Thank you.8 points
-
Vultee Vengeance Mk.II (DW48044) 1:48 Dora Wings The A-31 Vultee Vengeance was designed and built for a French order that couldn’t be fulfilled due to Nazis overrunning the country before any deliveries could begin. The British government became interested in the design and placed an order for up to 300 airframes, by which time the aircraft had garnered the name Vengeance. It’s unusual wing design that looked like a diving bird had a 0o angle of incidence that made for an accurate dive with no lift from the wings to draw it off course. After America joined the war the type was investigated for their own use and given the number A-35 for their own and export use. Changes to the wing made it a little less accurate, but gave the pilots a better field of view, and an uprated engine gave it a bit more power. By the time the Vengeance reached British service, the losses taken by the Stukas that it had been designed to emulate gave them pause for thought, and they weren’t allocated to the European Theatre of Operation (ETO), but were instead sent to India and Burma initially, although they were later phased out in favour of more capable machines before the war’s end. They eventually found their way to an anti-malarial spraying job, as mosquitos and the malarial plague they brought with them was taking a toll on troops and locals alike. Many of them finished their days as target tugs after being stripped of their weapons. Australia made a larger order and they found them to be much the same as the British did, seeing most of them out of service late in 1944, although a few lingered for a while. The Mk.II that is the subject of this kit was a slightly improved version of the original Mk.I, with just over 500 made. The Kit This is a new tool from Dora Wings of this peculiar beast that looks more like a creature than most. We’ve not been too well-served in 1:48 before now, and with the crisis in Dora’s home country right now, it may be hard to get hold of one for a while, although please check the bottom of the review for information. Nuff said about that now. It’s brand new, and thoroughly modern, with just a hint of short-run remaining, but they really have come on in leaps and bounds since their first kit that was not-so-very-long ago. The kit arrives in a small top-opening box, and inside are ten rectangular sprues in a greenish-grey styrene, a sprue of clear parts, two frets of Photo-Etch (PE), a sheet of pre-cut vinyl masks (not pictured), two decal sheets of varying sizes, and the instruction booklet. It’s a comprehensive package, and there’s plenty of PE to help you get some serious detail into your Vengeance. Examining the sprues, there has clearly been a lot of effort expended in creating this tooling, as detail is everywhere, and it’s good quality stuff with engraved panel lines and some raised panels giving it a professional finish. All it lacks is the fine rivets that are starting to appear on some companies’ products now. Construction begins with the cockpit, which is of a larger size due to it having two crew members. The pilot’s instrument panel is a well-detailed arrangement of a PE detail part over a decal on a styrene backing, which has more styrene, PE parts and another decal added along with an angled wrap-around section, and a pair of styrene rudder pedals suspended from the rear of the console. A compass with decal fits to the right diagonal section on a PE bracket, then the floor and bulkheads are made, which doubles as the roof of the bomb bay, as is common. Two seats are built from individual sections and have PE four-point belts included for the pilot only. He also gets PE head armour and a styrene head rest on the bulkhead behind him, and a pair of side consoles that are built up in the same detailed manner as the instrument panel. The pilot’s seat is fixed to the floor on a ladder frame in front of the bulkhead and is hemmed in by the addition of the instrument panel at that point. The gunner has a complex suspension mount for his seat that mounts on the circular section of floor with some additional parts around the area. The fuselage halves have a large area of ribbing engraved into the interior that covers the cockpit and bomb bay, and is further detailed by addition of various PE and styrene parts before it is put to one side while the cockpit/bomb bay are finished off. The rear section of bulkhead is built up with PE and styrene (it’s a theme of this kit), creating the base for the mount of the twin machine guns that are made later. A radio box is also put together for later. The bomb bay can be modelled open or closed, but it would be a shame to close up the doors on all that detail. The instructions allow you to do that though, as it’s your model after all. Steps 21-29 cover the bombs with PE fins, a reservoir tank of some kind, the door mechanisms, plus adding constructional beams to detail up the bay to an excellent level. The tail wheel is also made up now with more detail, and this level of effort also extends to the twin .50cals on their mount, with sighting and bullet-shield parts, plus the twin-spade grips for those dakka-dakka moments. That’s your laundry list of assemblies complete, after which you can close up the fuselage halves on the cockpit and tail wheel assemblies, adding two more detail parts in the area behind the gunner. The top of the fuselage is open forward of the cockpit, which is rectified by adding the insert and forward bulkhead to the front, and an A-frame roll-over bar between the two crew. Attention then turns to the big radial engine up front. The Vengeance Mk.II was powered by a Wright Cyclone R-2600-19, with twin banks of pistons all present on this model. Work begins with the front bell-housing and ancillaries, which has a drive-shaft for the prop pushed through the front and held in place by a washer at the rear. Each bank of cylinders is made from front and rear halves, with a star of push-rods and wiring harness added to the front, capped off with the bell-housing. Its exhaust stubs are each made of two halves for fitting to the model, one per side. The engine assembly is attached to the front of the fuselage ready for its cowling later. The oddest part of the Vengeance are the wings. Before they are closed up, the main bay walls are added to the upper wing, which has the roof detail moulded-in, augmented by some superb PE ribbing, plus some additional detail added to the front walls. As the two wing halves are brought together, an insert is fixed into the trailing edge that has a curved outer edge to accept the flying surfaces. Two of these are made up, and joined by three flying surfaces with an additional pivot point fixed into the wing as you go along. This gives you plenty of leeway for posing these parts to your whim. The forward section of the main gear bays are built up with three additional parts too. If you’ve opted to open the bomb bay, the two bombs are attached to their Y-shaped yokes and laid flat in the bay, then the wings and the angular elevator fin are fixed in place along with the rear gun and radio box in the cockpit. It’s looking like an aircraft now, and the transformation continues as you make up the cowling from two main halves and lip parts, into which a number of detail parts are inserted to build up the shape of the lower intake trunking. Care here will reduce any hiding of seams later, which is always nice. The cooling flaps are separated into sections, and are made from PE parts to give them an in-scale look from the rear. The festival of PE parts extends to the dive-spoilers, which are able to be posed deployed with PE supports, and should look pretty realistic once painted. The elevators are rudder are all separate assemblies that can again be posed deflected at your whim. The canopy is a large goldfish bowl with plenty of frames to terrify the masking averse, but they needn’t worry, as Dora have included a set of vinyl masks in translucent grey, and pre-cut for your convenience. There are five canopy segments, beginning with the windscreen and working back to the gunner’s windows, all of which are slender and clear within the limits of injection moulding. There is a short vertical aerial on the centre section, which should be rigged with a fine line to the forward tip of the rudder fin, which is visible on the box art to assist you in getting it right. The main gear is similar to many American dive bombers, consisting of a straight, thick leg with PE oleo-scissors and detail parts, and a captive “spat” at the bottom of the leg that is a lot less usual. Four small side bay doors are also included with PE openers, and throughout the various bays, detail is good. The legs are fixed into the bays with a retraction jack added behind in a fairly complex step that also included the lower dive-spoilers and the bomb bay doors. If you’re closing up the doors, there is a single part for you to us, but leaving them open you have four parts, two per side, as the doors fold-up into a sharp V-shape at each side of the bay. A small outlet is inserted into a slot in front of the bay, and at the rear of the aircraft the tail bay door is propped up against the leg. The propeller is made from individual blades that are fixed into a central boss and locked into place with the front section that also has the spinner moulded-in. Pop the pitot probe under the right wing, and fit two circular landing lights into their recesses under box wings, and that’s it done. Markings There are a generous four decal options on the sheet, although they’re all wearing the same basic camouflage scheme, with sky blue undersides, differentiating by their codes and lettering styles, plus two of them wearing a bright white tail section. From the box you can build one of the following: A27-220 GR-A Mustafa, 24 Sqn., Nadzab, 1944 A27-240 GR-E Salome, 24 Sqn., Tivoli Girls, 1944 A27-200 NH-A Ye Boss & Y’Gotta B Kwik, 12 Sqn Commanding Officer, Sep 1943 Camden Museum of Aviation, Australia Decals are by DecoGraph, which is a guarantee of good registration, sharpness and colour density, with a thin matt carrier film cut close to the printed areas. The profiles contain thanks to both Steve Long and the director of the Camden Museum of Aviation for their assistance with this project, and the last decal option is their preserved aircraft. Conclusion This is a well-detailed model of this lesser-known combatant in the Pacific theatre during WWII, with its weird wings and massive engine cowling making it stand out on your model shelf. Highly recommended. Available in the UK in all good model shops – we hope. Review sample courtesy of Normally this would be the end of the review, but the good folks at Dora Wings sent us this sample directly, and I couldn't resist building it. It's a fabulous kit, and one of my favourites thus far. Here's a taster of the completed model, and a link to the build and to the finished model. Best regards to all at Dora Wings and the wider Ukraine.8 points
-
Hallo My second T-34 from AFV with interior. The kit by itself is not so accurate. But, I liked it anyway. The track chain is not the quality I like. I had to absorb it. Well, I hope you like the photos, Happy modelling8 points
-
Back in 1954, WG774, the first of two Fairey Delta 2 high speed research aircraft made its first flight, and in March 1956 it set a new World Speed Record for jet aircraft of 1132 mph. Later it was extensively modified into the BAC 221 to test the wing design for the Concorde and now resides in the Concorde display at the FAA Museum in Yeovilton. The unmodified second aircraft WG777 is at the RAF Museum site at Cosford. In in 1957 Frog released a kit - basic with no cockpit as such but with a "working droop snoot". I bought one in the early 1960's and built it but after a while it was banished to storage, and I was lucky enough to find it again a year or so back. I have stripped it, added the undercarriage Ash @Doccur did not use in his build in the Frog Squad GB and kindly let me have, and repainted it. I could not get the appropriate decals so used stock ones, and as a result the fin flash does not taper as it should but I am fairly pleased with the result. I would have liked to take some pics outdoors, but as no suitable weather is forecast before the end of the GB, here it is. Not too bad for what is probably a 58 year old kit, and probably one of the oldest I still have. And that ends my contributions to this useful KUTA. No doubt I will be at it again next time round. Pete8 points
-
Today's update is brought to you by the letter delta - And here's some fintastic rake.... oooooohhh, the rake, the rake .... and forgive me please Mods, but I'm a bit smitten with the fin... it's just so ... so ... rakish! Geez Wednesday Andrew, calm the hell down! Okay, that's a perfectly cromulent depiction of tonight's state of play.8 points
-
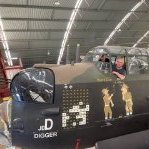
Hey, I'm back - having successfully avoided catching COVID! The trip was fun, although not as relaxing as could be expected since the entire brood (including three grandkids) had me running around like crazy. I managed to hang onto a dolphin's fins and fly through the water (man, those suckers are quick). I also did one of those pseudo deep-sea diving excursions with the 70 pound helmet and an air line leading up to the surface. Don't think I got too deep, but lots of big colourful fish, rays, and some things that looked suspiciously like sharks. Which they were, but not the kind that eat you. Nurse sharks, I think. Here is el turista diabólico in front of Temple 1 at the Mayan site of Chacchoben (circa 700 CE) in Mexico. I'm just about to clamber up the steps for the annual ritual sacrifice of a randomly selected Mach 2 kit. I also went to Honduras and visited a rescue facility for spider monkeys (one of them bit me of course) and three-toed sloths. I have to admit the sloths were very cool - how does something move so slowly and avoid being eaten by the rest of the food chain? Anyway, I want one. What else? Oh yeah, feeding the iguanas. I only had one broad leaf, but about a hundred of those buggers came after it. A little disconcerting, but we were all reptiles at one point, eh? ***** A proper RFI post is up for the A&AEE Phantom: Cheers, Bill8 points
-
Our youngest daughter bought me this one Xmas a few yrs back. What a great little kit. Can't remember where the cockpit detail came from, think I may have bought an etch set? Our eldest daughter got me the Airfix Vampire which was equally as good.7 points
-
Inbetween building the Atomic Annie, I've been working on adding better (more) weathering to some of my models for a bit more realism, next to feel the wrath of the wash and mud effects is my M117 Guardian. I picked this mostly to have a crack at working on the tyres before I get to that point on the big beast. Also, I loved this kit, especially for a cheapie - went together really nicely and it's a nice looking vehicle (I think). So from the shiny factory new look it started out with, I've added a wash and a small amount of Mig Jimenez mud to the tyres and lower hull, for a not too dirty but seen some use look, love to know what you think. Thanks for looking, Matt7 points
-
This was the model I was doing last time I was here on the forum; Matchbox PB4Y-2. Privateer. 1/72 scale. I had fitted the decals to the model and was fitting the last one, the nose art and the decal disintegrated! The model stood for a few months before i was able to get decals for it; in the end I bought another Privateer, the Revell version of the exact same aircraft and used the decals from that on the one I had. None of the numbers and codes already on the model went with the new decals so I had to paint over them before I could continue. After all I'd been through with this model I wasnt going to paint it all over again, and the trouble was that I had varnished over the other decals, so when I painted over them it came out a very slightly different shade! I decided to put the whole thing down to experience and carry on. The star and bars insignia was fine I didnt touch those, just the others. By this time I had changed from using that Humbrol Decalfix - to Decalset and Decalsol which I find far better, I also changed to using Klear before the decals and after when they were on and happy. I would wait a few hours for it to settle before using the mattcote, I now thin this down. The changes look like a sort of front line weathering, on the model, I changed the lines of the colours from straight to nice wavy lines instead, looks far better. I decided to swallow my pride, and kept it as it was once it was finished; I was glad to be able to put it in the cabinet after a long time on the table. Only other decal trouble I had was with a B-26 Marauder but that's because the decals were old; I cleaned the remains off right away and let it settle while I ordered aftermarket ones. So, here we are! enjoy! I came to rather like it.7 points
-
Nah, leave ‘em alone and do a bequest to @Mike leaving them to him with a request he does both as a wip on here - revenge from the other side7 points
-
Couple from RIAT 2017: rest in peace.7 points
-
Been told it's 25 years to become a blow in, can't really say how old for curmudgeon status......though I have it on good authority you HAVE previous! Nowt wrong with Leicestershire, please note I said nothing about Leicester! I even employed Gary Linekers cousin.....well, someone had to.... Personally, I tell folk I came up here on missionary work.......7 points
-
Hi all, again... Here are some pictures of my TA-7C CORSAIR, in Hellenic Air Force duty. It’s a kit from Hobby Boss, in scale 1/48. I’ve included Aires detail set for the cockpit. The ejection seats SJU-11/A & SJU-12/A of the kit΄s cockpit are replaced with two seats from Aires detail set. Also I΄ve included Eduard Detail Set for A-7E and Aires Detail Set for Wheel Bay. I scratch-building the tail section and the brake chute housing, the air starter receptacle panel, the gun gas purge door and the pilots steps ladder in open position left rear of the fuselage, the battery inspection panel rear right of the fuselage and below a strike camera K18B and a central speed break. Also I corrected the air intake shame from the model. The model is painted in “SEA” camo (FS 34102), (FS 34079), (FS 30219) and (FS 36622), using colors provided by the ModelMaster and it finished with extensive weathering. Decal sets are from Icarus Decals, representing a TA-7C (336 squadron) in Hellenic Air Force duty. I hope you enjoy my model. Happy modeling to all! Giannis Doxas6 points
-
Another one of my old models plucked from the storage boxes beneath the stairs in the garage. This one was covered in various shades of blue paint, and it was clear I had been using the poor thing as a test dummy for my airbrush many years ago. I think it was an old Italeri model kit, but I'm not sure; the kit wasn't great, and I despise the old panel lines that stick out. I basically just used this one as a painting and weathering test-bed. Enjoy!6 points
-
Here's a treat for ya! I made this a year or so ago! I got the kit for a song (can't whistle either!) and decided to get it built up. It was a nice build, lots of good detail features on the kit itself, such as an open bomb bay and all the bombs, I also added a few things to it such as feed belts for the Navigators and Bombardiers, and the waist gunners machine guns; just a simple strip of etch cut from a sprue! I added the rear gun sight on the tail guns mounted just outside the tail gunners window, and some oxygen bottles behind the pilots. Thoroughly enjoyed this build, and the only thing that went awry was the tail gunners decal! it just would not go on the model, kept curling up the wrong way. It was before I'd started using Klear but I'm not sure even that would have helped; possibly Decalset & Sol would have tamed it but I hadn't started using that yet either. Pity. There were even decals for the main wheels and they worked out fine. I have read a fair few comments elsewhere that Academy decals can be a pain to apply! I did get all but one fitted and they were fighting me all the way but I knew I couldn't get the decals replaced, I have tried to contact Academy about other models but never had any reply from them (are they allies or what?). This was my first B-17 and I wanted an F and a G model in my collection. I painted it in Hannants Extracolour, a nice olive drab that seemed to go well with this particular aircraft early in the war; there were so many different shades of OD, I have a few of them, in Humbrol, Extracolour and Colourcoats.6 points
-
Great subject , average kit I’m afraid , used SK decals wynns scheme with zero purple pearl , enjoy !!6 points
-
still in the bottle, along with the AVRO504k and a few other bits and bobs if only that were true Johnny thanks Bill. Yeah I really doubt the powers that be would have spent the moolah on glittery gold paint I think you hit the nails on their heads there Pete - a combination of little or no greebling plus dealing with contractors and such put a cap on the mojo bottle thanks Ian. The plumbers are no more. I threw them off the job this morning. Now I just need to find a GOOD plumber... You were right about the oil dots George. These idiots weren't so much about cutting corners as not even knowing where the destination was. thanks Terry. ouch! dotted. smudged about. dismal. removed. I am now in full agreement with that statement. ta Colin got any room in that rucksack Bill? The test flight was the Hunter. Another small update while I continue dealing with life's inevitable thunderstorms. Getting dangerously close to the finishing line I started looking at all the small jobs that needed attention. One of those was the ejection handle on top of the seat. Amazingly enough I had not lost the incredibly fragile and small resin part that came with the seat so I spent a good 30 minutes cleaning it up, removing flash, and very, very carefully painting it in black and yellow stripes - even to the extent of almost getting them to look diagonal. It was definitely one of my better attempts at detail painting. Time to fit the little blighter now. I placed it carefully on the matt directly in front of me, right beside the seat, turned to pick up the superglue, turned back and it was gone. I mean gone, gone. Gone. How does that happen then? I searched everywhere. The benchtop, the matts, the shelves, the floor, my sleeves, everywhere. I don't even have a carpet in the basement. After another half hour wasted searching I resorted to this... 0.2mm wire. which didn't run out too badly though my detail painting was about as good as my plumbers workmanship. I also added the drogue chute cord from thread steeped in pva Next up it was time to get all excited about this oil dotting that everyone keeps raving about and does so successfully. Being a tad apprehensive I thought it best to start on the underside in case it all went pear shaped. ....aaaaaand In hindsight... I should probably have used far fewer colors and chosen a few muted shades compatible with shades of aluminum. I should probably been less liberal with the dotting. I should probably not have used some old cheapo oils I had lying about. I should probably have thought it out a lot more and not just jumped in at the deep end. In hindsight - I think I learned something from it so it wasn't all bad, and I'll have a much better plan of attack should I ever attempt it again. After staring at it for a while and actually using my brain for a little, out came the cloths and we went back to this. I should have heeded my peers advice. As George and Mark stated above, this aircraft was well looked after and based on the HAECO photo it looks like it just had a new paint job and so would have been nice and shiny. Moving on as if nothing untoward had ever happened, I started or at least tried to start gluing on undercarriage bits. The legs had to be fettled quite a bit before they would fit and getting the angle and rake correct was a bit challenging. I think we got there though. The wheels were another challenge as they would not fit on the axle stubs at all. A lot of scraping was involved before they would slip on, then a nice easy task to fit on the underwing tanks which when turned over... The ejection seat and control column were glued in place and try as I might I could not get a decent shot of the cockpit interior. Here's some other shots instead. The canopy was such a tight fit it didn't need any adhesive. That was it I thought and began taking some it's-all-finished shots. Full frontal this is about the best shot I could get of the cockpit area OOps - the front U/C was fitted but forgot to take any IP shots. Is it just me or does that gap between the front undercarriage leg and the forward u/c door look overly large for the length of the leg? P'raps I'm just not accounting for the extension as it lifts off the ground. Only a Hunter could still look good from this angle then as I looked at this shot I realized that I had still forgotten something rather important the darned pitot tube. Now fitted I even remembered to add the heat staining to the forward end That's all folks. All done. Finished. Have Airfix done well? I think they have certainly upped their game from previous, but there are still a few areas that I think could be improved - mainly be actually managing their processors and not just leaving things to chance. It all went together well aside form niggles like the wheel hubs being thicker /wider than the tires themselves - how did that happen? Imperfections on the clear parts, and the design/molding of the various grills on the fuselage is particularly poor. It would undoubtedly make a great kit for a beginner, but for a number of reasons it just didn't incite me to push myself though that was also partly down to other factors. I could/should have done better but I felt I had to finish it off quickly otherwise it was going to lie there for a long time to come. Still, that's a Hunter off the 28 Sqn List now. I've no idea what's next - I keep waiting for word of that Arma Hurricane release... or is there another biplane lurking somewhere in that bottle of resin?6 points
-
Took stock tonight. Lightning.Nearly there just need some nose weight added as what I put in wasn't enough. Starfighter. Waiting for decal's. Sabre.Waiting for decals to see what colours required. Mystere.Next step the upper colours. Alpha Jet. Next step upper colours. F-5. Happy with the tail repair so now can crack on. Fury.Need a dry day to spray outside. Stuka.Needs matt coat. And went and picked up a Hawk for £6:99 tonight building a Finnish machine.6 points
-
Hi folks, More slow but sure progress. I've glued the door cards to the door interiors and added small bits of scrap plastic, foil and tape to represent lock bodies, straps, window catches and door hinges: The RHD dashboard has been fitted, complete with fire extinguisher and local Ordnance Survey map: It's really more of a suggestion of the real thing, rather than a precise replica, especially as I've realised that the 'frame tube' is actually slightly overscale, but I'm fairly happy with it all: (That's a stray wisp of plastic card 'swarf' lurking on top of the front passenger door card...) After two rounds of fill 'n sand on the front passenger seat to try to remove the kit's deeply-engraved diamond pattern, I painted it only to find that thd diamonds were still obvious. So, it was out with the filler for a third cycle which, after a coat of primer, seems to have done the trick. All the seats still need work; the white stitching will be tricky and I need to add the rear lapbelts, plus the wall-mounted front seatbelts will need to be made and fitted. The Revell kit does provide these, but they aren't quite the same as those fitted to my car so I'll probably scratchbuild new ones: So, I need to finish the seats, make the seatbelts, fit the steering column, modify the steering wheel to a 2-spoke version, fit a fabric 'parcel shelf', make the catches etc for the folding roof, paint the wheel arches...at which point I might be ready to fit the chassis, floor and body shell together! That's a lot to do - I think I'd better check my 2CV Haynes manual: I'll get there eventually! Jon6 points
-
Weathering the hangar roof, part 1 (before): …and Part 2 (after): Now let it dry fully and see what more is needed, gradually building up a more convincing surface patina. Crisp6 points
-
Thanks a lot! I like this explanation very much. Especially since it justifies the appearance of the ship as it is and there is no need to fix anything else 😉 -------------------- I continue to put the parts together, improving and unifying the painting at the same time It's time for a room below the deck. First, I painted the bulkhead with the door. I did it not very neatly, because this element will be almost invisible. This is what it looks like after assembly, but without the hatch that will cover a large part of the opening. As you may remember: I wanted to build a generator station in this room. But after putting it in place, I started to doubt if it was a good idea. The generator itself is not bad but in my opinion it is made worse than the rest of the ship, has less detail and lowers the overall level. An alternative may be a storage room in this place. So I started doing stuff for that. I chose the classic method of making boxes covered with a tarpaulin. The shape of the boxes is imitated by cubes cut from styrofoam. I covered it with a tissue soaked in heavily diluted wood glue. With the brush, I shaped folds and creases. Painted with vallejo russian uniform green and then drybrushed (the same paint with a bit of off white). In the photo below, the tarpaulin shines a bit because I have secured it with gloss varnish, but at the end I will cover the whole model with a bit of enamel dust, so it will change. And when I finished this work, I came to the conclusion that I still don't know which option is better: generator or storage. 😝 Will you help solve this dilemma? I also attached some details. And I painted the frame with the radio boxes above the deck. The whole view, with the crane finally attached, but still no rudders and few other parts. Thanks for watching and commenting! W.6 points
-
I keep wondering if any former matchbox employees are looking on. The other thought is that given the popularity of the group build ( and I know for most of us it’s nostalgia fuelled) there would seem to be a market for new matchbox kits or at least some limited rereleases ( I know Revell does do this) Imagine seeing a load of new matchbox kits in your local AldI at Christmas instead of Airfix.6 points
-
A first approximation of the starboard casemates As you can see - no innovative technology, everything is like in the last century: thick pieces of plastic, putty, model knife and sandpaper. What's next? Copy-Paste-Flip Horizontal! We have to do the same on the port side. 🪚Then you have to fit the deck to the modified boards. 🪚 I will make the detailing (4" guns, rafts, second Swordfish etc.) so it won't be boring.6 points
-
Almost over the finish line now. I've attached the last bits of PE including the hand rails and the canopy slider. Everything has had a bit more weathering on the decals and now a second coat of Future. The next photo will be it completed hopefully later today.6 points
-
So, last night I found my Humbrol No. 32, I've had it for years, opened it, stirred it with the largest jewellers screwdriver to loosen it all up and then reduced it to consistency with my little Badger paint mixer. Spent quite a few mins because there was obviously still lumps in it; I could feel the paint mixer kicking off them. finally I got it but when I took the mixer out it trailed a yellow milkiness, I tested a bit but the yellow still came through a bit. It's had it. Not to worry though; I tested Colourcoats 'tyre grey' next to it and they are identical! 😀 It's to add a camo pattern on the Scammell and trailer, I thinned down the grey and put some on. Did another coat today, looks good! I still have other bits and bobs to paint on it and I'll get those tomorrow.😉6 points
-
Hi All, Although I’ve not been posting nightly recently, things have been happening to the Gannet. thanks for the messages of support on this build. Chris, I’m more than likely going to get the vac formed canopy set to enhance the cockpit area. Don't tell SWMBO though! The other half of the ‘cockpit’ and crew was cut out, as well as the radar operator office. The simplified head padding and radar equipment were removed as they were I. The way of cleaning up the edges of the openings. They’ll be replaced later on I the build. Also, the panel lines were re-scribed on the starboard half of the fuselage. The Eduard interior set arrived so that meant I could design the cockpit tubs around it. Once the part was 3D printed, the instrument panels looked too deep, so they were brought up by 2mm and seat mounts were added. Three generic seats were also 3D printed, of which two were mounted into the front tub. The radar operator’s office was simpler but had to be shallower to miss the exhaust intrusions on each side. I also had to chamfer the top slightly to get it to sit level(ish). I then set about the wing scribing (two nights ago). It was fairly straightforward with no issues apart from differing images give a different set of lines around the first folding wing joint. I’ve a feeling the AS -1 is just a straight line whereas the Mk3 has an extra rectangle on the fixed wing part. maybe somebody could help out on that front. I felt it was better to leave the rectangle un-scribed for now. The landing light was filed into the front of the port wing. My small square file was just thr right size for it. The wing tip light was also filed - hopefully this time I’ll remember to get the red light on the port side where it’s meant to be! Next up was to tackle the undercarriage bay - or the lack of it - just an outline. The main square was drilled inside the raised panel lines and then snipped out. The rough edges were then filed back to the raised outline. Then it was the wheel ‘hole’ to be opened up. It was also chain drilled, snipped out and filed back. It went fine except the kit location tab sits exactly half way under the new opening, or it did - until I cut it off! This means I can 3D print a wheel bay - I just need to find an image to copy. The engine assembly needed a fair bit of fettling just to get it to sit on the front of the fuselage. In the end, I found the bottom of the raised location ‘ring’ was too square in profile to fit inside the recess. A good scrape with a knife sorted that out. A quick trial fit of the wings with the cockpit tub in found they fouled each other - not much but enough to stop the tub sitting where I wanted it to. I figured if I cut the front 3-4mm off the front of the upper wing half locating tab, it will clear the cockpit tub. I’ve got the starboard wing to re-scribe, file the lights and make the landing gear openings. The Gannet as it is at the moment with the wings dry fitted along with the two tubs (and a previous incarnation in the background.6 points
-
There are too many threads on which to comment...Let me just say we are all doing magnificently!6 points
-
Good evening boys and girls The painting process on the big Sunderland is now more or less complete - since the last pictures I've added the upper wing insignias and given the model a couple of coats of flat varnish to kill the high gloss Xtracolor paints provide - great for decaling but not so for a WWII-era flying boat! After that, I made and added the radar aerials for the fuselage sides: As well as the one above the flightdeck: The canopy has been unmasked and the good news is it survived the painting process unscathed: I have made the early-style exhausts from Evergreen tube, bent very carefully over the toaster! They were then sprayed with Humbrol burnt steel and added to the collector rings, which have also been painted according to references: I've started the weathering of the upper surfaces by blowing some various greys back from the exhausts: I've also sprayed on the distinctive water marks on the lower hull using various browns as seen on period photos: And here's where we're at now: The to-do list is certainly getting shorter and I'm now entering the home straight, although there's still a lot to keep me occupied. Jobs still to do are: - cabin glazing - paint/weather/install wheels for the beaching gear - rigging on the floats - make/paint/install radar aerials on the lower outer wings - make and install depth charge racks and depth charges - make turret interiors - paint and install turret transparencies - landing lights on port wing leading edge A good couple of month's work yet, but the end is getting nearer! All the best, Tom6 points
-
Tonight, I trimmed the aforementioned top half wing locating/support tabs to allow for the cockpit tub to clear them. It was odd though, that the port wing needed to be trimmed further back than the starboard side. The crew tubs and the openings in the fuselage were hand brushed with Matt Black. There’s still some instrument panels to make, but they will be added later in the build once the fuselage is cemented together. I will give them a dry-brushing with grey paint to simulate wear and tear tomorrow. The remaining wing had the wheel bay opened up the same way as the other side. The wing was also de-flashed, scribed, sanded and had the landing and wing tip lights filed. The openings were measured for depth in each corner and at three points around the wheel bay. I can now make the wheel bays just under 6mm allowing for the thickness of the plastic of the lower wing half. The Gannet was then dry assembled again with the crew tubs fitted in (also dry). They are temporarily held up with pieces of sponge between them and the weapons bay ‘roof’. Everything seems to fit together well so far. I need to fabricate (or find) a pilot’s control column.5 points
-
There are many available wheel bay images, lots of them from James (Chally) who has access to a Gannet all of his own. kind of.. And there are many pictures out there of resin and etch versions of the bay, like this one I used this amongst others to make the bays for mine, they are rather good. (resin not mine) The circular cut out isn't, circular 'cos the wall of the bay is several flat panels and the cut out mostly reflects that. You will probably already have seen that, sorry.5 points


.thumb.jpg.cfc129272ffec824439b15e6013d5952.jpg)


This leaderboard is set to London/GMT+01:00