Leaderboard


Popular Content
Showing content with the highest reputation since 09/10/24 in all areas
-
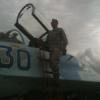
Finally got this over the line after coming back to it in May this year. The kit has a few shortcomings, the clear nose and a few other clear bits being the obvious ones. The engine cowlings didn't look right in my opinion and so I opened them up a little more. Also, the props were too 'paddly' at the roots and so I filed them to a more accurate shape, albeit by eyeball only. The olive drab is a mix of MRP 138 & 139 to give a slightly faded look and the weathering a mix of oils and soft pastels. From photo's of the aircraft after it had a replacement tail section fitted, the insignias appear to have faded blue inners with a darker blue border which I presume was to paint over the red border previously. Also, the tail artwork was on the original tail, hence not added here despite it being the reason I initially chose this scheme! The nose blister was taken from an old Hasegawa kit and the gun mount scratch built which was a little fiddly and not a perfect fit, but far better than the Revell part. The build thread is here: Overall, quite a pleasant build despite some of the kit supplied inadequacies. Thanks for looking, Cheers Neil103 points
-
Hello, this is my Fairey Barracuda, from the old Special Hobby kit. It was extensively improved...basically, every part of it needed to be reworked or just trashed and redone from scratch. If you're interested, WIP is here: Barracuda103 points
-
Here's yet another of my 1/72 Sword Harrier two-seaters! XW175 is one airframe I've wanted to build for ages, with its amazing livery and assorted extra bits to scratchbuild. When Combat Decals re-released their British Test and Development Aircraft sheet, I grabbed one as I already had the Sword Harrier T.2/T.4 kit in the stash. Being a Sword kit, it's not without its challenges, but has a good 'sit' to the finished model. Extra bits were Freightdog intakes, Pavla nozzles, the aforementioned CD 72-005 decal sheet, and assorted plastic scratchbuild including aerials, underbelly pods, and the intacke FOD covers. Not forgetting the Master F-16XL nose probe with its extra vanes, coincidentally a superb match for this aircraft too. Inspiration was from @Navy Bird who built the same kit a while ago to a stunning standard, and gave good tips on his WIP thread too - thank you sir! I'm not 100% happy with some of the finished areas of mine (the paintwork is a bit off in places and the more I look the more little faults I see, so I'm simply going to stop looking!) but from a distance it's a good addition to my new display cabinet, and it's one itch which has definitely been scratched now. Photographed here against various backdrops on my dining room table - that's the other hobby, and it's nice to combine the two at this stage! Thanks for reading. Finally, seen here with the last one I built - need to break this Harrier addicition!!!99 points
-
Hello all, I am so glad this is finally finished. For the sheer amount of hours put into Fusion 360 which I'll never get back, the pain the paintwork has caused me (oooh you fighter!), and also because it looks like it means business, especially in NMF with 74 Squadron (Tigers) colours. So for those who don't know, the AW.169 was Armstrong Whitworth's submission for RAF Operational Requirement F.155T. The requirement called for an all-weather fighter/interceptor to counter mach 2 Soviet bombers. Of all the submissions, this one screams "I want to be a 1950s supersonic jet" the loudest. Pointy? - check Big missiles? - check Multiple jet engines? - double check Additional rocket motor for a laugh? - check Short on fuel within 5 mins of launching? - probably check My somewhat rambling, disjointed WIP is below. I put many, many hours into the drawing and printing to get this right. And wine, lets not forget the wine. Kit - my own design 1/72 3d print Extras - Aeroclub Martin Baker Mk.4 seats, spare EE Lightning etch grab handles, spare EE Lightning decals raided for stencils and 74 Sqn markings, generic stripe decals for canopies, missiles and wing walk areas 3d Print - Er, well all of it actually Vac Forming - OK, I lied, the canopies were vacformed from 3d printed moulds Primer - Mr Surfacer 500 and 1200 grey, Hobbycraft rattle can gloss black Paint - Alclad II Clear Base, Aluminium, Polished Aluminium, Chrome for Plastic, White Aluminium, Dark Aluminium, Stainless Steel, High Speed Silver, High Shine Plus Aluminium, Hot Metal Violet; Tamiya X-1 Black, XF-1 Flat Black, X-9 Brown, X-10 Gunmetal, X-11 Chrome Silver; Mr Gunze Aqeous 8 Silver, 21 Off White, 52 Olive Drab, 77 Tyre Black, 79 Sand Yellow Weathering - limited use of sludge wash from Mr Gunze 77 Tyre Black; Tamiya Weathering Master Burnt Blue, Burnt Red, Oil Stain, Snow, Silver, Gunmetal. Varnish/Finish - Alclad Aqua Gloss Clear; W&N Galeria Gloss, Satin and Matt. So in terms of work to improve the print: - 5g of lead in radome (it was marginal, definitely teetering without) - 1mm stainless steel wire to attach tail fins, and also wheels to undercarriage - 2mm brass rod to attach tail planes Faults? - some of the decals silvered and I couldn't resolve it, so I did what any good modeller does.... I drank some wine and carried on regardless (what do other people here do to put decals on flat colours?) - lots of nicks, chips, fingerprints etc in the paint which narked me right off. One day I'll pull it all together and deliver flawless paintwork - I could have put more detail into things like the landing bay doors, brake pipes, canopy jacks and so on, but I must have put 200hrs into drawing it, so I just got the the point where I wanted to make it, paint it, and move on to the next one - I probably should have done it wheels up, because it looks a lot better without those WW2 spec balloon tyres on display "Shut up!" I hear you cry, you're right, lets get to the important bit, PICTURES!!! Thanks for looking. After all this work it would be a shame for me to have the only one (other than Geoff's at the Midlands Museum), so if anyone wants to build their own, please take a look at the 3d Makerspace section of the forum here for details. Alternatively, PM me. Bonus pic; here she is with the Vickers 559 submission for F.155T97 points
-
Well that was an unexpected blast! Bought as a quick OOB build to do before serious modelling time arrives in the Autumn this turned into a very interesting WIP as I enjoyed massive contributions and insights from BM members who had actually flown this particular airframe and others who had vast knowledge of the Seaking. For 1/72 scale Airfix have produced a lovely little kit that has more than enough internal detail and although there is some online criticism of the external detail(or lack of it) it sure looks like a Seaking to me. Added as much painted detail as I could, extra stencils from an old phantom decal sheet and stretched sprue for the Ariel’s etc. Main colour was Xtracolor enamel, Rescue yellow.97 points
-
Hi Everyone Here`s another subject from the Southern Hemisphere I decided to do whilst I had my Aussie Twins decal sheet out Revell`s 1/48 PV-1 Ventura kit Finished to represent an aircraft of 13 Squadron RAAF 1945 Took a while to find some info` on the painted out areas and photo`s of the real thing and still don`t really know the facts...... The decal sheet suggested light grey but I found some consensus that it was light blue although it could even have been bare metal What it was covering or why is unclear as other Venturas of 13 Squadron didn`t seem to have it. No pictures either of the starboard side so just gave it best shot What photo`s I did find showed a very weathered airframe so may have been a previous owners markings I didn`t accidently put the tail markings on back to front, they were actually painted like that🙂. Hope you enjoy, thanks for looking Cheers Russ94 points
-
Evening guys and gals, Here's a model I completed today - Tamiya's classic of the mighty Lancaster in 1/48th scale. My model represents a B MkIII of 300 (Polish) Squadron, based at RAF Faldingworth in early/mid-1944. I picked this up for a steal on a well known auction site a while back, shortly after HK Models released their new kit and thus a lot of these were being sold off cheaply. Whilst the Tamiya kit is of 1975 vintage, it still builds up well and holds its own against the newer HK rendition well: I actually like the raised surface detail (which although a little overdone in places is a more life-like rendition of the real aircraft) and whilst it has the odd tricky element during construction - namely the fit of the engines - it doesn't take any major effort to put it together: Painting all the bombs took nearly as long as building the entire model - that is one impressive amount of ordnance! I painted it with my trusty Badger 200 using Xtracolor enamels, and added a Flory 'grime' wash and did all the exhaust staining with Mig-Ammo pastels which are really easy to work with: Decals came from Techmod and were superb, bedding down over the raised details without issue: All in all a very straightforward and enjoyable build, and whilst I need to get hold of the newer HK kit one day, I'd happily build another of these if the opportunity arose - you can't beat giving an older classic some love! Tom90 points
-
Hello everyone! Buccaneer is one of my favorite planes) I built this XN977 from the Airfix kit. I supplemented the interior for the early Buccaneers and the seat set with Quinta Studio kits. I also added rivets. The decal for the XN977 from Xtradecal. The model is very pleasant to assemble. Unfortunately, I only recently learned that this particular plane did not have a fairing in front of the air intake, so there is an error. I used the wrong drawings and changed the panel lines in the tail section - also an error. It would be nice to change the rivets on the control surfaces, air brake and around the landing hook niche to external ones, but I did this on the XX900 model, which is still in work.89 points
-
Hi everybody! This is a long overdue RFI, since this build was completed in November 2023, so almost one year ago! The aircraft is and F-4E Phantom II of the 117th Combat Wing, based in Andradiva, here depicted in her 2014 "40 years Of Phantom II In Hellenic Air Force" livery. Let me start with a couple of pics, more to follow below. Here's one in natural light: Same subject, but using color auto-adjust from Irfan View A few words about the build: this was part of a double build, the WIP can be found here: The idea was to build two F-4Es with slatted wings, complementing the two kits with parts of each other, according to what is represented best in the two of them. The Hasegawa kit was used to represent a Turkish Air Force machine, whose RFI is here: For the Greek Spook, I used the Finemolds F-4EJ kit, converting it in a slatted F-4E by doing the following: Scratch built items: - Instruments panels, keeping parts of the kit ones and adding bits from stock styrene card, copper wires and spare decals - 3D printed exhaust cans and air brakes - air brakes actuators, from rigid copper wire and its plastic sleeve - canopy latches. from copper wire shaped up and hammered flat - resin outer wings, cloned from a set of Revell ones, with scratch built and re-positioned wing fences - drooped ailerons. cutting out and bending the kit parts - inner wings slat actuators, cloned from the Hasegawa kit - drop tanks from the Hasegawa kit, improved by removing the side welding strip and replacing it with thin brass pipe - rear fuselage air pressure gauge, by carving out its square hole and filling in with clear UV resin, and a generic gauge decal on the inside - DIAS ECM antennae, the intake shoulder ones using parts form the Hasegawa kit, the gun muzzle, tail fin and tail door ones from scratch, using various styrene bits and shaping them with standard sanding tools - IFF blade antennae (the ones sitting in front of the windshield) again using styrene sheet and sanding tools - home cut masks for the clear parts, designed by @Gene K and cut using my Silhouette Curio - RBF tags, printed on regular paper, soaked in Future and with copper wire glued to one end as connection wire/pin After-market items: - Quickboost seats - AIM120 and AIM9-L missiles from the dedicated Finemolds set - Pitot tube, fin sensor and AOA probe from the specific Finemolds brass set - Slime lights, canopy frames and gun compartment scavenger door from various Eduard PE sets - Decals and stencils from a Model Maker sheet for HAF special color Phantoms Paints and weathering: - Camouflage colors using Lifecolor paints - Metallics from AK Extreme Metal, Model Master Metallizers and Vallejo - Interiors painted using Lifecolor and Tamiya paints - Weathering done with tempera and oil paint washes, the chipping on the drop tanks was done with the good old salt chipping technique I'm pretty sure I forgot something, but I won't forget to thank everybody that followed my build, and especially -@Gene K for donating the kit, the 3D exhausts and air brakes, the masks cutting files and a ton of other Phantom related things that I'll be using in next builds - Silvano @phantom61, for donating Eduard PE sets and lending me a precious reference book for Greek Phantoms - Everybody else who gave advice, shared knowledge or just plainly cheered me up during the build You all wanna see some pics, now, right? There you go: Some interiors details Underneath views, from the WIP Last, a "Phamily" Photo As usual. all comments welcome! Ciao85 points
-
One can never have enough of Hornets! - Kinetic kit + Super Scale decals - Eduard AGM-62 + AIM-9L - Astra Resin AN/AWW-9A datalink - wheels + pylons + nozzles from Brengun84 points
-
Latest of the bench. Airfix's Whitley is an OK build but does a fair bit of work to get things to fit. Lots of clean up mould lines and some serious clamping helped. In the end though I am happy to have a Whitley in the cabinet. It was built straight from the box except for some Master Models barrels for the rear turret. More details at my blog but here's some photos82 points
-
Here is my latest build using the very nice Tamiya kit of the F-4B combined with Furball's "Bravo Mig Killers" decal sheet #48-011. I can't quite believe that at the grand old age of 61, this is my first 1/48 Phantom! The Furball decals were great to work with - strong, with sharp delineation of colour and bedding down very well. I also bought an Eduard stencil sheet but I abandoned use part way through as the stencils were too black and did not look right on the model. I therefore resorted to the Tamiya stencils. Yes, the Tamiya carrier film is on the thick side but they have two things going for them: excellent colours and a very clear placement guide. I just wish Tamiya would outsource their decal production to a company like Cartograf. I tried to keep the weathering fairly subtle. My Go To products are Flory washes as they are very forgiving if I want to undo an effect. The back end was done with various shades of Alclad and AK Extreme Metal combined with the Tamiya "cosmetic-type" weathering powders. I did choose to weather the underside more heavily. This used a combination of Flory wash + stippled Games Workshop washes + Tamiya weathering powders. To display the model, I decided to have a go at recreating a carrier deck. The MD-3 tractor came from SkunkModels and the figures from the Hasegawa US Navy crew set. The tie downs are photo etched. I drilled 5mm holes in a sheet of plastic card, then glued the card to the MDF base. I established that USS Coral Sea had 4 point tie downs spaced 10 feet apart (which works out at 2.5 inches in 1/48 scale). I created the anti-slip coating by stippling cheap artist acrylic paint with a piece of sponge. The advantage of artist acrylics is they are gloopy and hold the stippled effect when they dry. All in all, a very enjoyable build and I would recommend the Tamiya kit to anyone looking for a stress-free modelling experience! Thanks for looking. Richard C.80 points
-
Hi all. I want to show you my latest finished modell. As it was a commission build it was a in between project and finished very quickly. In 2002 Austria decided to purchase three former RAF Lockheed C-130 Hercules. The Aircrafts arrived in 2003 and 2004 at Fliegerhorst Vogler in Hörsching near Linz/Upper Austria. 8T-CA was built 1967 and former XV181 in RAF service. It has a landing mishap in 1975, was rebuilt by Marshall and also used as testbed for the Allison GMA 2100 engine before sold to Austria. In 2028 Austria will replace it´s three Hercules with four Embraer C-390M, they C-130 will be in service with RAF and AAF for 60 years then. The kit from Zvezda went together very nice and easy, no major fit issues and details also look very neat. Lots of extra parts for different versions are already in the kit. Some details had to be scratched from styrene, belonging to the wide range of different versions and modifications of the real aircraft. I used Gunze H306 for the overal grey scheme and Gunze H336 for the darker stone protection paint on the belly. Some dirt and soot was done with Tamiya x-19 smoke and Gunze H343. The decals from Brent-Air-Decals were also very nice to maintain and gave all the neccesarry details for the Austrian aircrafts. Thanks for watching, I hope you like it. Regards Daniel80 points
-
Finished today (at last!) - 1:48 McDonnell-Douglas F-4C-24-MC Phantom II, serial 64-0861, aircraft no. C.12-26, side no. 122-13, 122 Escuadron, ALA 12, Ejercito del Aire, Torrejon AB, ca 1983. Academy kit with Eduard PE set for cockpit, Aires resin ejection seats and Series Españolas decals. Painted with Gunze Mr.Hobby C series and Alclad II metallics. Thanks for watching!77 points
-
1/48 Hasegawa build.76 points
-
Hello all, 486 Bomb Group 384 Squadron out of Sudbury. This aircraft survived the war to be broken up in Kingman AZ. I am waiting for the California countryside to turn green which should be in March. At that point I will post many more pictures. But here are a couple that I have taken so far. Products used Paint: Ak Real color, Model master and Alclad Aftermarket: Eduard wooden floors and ammo boxes set Eduard Zoom cockpit Eduard engine set Eduard Radio Compartment Eduard masks Master gun Barrells P.S. Special Thanks to Tom Probert for the B-17 Info post, very helpful. Rod Again, more pics to follow in the future.72 points
-
Hello Here is my most recent build with this Special Hobby 1/72 Republic F-84F in French colours. It was the F-84F-46 52-8844 #1-PB from Escadron de Chasse EC 3/1 “Argonne” in 1957 on Saint Dizier Air Force Base. This is an easy kit with many details and I suppose the forerunner of an RF-84F later. Patrick72 points
-
Hello! Here's my recent project, a Mitchell B-25H, one of the strafer versions. This Hasegawa kit came with damaged decals, so I opted for new ones, this time depicting the Pacific theater bird baptized “Powerhouse”, with that not so appreciated nose paint job by the Japanese. Despite being marked to be destroyed, with priority, by enemy air defenses, I've learned that Powerhose was just salvaged for its metal and parts after the war and never returned to the US. I decided to take my time (lots of it) and add rivets, but, unfortunately, some of them weren't deep enough and are not as visible as I intended, after paint and varnish. But, at least, I know they're there. I've used Eduard PE for the interior (kind of useless ‘cause almost nothing can be seen) and masks for the clear parts. The kit itself is ok, no issues, just a couple of .50 machine guns with warped barrels. I had the impression it would be bigger when finished, that's why I opted for a 1/72 scale, but now I see my shelf could have a 1/48 scale, so maybe I'll go for a GWH kit in the future. Paints were Gunze Aqueous range and zinc yellow primer from a local brand, so hairspray double layer technique could be used with a silver base as well. Hope you enjoy! Cheers!72 points
-
Since the work in progress department did not progress very well with this model, I am offering the finished model here. The Estonian Air Force received one Anson in 1937, which was intended to be used for training purposes. The aircraft was never armed. The Soviet army destroyed this plane after the beginning of the occupation. Special Hobby kit, Kora decals.71 points
-
Hi! First time here! Building kits for the last 15 years... This is my last build, after ten months (yes, I'm veeeeery slow modellee). Feel free to ask anything. Hope you like it! See ya!68 points
-
The famous Tamiya F-14a late model. The only modification is the interior of the Kvita. The kit is very good. But it was a shame to find a lot of sink marks on the wings, stabilizers and vertical stabilizers. The Tamiya decal is a particular disappointment - great colors and geometry along with incredible thickness.67 points
-
Scratchbuilt details to improve the kit. No aftermarket used. Overall I enjoyed the build. Kit has it faults but I can look past it and accept as it is.66 points
-
I really swithered about sticking this up as I think it's far from my best work. It took four repaints to get it to this stage and it shows in the loss of surface detail. Towards the end this was an effort in perseverance and sheer bloody-mindedness that I wasn't going to let some plastic and paint get the better of me But, I thought, I have learned so much from the errors made that will be useful in the future that I would post the pictures. It looks OK at best but....... It does look good in the cabinet though WIP Here. Primed with Mr.Finishing Surfacer black 1500 Painted with. Colourcoats Dark Gull Grey and Oxford Blue. Tamiya Flat White, Rubber Black, Semi-Gloss Black, Nato Green and Nato Black. Humbrol Signal Red. Finished with Citadel Nuln Oil Wash for the undercarriage and a Windsor & Newton Galeria Satin Varnish. Decals from XtraDecal AM Eduard Cockpit PE Set which, I found out, doesn't play well with a closed cockpit It is what it is as part of an ongoing series of Phantoms. Now on to the next one with a much simpler paint scheme. Thanks for looking, Cheers, Alistair66 points
-
Hi all, here my new built Eduard P-51C in 1:48. Add some Brassin parts (wheels, wheel bay, fuel tanks and seat). Its just a great kit with many details and amaizing fit.66 points
-
Hurricane Mk.IIc 87 Squadron HL864 'NIGHTINGALE' LK-? This is the first model that I have managed to complete in over a year. Normally I find myself over in the armour section of the forum, but recently I have had a complete lack of mojo and have ended up with far too many stalled projects. So, I thought I would try some aircraft builds for a change. I started with the Airfix 1/24 Spitfire, which I was enjoying, but when I got to the painting stage I felt that I needed something less challenging to practice some different techniques on. Looking on this forum and various Youtube channels there seemed to be a lot of praise for this kit, and I have to agree, it is very nice indeed. This is the 'Jubilee' edition of the kit and features markings for one of the 87 Squadron aircraft in it's Night Intruder scheme of Dark Green and Medium Sea Gray over Black. It appears that the squadron hastily applied the camouflage over the existing black of their night fighter aircraft, leading to a somewhat scruffy appearance, perfect for getting the modelling juices of an armour modeller flowing again. After reading a few discussions about 87 Squadrons paint scheme I decided to use a darker tone than Medium Sea Gray. On most of the reference photos it appears that the aircraft had patches of lighter tones brushed on in various places and I felt that these lighter patches were most likely closer to Medium Sea Grey. The challenge was to replicate a badly painted aircraft and not make it look like a badly painted model. Using MRP paints I painted the model with a mixed up close to black and then, after applying hairspray in a few places to aid chipping and wear effects, I sprayed on the camouflage colours. The gray was a mix of Medium Sea Grey with a touch of Bronze Green and black added. I then sprayed on patches of thinned Medium Sea Gray and lightened Dark Green. I bottled going full on with it so it looks a little subdued here, but it is more obvious to the naked eye and in higher resolution photos. The aircraft I chose to depict is HL864 'Nightingale' flown by Pilot Officer R.W. Mitchell. The ? code appealed to me but it is not one of the markings provided. As I try to avoid decals and create masks where possible I was hoping that shouldn't be a problem. I used the kits decal sheet for sizing the codes etc, however looking at the comparison photo above it seems to me like L and K are a little too tall as is the tail flash. I have also missed the serial number 'just visible' under the stabilizer. I can add that later but I will have to live with the codes. I'm a little bit out with the demarcation lines of the camouflage here and there and I have also noticed when posting the top view photo that I have got the fuselage roundels slightly out of line, oh well!🙄. The most challenging part of doing this scheme was the name scroll. The lettering was far too small for my cutter so I resorted to doing the art work in Photoshop and printing a decal. I have never really had much success with this. I did think of painting it, but my eyesight and diminishing dexterity put that out of the question. The close up above shows off how excellent the Master Barrel guns are. The resin kit supplied exhausts are also very nice, however, I should have painted them a lot more orange to depict the coating applied to the night fighters, they just look rusty here which I didn't want. Out of the box it is an excellent kit, but I did choose to add the gun barrels, some HGW seatbelts a few pipes, cables here and there, a navigation light in front of the ariel mast, and the uplock lugs on the wheels . I also felt that some of the rivet detail on the wings was a little too pronounced, so I gave them a bit of a rub down with a sanding sponge. The research done by @Ray_W for his excellent build proved very helpful in this project and is well worth a read through HERE if you are planning to build one of the 87 Squadron aircraft. I'm so glad that I built this kit, my mojo has been fully restored. As always, there are definitely things that I could have done differently/ better, but overall, I'm pretty satisfied with how it turned out and, I feel ready for the next project or maybe I should get one of the multitude of stalled projects finished. Sorry if this is a little long for a Ready for Inspection post, I didn't do a WIP this time as the kit has been pretty well covered on this forum. After the discussion with @Troy Smith, see in the comments below, regarding the exhausts and under tailplane serial numbers I decided to make the alterations. I didn't want to replace all of the existing photos so I have just re-shot the following three to show the changes. Wayne65 points
-
Hi all, This was a long, long, long built F9F in 1:48 from Trumpeter. But, finally, I've made it. And little DIO (comme d'habitude)62 points
-
Hello This year I am finishing some kits started some years ago and which were waiting in my own shelf of doom. First here is this 1/72 Hasegawa General Dynamics F-16N in the colours of the Navy Fighter Weapons School around 1990. Actually the F-16N was a modified F-16C Block 30 with a reinforced wing, no cannon, a F110-GE-100 engine and an APG-66 radar. Due to airframe fatigue the F-16N were retired in 1994. Sadly in the box the ACMI pod was missing as Hasegawa did not catch the opportunity to have an operational Top Gun Viper. On the other hand this kit was cheap and we can find some on the second-hand market. The paint came from Gunze aqueous range and according to the pictures found on the Internet. Patrick62 points
-
Hi everybody. This is my latest build, an Airfix 1/72 RAF Tempest V from 80 squadron late 1944. This Tempest was usually flown by australian pilots and so sported an appropriate badge with a kangaroo and an australian flag. It's a nice small kit even if the engraving is a little too deep, I added an Eduard photoetched set, Barracuda Cast resin items, Xtradecals sheet and a little personal work. The paint job is done with Tamiya and Gunze references.62 points
-
Hello to all.I have jsut finished this model.I managed to rescribe the panels and rivet it.Quinta 3d ockpit was used and master pittotube and nose machine gun.I also did add a lot of additional scratch details.Painted in revell enamels and weathered with oils.The ub-32 rockpet pods came from the excellent eduard brasin sets.Decals I made myself at home.62 points
-
Finished the 1/48 ICM Marauder. When I started building I thought this scheme looked the coolest to build. I didnt appreciate at the time the amount of masking it would take to get this finish. All markings masked and spray painted except for the tail numbers and the detail on the nose art (the yellow was masked and painted) Although I had put a fair amount of weight in the model, I discovered when I put the landing gear on, that it was still a tail sitter. I managed to add some extra weight (about another 20g) in the nose wheel bay. Luckily it is hidden from view by the gear doors. The few decals I actually used went onto the model very well. The top layer peels off to leave a painted on finish to the decal. a few small areas needed touching up where the peeling removed a small bit of decal (peeling off the nose art was a real stressful moment) Extra Weight added to the nose wheel bay. not pretty, but necessary62 points
-
Another Arma’s Hurricane took off from my bench. An since they come in all shapes and sizes, today we have a Turkish Mk.II in 72nd scale. Turkey procured a number of Hurricanes during WW2 in several batches and in various circumstances. In March 1943 a flight of ex-RAF Hurricanes Mk.II (b and c versions) was transferred from RAF bases in the Middle East to Turkey. One of this flock was an aircraft bearing serial number HV608 that I present you here. Very few photos depicting those Hurricanes are available today (I know only two), so decisions regarding the equipment and painting scheme of this particular bird were based only on my “educated wish” reinforced by the opinions of the wise men (thank you very much @Troy Smith and @Paul Lucas). some info you may find here. So, without further ado, Arma Hobby’s Hurricane Mk.IIc, 1:72 scale, built mostly OOB (a 3D printed seat with seatbelts, a mirror and exhaust stacks were included in the kit). I used gun barrels from Master, an instrument panel from Yahu and a gunsight from Brengun. Please enjoy and comment at will. Cheers, Marcin61 points
-
USAF Sikorsky HH-53C Super Jolly Green Giant 68-10364 67th ARRS RAF Woodbridge 1978 1/72 Fujimi - Academy "Frequent Wind" CH-53D boxing. Not bad for a just over two month build if I say so myself. Actually pretty glad I've got it done as it was a long process. Apologies for not updating the build progress in my build thread. A nasty bug & adverse side effects from the Covid booster slowed me down. To start off, for some nutty reason & I mostly blame Courageous for the lighting idea but I thought I'd illuminate the interior so that people can actually see that close up I actually did some work to it! Interior - cockpit had a 3D printed Kelik decal set. Rear loading bay had some evergreen strip added to represent the side walls, plus I made up a ceiling with some more plasticard strip to "represent" the ceiling gubbins. That was then obscured by a scratch built lighting rig using a craft light led set that one would use for craft made christmas cards etc. Then after finding photos of HH-53C's in maintenance I thought why not open up some bits. The port engine is from the blackdog big set which is actually intended for the Italeri 1/72 MH-53J kit. This was made to fit this Fujimi kit, so some cutting & keeping of kit parts for the engine to gearbox drive shaft housing was kept & added to the resin part. I'm sure that the engine represented in resin might be slightly different to the earlier engine, but I bet not much. The rotor head & gearbox was from Reskit & the drive gear shaft & attachments were scratch built using rough drawings from the Sikorsky website. At this stage I have omitted from applying the hydraulic lines to the rotor clasps. I might come back & add it when I can be bothered. I did add some scratch detail to the side steps after studying some of my own photos of the German Air Force CH-53, wether they had the step detail on the reverse of the older CH-53 side doors, I don't know. All colours were from the Hataka Redline Vietnam War Era USAF set. Decals, from Print Scale. Oh & the complete airframe was riveted as the kit has simple straight line recessed panel lines. Used a AK Gauzy gloss wash then applied a enamel panel line wash. Finished with a final coat of VMS XXL Matt. The little people & Chevrolet Flight Crew vehicle are from the US ground crew set from Hasegawa. Thanks for looking! Martin57 points
-
This is Revell's 1/72 Douglas C-54D Skymaster built as an SC-54D Rescuemaster. The SC-54D's were converted from surplus C-54's for use by the US Air Force as Search and Rescue aircraft in 1955 to replace the aging SB-29's then in service. A total of 35 aircraft were converted. Used mostly for long range searches they were equipped with additional radar bubble windows for observers and cargo doors that could be opened in flight to drop supplies and rafts to those needing rescue. This kit was a bit of a disappointment with it being closer to a limited run kit then to what I would have expected from Revell. The fit was hit or miss, there was plenty of flash and large connection points between the spues and the parts. There was instructions that proved to somehow be both detailed and vague at the same time. The kit had a unique feature of having both an inner fuselage where all the interior parts went and a separate outer fuselage that wrapped around it. For me this caused problems getting the outer fuselage to close around the inner and I was never able to get the forward fuselage to completely close and had to use styrene strips to fill the gap. The interior was very detailed and I was tempted to leave the doors open but, with all the fiddling to get the fuselage to fit some of that was damaged so I left them closed. Revell never released an SC-54 boxing but they were apparently planning on doing so because the included the radar nose, other extra radar bumps and markings on where to cut out for the bubble windows. The bubble windows were also included in some boxings. Any boxing may have 2, 1 or none. Not included was the special cargo door. I used Caracal CD72-45 C-54 Skymaster Part 2 decals. I also used the Eduard CX418 mask that included masks for the bubble windows. Total build time was 21 days and I am happy with the results despite the effort. Next up will be the Italeri UH-34J built as an HH-34J as used by the Air Force for search and rescue. Enjoy57 points
-
Hi all. I've just finished this on Friday having started it in early Feb with a 7 week break due to modellers block. The finished article is not what I had in mind when I started it. Originally it was a landing TWCU aircraft with a CBLS, but mind drift sent me this way. I picked up "Tornado GR1 an operational history" when it first came out from a book seller at Telford. It's an absolutely brilliant book and one photo caught my eye; one day I thought............ I picked up this kit second hand (as I do with most of my kits) with a bundle of extras that I thought I may use - I didn't. So I started the kit and through research back dated the kit to a GR.1, and the kit allows you to do it. I cut the MLG and extended the oleo and cut the nose and reduced the oleo. Hopefully you can see a nose down/Tail up attitude. The kit itself is very good, with only a few issues. The fin antenna holes need opening up a little more, or cut down the tabs on the antenna. The RWR housings seem too thin to marry up into the fin. The kit antenna under the nose is way too big. Ive added the wiring to the Navigators suite as they are quite visible. I used the kit seats and seeing as the world has consumed the PJ production of aircrew as I was steered towards Wolf 3d resin parts. These are superb although a little expensive, but it is what it is, and at the time my only option. The paint job - I personally think I'd got it easy as you can see from the reference photo. A sandy and dirty aircraft not a trace of pink in sight. Again I seemed to have looked at every tornado photo and specifically ZD790 on the internet. So I made a concoction of made up paint from various shades of Revell Aqua range, consisting of Light beige/white & flesh, but it's predominantly beige. Through my research I found that some aircraft were painted with the wing sweeps grey area deleted and others have it. I found photos of freshly painted aircraft at Brüggen where they are a light sandy and not a shade of desert pink to be seen. Anyway moving on. So with the kit sprayed I plastered it with a Dirty wash that again is very old now and let it eat into the matt paint (no gloss varnished applied yet). I then spent a good few days with a cotton pad and buds gently wiping and dabbing away the excess I wanted to achieve, looking at the photo. Silvery bits done, buckets fitted and then lights and chipping on the leading edges. I used the sponge method using Tamiya green and gray accordingly. I painted the Landing lights with enamel white behind the glazing and coated the front face with Deluxe "looks like glass" to enhance the glare. I cleaned the immediate are around the roundel above and below. The nose I sprayed a little matt varnish to replicate the harsh environment of low level sand blasting sorties prior to the start of the war. When I removed the masking tape I was left with tape residue. Having used Deluxe "looks like glass" for the first time, I subsequently found out from them that it is not designed to have masking tape put over it. So lessons learned. I managed to make it all dissappear applying a coat of Klear. ZD790 had the old style anti-collision lights at the time where others had strobe lights mod. Decals - I purchased a set of kits-world decals for ZD790 "Debbie" as its the only game in town. It's the first time I've used these so a little trepidation. When removing them from the backing paper onto the model they just curled up and tore, they were so thin. It was a tense moment as I'm conscious of the base coat of klear will start to dry. Frankly they were pants, imagine wet tissue paper. I got some of it the "debbie" on and the mission markings box are translucent, so I lost the freshly painted area and like wise the area after "Debbie". On the other side the snoopy airways were again translucent. I was highly disappointed as I'd got this far to be knocked back. So I ended up hand painting what was lost or not usable. As you can see from the kit and the reference photo, the decal is way over scale. I've message kits-world but as yet have not had a response. The 2 roundels are from the Revell kit boxing and the letter D is from the spares box. Finally the model placed on a generic 1/32 runway I have lying about. Photography is my weakest non-skill so please be kind. And finally the photo that caught my eye. "Tornado GR1 an operational history" by Michael Napier.57 points
-
27th July 1942 ... The Skies over Malta At 08.55, 249 Squadron scrambled 6 Spitfires, joining other from 126 & 185 Squadrons, to intercept a flight on incoming bombers (7) and over 40 fighter escorts heading to Malta. On the day George Frederick "Buzz" Beurling, DSO, DFC, DFM & Bar was flying in UF-S BR301 was the first to spot the incoming swarm and locked himself onto 4 Macchi C202. The first Macchi to be hit was that of Sergente Faliero Gelli, which plane ended up crash landing on the island of Gozo. Beurling then latched on to a second Macchi shooting it down and in the process killing Captain Furio Niclot Doglio, Regia Aeronautica's best fighter ace. In Beurling words ”the poor devil simply blew to pieces in the air”. As if that was not enough Beurling then zoomed into the Macchi of Maresciallo Ennio Tarantola, known as Dai Banana. Luckily for the Italian fighter Beurling just fired a quick shot, then disengaged the Macchi to engage two ME 109 shooting down one, piloted by the ace Leutnant Karl-Heinz Preu of JG 53, and damaging the other. Tarantola who although hit in one hand, managed to crash land back on his base. The diorama represents Beurling's Spitfire Vc UF-S disengaging from Tarantola's Mc.202 to take on the Me109s. The build The Spitfire Vc comes from Eduard (scale 1/48), by now my preferred source for Spitfires, while pilot is a Tamiya figure picked up from spares box. The “camo” was obtained by first painting the plane in standard Desert Camo and then spraying highly thinned Dark Med Blue overall. This created the two-tone blue colour. The Macchi Mc202 hails from Hasegawa also in 1/48 scale with decals coming from a kit from Tauro Models. Camo circles are actually the new generation decals from Eduard. Was actually contemplating to do them freehand but seeing the result after applying the decals, I highly recommend their use. The pilot is a resin print by fellow model builder Christopher Ellul ( Elluvian 3D Prints ) The base is a colourised version of an actual 1941 photo of the Marsamxett Harbour Valletta and comes courtesy of Mark Flood. Had been looking all over the net to find a proper backdrop and had actually given up…. this photo saved the day. Special Thanks goes out to fellow modellers who helped in one way or another but especially to Brian Cauchi for his insight and experties on the subject. Hope you like the build and history behind it, but I always appreciate any constructive comments … so fire off…57 points
-
F-14D 1/48 Tamiya+AMK. I had two kits - one Tamiya and one from AMK. Having started working on Tamiya, I thought - why not make him a wing with fully released mechanization? Especially since the AMK kit has such a wing. At the same time, the AMK kit will receive a wing from Tamiya, which is made much better and more prominent than the same one from AMK)) Just a few modifications and the wing from AMK joined the Tamiya Tomcat quite well)) Everything else is "out of the box", only the cockpit interior was added from Quinta. Enjoy watching, criticism is welcome))56 points
-
The second Eduard Mustang in the display cabinet this weekend gone. Built from the 'Weekend' boxing with additional etch and wheels, also by Eduard. This one is 'Little Chic' flown by Lt. Warren S. Blodgett from the 84th Fighter Squadron, 78th Fighter Group out of Duxford in April 1945. As said in my previous post, a great kit with a few trip-ups if you're not careful. Onto the piccies and, as always, comments and critique welcomed. Cheers Pete.56 points
-
Hi Everyone, thought you wouldn`t mind if I troubled you with some photo`s of the latest from the kitchen table Another of Hobby2000`s reissue of Hasegawa`s 1/48 scale P-40N kit Also my second attempt at this particular airframe ( the first was Eduards Mauve reissue a long time ago ) Built as usual from the box contents, with some foil seat belts, wire brake pipes and aerials Drilled out the filter covers just after the propeller..... ....also replaced the kit wheels with come True Details resin items which I`d had hanging around for years waiting for a suitable candidate The decals came from a Ventura set and went on beautifully, the only problems being the white on the national markings were to transparent and the white strips showed through....... ......which I solved by cutting patches of white decal and applying over the top of the affected areas and the blue was very lurid requiring knocking back with some light grey weathering. Think I`ve probably bored you enough, hope you enjoy the pic`s Cheers Russ56 points
-
Hi everyone I finished this bird a year ago - with Barracuda Studios wheels, spinner and engine front plus decals, as well as another companies wing fold set and as of yesterday my Aims FAA wheel chocks. Thanks John55 points
-
Hello all! This is my new model. It`s new Airfix. The excellent quality set. But there were problems when assembling the main landing gear As an addition I used 3d decal from Kelik. Painting AK real color Weathering oil paint and washes.55 points
-
Su-24 1/48 Trumpeter. Model out of the box. Additions - Quinta Studio cockpit interior, FAB-250 bombs from SMK, PVD - Amigo Models, decal - Begemot. Enjoy watching)54 points
-
Hi all, Happy Friday! Sharing this recent Voodoo build that has eluded me for years. I tried this in 1/72 a long time ago and my skill set was not up to par and quality metal paints were not available in the 80's. After seeing a lot of recent beautiful NMF builds here i wanted to give it another go, this time in 1/48 using the only kit available in 48 for the single-seat recce jet. But first: *A special thanks to RobK for assisting me a while back and sharing some hints on metal finishes. He had just finished this same kit and his insight was very helpful. *Also below is a link to an article in Modeling News back in 2018 where the author highlights what needs to be corrected to make this kit an accurate rendition of the Voodoo. I won't go into everything that's needed but I corrected the intakes, added correct lights, removed the slime lights and tried my best to give the cockpit a go to represent the recce cockpit. A word or caution on this kit. This has all the typical Kitty Hawk engineering blunders with parts that dont fit, massive gaps and steps . But if you can get by all of that the finished product is very nice. https://www.themodellingnews.com/2018/08/dry-fit-review-gary-puts-together.html The Voodoo has always been one of my favorite machines, it's just got some lines that actually look like it belongs in space ( think Battlestar Galactica, Starblazers LOL). I attempted most of the corrections but did not go crazy in the name of keeping this hobby fun. Ive included some along the way pics of the metal finish process. The biggest challenge for me was getting some realistic panel contrast, weathering and making sure the whole finish did not look like it was applied with a paint can. The contrast and weathering can be easily overdone if you dont watch it. It was very challenging to find good color photos since this is of course a 50"s beauty and not much HD references are around that really show off the natural metal finish. Anyway, I added some narratives along the way so on with it. Attempting to get the instrument panel correct So here is my new weapon of choice ( bottom airbrush). The verdict is still out but it appears to be worth the money, $130 U.S. Its typical German engineering, smooth as can be and superbly built. BUT.....;my $35 cheap Master had to be relied on several times to save me as i kept getting some delayed feed with the H&S. ? Dunno but well keep at it . Metal work progress. The main colors were all Alclad. The whole jet was first sprayed in "Aluminum". I then used "Dark Aluminum" and "White Aluminum" for the majority of the contrast panels. The exhaust was a lot of "Burnt Iron" and "Steel". The center panels in the wings & tail stabilizers have a different patina and I tried to capture this contrast by spraying the panel light ghost gray the misting over it the Alclad Aluminum. \ Here is the tricky part. The Aluminum skin weathering was done by spraying fine vertical bands using of mix of Nato Black on some panels, panel line wash (sprayed) on others. This is where the Harder & Steenbeck really shined when it worked .54 points
-
Latest model completed.. that comes a long time after the previous! I've been struggling to finish a model for a long time, now it looks like I may finish a few and this the first of the bunch: AZ/KP's Bf.109f built as a the 109F-4/Trop flown by Major Erich Gerlitz of III./JG 53 in May 1942. Ok, the wires are actually missing but I'm not going to add them yet... The model was built from KP's Club Line box for Egon Meyer's Bf.109F-3, the Club Line being the cheaper kits with one decal option only. This retails for around €8-9 in Europe but I got mine for €6.50.. all AZ/KP 109Fs include the same part so one box is as good as the other if using extra decals. That is what I did, mine came from Eduard's dual combo box for the F2/F4. Paints used were from Vallejo and Lifecolor. Now I'm generally very critical of the kits from this company and for good reasons. This however is actually a pretty good kit, fit is good and the parts are well moulded. Detail is also quite good. The decals are unfortunately the current bad ones offered by the company in their kits and in the end I only used the stencils from the box. Individual markings are Eduard's and the national markings from various generic sheets. Can't comment on accuracy of the kit as I know little about 109s... funny how I realised I have other FS in the stash: Eduard, Zvezda and Amodel... I should build them all and compare them This was a very enjoyable build of a simple kit and being practically OOB served as a good way to relax between more complicated projects. The only problem I had was with my scratchbuilt pitot tube, that got lost and I had to make another... and kind of damaged the finish gluing it in place I'm actually tempted to buy another couple to use other decals from the Eduard sheet but then I'd have to find other sources for the crosses etc. More pictures below and every comment or criticism is welcome54 points
-
that is my last one... MS406 Dorawings at 1/48 Pilote Hubertt de Salaberry GCI/3 winter of 1939 hope you'll like it! Can be seen in next Wingmasters,k french modeler magazine.53 points
-
Just for comparison, here's the new Airfix Beaufort kit side by side with the Special Hobby kit. Both are 1/72 and both cost around $30 in the U.S. The Airfix kit has finer detail and a good interior, but due to the close tolerances and a few fiddly parts takes some care in assembly. The Special Hobby kit has an adequate interior, but less than the Airfix kit's and you have to be careful during assembly as fit can be problematic in some areas. These models are not of the same mark of the aircraft, but they are very similar. Anyway, here's for you to compare. Both are OOTB.53 points
-
Hello I never shared thi build finished in late 2017.. time flies... This is the AMK Kit with some goodies: Update set AMK Eduard Wheels, maskes, PE Katran Exhausts Pitot & dischargers Master BegemotDecals Main paint job is done with AKan Grey and some MLr Hobby blue, over a mottled preshading with zinchromate, dark blue, black.. Weathering done with oils: Paynes Gray, black, grey, sepia. Cheers! Romain53 points
-
Hello Gents, Here I am again, with (once again) a Korean War item !! So, let's go on the flight deck of HMS Glory .... Xtracrylics paints, Flory wash and oil paint weathering.... As usual for me.... A Fleet air arm warbird with a Pin Up on it ?? Too tempting for this CC.... I added some bits on it, Barracuda guns, Eduard seatbelts and some plasticard here and there A real war horse that is credited with 118 sorties over North Korea ! from 821 NAS and mainly flown by Lt J.F.K "Sean" Mc Grail. I added antenna's aerials and a landing light too... It is amazing but SH have a tendency to make their 1/48 kits less detailled than the 1/72 ones.... And huh, rockets of course... I stayed measured with the weathering since the pics I saw show pretty clean aircrafts.... Soooo, It is now time for comments and family pics as usual... Don't you forget banters are mandatory... On we go for the other pics now...53 points
-
F-4B Phantom-II Tamiya 1/48 The model is so excellent that it does not require any additions. Except, perhaps, replacing the decals. Tamiya's decals are excellent in all respects, except for their thickness(( I only added the interior of the Quinta cockpit to the model. And I decided to make the flaps extended. A very pleasant model to assemble. No putty was needed at all. Enjoy watching, criticism is welcome)52 points
-
Finished up my latest build, the 1/72 Spitfire Mk Ia starter set from 2013(?) I tried to add detail using as many of the existing kit parts as possible. I was able to drill out the exhaust manifolds. I cut the kit cockpit door out with a razor saw, and thinned it using a sanding stick. The kit canopy was cut apart with a razor saw, but I ended up cracking the sliding portion while trying to thin it out. I used that portion from a Falcon vacuform canopy. Paint is Vallejo Model Air throughout, topped with Vallejo premium satin varnish. Weathering was done with oils, pastels, Tamiya Weathering Master, and a silver artist pencil. I used Eduard seatbelts, from their "early RAF" 1/72 set. They look off, so I'll likely do a little surgery on the next set I use. The holes in the bulkhead and instrument panel were drilled, and details added. It doesn't really show well, but I made the reflector glass on the gunsight from spare plastic stock. I used the kit decals, supplemented with Techmod stencils. I purposely didn't stencil the "night" wing, as it could have been painted in the field. I also used Uschi rigging wire for the first time. It was nice to work with, but difficult to see! The rigging wire from the mast to the fuselage has since been corrected. It's not perfect, but this was a fun, relaxing build overall. Feedback is always welcome and appreciated. Thanks for looking!52 points
-
Started sometime in mid-2010 and finished today, my model of F4U-1 BuAer 02153 is off the Shelf of Doom and in the books. 02153 cannot lay claim to being the first F4U, but it certainly was the first combat-worthy one. The changes dictated by the Navy Bureau of Aeronautics resulted in a different aeroplane from the original XF4U-1. Vought originally intended to use the wing center section as an integral "Wet Wing" for fuel tankage, but the Navy vetoed that idea. The fuel had to go somewhere, and that dictated the fuel be located above the wing near the CG.....which forced the cockpit to be re-positioned over 3 feet aft. Additional fuel was contained in 63-gallon tanks in the outer wing panels forward of the spar. The tanks were blanketed with CO2 as a fire preventative measure. They turned out to be more trouble than they were worth, but on paper anyway it gave the Corsair an impressive internal fuel fraction. This aircraft took a brief respite from flight testing to be photographed for posterity in June of 1942, as the Battle of Midway was raging. This model was begun well before the groundbreaking Corsair references written by Dana Bell. As a result, it incorporates a lot of "Old Thinking" about the Birdcage which at the time was somewhat shrouded in mystery. So, the model has some.... inaccuracies that are too late to correct. Most notable are: 1) The cockpit interior colour and, 2) The lack of drooped ailerons (Flaperons). So now...lets go to the Executive Summary! Kit: Tamiya F4U-1 Corsair, Kit number 61046, vintage 1996. Scale: 1/48th. (Why? Because well.....'Merica.) Aftermarket Parts Used: David Shaw 3D Printed resin Main Landing Gear Struts, Wheels, Tyres, and Brakes. Eduard Photoetched Seat belts and harness Mal Mayfield Miracle Masks for 6-Position National Insignia. MV Lenses for Landing Light, Formation and Identification lights. ELF aerodynamic lights on fuselage spine and upper right wing. Anything else: Nope! Paints: Mostly Model Master Enamels (Sea Grey mixed from scratch, using 36118 Gunship Grey, darkened and tinted with Testors 1111 blue PLA enamel); towards the end final detail items painted with Tamiya and GSI Creos GX Super Clear Finishes. Kit Modifications: The kit is the best starting point for an early "Birdcage"type Corsair- in 48th scale- but it predates the totally new, from-the-ground-up research effort that resulted in the 2013 Tamiya 32nd scale Corsair. As a consequence, there were some minor corrections required to properly "Baseline" the model to its prototype configuration. The notch for the Brewster Bomb Rack and cutout in the intercooler flap had to be filled in, and restored (Birdcage Corsairs sported very few, if any stores or tanks on the centreline; there was no need). Most people know the original Corsairs had a 360-degree set of cowling flaps, all activated by individual hydraulic actuators ( what could possibly go wrong??). I needed to splice a section from another closed Corsair cowl flap ring to ensure continuity, and i filled the recessed notch in the forward upper fuselage which was designed to take a locator tongue integrated into the later style "dead", or "Battened Down" cowl flap in the 12 O'Clock position. Early Corsairs used a much smaller, hard rubber tailwheel that was fully retractable, so the Tamiya doors came in for some rework. The tail wheel door was actually 2 sections which were connected with a flexible linkage to conform to the lower fuselage curvature when retracted. Not clearly depicted in the photo, but the filler caps for the 63 gallon wing tanks were mis-located, so the holes were filled, new locations mapped and drilled out, and replacement filler caps made from Evergreen Plastic Rod, cut and adjusted to length and installed after the main painting was done. I also replaced the piano hinges for the Coffman Starter, Oil Filler, and Hydraulic services doors with short lengths of .010 diameter Plastruct rod. The antenna installation in the Tamiya kit is...flimsy, so i fabricated a new antenna mast from a laminate of Brass bar stock and Evergreen strip. Were i to do this again, I'd start with a piece of round brass rod, and then file it to correct aerofoil shape and taper. Since the model would have a closed canopy, i did not invest a lot of time superdetailing the cockpit. I did, however extract the installed kit seat and repainted it the correct Bronze Green colour (roughly equivalent to FS 34092). I then installed a set of Eduard Shoulder Harnesses and lap belts (courtesy of Joshua Van Dyke), gave it the Roy's Secret sauce, flat coated it and re-installed it. Speaking of the closed canopy, i sourced a decal from a Barracuda Studios sheet and i added the red emergency release button from a piece of small diameter Plastruct rod. The model made it to the painting stage fairly rapidly. This was my first time painting on national insignias and the Miracle Masks worked very well. However, i encountered an issue that i refer to as the "Oreo Cookie Problem"...a dissertation best saved for another time. I had references that were just good enough to locate and paint the black walkway lines on the upper wings. This is a feature all Corsairs had, that went overlooked...until the 32nd scale Tamiya kit hit the shelves. Mine are slightly too wide, but not objectionable. The big challenge that stopped the project cold was the landing gear: specifically, the tailwheel. The wheel itself is considerably smaller, the fork is smaller and rather chunky, the oleo inflation was different and the tailwheel truss geometry may or may not have been different. As a result, the tail on the first Corsairs sat much lower and there was no readily available replacement, until Dave Shaw released his 3D printed resin parts a few weeks back. Seen here: original configuration: Revised installation: The new main gear struts by Dave are excellent. All they need is a brass rod reinforcement added to the core and aside from getting it out of the "crash cage" and cleaning it up, no additional work is required. The wheels, tyres and brakes put end to what was arguably the most antiquated aspect of the kit and brings it up to speed with more recent offerings. I did a lot of "Old School" detail enhancements, such as notching out the wingtip lights, adding MV lenses for the Identification and Formation Lights, and installing an LSO line up light in the port wing leading edge. I also replaced the kit pitot tube with a new one made from metal tubing, and i installed fuel vent masts in the lower outboard wing panels. Finally, i removed the molded on mast atop the rudder, drilled a hole and fabricated a replacement from aluminium rod, drilled a hole through it and fashioned a hard rubber tensioner made from a piece of evergreen tube, heat stretched over a piece of copper wire. Rigging the antenna and installing the gear doors.... a third time... completed the model. And now... pretty pictures. Seen here, a "Forced Perspective" image, using my 32nd scale FG-1 in the foreground. This model is so old, that it spanned the transition between the "old way" and the "new way" that i build models. Were i to build another one- based on what i know now- i'd definitely do things differently. The Tamiya F4U-1 is getting long in the tooth, but a lot of people have the kit in their stash and i feel its the best show in town at least in 48th scale. The jury is still out on the Magic Factory offering, mainly for reasons of how they addressed the surface detail. There have been complaints about the wing assembly of the Tamiya wing sections in the past, but several people have "cracked the code" on proper assembly, so it's nowhere near as daunting as it used to be. So, with this model off the "Shelf of Doom", i can return to finishing up El Corsair Grande Numero three, the Fairey Delta, LOVEBUG, VC10 number 2, the AD-6....and the Boeing 727. Thanks for tuning in and as always- Fly Navy!52 points


.thumb.jpg.2c282efcc138b7cf7f1e1586a9c534d2.jpg)
.thumb.jpg.d17ff607fc7e89ed057e63fcb6f2a888.jpg)