
Leaderboard


Popular Content
Showing content with the highest reputation on 22/04/24 in all areas
-
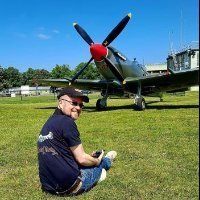
Despite early issues with noise levels, the progression of the rotor tip jet design led to a more satisfactory decibel level that paved the way for a niche service operated by the Fairey Rotodyne. Its ability to serve more remote parts of the UK that never had the benefit of runways made it popular due to it's flexibility of cabin design where seats could be removed and freight loaded with ease via the large rear doors. It entered service with BEA in the mid 60's and served into the late 80's with British Airways in a largely similar and uninterrupted capacity. Capability evolved through the addition of upgraded avionics, a radar and more powerful engines and it's service demonstrated an excellent safety record. Operating costs eventually brought about an end to it's role, some of which was replaced by more economical replacements, but some services were sadly ended as BA re-evaluated it's commitments. Of course, this is a 'What-if', the re-released classic Airfix kit that I couldn't wait to have a play with! I'd had this idea for a while and being a 'What-if' took the pressure off creating something accurate. It was about pure fun and nostalgia! The basic kit is well....basic! sink marks and an abundance of rivets typical of that era are present. I wasn't against keeping the rivets, however many had to be destroyed filling sink marks and removing seams so it was easier to remove them all and re-rivet afterwards. The Negus livery was painted and spare decals used for the lettering. The home printed registration was chosen due to being approximately from the era that would have been first flight and being one of the few serials that wasn't assigned to an aircraft (based on my quick research!). The paint is all MRP lacquers, with the blue being a mix of Oxford & Blue hornet blue. Thanks to those that contributed along the way with advice and inspiration The build thread is here: The interior was fitted out with some seats from an OO gauge railway carriage and pre-painted figures added to bring it to life. The windows were sanded flat to remove distortion so that the interior is more visible: Thanks for looking Neil53 points
-
Oh no!!! I did it again! I built another bi-plane! I need help! This is the Matchbox issue of the kit in it's multicoloured release. I was looking through the WIP forum and found Vulcanicity's build and that did it, I had to have a go at following his excellent build. I added interior detail using plastic card, stretched sprue and wire. The engines were detailed as per Vulcanicity's work and I also copied his work in the main bomb bay. For the rear fuselage sides, my attempt at replicating the linen covering was to applied lengths of wire to represent the structure and cover it with self adhesive aluminium tape. My finish is not as subtle as Vulcanicity's, but I think it's better than what the kit provided. The under wing bomb racks were etched items from Marabu Design, the gun mounts are from Eduard, but I replaced the etched gun support with wire. The Lewis guns are from Gas Patch. For the bombs I raided Italeri's Stirling kit. The model was painted with Tamiya acrylics. Thanks for looking, Angelo.30 points
-
Hello all, this is something i've been working for a while....the Tamiya F-16 There isn't much to say about this kit that most haven't already said as its quite an old-ish kit now and been covered a lot, but I'll add to its plaudits. Nice detail and fitting isn't an issue anywhere on the kit. I added some extra detail into the undercarriage bays using various thicknesses of solder wire, Red Fox Studio's cockpit set, mine own mask sets (DM Scale Models) for the insignia and tail codes plus my 'inspection hatches, stencil masks and canopy' set. Paints used were all by Gunze, C305 and C306 were the basic colours and various parts were base colours plus white for variation. I hope you like it :-)28 points
-
Hi all Been working on this one, the kit goes together very well and quickly too. I built mine OOB and was enjoying up to a loss of mojo when I had trouble getting the panel line wash to stick , my fault, I should have deepened the panel lines with a blade or Olfa cutter first, thanks to Stuart @Courageous for pointing out something I used to do , use a brush to clean away the excess and it worked well. The model was brush painted with Humbrol enamels, the parts of the codes in the bkack stripe area under the wings were a different colour yellow so painted over them with Humbrol 24. I am pleased with the overall look of this one. Thanks to those that commented and liked, the support and encouragement given is very much appreciated. Thanks for looking in Chris26 points
-
Second build. Another spitfire completed. A few mistakes on my behalf but I am learning and most important enjoying myself.19 points
-
Hi, here comes my third model. 😊 This is my first three-tone Asia minor desert camo scheme. I thought this going to be an easy build but despite its small size, it was a challenging build for me. I had issues with parts fitting, so much sanding and inaccurate decal sizes in the box. I ended up using custom made decals and some minor modification on the model. Overall, I enjoyed the process and I'm proud to have this little model on my shelf. I was picky on getting the right paint code for this build, to my surprise every brand has its own interpretation of these codes: FS30400, FS30140, FS36622 and FS34079 So, I matched the colors with a reference picture and experimented different mixings!! Model Info: Imperial Iranian Air Force (IIAF) F-86 Sabre S/N 3-140 Location: Dezful AFB, Iran 1960s Scale: 1:72 by Italeri with minor modifications Decals: Modeller and custom made Paint: AK Interactive / Mr. Color / Gaia / Tamiya / Liquitex Link to my first work (F-22 Raptor) Link to my 2nd work (T-33 Shooting Star) Thanks, Adam18 points
-
Hi, Savoia Marchetti SM 55 was a very successful design of an Italian flying boat in 1924, so 100 years ago (what?!). It was produced in short series of different variants, which although similar in general outlook differ a lot in details. Almost 250 of them were constructed. The Royal Romanian Naval Aviation (RRNA) got seven Savoia Marchetti SM 55A about 1930. They served till the end of WW2 at least. The WIP is here This is a photo from a private resources, which I have found on Romanian FB, I was trying to follow it assuming Italian Grigio Scuro as top camo color The model is Dora Wing SM 55A kit with some modifications on floats surface (see WIP when need details) Here is the results: This is my second SM 55, the first (SM 55X) was done five years ago from Delta 2 kit in Italian livery from Spanish Civil War. I discussed also many of my doubts in separate threads I am very grateful for all comments in all past threads and in the current one as well. Regards Jerzy-Wojtek #5/202418 points
-
Thanks all for the comments. @Paul J, the reg is G-AOXM, this was an unused reg too, possibly not the correct font type for this era though. Finally got it over the line after doing some scratch building to busy up the basic rotor hub. Thanks for all the input along the way, both technical and inspirational, it's now in the RFI section: Cheers Neil18 points
-
Yesterday was very much a day of two parts. In the morning I was doing micro-soldering and solving problems that had kept my brains taxed ever since I began the Zeppelin project. However, in the afternoon, I was feeling quite grotty and it seemed to take an age to get even the simplest task on the Mariner right. In the end, I decided to cut my losses before I ended up ruining the model. Before that, I did ,manage to get the portside structure finished and the main frames fitted to the starboard interior. So, we now just have the stringers on the starboard side to do an a limited amount of detail to the deckheads. Hopefully I will feel a bit better tomorrow and be able to get this phase of the interior put to bed. Where's Nurse Mary when you need her? @general melchett, put her down! Thanks for looking. Under The Weather of Mars 👽15 points
-
Hello to all of you.I have just finished this one.rescribed the panels a bi to f detailing in the cockpit.Painted in gunze acrylics.The decals came from the spares box.13 points
-
Good day, Here is my second submission for the year. The highlights of the kit are as follows………… 1. Paints / colors used A. Airframe : AK Gunship Gray FS36118, Model Master Dk Ghost Gray FS36320, Lt Ghost Gray FS36375, Vallejo Med. Gray FS36270 B. Exhaust : AK Extreme Jet Exhaust, Titanium, AK Buff C. Interior : Life Color Dk Gull Gray, Mission Models Dk Gull Gray, Tamiya Flat Black XF-1 D. Landing gear and bays : Tamiya Flat White XF-2, Tamiya Gun Metal X-10, Mission Models Tire Black 2. Washes : Vallejo Black, Lt Rust, Lt Gray, AK Medium Gray, Tamiya black, brown 3. Kit decals used 4. Master nose metal pitot tube ( Angle of Attack / AOA probes lost during construction and awaiting shipment of new probes ) 5. Hasegawa GBU-10 bombs. 6. Eduard photo etched seat belts 7. Plumbers putty and lead fishing sinkers were used as ballast to have the Viper sit proper. Continuing with my Fiftieth Anniversary of the F-16`s first flight in January, 1974, I decided to add this somewhat unique Viper to the display cabinet. The Revell kit comes with very nice detail and construction was straightforward without any issues. I used the kit supplied ejection seats, decals, AIM-9 & 120 missiles, and external tanks. The decals went on very nice without any problems. The colorful tail markings all fit together nicely. I enjoyed putting this one together and I believe you will too. Recommended for those with a bit more than novice skill level due to many parts and significant amount of decals required. Thank you in advance. With much respect, Mike12 points
-
Hi everyone, hope you don`t mind me bothering you with some photo`s of the latest addition to the Pacific collection My attempt at Hasegawa`s 1/48 scale `Oscar` Late Version Finished in the markings of Captain Yukichi Kitakoga of the 54th Flight Regiment Built from the box contents and just added the usual, belts, wiring harness, brake pipes and aerial wires For a simple aircraft, Mr Hasegawa managed, I think to make it a bit trickier than it needed to be, especially the 2 part undercarriage legs and cowling attachment Also the separate wing tips also include part of the ailerons which are tricky to clean up. I know the flaps shouldn`t really be deployed on the ground but I couldn`t be bothered to try and get them to fit closed....... ....and in any case I like the look of them as they are. Decals were the kits and weren`t any bother. Thanks for looking, hope you like Cheers Russ12 points
-
Hello everyone. This ready for inspection has taken me way to long to post--apologies to all. Given the caring group of builders here, nothing was wrong which created the delay, life has just been super busy with all the phenomenal things it has to offer. This build series started nearly 2 years ago following my F4F-4/IJN B5N2 Kate build linked below. I had originally thought about just completing the Hellcats and calling it good after being inspired by @Corsairfoxfouruncle's USS Essex build linked below, but then @Dana Bell had to publish his Corsair books😎. These books coupled with the importance of the Corsair F4U-1D at the end of the drove me to decide to add an F4U-1D to build as I have learned from @Jamie @ Sovereign Hobbies and @Dana Bell Dark Blues are from a singular shade from a weathering perspective. Linked below are the build threads for the 3 Hellcats, Corsair aircraft and the F4F-4 referenced above. This build would not have been possible with much help from the following folks in building my understanding of these aircraft. @Dana Bell (I finally got to meet him at the Northern Virginia Modelers Model Classic, 2024--what an amazing treat to shake hands with someone who has done for our hobby and historic aviation for so many years!), @72modeler who always seems to have great background for all of us on the forum, @Jackson Duvalier, @Lusitanian, @mark.au, @don f, @Seahawk, and @Chuck1945. @CraigH's & @Dermo245 Hellcat builds are well worth the time to review and learn from. Thank you all for your valuable insights on these aircraft! In developing my skills and pushing me on the art side of the house, I have to send a thanks to @giemme (whose current Corsair is amazing), @The Spadgent (who got me on the RFI kick), @billn53, @opus999, @Corsairfoxfouruncle, @Jamie @ Sovereign Hobbies, @Jackson Duvalier, @mark.au, @ModelingEdmontonian, @opus999, @SaminCam, @RidgeRunner, @rob Lyttle, & @Grey Beema. Thank you all for the help and pushing my skills. For those that would like my thoughts on these kits given they are well covered, I would say the Academy is the weakest kit. I felt the Eduard Hellcats had overly thick gear doors and one needs to be careful when building the Tamiya kit to ensure that the wings are modified to support HVAA launches. They are all fun to build and would I would most certainly build them all again. Please see the build threads for in depth thoughts on each. Without further ado, here are the builds--best and thanks again to all on this subject. Up next is Fujimi's 1/72 F-86F with help from @Sabrejet--NMF, here I come--fingers crossed. 😎 Erwin In the sunlight all together F6F-3 (Early-1/72 Eduard) Link to photo of actual aircraft https://www.asisbiz.com/il2/Hellcat/F6F-3/pages/Grumman-F6F-3-Hellcat-VF-8-White-8F14-preparing-to-launch-01.html F6F-3 (mid/late depending on reference) 1/72 Academy Link to photo of actual aircraft https://www.asisbiz.com/il2/Hellcat/VF1/pages/Grumman-F6F-3-Hellcat-VF-1-White-K21-aboard-CV-10-USS-Yorktown-II-1944-01.html F6F-5 (1/72 Eduard) Link to actual aircraft https://www.asisbiz.com/il2/Hellcat/VF83/pages/Grumman-F6F-5-Hellcat-VF-83-115-Death-and-Destruction-BuNo-72534-CV-9-USS-Essex-May-5th-1945-01.html F4U-1D (1/72 Tamiya) Actual aircraft:12 points
-
Good evening, dear ladies and gentlemen modelers. This time again I present to you Spitfires from one of the best model companies. You can't have too many Spitfires!😊11 points
-
We got the first ClassicWings ops done at IWM Duxford today, and were joined on the flightline by Biggin Hill's T.9 TE308, known as "Sharky". Pretty unique to see two non-RAF marked Spitfires operating together! Serves as a reminder that many other nations used these aircraft, they don't have to carry red and blue roundels to be a "proper" Spit! '308 also blessed me with some pretty spectacular exhaust flames, talk about "right place, right time"!!!11 points
-
This weekend there was the annual classic cars meeting during spring festival in Munich and though it was raining nearly all day I got some pictures. If you want to see more have a look here.10 points
-
I had a few minutes on this: I've cut down the fin on the starboard half and excised the radiator areas on the wing. 40 thou endplates and 20 thou top and bottom skins should do there, and I need to make some radiator faces.10 points
-
Hi guys! I want to show You recently built model. The well-known F4F-4 Wildcat from Arma Hobby. Built didn't cause any problems, except those that were my fault. I added positive rivets from HGW, unfortunately the effect is not very visible in the photos, you have to look closely, it is much better visible in real life. Moreover, I decided to minimize the number of decals, so I painted the markings. I also replaced the position and formation flight lights, which were cast together with the wings and fuselage. The whole thing is enriched with 3D printed parts that I received from Marcin Ciepierski (engine elements, cockpit elements, bombs and bomb racks). You can watch build process o YouTube:9 points
-
1/6th of the way round the sun since the last update here and I'm shamelessly blaming interstellar debris as an excuse... (This - interestingly enough - from an issue of Flight magazine published in the early 50s.) Work on the Wasp has in fact been continuing in the background of the business of living in these times, so best to recount some of the key developments before what's happened and why get lost in the fog of the now. Essentially I've been gradually working my way through the plethora of parts which amassed in CAD form over the past few months and which were long-overdue for translation into solid objects. Due to the combination of extreme thin-ness and compound curves on things like doors and so forth, this required a lot of troubleshooting with resin types and orientations in order to maximize part strength and avoid striated surfaces due to poor orientation of such curvatures in space. It also took a lot of customization of support types in VDT, which I have to say has proven itself a godsend for the variety of shapes involved here in terms of facility. Here are the final results of all these various print runs en masse: And lest anyone gain a false impression that over time you ever get good enough for your efforts to succeed first time on more than a single part, this rarely rarely happens as the image below demonstrates in terms of the the level of failures required to iron out flaws and reach that point above: The usual caveat applies to the following images in that they are shown freshly printed i.e., resin washed off but none of the print-support stumps sanded from surfaces. The design of the rear wall of the cabin was revised in Fusion compared to the printed version shown here in previous updates, in that it now has the angled rear-window panels on either side of the central panel integrated into the one design: It turned out to be feasible in the end to print these as one component and will, I think, prove a more accurate solution than trying to glue them on separately at the right angle during assembly: All of that surface details remains present in the 1/32 version shown below as well, so my guesses about minimum feature size in the 1/24 version to survive scaling down seem to be holding up pretty consistently across the model so far: Pretty much the same for the doors; both front: - and rear: - retaining equal levels of detail when scaled down to 1/32: Door pillars too will look even nicer with the naviagtion lights installed later: Too fragile to reproduce in 8k resin, the sliding windows for pilot/obervers had their frames printed using eSun Hard Tough resin: Again the 1/32 version of these also survived the Alice in Wonderland treatment and printed as well. Amongst a number of other components requiring the black eSun resin for strength were the jury struts onto which the floation gear attaches as the front: On the 1/24 version shown here you can see from the translucency down the sides just how thin the edges of that I-beam shape are. In this view below the translucency also betrays how thin the walls of the recess which the float gear struts fit into are as well - even after I added a small reinforcing panel inside of there on either side: These features also reproduced at 1/32 quite pleasingly: - however the walls of the strut recesses were just so molecularly thin at 1/32 that it necessitated them being largly filled in as a compromise between being present but not causing the print to fail in those regions (as it had done in tests): Driveshafts from main to reduction gearboxes were also done up in black stuff as they'll be helping to support and align the entire engine/gearbox asssembly later on: The rear cabin framing at 1/24: - and at 1/32 both required the stronger resin to avoid breakage during kit assembly: I wasn't sure if the door handles (on the right end) would work at 1/24 but they did: More improbably however they also printed at 1/32 using the smallest feasible tree support I could devise in VDT: Enormously pleased with how the nose parts came out in the 8k resin at both 1/32: - and 1/24: Some residual striation around the drain holes (necessary to avoid suction issues during printing) on both to tidy up at the same time the holes are filled. Detailing along the top surfaces was everything I hoped it would be, despite my heavy handling during support removal resulting in some breakages along the cheek window guttering (though these are easy enough repaired with some tape and the UV laser): Underside and RADALT enclosures: The weapons loadout had some attention in the form of prints for the Mk44&46 torpedoes: Mk.44 first - this performed nicely at both scales: I wasn't worried about support structures for that annular feature at the rear on the 1/24 scale: But VDT came through again in allowing for some very fine structures to support it at 1/32 scale without causing undue damage to the torpedo casing in the process: I just noticedthere's still a revision to do there at 1/32 as you can see the supports for the fins themselves weren't strong enough. The propeller assemblies of the '44 at the smaller of the two scales: Mk.46 behaved itself equally well at both scales, with no features failing: Parifcularly pleased with part definion on the props for both sets, 1/24 looked nice: - yet 1/32 turned out far less of a problem than I'd feared in terms of effective support processes: The same story regarding all the fiddly detail on the carrier racks and sway braces which took so long to do up in CAD: in printed form there were no features missing or compromised at either sale (shown here at 1/24): Suspension bands on the torpedo bodies also nice and crisply rendered: Also added to the pile at this time were the landing light assemblies and transponders in both scale: Fairing seen here in 1/24: With no detail absent from the 1/32 version in relation to its larger cousin: For reasons which as modellers I hope you'll understand, I couldn't resist doing a mockup of the Mk.46 torp at 1/32nd scale the other night, 'just to check' that the parts fitted together Ok: Over the weekend I sat down and drew up a snag sheet for all the parts still needing to be designed in CAD: The bulk of this as you can see involves the cabin & cockpit interiors, to whit I have the reference mosaics done up ready to start preliminary sketches for those areas: Particular thanks need to go to @Ex-FAAWAFU, @Terry1954, @Anthony in NZ for imagery of the interiors which they've shared with me from their collections that will prove invaluable in the next phase, as well as all those positng stuff in the BM Walkaround for the Wasp. Thanks for reading as always and hoping this finds all here in good form. Tony9 points
-
Hi Martin Great choice of build. These were based in Oban, so I'm a bit biased ! I would love to know where this picture was taken, surely it would have easier to bring a car home from work, it must have been a swine to park, and the lawn isn't going to be too clever either ! Cheers Pat9 points
-
Hi all, out of the box 3 day build. Excellent kit from Magic Factory, Tamiya and Vallejo paints used, Flory wash, AMMO dry brush, ttfn 😇8 points
-
I had built this kit 2 years ago and I liked it so much that I bought another one for my stash. Last winter my basement was partly flooded and the only kit that was damaged was - ironically - the U-boat. Due to its size ist was stored on the ground and was soaked. The instructions and the decals were unusable, but since I had built the kit before, I could use those from the first one. The kit is well known and with all the PE and the metal and wooden deck builds into a beautiful model: Thanks for looking Volker7 points
-
I finished this one up a few weeks ago, but didn't get around to posting yet. Another home run by Gecko. Their 1/16 Panzer IIs are great kits and a lot of fun. I had been pretty much an exclusively 1/35 builder until I was given Gecko's Pz II Ausf. F to build last year. That kit made me see how enjoyable building a well done large scale kit could be.7 points
-
I have finally finished this kit originally started for the Bf109 group build back in November! In my defence I was away for several months but I take so long to build anything I probably wouldn't have got it finished in time anyway. The kit is a limited run type moulded in a very hard plastic but with fine scribed detail and a vacformed canopy, resin cockpit and etched fret included. It went together quite nicely without too much trouble however I replaced the undercarriage with more detailed resin legs and G10 style tyres from the spares box. The mass balances unique to the V1 were made from plastic card and the pitot added again from the spares. The first of the many, it looks good in amoungst it's younger brothers in the model cabinet. I hope you like it. Thanks for looking Duncan B Edit I forgot to mention that I made the undercarriage doors out of an Irn Bru can cut to shape (top tip from Nobby) as the kit ones were the wrong shape. The oil cooler and oil tank in the leading edges of the wing are metal foil with ridges embossed in the foil to simulate the fins on the cooler.7 points
-
I got these 5 kits for free at a sale and given the pretty poor condition I would probably have not spent even a €1 on them. The PE frets that Mirage used to sell are nowhere to be found but I decided to try and do my best with them, So in addition to the kits I bought barrels and periscopes from Aber, albeit in 1/350 scale but the difference is a couple of mm on the tallest scopes so it should work, I managed to find a set of Tom's Hardware PE for the type VII's and I raided that set also for parts for the type IX's. The railings on the type IX's I made from Abers ship railing in 1/400. I wanted to try out a more wooded look on the decks so I gave them a deck-colored base color which I then covered with grey oils and washes. In hindsight I should have made them grey from the beginning and then just drybrushed on the deck color. It was way too much time spent on this. The rigging I made from extra thin thread. The Tom's Hardware set had rigging in PE but that was just ugly looking and hard to get a good look with, so those went in the trash. Flags and pennants where mounted on aluminum foil but the decals where quite old and brittle so not all made it. Still fun to add the pennants as it adds a little "height" to the models. I'm still considering to erase a bit of the rust stains to not get such a brown look, but in normal daylight the subs look a lot more grey than in indoor light.7 points
-
Hello Everyone, This is the 1st ever helicopter that I built. It is an Airfix Sea King Royal Navy rescue helicopter and considering that I had never built a helicopter before, I was very happy with the way it came out. This kit was painted with Humbrol Acrylic paints. Here are the photos. With my Royal Navy Airfix Sea Harrier : Have you ever built this helicopter kit ? All the best, Rick7 points
-
This is Hurribomber BE687 of 175 Squadron based at Warmwell in Dorset in 1942. She was flown on the ill-fated attack at Dieppe in August, her pilot was D L Stevenson, “Steve”. He was hit by flak, baled out and rescued by a Polish destroyer….back flying the next day! The Revell Hurricane IIB is an excellent kit; well designed and accurate, a real pleasure to build. I have used though CMK weighted wheels, an AIMS prop ans Air Master gun barrels. The 250lb bombs and carriers don’t come with the kit but were supplied by a clever 3D printing friend. More pics:7 points
-
Last night I added the end plates and got the top surfaces between them: They have sanded down very nicely to blend in with the wing but there are two problems. Firstly they are 9mm wide , which makes them about 0.5mm too far forward, so I need to do something there. I cant just chop it off because the end plates need to protrude in front to the top lip. Secondly, they seem awfully flat. I am now regretting not using 40 thou/1mm card so that I could have sanded a little aerofoil camber in. I could either add some filler and sand that to a curve or I could add a 20 thou lip under the from and sand the camber into the card. Although I don't want to drop the leading edge slot too low - decisions, decisions! I think a bit of filler and sanding is the way to go, and if it all goes pear-shaped I can cut it all out and go for 40 thou card all over.7 points
-
Good news from Instagram account of Clear Prop. The most important part:7 points
-
Fuselage together. Some of the etch made it a little awkward to fit. The kit wasn't the clearest on precise placement to avoid parts trying to clash. Oh well, easily sorted. Also, don't forget the bit where the tailwheel will be fitted or you'll have to tear it back open... I assembled the wings. Wheel wells were painted in RLM 02. I'll be modelling all the flaps down.7 points
-
Had a chance to pick this up again today. It's a lot of work but I'm definitely winning! Thought I'd start to tackle those gaps, using a two-part finishing putty (kind of like car putty) for the big seams. Filled the big gap in the rear cockpit wall, assembled and fitted the nose gear well (which is also the cockpit seat structure as well) The putty gives off a helluva whiff but it's heavy duty for filling the bubble holes and yawning gaps between the different grades of resin. The wing seams are no more You can also see how effective the epoxy was at bonding the resin parts together, this thing is rock solid now. The underside bonded really well too, unfortunately the canoe bomb recess part doesn't fit the gap (it's significantly smaller) so this will be a Milliput filling job to get everything smoothed in. But otherwise, this is slowly but surely going together! Some eye-watering PE to add in this build, but I really enjoy this stuff. Interior cockpit details - I'll try to paint all this stuff before assembling so it looks more organic, as it's all the same colour. Got these amazing fabric/paper seatbelts from Airscale - tremendously fiddly but they look amazing in the pics. I also invested in a MasterCasters Luftwaffe jet pilot figure (standing) to pose alongside. I'm even daring to think about the paintjob - I purchased an additional 1000kg bomb from MDC, and decided I'm going to do F1+AS which took part in an unsuccessful attack on the Remagen bridge in March 1945. The aircraft was shot down by US anti-aircraft fire. The instructions mention (possibly) RLM 81/82/76 camouflage but I believe it was probably in 70/71/65 at the time of the attack. Well, who's going to argue? After this much work, I'll paint it however I blimmin' well want! Cheers folks, Alan7 points
-
So, whist I am still trying to figure out the identity of the "mystery ship" I hit on a problem regarding finishing it as the L.11. The ship in the pictures sports the later style of rear gondola. I have as will be seen in the accompanying pictures, I have built the model with the early style rear gondola. Building the kit with this in mind from the start is a relatively easy conversion. Less so at this stage of the build. It would involve the very high risk of ruining the extra detail I have put into the model. As I am very happy with what I have achieved thus far to the point that I feel that the gondolas are the best that I have achieved to date, I am naturally reluctant to do this. The amended plan is to do the Q Class that I have on order as the camouflaged army ship, finish the current P Class as an alternative ship, possibly the LZ.38, the first ship to bomb London and do the L.11 at a later date, perhaps using the Snowman 1/700 kit. So, what have I been up to? Although the exhausts that I have fitted out my previous Takom builds are a considerable improvement to what you get in the box, I have not been too happy with the way of mounting them. This time round I decided to try soldering brass mounts to the exhausts so that they can be mounted in very much that their 1/1 scale counterparts were. Two days, a lot of swear words and burnt tentacles later I think we have got there. It's a good job that I enjoy building these Takom kits. Better start thinking of how to make a 1/350 scale cloud car. Wibble (yet again!). Martian 👽7 points
-
Hopefully the HMS Bismark will be safe from Goering's spitfires!7 points
-
Announced at Mosonshow this weekend, sprues were present for inspection( sorry no pics), should hit the shelves by June.6 points
-
Blimey well this was a challenge! Its the only TB that I didn't have before, basically because in my mind its the least interesting one - it just just sits in orbit and bleeps! I picked up the AIP boxing of the old Aoshima kit a while back as a bargain - thank goodness, I'd have been really upset if this had been full price! I started it earlier in they year but put it to one side as I hated it so much. The kit is really poor - it is badly moulded, badly fitting and has a load of "toy" like features that include an electric motor to make the antenna rotate and the whole vehicle to rotate around the support! The worst part of it though is the corrugated tube around the middle! It comes as two parts spilt horizontally with a very poor joint down the middle that is impossible to clean up well due to the plethora of corrugations! On the original studio model I believe this was a corrugated automotive vent pipe. Anyway I did the best I could of it but I think I can safely say this is the worst kit I've ever built! The most enjoyable part of it was painting the stand6 points
-
Bell YP-59A-BE Airacomet/42-108773 Swapped for the first production Gloster Meteor I and assigned RAF serial number RJ362/G seen at RAE Farnborough in 1943. This is the Hobbycraft kit which I picked up at the Gloucester model show. Apart from some replacement wheel hubs (lost the originals!), the pitot tube on the tail (not in the kit) and a set of generic seat belts you can hardly see the rest is out of the box. Good kit to build which went together reasonably well. Kit serials, roundels and fin flash from xtradecal sheets and xtracrylix for the paint.6 points
-
Although the Special Hobby kit is a better option, the Sword F84F is quite buildable. I 3D printed a correct ejection seat as the kit only includes the early seat. The incorrect wheels were replaced with some new ones I designed and printed as well. The build saga is here. If anyone has a 3D printer and wants the wheels, send me a PM with an email and I will send you the STL file.6 points
-
USCG J4F-1 Widgeon San Francisco, 1941 This is Classic Airframes' 1/48 J4F-1 Widgeon in the IPMS USA 2008 Virginia Beach Convention boxing, which only included USCG subjects. Thanks to @81-er and @vppelt68 for hosting this mega GB and especially for those who liked and commented on the build. Here's a contemporaneous photo of the subject I certainly had to work on this short-run kit. Besides a lot of fitting, I needed to spend a fair amount of time figuring out how this wanted to be built. But I mostly got there in the end. As usual for me, I now know how I should have built it... And the WIP6 points
-
G’day all. I’ve just completed the Airfix Phantom FGR.2 this afternoon (Easter Monday). An annoying start followed by a pleasant build for the most part, I’m happy to say that this was an enjoyable project. The kit is built as XV466 ‘D’ Desperation while assigned to 1435 flight at RAF Mount Pleasant in 1991. The most annoying issues with the kit are the fit of the lower wing to the underside of the intake trunks and the fir of the forward canopy section to the nose fuselage. Some judicious plastic removal and fettling had the parts slip into place. Gaps were addressed with the tried and tested recipe of CA glue and talc. The Skyflash (Sparrows) and Sidewinders are courtesy of Eduard but the rest of it is what you get in the packet. The kit ordnance have fins that are a scale 6 inches wide so this was a must. The yellow seeker head covers on the Sidewinders add some colour to an otherwise muted colour scheme. I’m frustrated that Airfix still persist with panel lines that really are suited on a 32nd or 24th scale kit. Here in Australia you pay anywhere between $50 - $65 for this kit (25-33 pounds). Comparing kits of similar size and cost you get panel lines that are much more refined. Airfix, if you’re listening, please get your act together in this area. There has been much discussion about it. On the plus side, the kit decals were fantastic and reacted well to the Microset/sol combo. Painting is always the fun part for me. On the kit I used Mr Color lacquers for the camo greys and Alclad for the metal exhaust areas. Looking at photos of period jets and particularly XV466, the greys seemed to lighten over time, almost to the point of almost no contrast between the two topside greys. A variety of weathering products have been used for panel lines and such. You can make out the two tones of greys in the overhead shots. Anyway, on with the photos. Let me know what you think. Cheers, Mick.6 points
-
Markings, what-if as the add on track armour is what-if. Not sure how much of this will be visible with said track armour added...6 points
-
A bit slower at the moment Alistair but getting closer each day. Thanks @Hamden, @dogsbody, @elger, @amos brierley and @Stew Dapple. Bomb aimers window fitted. Seam filled and sanded. Window added. Engines together ready for mounting (Fnar). Firewalls added, but I cannot see why they detailed them, nowt can be seen once the nacelles are fitted. Tail wheel done. Time for tea, Lasagne... Simon.6 points
-
No wonder some people are faking it. 😁 Errr, I'll get my coat. 🙂 Regards, Jeff.6 points
-
So, more progress has been made ..... Wheels repainted and tyres coloured ...... which kept me quiet and busy for a couple of hours! Hull and turret now painted Dunkelgelb ... I've also ordered some AFV Club individual link tracks .... hopefully they'll be ok, fit and look better than the supplied black rubbery things! Camouflage next ...... As always, comments welcome! Keith 😁6 points
-
What a fantastic GB this is! Wonderful gallery so far and we've still got over a month to run! This is my Revell/Dragon 1/48 Ta 154A-0 Moskito. It was the nightfighter prototype with the FuG 220 Lichtenstein SN-2 radar fitted, but no Schräge Musik. Sorry not to have been a keener participant, but I still have another build in the GB and hope to complete that one too! All the best, Alan6 points
-
Body now 99% finished. Just have to add some weld beads to few certain areas. The side shields and front guards needed some careful placing as they have a tendency to move easy while the glue sets. Not as easy as they look so just take your time. @Retired Bob mentioned before that Dragon mould their zimmerit in places it shouldn't be. This is similar but not as obvious as a Tiger would be and it is reasobly hidden behind parts. The following parts should be placed earlier really. I struggled to get them in at this late stage knocking off one of the wheels. Luckily I could remove the tracks and refix parts. Thanks all, have a great week.6 points
-
Fortunately, I don’t have to assemble a Mig-25 using only Condor parts. A couple of my friends bought kits from ICM, and decided to improve them with resin parts from RESKIT. And I asked to give me the extra plastic parts. I received: Exhaust nozzles, wheels, two P-40s and a drogue cap. I also took the ejection seat KM-1 from the old zvezda Mig-21PFM kit. Actually, I have better ejection seats. But I'm going to make the canopy closed. The plan is as follows. I won't be adjusting the geometry. I plan to improve the detail. Engrave the panels correctly and accurately. Make an imitation of rivets. Add more small details. And it all starts from the cockpit. Since I plan to the cockpit canopy is closed, there is no need to do super precise detailing. It is enough to do something very similar to the original:6 points
-
Well this is rather nice! Credit: Jamie Ewan5 points
-
The ribs that I’d removed when the forward bulkhead was replaced were added with plastic strips. Mr Surfacer 1500 black primer was used to uniform the PE and plastic parts… …MrColor 364 aircraft gray green was used for the internal colour. Other PE was added to the crew hatch… Next I’ll be “fine tuning” the ribs, detail painting and weathering the wheel wells. until next time as always, any suggestions, criticisms or comments will be gratefully received. rgds John(shortCummins)5 points
-
Nozzle and intake. Experience has taught me that when building these models there are several things that are best done early on. Now is the best time to cut any rebates that are needed to hold any major structures in place and it's also the best time to complete any work that makes use of access to the centreline. In this case cutting the nozzle and the intake. The biggest - almost disastrous - mistake that i made on the Mirage project was when I drilled out the jet exhaust nozzle and the two halves of the fuselage slipped relative to one another causing the spade bit to almost rip out a large chunk of the rear fuselage. On this project i therefore decided to complete this high risk drilling early on in the project. This way, if it goes badly I can start again with minimal loss or at least have the best possible chance of correcting it. Here's the initial mark-up. Here you can see just how useful it is to have a natural centreline to ensure that the drill is centered correctly. It even looks like a high risk operation. Next time I think I might even drill out the exhaust nozzle before cutting out the basic fuselage shape; just to be sure. The two halves of the fuselage are firmly held together with dowels and glued-on paper (which is remarkably strong) but just to be sure that nothing slips I've also bound the two halves together with wrapped layers of masking tape which you can see in this photo. When using a spade bit for delicate work like this, I aways start by running the drill backwards, this cuts a circular scoring mark on the surface of the wood that prevents it chipping-out when the actual drilling begins. Drill slowly and carefully and a few minutes later you will - hopefully - have a nice circular hole in exactly the correct spot. It looks tidy this time. Splitting the model in half like this allows us to see how it went & I'm thinking this time things went well. At the opposite end of the aircraft is the air intake. This is a highly visible and very distinctive component of the F-100 and is likely to be the most difficult part of the entire project. Getting this right is 'make-or-break' on this model and frankly I'm not sure i can get the intake 'lips' sufficiently sharp and accurate using only wood. I do have a 'plan B' in mind, but for now, 'plan A' goes like this... Stick a paper pattern showing the required shape on the front of the jet and drill a chain of small holes about 1mm inside that perimeter as shown below. Then drill out a dense pattern of small holes scattered throughout the entire volume within the chain drilling. Once we separate the two fuselage halves we can drill more holes at 90 degrees to the first set. This creates a weakened volume of wood that is prepared for removal. The removal itself can be done with a chisel... or a Dremmel tool. At this point we have the first signs of an intake. So far the intake's aperture has been intentionally made too small. Once the external contouring of the fuselage is complete I will return to slowly - very slowly - enlarging this hole and sharpening its leading edges. There's been a lot more than this going on with this project, especially various rebates being cut for major structures such as the wings and tail surfaces but all that can wait for another post. For now though, this jet has a rudimentary intake and nozzle and that's enough to keep me happy. See you soon, Bandsaw Steve.5 points
-
Seriously? You know he'll cobble it up again and she'll come back at you with/in a vengeance attack. Oh ah not THAT kind of putting her down... Phew. Do you see this? Its like a rash of Evergreen, has it spread to you old buddy? These rashes can be a bugger to get rid of Hope you get well soon sir, we need you fit to go old alien5 points


.thumb.jpg.d17ff607fc7e89ed057e63fcb6f2a888.jpg)


.thumb.jpg.847c20c2e40e13e24e658988f9f312dd.jpg)


This leaderboard is set to London/GMT+01:00