Leaderboard


Popular Content
Showing content with the highest reputation on 13/06/24 in all areas
-
I'm glad I've finished this thing. It was one of the worst fitting models I've encountered. I've gone through a raft of putty, and my fingers were sore from sanding the putty back. I almost at several points nearly gave up with it and binned it, but I suppose my sheer bloody mindedness wouldn't let me. Nownits done I'm happy with how it turned out, and glad I persevered with it, and I once again used it as a learning model. I bought the stand separately as I wanted it wheels up. Given all the negatives of building it, it is an impressively sized model once finished. I hope you approve of my efforts21 points
-
My main interest is aircraft with a local connection to where I live or have lived. Mostly East Anglia (Suffolk and Norfolk since 1996). This model was completed over about 2 years as it was interrupted by job changes and house moves and general life stuff.I was intrigued to read the story of the Italian effort against the UK during 1940. This vignette used aftermarket decals which I can't remember the manufacturer of, Eduard cockpit etch and I think a PJ productions RA figure. Italeri's moulding has a few issues with strut length and location holes, but that might be me! First attempt at mottle freehand airbrushing, let's keep it between us that it took 3 attempts to get the pattern on the top wing something acceptable to the photos on the book covers. I have spent time researching the articles about Italian camouflage types and came to the conclusion that this aircraft was two colour rather than 3, but that might be my interpretation of the contemporary photos. I'm really pleased how it turned out, I found those individual interplane struts a challenge.21 points
-
Hallo P-51 44-13321 from J.M. Simmons 317th FS, 325th FG 15th AF Lesina Italy August 1944 This is my first Mustang P-51 in a long series. So you may be sure, the next ones will have a little less flaws or inaccuracies. There are some issues to obey, when you want to enjoy relaxed building sessions. To comfort you, I will call them ALL out for you, so that you may overcome all shortcomings in the design and instruction. Ok? Let’s start: The wheel bay is in tolerances in vertical dimension about 0,2mm too thick. You must grind it down, otherwise you destroy the leading edge of wing, when gluing! The inlet gate for the oil cooler has no support on the backside to glue on vertical direction, as it should be! The flaps are flexing, there is no support inside. The pins to glue them on the wing are too small. The gluing area is too small for such a big part! The tail gear, to position it correctly, the pin is missing. Assembling with one movement is not possible. Fiddling. The parts of the main gear strut and G68 and G67 have so tiny pins for correct orientation and holes, they slightly can be overseen. They are NOT shown on the instruction. Remark in instruction is missing. The main wheel hubs have in the center a horizontal pin and a pit. What for? This two match sometimes, sometimes not, from size and so the distance is too big and the wheel looks awful. The auxiliary fuel tanks are mold and designed to be divided on the lips or seam. In the middle of my tanks the seam is just a film. And breaks away. The top trophy is your landing light. Be careful to seperate the parts! A detail, in the D-5 version. The radio compartment does not show a D-5, it shows a D-20. This issue, is an eye catcher! The landing light bracket I could not install it. No way, since there are two pins, upper most edge, rear spar, not to catch! Must be done before gluing the wheel bay on the wing! The hood, there is nothing for showing properly an open hood, in the open position to get it fixed properly! Make a pin at the very rear of the hood! The rear spar in the hood from etched parts is a little to big! You will have troubles with fixing the hood! The landing flaps, a small gap like a black line shows up after being in position! Have to find a better solution. Installing the gun sight is quite tricky! Do not forget making a hole for the pitot! There is none in the kit, just in the instruction! If you want to see how I handled it, all in my WIP. Since this is my first Mustang in 1/48 now, from Eduard, I am sure, since I learned my lesson, the next one will be better. It is simple my intention to make models, which back in history were in Austrian airspace during the WW2. So enjoy the photos: Happy modelling19 points
-
I have not contributed anything to modelling sites for the last 6 months, and here is the reason. Perhaps unwisely, I decided to build a model of HMS Vanguard, the Royal Navy's last battleship. And, before someone says it, I know that Vanguard was not the last operational battleship. She was the last battleship to be commissioned, although long outlived by the Iowas. But what a great looking ship! At the risk of provoking a debate, I think that Vanguard was the best-looking British military ship ever. Having decided that I just HAD to build her, the only option was to tackle the venerable Hasegawa kit, originally from 1969, and never updated. It also has a weird scale (1/450) which makes challenging to buy aftermarket parts. But I will not mince words. This is, absolutely and without a trace of doubt, the worst kit I have ever had my hands on. I should have given up at the start, and use my time to build 3 satisfying models. The gallery will show some pictures of parts just to give you a taste. The main parts looked like Lego blocks, without any engraved or raised detail. But, unlike Lego blocks, the fit was atrocious. There was also a mould ejection seam that run along every single part, which meant sanding around every nook and cranny. This kit brings dishonour to the Hasegawa family. In summary: the only original parts that made to the end were the hull, deck, major building blocks of the superstructure, and stacks. Even these were modified, for example by drilling the portholes, and engraving the hull plates. For the rest, you can assume it was either 3D printed, part of a photoetch upgrade, or scratch built. A wooden deck from Artworx and the Vanguard set from Atlantic models were used. The armament, type 262 radars, boats and Carley floats were 3D printed. A lot of other things were made from Evergreen or spare bits and bobs. I will not bother you with a kilometre-long list of modifications. If you are interested in a detailed build report (and more photos) please check https://www.marcellorosa.com/hmsvanguard. But here she is, finally. Finished just in time for the Australian Model Expo 2024, where she got a commendation.17 points
-
Hello again.Another day another finished 72 scale model.THis time a kp mig-23mf buiilt as a bulgarian af flogger.I built it pretty mych oob.Painted in gunze and tamiya paints.The decals that came with the kit were abit bad but I managed to use them.16 points
-
After a very long break away from building aircraft as the airplane cabinet was full, and needing a break from the f1 cars. I decided to re-arrange and squeeze one in from the stash. Decided on the A330-300, quite apt as I see Revell will re-release it. There are of course some kit errors, and my errors. Which when building I remember from the A340. I.e L+R3 door frame size, and the wing also still has the slat cut out for the A340 wing. Alas I didn’t fill and re-scribe these. And I should have filled the cockpit windows with filler (I did the cabin!), as once the window decal was applied, I could see how deep the decal sank. Oh well never mind, the joy of modelling ! But without my glasses on, and from a distance it looks fine !! Pretty much built oob, except for the addition of the extra tech PE parts. On and off took around 2 weeks. Paint was MRP and Tamiya lacquer, purple was mixed tamiya acrylic Only the pink/gold decal was used. Made templates to spray the purple. Enjoy Peter parked in the cabinet16 points
-
Out of box Italeri 1:72 scale kit. Hope you enjoy13 points
-
Well after another lay off from this build starting to finally get my MOJO back been working on her again but still need to add some more figures and boom ropes then should be ready for RFI at last. Stay Safe beefy13 points
-
Back home, but I saw this in my route. Really nice one.13 points
-
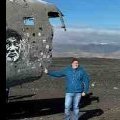
I am really pleased to present to you all my latest build, a North American F-51D-30-NA Mustang of Nevada Air National Guard as she was when seconded to the Icelandic Defense Force in 1952-53 (https://en.wikipedia.org/wiki/Iceland_Defense_Force), based at Keflavik Airbase, Iceland and operated under United States Air Force control. This subject caught my eye many months ago and I have been determined to build her. I could have plucked any of the aircraft from this deployment but I chose 44-74482 “Nancy” as she had some of the markings that appeal to me – the stencil-type Buzz number, particularly, as well as the one named aircraft that I could identify. In building her I have used a little “Modeller’s Licence” in terms of the colours applied. You will see in the text below that there is detailed description. However, I fear that time has allowed memories to wain and so I have used “best guess” for this model, with reasoning for each difference using reference images. I have noted my changes in the following text. The following background has been extracted from Wikipedia (public domain and edited): One of the last overseas deployments of a F-51D Mustang unit by the U.S. Air Force was in late 1952 when 25 aircraft of the 131st Fighter Bomber Group, were assigned to the Iceland Defense Force (IDF) at Keflavik air base in Iceland. Most of the 25 Mustangs came from the 192nd Fighter Bomber Squadron, Nevada Air National Guard, with fillers from the 110th FBS, Missouri Air National Guard and 170th FBS, Illinois Air National Guard, as no squadron in the 131st had the originally required number of 35 airplanes to be readied for the mission. Distinctive "arctic-red" (Insignia Red) markings were applied to all IDF Mustangs before their transfer from USA to Iceland. This included the painting of the outer wingspan, fuselage aft end, and tail empennage (minus control surfaces) in Insignia Red. My note: wing control surfaces were red also. The sliding canopy frame, propeller spinner, and tips of wings and tail empennage were Insignia Blue (the standard colour trim for the 192nd FBS). The windshield frame and the anti-glare panels (between the propeller and the windshield) were black although some were Olive Drab (often not distinguishable from black in colour photos). Some aircraft had stainless steel panels around the exhaust stacks painted glossy black for easy cleaning. The landing gear strut fairings had a 6 inch colour at the panel bottom for separate flight identity, blue, red, and yellow. The panels over the filtered air intakes on the lower nose were painted red. My note: these were Insignia Blue. The wording “Nancy” was determined by me to be in Insignia Red. According to written personal notes from Col. Robert W. Gruenhagen (flight chief, line chief, and quality control inspector of the F-51 Mustangs stationed at Keflavik airbase in 1952) the deployment procedure was as follows (quote): "P/F-51 assignment, Iceland During august 27, 1952, 35 Mustangs were readied for launch from George AFB, Victorville, California with destination of Keflavik, Iceland by 1 September, 1952. The aircraft were prepared in A/W T.O. 00-25-4 for overseas transfer and modified with APX-6 transponders to provide the latest IFF capability. Two groups of 17 and 18 aircraft were flown across the U.S. in a northern and southern routing through bases coordinated for en-route support. Two C-119 aircraft were manned with 15 man crews to follow the flights and repair ant turn and launch the Mustangs at each base. Intend was to reach the east coast with 30 aircraft and proceed on with the best 25 for the final destination. The serials listed below were in place in Keflavik and on alert by 15 September of 1952. The aircraft were assigned to the 192 Ftr Bmr Sqdn. (TAC) with support crews made up from three squadrons of the 146 Ftr Bmr Wg, the 178th, 186th and 190th. Serial: 44-72708 44-73788 44-74482 44-74880 44-74845 44-74717 44-73769 44-74586 44-74963 44-72843 44-74377 44-74522 44-84769 44-74382* 44-73996 44-73826 44-74870 44-73409 44-74317 44-74811 44-84834 44-74975 44-74959 44-74368 45-11364. The aircraft served until April, 1953 and were replaced by F-94B interceptors assigned to the 82nd FIS. The Mustang unit designation changed to the 436th Ftr Sqdn on 1 December, 1952. The Mustangs were flown to England, (Renfrew) and transferred to AMC at Brookley field, Mobile Alabama and eventually to Norton AFB Sam Bernardino California were they were scrapped in May of 1954. *44-74382 was left at BW-1 (Narssasuak, Greenland) enroute for an engine change which was completed in one week. A B-26 Navigation aircraft accompanied the Mustangs on all the overwater legs and the later pick-up of 382.” Except for a few remaining on active duty, the three support units returned to Air National status upon return to the US. During this period, the Mustang units in Korea were also converted to jet aircraft with the Mustangs being assigned to the Republic of Korea Air Force and these units along with the Icelandic units were the last overseas assignment of the type with the USAF. What did I use/do? 1. Kit – Tamiya North American F-51D Mustang (60754) in 1/72 2. Decals – the aircraft specific markings were drawn and printed by Arctic Decals. The remainder were from the kit. 3. Aftermarket – Falcon Vacform canopy (9158), AML seat belts (AMLE 80 003), CMK exhausts (Q72 033), Uschi antenna line, Yalu instrument panel, various bits of rod and wire to create the radio box etc. 4. Paint – Mainly Colourcoats Insignia Red (ACUS26) and Insignia Blue (ACUS39), together with Humbrol 27002 Polished Aluminium. H27002+Humbrol 140 mix on the wings. The rudder is H11 Silver. Interior was primarily Colourcoats US Interior Green (ACUS09) and wheel wells are Colourcoats Zinc Chromate Yellow (ACUS23). Varnished at various stages with Humbrol Glosscote (first coat) and Vallejo Gloss and Satin. 5. Weathering – Flory washes used here and there – not the panel lines – plus Prismacolor Silver pencil and various Tamiya Weathering Powders. Here she is: I hope you like her. Martin12 points
-
afternoon ladies been busying myself with fuselage skinning which I have shown the process for many times - essentially masking tape templates and scale panels drawn from them to nail the rivet patterns. restoration pics are invaluable at this point. like this one.. these can then be transposed one by one to a drawing from the tape template and the printout used as the rivet guide.. ..the cowling was probably the hardest to fashion, but I will let the pics explain work to date.. ..the exhaust area is a complicated little structure, so more work to be done there.. ..think I will finish the fuselage, add the tailfeathers and then make a start on the wings take care y'all TTFN Peter12 points
-
Since first posting, the FAST Museum at Farnborough contacted me through IPMS and have been donated the diorama which is on display at the Museum. ********** With Russia developing their TU-144 parallel to Concorde, the testing of the Anglo-French Concorde was kept as secret as possible which amounted to less than a handful of accurate detailed pictures made publicly available for reference. With minimal information to work from, this diorama aims to portray (ad-lib) both the static and structural testing of the British development of Concorde, along with the early assembly stages of the thermal testing jacket development undertaken at RAE Farnborough, and the submersed water tank airframe testing which started at Farnborough and concluded at BAC Filton, in Bristol. The diorama excludes the later developed thermal jacket testing rig. The testing progress at Farnborough was fairly rapid; having commenced during August 1973. The certification requirement of 6,800 cycles was achieved by the end of 1975. Subsequent testing was carried out at a yearly rate of 7,000 cycles to maintain the fatigue life of the test specimen at around three times that of the joint airlines fleet ‘fatigue leader (G-BOAA)’ aircraft in airline service, which flew for 28 years. By 1984, testing at Filton was complete, and the remains of the British test airframe was handed over to British Airways for the airlines staff emergency fire and evacuation training. Parts of 006 remain on display at both the FAST Museum, Farnborough and at Brooklands Museum. In the development of the world’s first supersonic airliner there were to be many unknowns to be explored, and design calculations to be verified or validated. Once the materials had been selected, it was necessary to carry out an exhaustive programme of laboratory tests to reproduce the supersonic flight environment that Concorde would spend her life flying in, both in terms of the thermal cycles that she would be subjected to, and the structural loadings and resistance to fatigue of the articles under test. An understanding of the thermal demands of the supersonic flight profile could be gained from extensive laboratory testing. The rapid rise in the temperature of materials during acceleration, coupled with prolonged heat-soak in supersonic cruise, followed by rapid cooling under deceleration, could all be reproduced using relatively small articles in the laboratory. Because of the pioneering nature of the project, it was decided to build two test airframes, one for the purpose of static testing, and another for fatigue testing. The use of these test airframes would provide valuable data relating to the ability of the production machines to withstand the rigours of supersonic flight and give confirmation of the calculated in-service life of the complete aircraft. Concorde remains the most tested aircraft ever developed. Both kits used here are original first issue moulded Airfix Prototype 1/144 boxings - both older than the aircraft itself. In order to display the aircraft without its nose cone, the forward fuselage sections (about the same that was produced at Weybridge) are cut and shut forward sections taken from the Revell production Concorde. Starting with - a photo of the structural fatigue drop test rig and the diorama from here on...11 points
-
Textured and started with the "furniture"..10 points
-
Boeing Chinook HC.1 (A06023) 1:72 Airfix The CH-47 Chinook is a tandem rotor heavy lift helicopter, developed by Vertol and manufactured by Boeing Vertol since 1962, and its incredible longevity is testament to the quality, flexibility and robustness of the original design. Over 1,200 examples have been produced, and the type has seen frontline service in conflicts as disparate as the Vietnam War, the Falklands Conflict in British service, both Gulf Wars, Iraq and Afghanistan where its utility was so much in evidence that many airframes became worn out by the end of their time there, causing availability issues for the forces that sometimes reached the newspapers. In its capacious loading area, the Chinook could lift a 24,000lb payload or carry anywhere between 33 and 55 troops. The first variant to be taken into service by the British forces was the CH-47C, which was designated the HC.1, and after an initial cancellation of the first order due to “budgetary issues”, a decade later they were back again with an order of thirty airframes that entered service with British forces in 1980. These aircraft were flown extensively before being re-fitted with composite blades that saw them change to HC.1B, and eventually they were returned to Boeing for a zero-hour refit to HC.2 standard, which was the British equivalent of the CH-47D. The HC.1, like the American equivalent was fitted with more powerful engines than its predecessors, adding an additional 2,000lbs to its internal or external carriage capacity. The passage of years saw the night-vision capable HC.3s entering service with Special Forces, the HC.4 and HC.5s developed from re-engineered HC.2s and HC.3s respectively, and being equipped with more modern avionics, a FLIR turret under the nose, and the HC.6 and 6As fitted with a fully digital flight system. As of time of writing there are no more HC.4 airframes in existence, having all been converted in the meantime. The Kit This a totally new tooling from Airfix, and appears to have used all the lessons learned on the recent 1:48 Sea King only in smaller 1:72. The kit arrives in a sizeable red-themed top-opening box with a painting of the subject flying over a wide seascape somewhere near the Falklands with a cargo ship in the background on the waves. Inside are six sprues of darker grey styrene, a clear sprue, decal sheet and the instruction booklet that is printed in spot colour on matt white paper, with colour profiles on the rear pages for the decal options. Detail is excellent throughout, with a lot of detail on the interior, including ribbing throughout the entirety of the passenger cab, although there will be some ejector-pin marks to deal with by necessity too. The clear parts will show off the details within the cockpit, and the thick rotor blades that give the Chinook its distinctive blade slap are moulded with their curves pre-formed, which is always good news (unless it’s upside down!). Construction begins with the floor, which extends under both the cab and cockpit, requiring six ejector-turrets to be cut from the underside to achieve a good fit later. The edge of the floor is slotted into a curved console moulded into the underside of the nose, then the centre console is glued to the other side, applying a decal after painting. A tunnel between the crew and passenger areas is created from two parts, the outer faces having sound-deadening quilting moulded into it, fixing on a step at the rear of the cockpit, and adding a pair of equipment racks behind the seat backs, taking care to remove more raised ejector-pin turrets before you glue them in place. The crew seats are each made from two parts, and attach to the front, as shown by a scrap diagram nearby, followed by a collective and cyclic stick for both pilots. The coaming has a pair of raised circles moulded into it that must be cut or sanded away to improve fit, joining with the instrument panel face and a dial decal before it is attached to the cockpit floor, completing work on that portion of the interior. The passenger area has a well-detailed floor moulded-in that should respond well to careful painting before adding the rows of canvas and tube seats to either side, which are each moulded as single parts, but with excellent detail. Another scrap diagram shows how they should be oriented once installed on their legs, which would be wise to be done as late as possible to avoid breaking the legs off the individual chairs during handling. Preparation of the fuselage halves is first, drilling holes into the sponsons for one decal option, and more above the side door for both. There is also some nice detail to be painted near the load door, and some ribbing that could be the basis of a little more detail if you felt the urge. Before proceeding however, there are two jigs included on one of the sprues that permit accurate drilling of three holes under the nose, but don’t be tempted to apply glue between the jigs and the fuselage halves though, or you’ll be very sad when you realise your mistake. Two detail inserts are supplied to block off the view inside the fuel tank sponsons, and these too have ejector-turrets to be removed on the inside, after which they are be pushed into the fuselage halves, locating the circular spacers in raised circular shapes in the depth of the tanks. The inserts have a small part fitted to the tapered end near the door before installation, and these too have a small tab to remove, marked in green like the others. The fuselage halves can then be closed around the interior, ensuring that the cockpit is correctly bracketed between the forward ends. The underside of the fuselage has ten 0.9mm holes drilled in it before it is fixed to the inner floor on six posts, lining the fuselage halves as carefully as you can to reduce clean-up of the seams, then placing another jig on the top of the fuselage between the rotor turrets, which will align with a pair of holes in the roof so that you can drill out two pairs of 0.7mm holes, and a solitary 0.8mm hole in the roof before attaching the avionics spine between the turrets and capping off the tops with circular(ish) panels that have arrows on the underside to assist with alignment. The two decal options wore different filters on their engines during the time they are depicted, so you must choose which ones to use on your model. The basic engine comprises of two cowling halves with a conical exhaust at the rear, built in a handed pair for installation on the recess either side of the aft rotor turret’s base. The conical filters are made from two shallow halves, and they fit on pegs that insert into the fronts of the engines, aligning the supports inboard toward the turrets. The cylindrical filters are formed from two half cowlings, with a circular front, and they support a separate part that hangs downward on the finished assemblies, as illustrated in the accompanying diagrams. The landing gear is comparatively simple because it is fixed, with two straight struts at the front with T-axles that hold a pair of one-part wheels each. The rear wheels are mounted on a box frame that has a short axle on the outer side only, holding just a single wheel each, half-recessed beside the load ramp, which is next to be built. There are three options for the ramp, fully closed, open level with the floor, and open for taking on or offloading cargo, all of which use the same outer skin portion for the main part of the ramp. The closed ramp has a pair of brackets added to the sides, and is glued to the rear of the fuselage along with the top section, closing it completely. The level ramp has a detailed floor glued to the external skin, and is slid into position on two pegs for a strong join, while the loading option adds a fold-out ramp section to extend the end and smooth the journey for anything using it. For the two open options, the top portion of the outer skin is unused, as it is retracted out of harm’s way until needed to plug the draught in the rear. The circular portholes on the fuselage sides are applied from the outside, adding the main canopy plus the two side doors to the nose, then mounting the two-part side door with clear porthole in the open, partially open or closed positions, the former having a more detailed part that will be visible when flipped down. Numerous small parts are glued around the cockpit, with more around the rotor turrets, including a choice of a grab-rail antenna or a box on each side of the rear rotor. If fitting the winch, the body is made from two halves, adding the support frame to the rear, and a hook underneath, gluing it to the holes drilled earlier over the side door with the help of a scrap diagram. There is a forest of antennae on the spine and under the aircraft’s flat belly, with two towel-rail antennae around the winch hatch in the floor, and here you have another choice. The hatch can be covered with a panel, or fitted with a beam and winch block, and a pair of stabilising winch blocks further away from the main winch location. The Chinook has a long antenna running down the port side of its fuselage, supported on a run of nine masts, which plug into holes in the side of the fuselage. There is a fine antenna wire running through these posts if you feel like increasing the detail on your model a little more. The last step is to create the twin rotors that keep the Chinook aloft, and give it its distinctive “WOKKA!” sound. The front and rear blade sets are similar but use different parts, so be sure not to mix them up during the build process. They share a simple base plate, and the rotor-head is glued into the centre, fitting the three wide blades to the flat ends, doubling the thickness at the attachment points. When both sets are built and painted, they can either be glued or placed on the tops of the rotor turrets, spinning around a hole in the centre if you leave them loose. It would also be sensible to leave them loose if you have limited display space, or intend to transport the model to shows at any point. Markings There are two decal options included on the sheet, one in the traditional green/grey over black camouflage that we know so well, and the other in a desert scheme from what we called Operation Granby in the UK, or Desert Storm as it was otherwise known. From the box you can build one of the following: ‘Bravo November’, No.18 Sqn., RAF, ‘Operation Corporate’, Falklands Islands, South Atlantic, May-June 1982 No. 7 Sqn., Operation ‘Granby/Desert Storm’, Gulf Region, May 1911 Decals are by Cartograf, which is a guarantee of good registration, sharpness and colour density, with a thin gloss carrier film cut close to the printed areas. Conclusion There’s a lot of detail packed into this model, along with plenty of options to personalise it to your taste. The decal choice was intended to appeal widely for this first boxing, but many more will be along, if not already in the works. Very highly recommended. Review sample courtesy of9 points
-
Thanks Adrian, that means it must be getting near completion....please...! A frenzied bit of activity yesterday with numerous surreptitious (def: kept secret, especially because it would not be approved of) visits to the loft (the stairs up to there creak loudly). Wing nav light tubes pulled out to show at the wing tips, glued in place and left to set. (The tube on the port wing was under a bit of pressure and actually broke as I assembled the wing upper surface later. Ho hum). A couple of pieces of painted packing a la @Rabbit Leader set behind the intakes in the wing leading edges and silver applied to all the surfaces which get revealed when the flaps and slats move out. Also wheel wells and inside of the undercarriage doors painted silver. Some time later, the main wing upper surfaces went on with tape to hold tight but the flaps and main undercarriage legs had to go in at the same time to be 'trapped' in place. The main undercarriage legs can rotate in their fixings hence the 'dead bug position' to allow glue setting in the right position. Front undercarriage leg is in and this is especially delicate. Fabrication of wing fences in progress - my reference pics show one large and two small fences on each wing. I used the 'moulding profile comb to get the shapes but a lot of trimming /sculpting and sanding once in place is expected. Also blade aerials being made up. Before anyone asks, vortex generators are out!9 points
-
A kit very close to my heart, as it was the first kit I remember being able to glue some bits to as I watched my father build one at the dining room table. it’s the old black plastic with a few extras in the Bomb bay from Eduard and Barracuda Casts.8 points
-
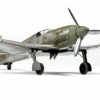
I had a Bf 109 F in my stash and got hand on a Arma Hobby Hawker Hurricane by chance. Normaly I only build Luftwaffe stuff. But the Arma Hurricane is so nice that I had to build it. The Zvezda kit is, in the face of being only a snap kit, also very nice and comes with a great pilot. So I decided to show both planes in a low fying context with a little base made from foam. All in all a lot of fun and a nice litte project.8 points
-
I did this plane before with a Koster vacform conversion, but it didn't turn out right* so it was given away at a local model show. I hope it found a good home. *right being totally subjective to the modeller, it was probably more than good enough, but you know that feeling when you just gotta move on..? Anyway, remember to feed the right wolf. Thom7 points
-
Kit from Airfix. I use resin kits: cabin, bomb bay, wheels. Some of the parts were not included in my kit, I took them from a kit of Special Hobby or additional kits, I also made them myself. Decal from the company Xtradecal. Alex.7 points
-
Frog Super VC10 with flashing lights! A very difficult kit all round and not for the faint-hearted. This will need to come back out sometime for a tidy up but that's all I can manage for now.7 points
-
Finished the Frog Super VC10. Wing slats are on, undercarriage support struts and doors are on and the transfers are on, most of which started to break up once on the aircraft. Cockpit windscreen is in after a final fiddle about which removed all the masked frames so has to be touched in again by hand. The lower beacon flashes but not the tail one and the light doesn't reach the wing or tail lights. That bulb carrier needs a final press in and seams putttied but I'm putting it away for now - no more time since I'm off on holiday tomorrow! Thanks to all for the encouragement along the way and @JOCKNEY and @Rabbit Leader for hosting.7 points
-
The Hurricane is a very special aircraft. On one hand it clearly shows its lineage to its fabric covered ancestors, the sleek interwar biplanes. On the other hand it shows a lot of rather heavy handed iron mongery, with a lot of domed rivets, fasteners and the like. The way it bridges several generations of aircraft design makes it almost enigmatic and, as stated; special. The way ARMA has portrayed it in 1/48 is nothing short of fantastic. It certainly made my jaws drop to the floor! Now, the Airacobra is quite a different bird. As aircraft they cannot be directly compared. However, to me it seems like ARMA has captured its characteristics in an equally fantastic way as well, with its smoother surface and more subtle lines. Judging the way ARMA has handled the Hurricane, I expect it to be very, very accurate with respect to shape, dimensions and detail. As a kit I expect it to be equally well fitting and easy to build perfectly. Personally, the Airacobra is not my first choice of subject. But I expect myself to become tempted some day, if nothing else because it's a 1/48 ARMA kit. I sincerely hope that ARMA will continue with their Hurricanes and venture into the Mk.I series. At the same time, my sincerest congratulations to Airacobra fans!7 points
-
Hi Guys, I recently finished this but havnt been motivated to get photos until this weekend. It's a pretty decent kit though I'm sure many would rather go the ZM J or Tamiya B route now. I added Reskit Wheels, winders, burner cans ,FOD covers and Kelik 3D printed decals as well as Furball Decals kindly supplied by @Ian Painted in New Tamiya LP-34 Light grey and Tamiya LP metals with SMS white on the...white parts. Weathered with Ammo oil brushers, with Starship filth doing most of the heavy lifting.7 points
-
Just received the light brown/green/dark brown version of the F-15DJ FK01 and it comes with a sprue not contained in the previous F-15DJ release. The sprue has parts for an ALQ-131 ECM pod and a couple of photo pods, I believe it is the same sprue which is included in the Fine Molds RF-4EJ. Sprue V in both kits.7 points
-
I was quite happy with this one, the barrel broke, which you can see in the first pic, but then I thought to use a bit of fabric plaster as lagging, which I understand was used to prevent the barrel warping due to heat, I hope it is acceptable, still need to do decals and weathering, but I think it's ready for inspection.6 points
-
This is my Northrop Delta build OOB. It is rader hard to build. A lots of putty used. I've done position lights and underwing lights, and small rivetting. Hope you like it.6 points
-
I present my build of the Tu-22. A fascinating aircraft that has always caught my interest due to the unusual engine location which lends the aircraft a very science fiction, Dan Dare comic book kind of look. Or maybe the artists of Dan Dare were inspired by the Tu-22! This was Russia's first supersonic bomber, and as such its entry to service was troubled by issues and a steep learning curve with both the aerodynamics and the engines themselves. It became known for limited performance and range, and as a challenging aircraft to fly with a high accident rate. Its takeoff and landing profiles had a relatively narrow margin for deviation and the engine placement, above the centtreline, added its own complications with a slow response rate and a tendency to push the nose down when power was increased or raise the nose when power was cut. Pilots struggled to convert to the new type partly because of the speed at which things tended to happen, but also because the much higher workload required. Bomber pilots were converting from types where they were used to having a copilot, onto the Tu-22 which was piloted solo. In retrospective analysis the accident rate wasn't particularly high for an advanced military aircraft and the Tu-22 went on to enjoy a very long career in a variety of roles including reconaissance and electronic warfare as well as being a bomber. Trumpeter's kit went together reasonably well. The critical join between fuselage and wings is important to get well cemented in because the loads applied on the join can pull it apart. Trumpeter happily provide a lot of surface area on that join which can be used to make a strong bond. The engine subassembly is tricky. The exhaust cans are supposed to be installed before the engine halves are joined, they don't fit fit in the holes afterwards. This makes masking them a bit more difficult. I guess they could be left slightly loose to make masking easier but I opted to leave them off and install them after the aircraft was fully painted. This required me to sand the cans down quite a lot until they would fit. Painting in general around the engine pod sub assembly is a challenge because of the lack of space and access to the lower, inner surfaces of the engine pods and the adjacent fuselage structure. Masking is a challenge, as is getting an airbrush stream into those tight spaces. That section could be painted before attaching the engines to the fuselage, but that join isn't a great one and needed some filler and smoothing. Alternatively that area might be a little easier to paint if the elevators are left off until afterwards. That's not so much a fault of the model as a fault of the shape of the aircraft itself, but it's something to plan for when building this kit. The cockpit is averagely detailed but it doesn't matter because you can't see any of it through the small glass area. You can paint it all black and probably leave the instrument panels and seats out completely because they won't be visible. That said, the kit does provide the option of having all three seats exposed in the "down" position, where they are all hanging in clear view out of the entry hatches beneath the aircraft, ready to accept their occupants. Then of course you'd want to have a bit more detail on them. Mine will hang from the ceiling so I had the entry hatches closed. This was my first NMF attempt, and also an early attempt at heavier weathering. Many of these aircraft look as though they've been stood outdoors through sleet and snow and have dirt and mud stains down the panels. I tried to emulate that look but it is heavier than I was going for. With the NMF, the actual aircraft look to be very uniform in colour which can look dull on a model so I tried break up the expanse of aluminium with different shades of grey. The contrast is a bit too high between the two shades. The panel selection I used also makes the end result look a bit patchwork, I perhaps should aim for bandings in contrasting colour instead in future. Still, learn from experience. I have to start somewhere. Paints are all Vallejo model air or metal color. Dull aluminium for the fuselage and the contrasting panels are a mix of dull aluminium and steel. The white is Vallejo aged white. Pure white really pops out on these and it looks too strong on a model even though the white really pops on the real aircraft too. The white, on random panels, is apparently anti corrosion paint. Anyway that's enough rambling, here's the model. Thanks for looking.6 points
-
This is Amtech's 1/48 P-40E Warhawk, built as Colonel John S. Chennault's 'Bengal Tiger' P-40E, Adak, Alaska. Every one of the 11 FS, 343 FG aircraft had a slightly different 'Tiger' head, and the fuselage stripe on some leaned backwards, some forwards! (and, yes, they DID have the blue surround on the star!) Built with a resin cockpit, wheels, seat, photo etch gunsight, a homemade vacuform sliding canopy, and the addition of a winter kit, (the scoops ahead of the exhaust, and the exhaust pipe blanking plates covering the openings). The Superscale decals turned out to be traneslucent, requiring careful masking and repainting of the Bengal Tiger head and spinner. Thanks for looking, Colin6 points
-
A newly released 1//72 scale Fine Molds F-15DJ aggressor. It should be noted that kit comes with a sprue not contained in earlier FIne Molds F-15DJ kits. The sprue contains parts for an ALQ-131 ECM pod plus different camera pods, I think it's the same sprue contained in the Fine Molds RF-4EJ kit. I really like this scheme and may build it much sooner than I planned. I am this close (holds thumb and index finger an inch apart) to finishing these two Fine Molds F-15DJs. I will use (have started) DXM decals, sheets 21-7107 and 31-7159, and ALQ-131 pods from the Hasegawa weapons set. And yes the masking was endless, for the past month my days have consisted of waking up, masking and then painting, rinse and repeat the next day.6 points
-
K wagon 1/72 Scratchbuilt RAF aerial target 1/48 Scratchbuilt Fury refuelling rig matchbox 1/48 with Scratchbuilt refuelling gear. Albatros CX 1/48 Scratchbuilt three built this one was used as personal transport for Von Richthofen DFS Floe 1/48 Roden (?) Sage Mk 2 1/48 Scratchbuilt Junkers J6 1/48 Scratchbuilt Bristol racer and deperdussen racer 1/32 Scratchbuilt Sopwith swallow 1/48 Scratchbuilt Sablatnig triplane 1/48 Scratchbuilt Wight quadruplane 1/48 Scratchbuilt PV8 & PV7 1/48 Scratchbuilt TA152 1/72 Revell Me262 development never got off the drawing board, 1/72 and my what if scheme. Supermarine Nighthawk 1:48 Scratchbuilt Sopwith Snark 1/48 Scratchbuilt Oertz W6 1/48 Scratchbuilt Berkut 1/144 can’t remember the kit. Caproni campini 1/48 Scratchbuilt Bristol F1 1/48 Scratchbuilt Radial engines Bristol F1 1/48 Scratchbuilt YF23 1/144 with Snark (again) and Pfalz DR1 1/48 Scratchbuilt Aviatik DVI 1/48 Scratchbuilt Geest fighter same fuselage as the Aviatik, wings have a double aero foil 1/48 Scratchbuilt Heinkel 116 1/72 vacform Caproni Stipa 1/72 Scratchbuilt Phew that’s it…6 points
-
Final bits added to the engine compartment and the rear engine compartment wall attached. Fitment has been good thorughout despite the complicated nature of the kit parts Shells are added .... The decal for the fire extinguisher is particularly nice The Driver's section is completed Meaning that the 2 hull halves can finally be bonded... Fit again is good considering the extant of the join and the multiple surfaces involved. The single exception was the glacis plate that didn't quite seem to comehigh enough Which necessitated adding a single strip of 0.5x0.8 With the hull completed the wheels and steering can be attempted. It's a small detail bt i always try to add tyre valves The wheels have round "bearing" joints that allow the wheels to "steer". The steering rack joins them and yes - fiddly it was.... Et voila - the wheels - it's beginning to look like an armoured car.......... Time to get some stowage ready - these come from the Bronco Brit Filed Accessories set And one last pic of the lower turret sitting More soon Thanks for looking Rob6 points
-
Made a little bit of progress on this one in the last week or so, not as much as I like so far but moving a little at least. First off I've started putting in the hanger side panels (minus the PE parts at the moment, just building the structure) It's pretty evident in that second picture, but there's no interior detail here. Plus, lots of flash/injector pin marks etc, very ugly. I'm not planning on opening up the sides, and I'll keep the elevators up, so it won't be visible for this one. Lastly for today, I couldn't resist building a single B-25, just to see it. Relatively basic as well, but it should scrub up pretty nicely when I'm all finished. Hoping to build momentum on her over the next few weeks, other projects dependent of course.6 points
-
Hello all. My main contribution to this Group Build will be Fairey's finest, the Rotodyne. This kit has been in my stash for quite some time, and I feel this is the right time to build it! I know it could have gone into the Classic Airfix GB, but fear not, the Vintage Classic reissue version will be appearing there too, as I just happen to have acquired that as well. This is the boxing that I will build for this GB: It cost me a bit more than the £5.97 label suggests. The parts are typical of those from 1959 - Not too bad for their age, and it has probably worn better than I have. The transfers were one of the reasons I had not built this before: The blue printed seemed to me to be way, way too light compared to the original, and I could not find any alternatives. Thus was born my idea to do it as a 'Raspberry Ripple' schemed aircraft. I was put off that too because me and masking had a bad relationship, having always thought 'that's way too difficult'. Then I did a Twin Otter with this scheme: I thought 'Aw, shucks, this isn't so bad after all' and I was hooked. The Andover was the best view I found of a Raspberry Ripple aircraft, but I think I will need to modify the red sections with the Rotodyne. The final nail in the coffin was when I ordered a transfer sheet for a Dakota. It too had a RR scheme, and, even better, alternative options for the Royal Aircraft Establishment legend: https://www.hannants.co.uk/product/X72084?result-token=Ce7lp The other option will be going onto my Dak sometime in the future, I just have to remember to use the right ones on this Rotodyne. The kit will be mainly built OOB, but I will make one or two minor adjustments, like maybe rivet removal, sinkhole filling and maybe rescribing. Personally, I would like to keep the rivets and raised panel lines, but it depends on the joint qualities. I have read that removing the location pins helps, especially on the fuselage. I am looking forward to building this one here, but I need to finish an EE Lightning first. Thanks for looking, and any advice or 'clanger warnings' will be greatly appreciated, I usually make a few each build Ray5 points
-
I bought this kit at Telford a couple of years ago and didn't really have any plans about when to build it until James proposed this GB. The kit's very basic but it seems nicely made, and hopefully it'll come out well. Of course I've had six months notice that the GB was due, so I made sure my bench was clear and all was prepared somehow still have five builds doing next to nothing on my bench, but hey.... None of them are for GB's (any more....) so this one can take priority. So, yes, the kit only consists of two and a half parts, but hey.... I hope the fit is good. With my recent projects (one of which is an Airfix Tonka with the worst fit in the entire known universe) this hasn't been the case, so I'm hoping that this one will pleasantly surprise me. Detail isn't huge but you never know, I may go wild and add some. This is the sum total of the decals - I can feel some raids on the spares box and a few semi-educated guesses in my near future to try and add some detail to the markings and maybe even the odd stencil or two, who knows? As for the scheme, I'm going to largely make it up, thanks to a bit of whiffery being de rigueur in this GB. I'm fancying something like an early war Bf109's RLM02-based splinter camo or something. We shall see. Anyway, roll on Saturday the 22nd, so I can get started. Oh, wait.... I've got two gigs that day, so maybe it'll be the Sunday before I start. Nothing likr getting the excuses in early, eh?! Cheers, JRK5 points
-
I'll be joining in with the Mirage 4000, when I can get at least one current build finished and off the bench. This'll be the Modelsvit 1/72 kit, I'll post a photo of the kit later but for now here's my photo of the real thing from the museum at Le Bourget last year: There are (I think) two possible schemes for it, this one and a desert scheme it was painted in to try and sell it in the Middle East - I'll be doing it in the white scheme. cheers Julian5 points
-
Quite liked the idea of this, especially as you get a lot of the pod vehicles. Simple enough to assemble but the colour chart was all wrong and who on earth knows how the engines are painted?? I just made it up as I went along haha. And the others... Hope you enjoy the pics! Alex5 points
-
JG 54 Fighter Color5 points
-
Hi all I don't normally 'do' 1/72 as the parts are too small & fiddly for my sausage fingers these days, but I couldn't resist Airfix's new release. It's a cracking kit, fine panel lines and selected rivets with plenty of detail inside & out. I think I'm going to have to track down their B17 now, I can feel a 1/72 4-motor bomber theme coming on! Engine 2 though is a temporary resin cast while I wait for Airfix's spares dept to cough up a replacement for a missing cowling (drums fingers)... Thanks for looking, J.A.5 points
-
HI, I got this with 1/72 scale Stork by Academy, thought it would be an easy couple of hours, but with my sausage fingers it took a bit longer, not quite done yet and maybe not 100% historically accurate but here you go... Oh, and I lost a wheel5 points
-
A few more Handley Page Hampden Grumman Widgeon / Gosling Seaplane (a nightmare of a kit ! ) Curtiss P-40E Kittyhawk Cheers Pat5 points
-
Really loving this build. Looking forward to future updates. I decided to do my own 1:500 Resolution in 1935 plain grey: So really looking forward to seeing how she looks in the 1942 camouflage scheme. Really great work thus far, most impressive.5 points
-
Slight break. Back on it. Cries of 'Holy thread resurrection'!! Its fair to say I had a mental block on this one, and I wouldnt care but there is so little to do to finish it Near side skirts all done The debate is how many I fit. May knock a link out of that track also. Should finish the other side tonight. Motivation back having just built a Comet and MkIII Churchill which are in the process of being primed. I'm going to stick with grey on this one as the bronze green is so dark.5 points
-
I was looking at references to Roy Cross artwork and found a very interesting working drawing he did for one of the aircraft kits (a dornier I think?)5 points
-
Another monoplane from the Golden age, here is my Macchi Castoldi MC 72 from a SMER 1/48 kit. One of my favourite planes and one with a unique engine layout. Here it is with the Curtiss R3C-2 from the top of the page and my other Schneider Racers. All in 1/48 Thanks again to @Corsairfoxfouruncle and all those who contributed during the build. Build thread is here ..Colins Macci MC725 points
-
Go on Martin scratch it! Thanks to the link I've sort of got her looking more like the real thing with a bit of paint and masking and spare decals.5 points
-
While at the Northern Model show a couple of weeks back got this little gem from Peter Hall of Atlantic Models and the only other thing I got was a hand held vice clamp. Stay Safe beefy5 points
-
Hallo Now it is finished. Some issues to call out: Landing light bracket can not be installed. No way, since there are two pins, upper most edge, rear spar, not to catch! Must be done before gluing the wheelbay on the wing! Hood, nothing for showing properly an open hood, in the open position to get it fixed properly! Make a pin at the very rear of the hood! The rear spar in the hood from etched parts is a little to big! You will have troubles with fixing the hood! Landing flaps, a small gap like a black line shows up after beeing in position! Have to find a better solution. Installing the gunsight is quite tricky! Do not forget making a hole for the pitot! There is none in the kit, just in the instruction! Happy modelling5 points
-
I cannot look at a winter camo JU-52 without immediately humming the theme to ‘Where Eagles Dare’!5 points
-
Tracks! Pleased with these. Now I just need to set everything in position so that I can remove the sponsons without it all falling apart. With this major part of the build out of the way I can get on with the hull and turrets. Good timing because I'm off to the Airfix GB with a Bristol Blenheim now. TTFN.5 points
-
Sorry Guys, I posted this in the wrong thread! I wondered why it garnered little interest! Let's try again. Having got back from holiday, I found that my mojo seemed to have disappeared. This frequently happens when I spend any time away from home. I don't know why this should be so but there it is. I decided to kickstart the mojo by doing something different on the Mariner and took a look at the wings. The bomb bays in the rear part of the engine nacelles, feature some very nice detailing. However, the detailing ends at the kit supplied wing rib parts, leaving a very visible void beyond them. Accordingly, I extended the kit supplied detailing beyond the aforementioned ribs using .25 'Thou plastic strip. I glued some .40'Thou to the back of the ribs supplied by Eduard in their bomb bay set for the Mariner. These were then applied to the inner wing of the aircraft. Eduard do not however supply ribs for the outer wind panels and these were scratch built from some more plastic card .The ribs then had the visible faces detailed with more plastic strip. I had been putting this task off for some time but in the end, I found the job somewhat therapeutic. Having done a dry dry run of assembling the wings, it began to dawn on me just how big this model is going to be. This beast is going to be huge!. Anyway, enjoy the following, very overdated pictures and thanks for looking. Plonker of Mars 👽5 points


.thumb.jpg.b4a5069fd2c2dd5708ce1694345c5b11.jpg)

.thumb.jpg.ba34a9f6ddce411193946dbdcc7b5fe8.jpg)


This leaderboard is set to London/GMT+01:00