


airscale
-
Posts
777 -
Joined
-
Last visited
-
Days Won
8


airscale's Achievements
")
Obsessed Member (4/9)
9.2k
Reputation
-

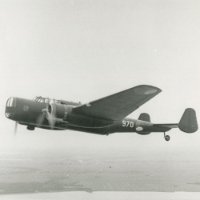
1/18 Hawker Sea Fury - probably VX620..
airscale replied to airscale's topic in Work in Progress - Aircraft
hey guys bit more done... ..I had done such a rudimentary job on the engine, so even though very little can be seen, I added what I could.. the fuselage formers were bulked out with hard foam and all the template outlines blacked out with a sharpie so I can see the sanding thresholds later.. also added some card formers to help shape the exhaust area around the nose.. I made up a 3D part to lock all the features of the wings together with the spars and dihedral on the outer wing panels and made up ribs from 2mm card.. ..and the wings & airframe start to take shape - it looks like an air racer without the last few ribs and the wingtips.. TTFN Peter- 16 replies
-
- 12
-

-
1/18 Hawker Sea Fury - probably VX620..
airscale replied to airscale's topic in Work in Progress - Aircraft
Thank you folks - very kind I went to make a basic cockpit tub from 3D and once printed I needed to make some adjustments... while I was at it, I got a bit carried away.. still lots to do, but a great canvas, even if it is cheating a bit TTFN Peter- 16 replies
-
- 13
-
-
nearly finished - just flying wires to go.. TTFN Peter
- 152 replies
-
- 30
-
-

-
No rest for the wicked they say, so with the paint drying on my S6B it's time for a new project.. I built a Hobbyboss Sea Fury back in the day and added loads to it including a visible engine and I have always wanted to make a large scale one. The problem was (and is) it doesn't fit in my display cabinet. I remeasured it the other day and somehow got my sums wrong and thought it would fit so off I went and started researching.. Turns out I was right the first time, the airfame is a beast and won't fit so will need a home once complete (or I get a bigger cabinet..) My last one was the civil demonstrator G-AKRY, but now I just proved to myself I can paint an aeroplane, this one will be a service machine. Choosing one is harder than I thought - it's got to be RN, but to be honest, they were all painted the same for now I chose this one VX620.. I started with Jumpeii Temma's plans and checked these with Will at DBMK on the one they scanned - they were bang on, so I designed the parts for my cutter.. also made a 3D cowling.. ..the brass bar is to keep the keel rigid.. ..the keel was taped to a flat sheet of acrylic and all the formers added - I also 3D printed a wingroot section to help alignment.. ..I have had problems with plastic card cores flexing during construction so I clamped an ali bar and added the other side, moving the bar as I went.. ..very quickly the fuselage took shape - it is huge.. ..the floor is too high here and had to be chopped out and lowered - this is the problem with not having drawings ..having designed the cowling, I spent some time doing the prop, spinner and a basic engine front.. I think it came out pretty good - it defines the aeroplane so has to be right.. ..starting to look like the brute it is.. ..so thats it - off and running with a new build ..A plea for help - if anyone has any good interior pictures of the cockpit, seat, seat bulkhead, rollover structure, please drop them here or PM me also if there are more unique RN schemes out there I am definately open to a rethink TTFN Peter
- 16 replies
-
- 22
-
-
-
..teaser... ..the primer was fine when applied over clean fine sanded surfaces and this model has had a LOT of masking so it needed to be getting some stainless steel flying wires etched and a mask for the serial - once thats done it's glamour shot time Now where did I put those Sea Fury drawings... Peter
- 152 replies
-
- 19
-
-
aaaand the primer is on, but I am stripping it off again..... ..I got as far as a topcoat of silver, then the first attempt at masking and the paint just came off with it I think there a couple of reasons for this - my test mule was fine (my 1/18 Fw190), the primer is properly on there and takes tape / fingernails and is pretty hardy, the only difference I can think of is I cleaned that with thinners the moment I painted a spot, wheras the S6B was cleaned with thinners the day before yesterday - I think the aluminium oxidises so quickly that it caused a problem with adhesion. The other thing is the S6B is polished with wire wool so it's like trying to paint a mirror, so I am starting with the floats and stripping all the paint off and giving it a key with very fine sandpaper, then a clean before paint and it should work.. ... this is why I don't paint models... Oh, and next one is not a Stuka - that is one of our products they made 864 of my subject if that helps TTFN Peter
-
Hey Toby - well my version is Humbrol 25 @75 - 80%, Revell 52 @ 15 - 20% and Gloss white @ 5 - 10% - was never good at quick maffs or paying attention - it was a full tin of 25 with amounts of 52 and white added ..and no, it's not a Mosquito - if I had a cabinet that big I would build one
-
thank you all, very kind So, the painting stage is looming.... I needed to get some new etch primer as it only has a 12 month shelf life and frustratingly it is still not here yet.. I have worked out the colour (I think) - some of the original paint is still on S1595 in the Science Museum (it was repainted ages ago in the wrong blue, likely roundel blue) so I did some samples and arrived at what i think is a reasonable match given the limitations of eyeballs, digital sampling and light I took all my similar blues and did a tester, photographed in natural and artificial light and ended up mixing a shade from what I had - this is the analysis.. It is what it is, there are no colour pics so sue me if I am wrong... ..while waiting I busied myself and there is absolutely no construction remaining.. Pitot tube done - complex little thing.. ..cockpit canopy done, another complex little thing - i hate doing transparencies as they are just a huuuuuge opportunity to fu#k up.. also all the beaching gear was made of plastic and wood, and the wire wheels finished.. ..again with no colour photos, I painted them what I thought / interpreted - basically battleship grey as it's likely marine paint.. ..added the petrol cans and trolley.. ..and thats it - the next time I post, it will be all painted.. wish me luck ..in other news, I have decided on my next subject - something I have wanted to do for ages but thought it wouldn't fit in my display cabinet - I measured again and I think I can just squeeze it in - any ideas? 😎 TTFN Peter
- 152 replies
-
- 27
-
-
-
thank you all, you are so very kind Hi Thom, I don't think this one will be an e-book, I did one for the Spitfire XIV and the Hawker Fury, but unlikely this one will You are right, I do want to, along with a Boeing 307, a Lancastrian and an HP Hastings... So, lots has gone on the last few weeks... ..the propeller was made as a 3D print which I found very hard to do as it's a complex shape which has oblong roots and quite a twist.. - the spinner cap is machined from solid aluminium so it can be polished like the original.. ..I started the wings by filling the plastic frame with foam & filler - this was then refined many times and note they are complete with the ailerons in place so they can be cut out later... ..after a lot of finishing, the ailerons were removed... ..and so to the skinning... I drew out the plans that copied the layout of all the fastners that cover the entire surface.. by the time I finished I selected all objects in the drawing and for the four wing surfaces there were 8,962 rivets... that is bordering on the ridiculous and likely as many as I have done on entire airframes before.. ,,nothing to do but get started, so here is a typical panel - the small dots are one rivet depression, the big dots two, which was even more demoralising.. ..also seen is a template to score out a hatch with a pin in a pin vise.. ..after 3 days and a very sore set of muscles they were done... ..no time to rest though, and the ailerons were completed.. ..the wings were added using JB weld and given a day to set, then I could start the fillets - I have not done the front ones as they need to also cover the forward strut mount.. ..with the wings on, I could add the belly oil cooler assembly - as with the fuselage sides this was a 3D printed buck over which the metal sheet was fomed.. ..in two parts, it stretches all along the lower fuselage.. ..with so much skinning going on, I fancied a change and so started on the beaching trolley - well at least the wire wheels of the trolley.. I 3D printed a hub, a rim and a jig.. ..and then bent a lot of piano wire spokes and started to populate them ..and the finished wheels, along with some Pratts petrol cans I have seen in pictures with the airframe.. ..and so before the painting starts next week, some final shots in all her nakedness... ..time to start thinking about the finish... until next time TTFN Peter
- 152 replies
-
- 46
-
-
-
Howdy all Hey Nick - yup, in this episode in fact I finished the floats and detailed the struts, all done with litho - this includes some very long, this one piece multi hundred rivet strips that run the length of each chine.. the struts were detailed as well.. ..next up the tailfeathers... the stabiliser seems to have overlapping panels, with the elevators a joggled but flush panel edge... ..the card formers I made had tiny brass 'L' sections added to the trailing edge and were filled with P38 - then the skinning started with the outer edges as the panels overlap in this direction.. ..tape and dymo tape guides used to make one piece wrap around panels.. ..the elevators were also done and interstingly have a sheet extension at the trailing edge so this was copied by leaving the brass sheet core exposed.. ..the rudder was a sheet brass core with plastic ribs, then covered with scored thin plastic sheet to represent linen - I can't see any evidence of rib tape, but there is a characteristic rib feature i need to add (perhaps this is tape?) ..after covering, I added the Flash Gordon style counter weights.. ..and while not fitted yet, the tail is virtually complete.. ..might do the prop next as it is starting to come together.. TTFN Peter
- 152 replies
-
- 32
-
-
Thank you Gents, very kind Will do - next time Hi Pete - I use a jewelers awl and do each one, one by one...I have a few templates to help with spacing.. The saga continues with skinning the floats - these are covered in symetric rivet patterns and rather than do panel by panel, I did pairs of panels for each float. I would say over the course of a few days I did ~5k rivets.. ..here are two pairs with about 1200.. ..again these were only lightly burnished to retain the oil canning seen on the real one - also any panel overlaps on the real one were copied.. ..once complete, I started the struts - I used a 3D extrusion to sheath the brass rods I set at the beginning, and then used ali foil on the floats and fuselage so I can fill to them and it will all unstick cleanly with a matching mating face.. ..it can all be seen in a jig I had to make so I can get everything aligned properly & the yellow sponges apply enough upward pressure to hold them in place without distorting the position.. ..the forward upper strut mounts have these odd tails, maybe to deflect water.. ..these were made by embedding stiff wire into the strut and filling around it.. some of the mounting stubs are a bit short for my liking, but they can't intrude into the cockpit or they are as long as they can be before they cross each other hopefully when mounted with JB weld they will be ok.. ..skinning these is going to be problematic as it won't be easy for one thing, and they would need to be a perfect fit when assembled so I haven't quite figured out how I will do it all yet.. TTFN Peter
- 152 replies
-
- 30
-
-
-
Thank you gents, you are all very kind With the fuselage coming along, it was time to start another major sub assembly in the floats... the former structure was filled with hard foam to give it a basic profile.. ..this was then skim filled with P38 and templates used to get the chines the right shape... ..I would say there were over 30 filling/sand/prime excercises before they were in their final forms.. ..then the undersides were skinned... ..there were a few structural features of interest, one is the lapped panels where on the real aeroplane the panels are joggled into an overlap, and the other are these sort of serrated panels which I assume have something to do with disrupting water suction on the step of the float - these were cut one serration at a time so quite tiresome ..on to the top surfaces now and these are covered in spaced fittings & rivets so are going to be a challenge... TTFN Peter
- 152 replies
-
- 33
-
-
-
1/32 Vickers Vildebeest 3D Printing/scratchbuilding
airscale replied to Jamesmodels's topic in Work in Progress - Aircraft
truly epic So many things to love about this build - unbridled ambition, consumate skill and I just get a huge thrill seeing customers enjoying my stuff bravo Peter -
Happy Friday my friends Hi Malc - they are just attatched on the edge - I have lost one already but there has been some heavy handling lately Thanks for dropping in - I did copy N248 as S1595 in the Science Museum has nothing there - just a big hole which can't be right, so I took a gamble and copied the other airframe.. I am a long way from colours, but will look for period paintings / adverts etc and go with whatever I can see at the time The fuselage is skinned like a Spitfire, from back to front with some overlaps - the fist step was analysing pictures to work out the skinning order - I started at the rear with a tape template, using dymo tape to define borders where needed. I always mark out rivet lines on the tape template so they are right on the model as what can look a straight line rarely is... these are those panels after rivetting and making the holes for the circular hatches..the next step is to peel the tape off, wash them with a stiff brush and solvent to get all the tape discs left by the rivetting off, and then finally turn them over and burnish hard with a rod to remove the 'quilting' effect... ..with that panel down and the others that form the bottom layer, I need to fill the upper edges as with another panel to go on top if I don't a visible ridge will appear when I lay it down... ..then the next panel that wraps across the spine - you can see some rivets done with the panel in place have deformed as the foam/filler skin has given out under pressure.. nothing can be done about that.. ..the edges are also filled again.. ..with that done, the skins on the tail are marked out....this is an intersting design feature as the tail is actually the oil cooler so the surface air cools it rather than a cooler sticking into the airflow and causing drag.. ..it has a very distinct 'quilted' appearance which is exactly what you get if you don't burnish a rivetted panel, so this will be fun to make.. ..same principle applies - tape templates & dymo tape..just this time i only lightly burnish the panels before adding them.. ..with the fuselage skinned another distinctive feature needs doing - there are radiators running the full length of the fuselage each side (again to reduce drag by hanging them off the wing or under the chin).. ..like this.. ..I pondered how to do it and eventually tried 3D printing a male mould I could work from - I figured I could burnish the shape in one piece if I was careful.. ..it had to be in two parts to be printed though.. ..these were then superglued to a bit of perspex.. and the work started.. ..millions more damned rivets... ..and then scored & carefully broken away.. ..I was worried that I would need to fill the 'tubes' but it seemed rigid enough so I bit the bullet, took a deep breath and got ready to stick it in place.. ..quite a bit of work that, so here is a walkaround.. ..gonna be a shame to paint it TTFN Peter
- 152 replies
-
- 37
-
-
-
Hi folks I have no idea Stuart, but the airframe in the Science Museum is unrestored so I assumed it was original? I kept thinking I will stop in a minute and take a picture of what I am doing, but then I would think, I will just finish this bit... well before I knew it the engine cowling was done.. it is a complicated structure, but shouts early aviation.. can start the fuselage proper now.. TTFN Peter
- 152 replies
-
- 41
-