Leaderboard


Popular Content
Showing content with the highest reputation on 17/12/17 in all areas
-
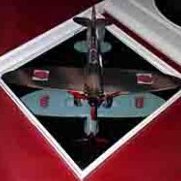
This model languished on the "Shelf of Doom" for ten years! I have finally gotten around to finishing it. It is an OOB build, apart for the Swastika. Painted with Xtracolor enamels. A nice and easy uncomplicated build (so why it took me 10 years to finish I don't know!). The Condor has always been a favourite aircraft of mine with it's graceful and elegant lines, I just haven't had much luck when it comes to building them! Thanks for looking, and a Merry Christmas & a Happy New Year to you all! Angelo24 points
-
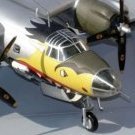
Hiya Folks, Another one which has been gathering dust, partially painted since the middle of last year,....I`ve got around to finishing it now! DSCF2120_NEW by Tony OToole, on Flickr DSCF2127_NEW by Tony OToole, on Flickr DSCF2124_NEW by Tony OToole, on Flickr DSCF2138_NEW by Tony OToole, on Flickr DSCF2120_NEW by Tony OToole, on Flickr DSCF2116_NEW by Tony OToole, on Flickr DSCF2092_NEW by Tony OToole, on Flickr DSCF2093_NEW by Tony OToole, on Flickr DSCF2115_NEW by Tony OToole, on Flickr DSCF2070 by Tony OToole, on Flickr As usual it was brush painted, but I had a slight hiccup with the decals which I only noticed while taking the finished pictures,...doh! I know that there is some doubt about whether this aircraft actually had the lightning stripe down the side of the fuselage and in the photo of the real aircraft that I used as reference it is not clear,...and it probably wasn`t applied,..in fact I have a feeling that the stripes might just be parks on the photo... but I liked it,...so decided to run with it! Here is the photo of the real thing,.....as posted by Troy; All the best Tony20 points
-
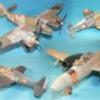
Hi everybody, Here you are my latest build... a frenchy Turbofirecat made with Hasegawa/Revell Grumann S2A Tracker kit and Wolf Model conversion kit.Decals Sheet from Syhartdecal.You can see more on my FB https://www.facebook.com/AviapassionMaquette-1507844922841510/ Or on Master194 frenchForum http://master194.com/forum/viewtopic.php?f=4&t=99446 I hope you will like it Cheers Thierry17 points
-
Dear fellow Britmodellers, this is Fly Models' 1/72 Ilyushin Il-10, "Soviet Service", built from the box. There have been a few comments about accuracy issues on this kit in the 'Rumourmonger' thread : In my humble opinion, the nose section looks undernourished, being about 2mm to slim and lacking the distinctive curavture of the original. The windscreen sits a bit too high, about 1mm. The placement of exhaust rows does not match plans either. Despite these issues, the kit builds into a well-detailed replica and does look like an Il-10 to me. A detailled build review will be featured in an upcoming edition of Scale Aviation Modeller International. The model was painted using Gunze/Mr.Hobby acrylics. All photogrpahs by Wolfgang Rabel. Thanks for your interest, greetings from Vienna.16 points
-
Here's my version of the classic kit from Hasegawa. These 1/72 kits make wonderful models as they are. Kit decals and Model Master enamels.16 points
-
Merry Christmas and a prosperous new year to you all. I would like to share my last build of the bench with Kinetics new 2 seat Harrier. There is a little bit of a story around this kit so to keep it brief the kit arrived on the 14th October and work started immediately with a deadline for the kit to be on display at Telford just four weeks later. For those eagle eyed modellers amongst you it was on the IPMS Lancashire club display at SMW. Cant go into too much detail as the build will be in print. But a much improved build than their two Sea Harriers and a first in 1/48th scale injection moulded plastic. A thoroughly enjoyable built any one who thought NMFs were difficult than they should try gloss black! All out the box with Tamiya gloss black and Eduard RBF tags. Thanks for looking Rick G15 points
-
After two years I finished building the IL-28 Beagle. The base was the Trumpeter model, to which I made more than 1000 parts. I bought resin wheels from Armory and the OFAB-100 bomb from Eduard for the model. Several photos of the interior and other parts. Cockpit of the shooter. Sights. Bomp chamber. Pilot and navigator cockpit.13 points
-
Hi everybody, After the C2 and waiting to finish my Ki-100 of Aoshima I started on the C7. Not too many squadron choices because only one had it in the IAF, but my Wife choose the name, so it's the 514 nickname "titan" With it's little brother the C2 Will finish my Ki-100 now By Joel13 points
-
Hello, This is the Academy F/A-18A+ converted into a spanish EF-18A (Modernized). The only after-market part is the decals. The kit is really very good, better than the old Hasegawa. The camouflage is a bit odd, definitely not the regular Spanish Air force one, probably applied during a maintenance work. Cheers13 points
-
Hi folks While it's a pretty accurate shape with good surface texture the kit is very much 'short run' quality in terms of parts fit. It's ok, but surely a subject deserving of a first line manufacturer in 1/32. Merry Christmas to all Britmodellers! Regards J A.13 points
-
#25/2017 My dad finished another one for this year. Hasegawa kit, Eagle Cals, EZ Line for aerials, plastic rods and lead wire for brake lines, Gunze and Tamiya acrylics Slightly different colour interpretations of this aircraft, also usually seen with a red spinner. My dad decided to go after Claes Sundin´s profile in his profile book no.6. Build thread here DSC_0001 by Reinhard Spreitzhofer, auf Flickr DSC_0002 by Reinhard Spreitzhofer, auf Flickr DSC_0003 by Reinhard Spreitzhofer, auf Flickr DSC_0004 by Reinhard Spreitzhofer, auf Flickr DSC_0005 by Reinhard Spreitzhofer, auf Flickr DSC_0006 by Reinhard Spreitzhofer, auf Flickr DSC_0007 by Reinhard Spreitzhofer, auf Flickr DSC_0008 by Reinhard Spreitzhofer, auf Flickr DSC_0009 by Reinhard Spreitzhofer, auf Flickr DSC_0010 by Reinhard Spreitzhofer, auf Flickr DSC_0011 by Reinhard Spreitzhofer, auf Flickr DSC_0012 by Reinhard Spreitzhofer, auf Flickr DSC_0013 by Reinhard Spreitzhofer, auf Flickr DSC_0014 by Reinhard Spreitzhofer, auf Flickr DSC_0015 by Reinhard Spreitzhofer, auf Flickr13 points
-
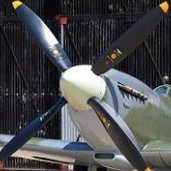
Hi Guys, today a really old Kit, with some improvement's. I used the Frightdog conversation kit with new Propeller und underside cowling to display a MK IV, Tanks are out of the Spare-Box, Seat is from Italerie, also the Wheels, The Roundels, as nearly in every RAF Kit from Matchbox, where out of Register and replaced. Stencils also from Spare-Box. Paints Agama, done by brush. Hope you like this old girl.. Best Regards Stefan13 points
-
Hi folks, Made this vintage kit, a 1963 Arii Nakajima A6M2 the kit is extremely basic with zero cockpit details and has even Hinomaru marks on the wing, the clear parts were really bad. It was full of flash and pin mark. But it was extremely affordable and quick to built. Hope, you like what I have done with the kits Cheers12 points
-
Latest and probably last completed build for this year is Airfix's Bf110c. Quite a nice little kit that when together easily and only needed a small amount of filler overall, cockpit detail is sparse and I was going to get the Eduard PE set but I managed to pick up one of the Eduard weekend edition Bf110's so that one will get all the extras. This on is OOB, painted with Tamiya acrylics, and dark brown oil paint for the panel lines. The kit decals and stencils are excellent and went on with no issue. As usual any comment are welcome. IMGA0128 by neil Connor, on Flickr IMGA0129 by neil Connor, on Flickr IMGA0130 by neil Connor, on Flickr IMGA0131 by neil Connor, on Flickr IMGA0132 by neil Connor, on Flickr IMGA0133 by neil Connor, on Flickr IMGA0134 by neil Connor, on Flickr IMGA0135 by neil Connor, on Flickr IMGA0136 by neil Connor, on Flickr IMGA0137 by neil Connor, on Flickr11 points
-
An attempt at another Pro-modeller kit that's been in the stash for a while. Nice kit overall. landing gear is bit fiddly though and I used Eduard masks to ease the painting. It is finished in Vallejo RLM 66 underneath, RLM 70/71 with an overspray of RLM76. The kit decals disintegrated so decals from the spares box were used. 20171216_105015 by dereknferguson, on Flickr 20171216_104959 by dereknferguson, on Flickr 20171216_104951 by dereknferguson, on Flickr 20171216_104923 by dereknferguson, on Flickr 20171216_104913 by dereknferguson, on Flickr10 points
-
Folks, i ran a WIP for my T-62 build on here a good few months ago.. Here is the WIP... I never however posted up a finished image of the build. Here is is. Thanks for looking.9 points
-
This is my effort at a Monogram/Revell/Pro-modeller Me410B. Nice kit with no real problems. I used Eduard masks for the cockpit glazing and finished it in Vallejo acrylics RLM 74/75/76. 20171216_104850 by dereknferguson, on Flickr 20171216_104835 by dereknferguson, on Flickr 20171216_104827 by dereknferguson, on Flickr 20171216_104818 by dereknferguson, on Flickr 20171216_104801 by dereknferguson, on Flickr9 points
-
I say ‘representation’ for two reasons; it is not the best build - I really am getting a bit old for this fine work stuff - and I am not really sure the decal manufacturer and the references in one particular book and the interweb have got it right. I was attracted to the Aeromaster 72-020 B-24 Liberators Galore set. The problem is that they have the rudder markings in red. This is correct for the 456th, but the diamond and clover symbols are consistent not with the 456th, but the 455th, specifically the 741st Squadron. In the Osprey work by Robert Dorr, B-24 Units of the Fifteenth Air Force, at p.29, the red scheme is repeated and the aircraft credited not to the 455th, but the 456th BG. This conflicts with Paloque’s Twelfth and Fifteenth Air Forces and Watkins’ Battle Colours vol. 4. Both publications have the colour as yellow, not red. I resorted to Kenn C Rust’s 1976 publication Fifteenth Air Force Story, which at p.53, shows a 455th B-24 with what he describes as yellow rudders. That photograph is not of great quality but suggests that the engine cowl rings are the same colour. This conflicts with Watkins, who infers a ‘plane-in-squadron’ colour of green. I think green would have shown up darker. However, Watkins, Rust and Paloque concur on the 455th BG rudder colour being yellow and the diamond / clover leaf logo combination being 741st BS. So I took the diamond and clover leaf symbols from the decal sheet and did the rudders and cowl rings yellow. I left off the aircraft name ‘Sissy Lee’ because that seems to have been for a 456th B-24. Michael9 points
-
Well I'm calling this one finished. Its the Airfix 1/72 Whitly VII done in Coastal Command colours. Paints all Humbrol and sprayed on. Done out the box, kit decal etc. Only replaced the pitot tube on the wing with a piece of good old Albion Alloys finest. Apologies for the number of images. Could not decide which not to post :-) Comments welcome. Tim9 points
-
Hello all .... As I said in my Scooter RFI I built this Hobbyboss FJ-4b Fury along side it. Its not a bad kit but i do think at least in some ways its a clone of the Grand phoenix Fury. I built the Grand phoenix fury as my 3rd model when I came back in 2014. I will add a few photos of it at the tail end of this RFI. I’m a bit of a nut with Sabres, Furies, and Super Sabres. I will let the plane do most of the talking. I chose to represent a Fury flown by VA-55 in 1958 off the USS Bennington. I had a spare decal set for the codes. But i hand painted the Checkerboards & made a mask for the Trident. Thanks to @Tailspin Turtle for his assistance in finding photo’s. So here is my VA-55 Fury. I chose to arm this with Two Aim-9b’s, two drop tanks, & two rocket pods. The Grand Phoenix Fury is from VMA-212 and has two Aim-9b’s, Two gas bags, & a data-link pod and a Bullpup missle. Ok the Grand Phoenix Fury is in the back, with the red markings. Yes i know the codes are reversed i didn't catch it right away when i built it. Well I hope they meet with your approval. As usual Comments, Questions, or Jokes ? Someday i hope to do a whif of both the FJ-5 fury proposal that was to compete with the A-7 and the Super Fury that was to compete with the F-8 Crusader. But this will be for another time. Dennis9 points
-
A return back to the forum after a few months achieving nothing. I started this model just to get it out of the stash. A few years ago I bought an F/A-18E model from our favourite auction site and the seller very kindly sent me this kit as part of the deal. It seemed like a good simple way to get back building after a mini lull in production. the trouble is it really isn't the best of kits and desperately needs some extras to spice it up. As I hadn't paid anything for the kit I figured a few extras wouldn't hurt, so added: Aires Wheel bays Aires Cockpit SAC - Undercarriage Master - Static Dischargers Royale Resin - F-16 Wheels The cockpit and wheels bays really are a drop fit, even though they are designed for the Hasegawa F-16. Not really a coincidence since both kits really do bear an amazing similarity to each other. Construction isn't too bad apart the usual intake troubles with most F-16 kits and a really awful fitting wing to fuselage joint. Lots of filler and sanding sorts that one out though. Painted with Hataka paints and matt coat provided by Xtracrylix. The decals were Afterburners 'Bentwater Aggressors' sheet and a Two Bobs inert weapons sheet, both performed flawlessly. All in all another build finished from the stash and another one added to the planes I've seen theme, that I often like to do. Onto the pictures:8 points
-
It's always a temptation with a seaplane isn't it Pete? I'm not sure that the forum is ready for such decadence... I have to remember that - ta Keith! Not being overly fond of social media I tend to forget such matters... I do remember 'O' levels. And the fact that absolutely nothing that the school told us about them turned out to matter in the long run. A saving grace was our English teacher, who introduced us both to John Donne...and to Spike! Bless him. Amen to that brethren. Bill: I just love these timely interjections of expertise. Keep an eye out for some Perdu-esque textile working before this build is over! Loved the pics - the barge rope looks excellent! Suddenly, after many weeks of pieces - a thing! I heard you say that in the voice of Vincent Price... Go for it Giorgio! Good point I have some quite fine PowerPro braid like this that I used to use for spinning Pete: Might be worth trying to unpick and Perduificate it as a test? Having been shown the ropes (so-to-speak ), I've filed those nuggets away for final detailing. For the moment though, needs dictate we crack on with final structural bits n' pieces. Something I forgot to post yesterday was the remedial work on the area where the gondola mates with the fuselage - in the case of my work there was a slightly raised profile: On the actual aircraft this area is a smooth curve so this obviously couldn't stand in this condition. I'd actually forgotten that I'd scored one of those micro-chisels (that many of you have raved about on the forum) off of the lovely bunch of lads on the Modelling Tools stand at Telford. Absolutely brilliant for shaving that 'lip' flsuh in such a hard to get to confined space beneath the wing: I only bought the 3mm one and am already regretting not buying one of each that they had. Now. Canopy. Yes. No putting it off any longer. Whence you saw it last it was perched thus: As of this afternoon, it now looks like this: Using a fresh scalpel I scored-out and excised both roof windows, and each of the side windows: Close scrutiny of photos of that region - plus the wealth of detail in the handbucher about fixtures and fittings in this region - reveal the canopy framing to be quite beefy in character. Here I've begun blocking out the main structural elements with Slater's microstrip: The various excesses will be trimmed to size when I'm satisfied everything's juxtaposed correctly (and also to stop the canopy keep falling into the cockpit at this stage!): I've masked inside and out using @Nigel Heath's double-cutting method for the masks. The masks were hand-cut and subsequent painting methodology for this rather tricky region of openings is to give the interior framing a good layer of RLM02 before masking the interior off completely and gluing the canopy into place. Once the exterior paint job is done the tape can be pushed-in and retrieved with tweezers and the sliding windows added. That's the theory anyway. Let's see how that pans out in actuality... Thanks for your support and feedback as always. Tony8 points
-
Thanks Gents I couldn't post yesterday morning before we went off to meet the future in-laws of the daughter - is there a term for that? Hmmm. A second coat. I dipped the brush in thinners before applying the paint and again it went on smoothly: I think I'll sand a bit with Micro-mesh and then one more thinned coat should do it.8 points
-
Hello all Im finally finished with this one, I started my first ever WIP on October 11th. Heres a link to the WIP It Represents an A-4E used by VMA-214 BlackSheep operating out of Chu Lai in late ‘66 or early ‘67. I represented it with a mixed load out of Mk.82’s and GP bombs left over from WW2 & Korea. There was a munition shortage at the time and all services were using up stored old stock. So here we go I’ll let the plane do the rest of the talking. I hope it meets with some good reviews. I built this in tandem with a Hobbyboss FJ-4b Fury. I will post the photos for the Fury soon. They are both completed. As usual any Comments ? any Questions ? any Jokes ? Have a great modeling day. Dennis7 points
-
Well my RWS-8 DWL quick build is all finished.Not to bad for me Quit fun to build really and learning as I go along. Now to get back to building my spitfire that I was waiting for the paint to arrive.7 points
-
My latest build is the 757-200 from PAS models (Russia), with decals from DACO, the Coroguard from Flying Colors and the windscreen and window decals from Authentic Airliners. I had fun building this model, but there were two problems. One was that I forgot the balance weight near the top of the fuselage, after I already glued and even puttied the two halves together. As such I had to cut open the model to add the weight to prevent it becoming a tail sitter (on the plus side, it did give me experience for possible future conversion projects). The second one was the decals. As said, I used the decals from DACO (normally they are very good), but the fit was terrible (most likely because it is designed for the terrible Minicraft kit) and I botched them up. Luckily TheFlyingDutchman (he can also be found on the Airlinercafe site) had a spare that I could use. Still, I had a lot of trouble with it, but in the end it turned out OK. As this is a resin kit, most will want to compare it to the Authentic Airliner offering. I haven’t build an AA 757 myself (yet), but in the far future I may make an Martinair one (I have the decals already). From what I can tell though, the PAS 757 is actually pretty good and accurate. The fit of the fuselage and wings isn’t too great and if I have to nitpick the leading edges of the wings are a bit thick and the engine pylon is a bit too short, but other than that it’s a very fine resin kit. Much cheaper that the AA one, although the shipping costs from the PAS website have increased recently. If you manage to spread out the shipping costs by buying various kits, you have a very good alternative to the AA 757. my next build is going to be the BAE Jetstream 41 from Welsh. I already started building it. I will probably make a build thread here at BM as well, as it’s a British build Aircraft and that’s appropriate I suppose Anyway, below are the pictures. And as a fun extra, a small Apron scene made with some of my previous builds: Hope you enjoy and thanks for watching! Martijn7 points
-
Hello All, Life and work (mainly the latter) has kept me busy recently, and I have bitten off a bit more than I want to chew with some recent projects, so a Mojo-restoration was in order. Enter the Airfix Martlet. A lovely kit to build. Not really any in-progress pictures, since it kind of falls together. Here it is in Winter daylight: And here on the bench next to its US Navy counterpart from a year or so ago (also the new Airfix kit): So now I can attend to the shelf of shame! (or maybe just one more quick one...) Regards, Adrian7 points
-
Revell 5" Star Destroyer kit (as you can see from the markings, which are accurately measured out!) Silliness aside, this was my first experiment at DIY decals, which worked OK although the transparent area is still just about visible.6 points
-
Hi, I am again uploading my 1/72 Airfix A.W. Whitley made straight from the box. I decided to go for the all black camouflage of 10 Squadron and attempted to enhance the black finish by first applying an overall black, spraying the main panelled area mid grey and finishing with a light overall black hopefully giving a weathered look. This was a really fun build with no issues at all. I hope you like it, Russ https://www.flickr.com/photos/154169520@N02/39081563852/in/dateposted-public/ https://www.flickr.com/photos/154169520@N02/39112903821/in/dateposted-public/ https://www.flickr.com/photos/154169520@N02/39112938081/in/dateposted-public/ https://www.flickr.com/photos/154169520@N02/24252025787/in/dateposted-public/ https://www.flickr.com/photos/154169520@N02/25246175268/in/dateposted-public/ https://www.flickr.com/photos/154169520@N02/38402815184/in/dateposted-public/ https://www.flickr.com/photos/154169520@N02/39081540402/in/dateposted-public/6 points
-
Hello, This is my first post to Britmodeller so it's just a bit of a test. This is my recently completed Stug from Bronco. Here's hoping the picture works. Thank you for looking. I hope to post more soon. All the best, Tim Now with more photos!6 points
-
Curtiss SO3C Seamew Sword 1/72 This was a build to help me get back In the groove following a break from the hobby. It certainly helped! The Sword kit is a typical short run kit with decent mouldings and some lovely resin parts. It all went together well enough with the only addition from me being some masking tape seat belts. In the main I used Vallejo Modelair and Tamiya acrylics. I hope you like it!6 points
-
Milligan even Bless the man and may he rest in peace, all the time taking the M off the Maker The wonderments of the Baron's entourage exceed all expectations I have been having tense times with the modelling and in my automotive endeavours, suffice it to say I am not enjoying reinventing the wheel with regards to BMC brake components I digress Ropes, The Baron asked a question re: ropes in 72th scale I wonder if a reprise of the techniques I used in 1/48th and 1/35th scale might help? Cotton does indeed act as rope in many applications in the modelling sphere but has an accuracy minus drawback, in so much as it looks like droopy cotton Rope should be thicker looking even in skinny scales, what I do is take a length of beige or fawn cotton at least twice the length needed and clamp one end in a vice ( a rather sexy looking etchy bending tool may suffice here) With the one end held tightly grip the other end in something able to keep a grip on it and rotate the cotton in the opposite direction to its twist You will see the twist unravel visibly as you go and (at this point you can earn your degree in ropemaking) place a rod (or needle or almost anything really, you will see) at about the centre point of the 'rope' and hold it there and bring the 'loose' end back to the fixed place and hold 'em together Let both ends retwist carefully which they will try to do as they mingle A little practise will give you rope-alike that will tether your boat to the sea and stop it becoming an aeroplane This isn't an aeroplane but it does have 'my rope' in 1/48 scale Sorry for the truly awful picture but I cant lay me 'ands on a better one at the mo' Then there's this in 54mm with varying sizes of ropes It's quite a fun pastime, be careful you don't have so much fun you forget to make models This is probably why people knit, there is a very high satisfaction level from twisting cotton6 points
-
Forgive the indulgence, I know this is primarily a plastic forum, but I do like getting to grips with a pile of wood and making something recognisably boatlike out of it. This build is of a Billing Boats "Nordkap", a North Sea trawler from the early '70s. I remember my Dad making this model about 30 years ago and me being impressed by it compared to my pile of airfix spitfires. Anyway, I have once again commandeered the dining room table as a workshop and started sawdust production in earnest. First things first, the keel. Add some ribs, then realise that while the keel was cut to the length from the instructions it is 4mm too short when measured against the deck. Measure twice cut once? Where's the fun in that? This is the third Billings kit I've done and is easily the best quality in terms of fittings and wood parts; not up to Amati standards, but pretty good. Luckily I had read up about the kit and had been warned that the instructions were more like outline suggestions than a detailed how-to guide. I was wondering about doing some weathering and making it look like a working vessel, but that was vetoed by the boss if I want to have it out on display, so shiny and shipshape it'll have to be.5 points
-
A while back I was on a PST kit building spree and here is one of the models I finished. I added bits of wire and a metal barrel. Careful and minimal weathering with wash, dry brushing and pastels completed the model. Kit decals. The track and link tracks can be a bit tricky. With care these kits make nice models in the end.5 points
-
This is my first ‘yearbook’ - so please be gentle. 2017 got off to a slow start for me as I was far too busy asking you all annoying questions, but getting some great answers along the way. The first part of the year was in reality spent acquiring ‘tools and equipment’ before I could actually build anything. So it was the end of May before I started and finished my first 'project'. This is the 1/48 Airfix MWD Utility truck – complete with a milliput base. It was my first go with an airbrush and my first attempt at weathering too – so very much a ‘work in progress’ – but it was fun to build. The slightly random theme was down to the fact that I had various decals lying around – the result – an RAF Ambulance. Oh it was my first making a plinth too... Next up in July was the 1/48 Airfix Hurricane MKI. I was debating whether to go ‘wheels up’ or ‘wheels down’ at the time and also how to deal with moving propellers. This is the result and again I made a little stand for it – but forgot to put the year on the end of the quote… By the end of July I felt I ‘was on a roll’ and disaster from over confidence was just around the corner. I made the mistake of ‘experimenting’ with a Sharpie to try and create panel lines on a 1/48 Messerschmitt 109E. This experiment turned into my first WIP – and though the result was a bit of a disaster – I really enjoyed the interaction with other forum folk and hey – I don’t mind ‘learning in public’. If you fancy a laugh then the WIP is here – all good fun… I had a couple of weeks off work in late August and I’d enjoyed my first ‘Emil’ so much – I decided to do a ‘matching pair’. If one 109 is fun then two is even better. I put a lot of ‘research’ into the build and this was the first ‘project’ I finished that I was really happy with – whatever happy is. ...and here is the WIP for these lovely girls - 'Grace' and 'Fortuna'... During September and October I went through a bit of a ‘strange patch’ – where I just couldn’t ‘get going’ with anything. But with a bit of encouragement from some good folk on here I was back on ‘track’ by the end of October with my first ‘proper AFV’ build. I say ‘proper’ in the loosest of terms, as I went 1/72 – rather than the 1/35 ‘standard’ and built the PLASTIC SOLDIER COMPANY M5 halftrack –simply because you get 3 in a box. The WIP thread is here and again it was a new experience to try filters and weathering. I can’t get my head round filters yet – but I love the Flory washes for creating a bit of ‘mud and dust’. As my mojo was fully restored by starting the halftrack and I was falling in love with 1/72 stuff I bagged a 1/72 Airfix Spitfire MKIA and worked on this at the same time. I don’t know how a 36 piece kit can turn into an eleven page WIP – but it did – thanks to so much input from fellow members ‘egging me on’. Again a 1/72 aircraft was a first – I haven’t done one that small since I was a kid. My final project of the year is still on the bench - but I'm almost there - so please feel free to cheer me along - Here is the WIP… So, looking back I have had quite a busy year. I won’t win any competitions anytime soon – but I have had an awful lot of fun. So thanks for all the support everyone and I hope you have a super festive season and a brilliant 2018. Lots of love from BIG X5 points
-
Hi, Here is what I have finished in 2017.. First up Cheese Cake Chassis a P-51D built for the Mustang GB its the 1/48 ICM/Tamiya clone.. 2 ACG Mustangs look really cool. As Airfix are proving.. Hasegawa's 1/48 A6M2 Airfix's 1/72 Canberra PR9 Airfix's old 1/48 Bf109F Airfix 'new tool' Bf109E3 1/48 Then a couple of builds for the 109 GB Tamiya 1/48 Bf109-E7 Zvezda's 1/48 Bf109-F2 Then Hasegawa's Bf-109G6 A change of Tack also with a couple of Armour Builds in 1/35 I've not built anything in this scale before.. Tamiya's Venerable 1/35 T-62A Also Tamiya's 1/35 M1 'Super Sherman' Built for the Radial engine GB Finally A quick foray back to Aircraft for a build of Academy's boxing of the old Hobbycraft F-8F in 1/48 Thats it for now there will probably be another completion or perhaps 2 by the end of the year. oops A forgotten build.... Tamiya's 1/48 V1... Fresh off the bench Revell's 60's vintage F4F 1/32 Wildcat. Final build for the year. HB’s 1/72 A5M4 ‘Claude’ Final final build for the year the Eduard I-16 Type 24 in 1/48 Hope you like the images. Cheers Plasto.5 points
-
Came across this and thought I'd join in Matchbox's usual 2-coloured runners Matchbox's transfers Instructions The decals I shall use References The runners have been washed5 points
-
Hi everyone May I present my 1/48 Tamiya De havilland Mosquito FB Mk. VI finished as NT198 305 Sqn RAF. It was built mainly out of the box with the only additions being new barrels from Air Master, instruments from Airscale, code letters from Montex and I made the Sutton harnesses from masking tape. All pictures were taken on my IPhone 6 in our kitchen.5 points
-
This one was tough to photograph due to the combination of dark finish and winter sun. Please forgive the stark shadows, the indirect lighting was too weak to shoot, so had to place the subject in direct sunlight. All comments welcomed... WiP can be found here: regards, Jack5 points
-
OOB, Sky decals.5 points
-
I made new photos, after Juan Manuel last tips (especially doing them after shuting down all the ceiling lights to avoid shadows on the background, and working with a more important depth of field (f:8, the maximum allowed by my camera) to get sharpness on all parts of the model, this last parameter being very important on front and rear views. I dedicate these 2 ones to all of you, dear friends who helped me to get a convincing build.5 points
-
I haven't broken my new phone (yet), so here are some photographs (you'll have to click on the link as Flickr is playing up). The MkVI had had a gloss coat and is ready for decals: https://flic.kr/p/HDqX98 The MkIX has had a coat of Colourcoats Sky Blue BS1: https://flic.kr/p/21vqjUb Thand for looking.5 points
-
Hmm, let's see, can we squeeze any more drag onto this airframe?5 points
-
I don't think I am explaining this very well - though the fact that it is not immediately obvious only reinforces my decision not to re-work the kit. This is hard to show, not least because of issues like lens distortion. None the less: Real Seafang - indeed, the very airframe I plan to build; Trumpeter's transfers feature two WIF schemes (fair enough) and one RN scheme... where they get the serial wrong. They had 6 to choose from... they don't help themselves, do they? Sorry, as I was saying... real Seafang. Note how the wing fillet goes right to the rear edge of the canopy (in fact slightly beyond it) and the training edge is behind the windscreen join. Now Trumpy-fang Both wing fillet and trailing edge are too far forward. Not very much, but it's definitely there. The front edge of the wing is in the right place (though hard to tell here because of the cannons), which means that the wing is slightly too skinny at the root. Anyway, it is quite subtle and I am not going to change it anyway, so I don't know why I mentioned it! In other, happier, news the Richard Franks Attacker book gives me some excellent material for addressing the fictional undercarriage legs:5 points
-
Well. I dunno where Britmodeller went today? Must have been the Mods Christmas party last night and somebody knocked an oyster into the CPU...? A semi-industrious couple of days to report on - little and often rather than any prolonged bench time - but looking back I'm surprised to see how much got accomplished. Last night saw famille Baron having Friday night at the flicks. Be the last Star Wars installment we'll bother with <actually dozed through the last two> but we did discover a most excellent fish and chip shop on the way home that more than made up for the cinematic dyspepsia. You just can't beat engulfing something hot and fried on a winter's night can you? Christmas Eve just over a week away? Haven't written a card, baked a mince pie or laid down any sweets. Is it just a time-of-life thing that I now just seem confronted at every turn by a bunch of spivs cloaking corporate gain as 'the gift of giving'? Thank goodness neither myself nor Mrs.B come from large families and have to deal with the benign authoritarianism of happy-family 'dos'. Bring back the Lord of Misrule, fire festivals, and an exultant contemplation of the turn of the year. Every 21st of December I read John Donne's A Nocturnal upon St. Lucy's Day as a reminder on the shortest day of the connection between light and life. You have to invent your own rituals nowadays, don't you? https://www.poetryfoundation.org/poems/44122/a-nocturnal-upon-st-lucys-day Ah. Excuse the self-indulgence.... Anyway. Today's correspondence: That looks about right to me Giorgio. 'Farewell and adieu to you fair Spanish ladies...' Always used to hum that when I went fishing, though mercifully nothing bigger than a fat pollack ever troubled the lure.... Thanks Jaime. I've added some more extra tonal variation in the form of dirty fingerprints, just to be sure... Yes. Yes. The main reason being the join between gondola and fuselage needing a good clean-up to get a flush seam, and as a result I reckoned that sticking that on after paint would result in some egregious wear and tear on the paint finish. More detail on that below. The elegant solution Ian. Where would we be without brass Phoenix? The more I work with it the more I like it as a material - not at all as forbidding as I used to find it once upon a time. Certainly at the scales we work at it gives a strength you can't achieve with plastic. I was lucky with my wing that Matchbox made a decent job of the point at which the gondola floor mates with the fuselage, giving a good stable platform. Are we there yet? Are we there yet? Not long now, I promise. Thanks Thom. It's one of those little jobs that just gives you a bit more confidence in the structural strength of those parts, compared to plastic. You said it Benedikt! I'm going to have to rehearse the painting process carefully on this before adding any pigment to the airbrush, just as you would learning a dance move - especially critical where the demarcation lines of the splinter camouflage run around all those complex contours... One outstanding task on the snag sheet was to drill all the holes for the various antennae (not all of which te kit provides), pitot tube and rigging points. In relation to the latter I had been expecting to have to drill holes in the wings and sponsons to seat the bracing wires that form an 'X' between the underwing struts. Thankfully I have the handbucher to stop me making that errors as the bracing wires are actually shackled to the base of the struts, disappearing into the fairing at top and bottom. I'm staying with the kit struts as these clean up to look pretty close to the actual aircraft: I'll make the braces themselves from 0.2mm brass rod and slip them in at the end, but to make the mounting slots for them, it was first out with the scalpel to score a guide line, then incise it more deeply with (the now indispensable) contour saw: I'd rather precipitously hellblau'd the undersides of the tailplane when painting the main wing, neglecting to consider that there would probably be some argy-bargy getting those fitted to the fin that would disturb the paintwork: Not least of which was the need for filler: You can't see it under the layer of PPP but on the actual aircraft the ribbed construction of the tailplane continues right up flush against the fin, whereas the kit has a flat slab-like 'sill that the tailplane glues onto. Strong, but not visually accurate. Dutifully I got out a round file and added this feature in on each side: Not perfect, but a sight better than the raw state. Digging around on the shelf earlier I happened upon a blob of plasticine. Remember before I made the metal rings for the gun mounts that - lacking resin and mould-making material - I'd made some rough sprue-gloop impressions? In all the ensuing kerfuffle I'd forgotten to even look at them again: To my surprise they actually turned-out to be Ok! I'll hang on to those in case I need them for a Walrus...or something. Speaking of the gunthingies (@CedB ™), there's a loop on the arm that the barrel of the MG 15 slips into: I can't believe I managed in the past without a bending tool: 0.3mm brass rod, cut to size: Getting these (robustly) soldered on to the gunthingy was not easy:I didn't want a mass of solder everywhere but neither did I want the join so weak that it then part would fall-off. What you see here then is a compromise between those two extreme positions: Cleaned-up and with the gun barrel test-fitted I can live with the results: Ignore the big clumpy laser-cannon bit on the back of the MG 15, I just haven't cut the weapon off of the mounting block it came on yet: What else? Added the fairing around the head of the bipod - Milliput shaped with a wet paintbrush to create the necessary profile: Jeez but the bench is getting impossible to find anything in at the moment: A final push after tea, adding the struts beneath the wings: Tacked in place with CA, then the obligatory Araldite for strength and filling properties: Remaining jobs on the snaglist before painting include: Build the canopy (with framing and windows open) Build rudders, antennae, blind-flying aerial and pitot from brass. Build central balance weight for either side of fin/empennage. Add straps to gunthingies. Build beaching trolley. Print decals (the combined laser/inkjet paper arrived on Thurs so I hope to have a small trial to show you). If all goes well during the week I'm expecting a hot time in old Iwatatown next weekend. I do hope you're having a good weekend. Tony5 points
-
Thanks John - another bit of reassurance, appreciated Thanks Keith - ah, my fault. For some reason I had in my head I'd need to mask the LE, do the yellow, mask THAT off and then do the camo to prevent the yellow effecting the camo colours. I didn't look forward to a narrow piece of tape down the LE. I've decided I'll proceed with no primer so the first coat went on the bottom: Untitled by Ced Bufton, on Flickr Stirred for 3 minutes with a Tamiya stirrer as, as Simon said, the paint is nice and thin anyway and I didn't want to get it all over the place with the Badger. I don't have a nice flat sable brush of the appropriate size so I used the one you can see in the picture. Thin coats and I must say I'm impressed - it goes on really nicely and self-levels well. I can't see any problem with brush marks. I can see I forgot to do the tailplanes. I'll do that now.5 points
-
Hello, I propose all my projects made of the brand Wingnut wings since the first, the SE-5, at the last Salmson. SE.5a "Hisso" Roland D.VIa Hannover CL.II Pfalz D.XII Pfalz D.IIIa Sopwith Snipe Late Sopwith Triplane Albatros B.II Early Fokker D.VII (ALB) Hansa-Bradenburg W.12 Early AMC DH.2 Bristol F.2b Fighter (post war) Bristol F.2b ....not finished Roland C.II Albatros D.Va (OAW) Roland D.VIb And the last Salmson 2-A2 Best Regards Michel4 points
-
Good day, gentlemen. Let me present my next model.4 points
-
When I was a kid, my local newsagent (a five minute walk) had a good selection of model kits. There were Airfix, Revell and, later, Matchbox. I think the first kit I ever bought from there was a Revell 1/32 Fw 190D-9. I was too young to make it myself, probably only five or six, so my Dad made it and my Mum, who was rather a good artist, painted it. The Dora has since become one of my favourite aeroplanes. I lived on the outskirts of St Neots, which was just a small town in the 1970s. The town centre has Woolworth's, which sold a huge array or Airfix kits (and later a few Novo kits). There was the Toyman in the old arcade, and he sold a reasonable range of different manufacturers. Sometimes you'd see something exotic, such as a Hasegawa or Italeri kit. Scott's Sports had a small area at the back which has mostly Revell kits. That shop stopped selling kits either in the late 70s or early 80s, but another shop, Fishers, started selling Matchbox kits at really good prices soon after. Further afield, Huntingdon, a neighbouring town, had Sports Amd Fashions and despite the title, had s pretty good model department. There was another shop on the corner of Chequers Court which sold the likes of Fujimi and Hasegawa, but it's name escapes me for now. Bedford was well served with Bryan Scale Models, Goldings and, best of all, Gasgoines. The latter two were both hardware shops which had a model department, but Gasgoines was by far the best of the bunch. The model department was stacked floor to ceiling with kits. Cambridge was a bit further away, but had Ren Models and later R&D models. Ren Models started my collection of Gloy paints, as the had a big, wire bin which was full of heavily discounted Gloy Authentic paints. I must have spent a fortune at R&D and was gutted when I went there for the last time and it had gone. These days there is very little in the way of nearby shops which sell kits, and certainly no specialist model shops in any nearby town that I know of. I very much miss that.4 points
-
Had you ventured onto the 'Official Britmodeller' page on Faceache Tony, you'd have found Mike explaining all... "The server is currently down for maintenance by our Hosts (a pre-notified company-wide change they are implementing)" Anyway showing just how thick I am, I have to say I didn't understand a word of that poem you linked to! Which makes me wonder how I got the top grade in O level (are you old enough to remember them?) English Literature. A wonderment re-inforced by my idea that this is what true poetry is; 'There are holes in the sky where the rain comes in, But they're ever so small, Which is why rain is thin.' S.Milligan, Esq. 1918-2002 Anyway, back to more on topic wonderment - those gunthingies (due respect to Ced's Copyright) are indeed truly wonderful, really most excellent modelling, as is all the rest of the work you are putting into the Dornier floaty thing! Bravo....!! Keith4 points


.thumb.jpg.76f12b87ce9ca9929c9aabdcf8f9d2dd.jpg)
This leaderboard is set to London/GMT+01:00