Leaderboard


.thumb.JPG.3498f40362ff13ebfc4b2e45abbd545e.JPG)
Popular Content
Showing content with the highest reputation on 21/01/22 in all areas
-
Here are the final photos of this last assembly, not the easiest! As a reminder: Aires cockpit, Brassin wheels, Alclad/AK paint... just Pin-up and stencils in decals, the rest in paint. Thank you in advance for your feedback , as usual the other photos on my FB page below... French Frog Models41 points
-
Back with another one, my older model. RT-33A it is a pure model kit came from Hobbycraft in scale 1/48. All about from my constructions, first the ejection seat and cockpit, wheel bay and flaps of the kit΄s components are replaced with ones from Verlinden detail sets. The photo-bay includes 2 cameras (K-22A, K-17C) and the removal frond part of the aircraft nose, were scratch-build. Also I scratch-building the electronics detail components. Rudder and ailerons was cut and repositioned. The model is painted in Alclad colors. Decals set was from Icarus Decals representing an RT-33A in Hellenic Air Force service during 1951-1955. I hope you enjoy my model. Happy modeling! Giannis Doxas25 points
-
A-6A Intruder VA-165 Trumpeter 1:3221 points
-
Hello, colleagues! The Eurocopter EC135 (after the rebranding of Airbus Helicopters H135) is a medium multipurpose helicopter developed by the Eurocopter concern in the 1990s. Widely used in law enforcement and civil structures around the world, the helicopter is one of the most popular products of Airbus Helicopters. A set from Revell, as for me, the quality is not bad. The whole impression of it spoils the glazing. It is terrible in quality and absolutely does not fit the size of its niches. The windshield had to be sawed, additional strips of transparent plastic inserted, then sanded and polished. It was going to be like a "sparkle" with small liberties, like "riveted" strips of aluminum tape. Painted as usual Valejio and Mr.Hobby, quite a bit stained with art oil. At the end, a few photos from the construction site. Enjoy your viewing. Sincerely, Mikhail18 points
-
I was looking for a relaxing built with no aftermarkets and difficulties. The colourful scheme of this 109 in Hungarian Air Force markings was selected and so I went. Building Ukrainian models is still a challenge but it went OK. After some research I came to the conclusion that RLM colors were all right for this bird, all MRP brand. A lot of masking has to be done for the Hungarian colors on the tail plane. The plane once complete had a little sparrow look! No decals but masks, a little weathering but to a very decent level et voilà. I do not have infos on this plane, Modelvist writes that she was in Varpalota in 43. An enjoyable project in a rare dress! Cheers to you all. 7B4F7D30-D128-437E-BE85-1D964334AA1C_1_201_a by jean Barby, sur Flickr 88F8A178-EAE0-49D7-B71C-F2A378C0FC55_1_201_a by jean Barby, sur Flickr 01684E29-6F63-423C-B7EC-FCA482E1D662_1_201_a by jean Barby, sur Flickr 301E81A0-EC69-4773-8431-CD963877C826_1_201_a by jean Barby, sur Flickr B07C7D00-DA42-40BB-95F0-E9ADFB84FBB8_1_201_a by jean Barby, sur Flickr 82663DD7-60CC-499E-9CE5-270A5609B4BC_1_201_a by jean Barby, sur Flickr 0BF3E35E-BE04-4C67-B278-63209B2C1317_1_201_a by jean Barby, sur Flickr17 points
-
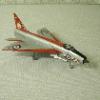
I was lucky enough to see just a few operational French Crusaders in the beginning of the nineties. Especially a display of two of these ancient birds on the airshow of Brustem in 1994 made a lasting impression. The Revell rebox of the Monogram Crusader is a very enjoyable build.. Fit is very good and there's a lot of detail, especially considering the age of the kit. I used a Berna decalset, which was unimpresive: decals are very thick and not in register. I used mainly Vallejo and MiG acrylics for the finishing. Anyway, here are some pictures, hope you like them. Kind regards, Gerben16 points
-
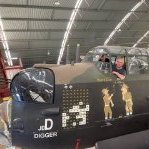
Good afternoon everyone! The dust has now truly settled on my Scratch built B17G and its time to start another project!.......( for those of you that followed my B17G build....you might be interested in knowing that the model arrived in UK safely with no breakages thank God.....and its now ready for the next trip to the States for the Museum next month!) I really didn't know what was next for me as I have spent the last 10 years building and fully immersed in the B17 project .....and since it was at 1:20 scale and coming out at 3 feet 8 inches long .....I thought that it would be good to have a go at the other end of the scale spectrum! Last year my brother sadly passed away and whilst clearing out his flat I came across this Airfix 1:72 scale Spitfiremk1a that he must of been thinking to build..... I took the kit home and have been thinking ever since if it would be possible to scratch build the interior of this kit!.....this would mean having a go at building the Merlin engine and cockpit! ....and at such a small scale wondered if it would be worth the effort?....then I thought that I would have a go at it.... as a kind of tribute to my brother David! So I started this project when I was at home in Bulgaria and took some photos of the progress so far and thought I would make the first post here now. ....however ...as I am away from my office at the moment not sure when the next post will be! After opening the kit box I decided to first mark up the area on the front of the fuselage where the merlin will sit. After cutting away the plastic I saw I had to sand down the thickness the plastic....way down!!.....else it will be way out of scale!....then I shaped out of plastic the first bulk head that sits directly behind the power plant. After adding some detail on the bulkhead ....by looking at some reference photos...I took these photos. So to the scratch building of the Merlin! The engine block was first made from scrap plastic and being so small it seemed the my fingers were getting fatter by the minute and making the task even harder and fiddly than ever! I tried to shape it the best that I could and slowly added other parts to the engine to get it looking as near as possible to the real thing! I started to scratch build the exhaust stacks but I wasn't happy with them!....then I realized that I could use the kits exhausts!....silly me! Here is the Merlin before all the piping work ..........after a weeks work.... I then painted the basic colours for the Merlin......and whilst doing that , thought of how I was to make the engine frame and I decided to make the frame out of wire and build the frame around the engine when it was sat in the fuselage....here is the painted Merlin with out the frame work.... I then had a real hard time lining up the engine with the propeller disk plate that I cut out of plastic but after hours of dry fitting of the engine finally got the job done!...I then painted the area before gluing the engine in....... It was now time to fit the engine in place and then add all the other detail...this included the radiator at the front plus the engine frame and all the piping and wiring. I taped the two halves together with masking tape for the purpose of taking the photos and to show the engine in place and placed the prop on for effect!.... You might have noticed that I have scratch built a tiny gun camera on the Port wing root and cut away the panel that housed it! So that is as far as I have got on this project for now. I am planning the next part and that is cutting the top of the fuselage off to either build the fuel tanks or leave it empty so you can see down into the cockpit floor and the rudder pedals....I think it all depends on how it goes when I'm back in the office in a month or so's time! So until then guys.......Happy modelling to you all! Cheers Fozzy15 points
-
For your inspection, my just completed D.520. It was a pretty straightforward and fun build. Being Tamiya there were no construction issues other than a couple seam lines to clean up and having to shave some on the landing gear doors to seat the landing gear fully in their posts. I'm happy with my camo pattern but it isn't as detailed as the supplied guide. I tried using blue tac and it left residue so I had to use masking tape and it limited how sharp a curve I could make. I mixed my colors to match references as close as I could. The decal set had options for Vichy craft, but I wanted it to look like a craft from the battle of France. I finally had a good decal session (if you've read my other builds it has been a anxiety inducing process for me). I waited 5 days for the future to cure before attempting anything and this worked well. The decals were hateful though. Despite being very thin they were not pliable at all. Multiple coats of setting solution did nothing and I had to cut every panel line into them with a hobby blade. The red was particularly bad, super brittle. I had to fill in a couple spots on some roundels and the tail with some paint I mixed. It looked great till applying the final coat of future and it got darker. Still looks good from a distance. I used burnt umber for the wash on the underside. For the blue/green I used a mix I made, and on the brown I used black wash. I weathered with oils and Tamiya powders. Finally, I added a tiny bit of chipping around the ammo doors and some removable panels. I was going to attempt adding antenna wire but I broke the mast and I didn't think it would be strong enough to properly stretch a line in a repaired state. Thanks for looking and enjoy the photos. PS: I did start but never finished an in progress thread. There is some additional build info and photos if you are interested. https://www.britmodeller.com/forums/index.php?/topic/235104168-tamiya-148-dewoitine-d520/#comment-428791813 points
-
Hello Everybody! Before the F and the G already showcased in the forum, now comes the "E"/Late. I built this Fujimi model I had it in my stock for quite a long time and I know that now far better kits of the beast have been released. However, I struggled finding at that time I started to "produce" USAF Phantoms (even the Hasegawa one was OOS), so I decided to go for only one I got (Fujimi), hoping I have good basis at hand to do a nice model. Alas! I spent so much time and efforts to improve it that, at the end of the day, I was completely disappointed by the result. Here is the list of what I did: - The fuselage is way too short at that scale, and the verdict of the 1/72eme drawings is there: it misses 4 mm. I put resin intakes (forgot the brand) to fill the empty original one and the adaptation was quite disastrous. I had to cut the fuselage aft and forward), added slices of evergreen to have the right dimension and fitting and then finally reshaped the whole stuff. This pix shows the resin intakes, the "plastic surgery" added at the rear portion of the cockpit ("pieces rajoutée" added part in English) For the rest, quite normal modifications for a F-4 kit of that era: - ailerons separated, flats modified, belly straps added, vent doors opened, airbrakes lowered, exhaust "hot area" modified, exhausts, cockpit, canopy, L/G wells and wheels aftermarket, etc... A lot of work! Translation: L/G wheel wells modified, "holes" after intake fitting filled-in, ailerons and slats removed For the marking my preference went to a Texas AFRES machine from the 924th TFG because they had a quite unique variation of the Hill Grey pattern, which I found very attractive: Not difficult to do. All decals are from extra stocks or home made and just little bit of weathering, these birds were kept in pretty nice conditions. I didn't put any armament, just a travel pod and a modified TER (from Hasegawa set but reshaped because they are wrong) and that it! Here are the pix: The real beast: My interpretation: A simple Dio: Definitively not my best Phantom, another good occasion to try the new ones! Enjoy!13 points
-
Whats not to like about the F-104. Here are pics of my collection in 1/72nd All are Hasegawa kits. THe three RCAF ones wearing Leading Edge decals and the Italian '-104S is dressed in decals by Cutting Edge of long ago. I used to have another four but have sold them all and one of these is next for disposal. Next few are of the Italian F-104S Tiger scheme13 points
-
Hi all, just fineshed the new Tamiya F-4B in 1:48 - one of the best kits I ever had in my hands! Used some Eduard parts like Brassin wheels, seats, early fin cap, exhaust nozzle and TER`s, Bronze undercarriage as well as Decals for a VMFA-323 aircraft. Further I add the Quinta Studios 3D Cockpit Decals.11 points
-
Hot off the press, the LUN 'Harrier' Goes together nicely, with just a couple of areas needing a few strokes with the file.11 points
-
Absolutely no idea who came-up with 'Gentlemans Scale' but it makes me smile every time I read it !! Started just before Christmas as a 'Mojo Restorer', loved the build and paintwork, gave me a great excuse to drag-out all my Starfighter reference books - yeah, 'books' remember them ?. Built straight from the box with no additives, just glue. Paints are all Tamiya, Xtracolour and Humbrol enamels - remember them too ? - decals are from the kit and a thirty-five year old Microscale sheet. There's really very little else to say, IMHO this is still the best 1:72 F-104 kit available and impressed me so much that I went and brought my (untouched) Hasegawa 1:72 F-14A to the bench, which I'll begin once the weather here cools-off a little, we're getting close to 30c here most days with almost no wind, so the paint is drying on the airbrush needle !! Please feel free to ask any questions, hurl any abuse or make any comments. All the best from NZ. Ian.11 points
-
Hello gents I broke my duck for the year with something outside my usual area of interest; I wanted something easy to build with some little fellas I could paint. It's the Tamiya 1/48 GAZ AA 1.5 ton truck. It was a nice build and I'm happy enough with how it turned out. It's all OOB including the wee men, the only thing I did was to score some 'plank lines' on the sides and ends of the crates in the back. The colours are guesstimates as I don't have any armour paints, I used Colourcoats ACS03 - A.II Green and I hope it's close enough to pass muster. The details (and passengers/crew) were painted with Citadel and Vallejo acrylics. Here it is: Thanks for your attention Cheers, Stew11 points
-
BAC Lightning F3 53-692/L 13 Sqd RSAF, Tabuk 1977 Ok so just finished this today and rather pleased with the outcome! It is one of two Saudi Air Force machines they did in camouflage in 1977 - this being the one with the wrap around camo. The other one had a sky blue underside with camo top. It is the Airfix F6 kit and I used Model Alliance decals and some aftermarket for the bang seat. Paints are Tamiya and Gunze and Alclads and I am particuarly pleased with the nose ring as I must have re-done that 10 times to get it right! Chris ty pleased with the nose ring as I must have re-done that 10 times before I got it11 points
-
Another in my series of recent builds that I haven't got round to posting yet, maybe we'll get the whole set complete at some point In this case we have Trumpeter's Scud launch vehicle - or as the name on the box puts it "Soviet (9P117M1) launcher with R17 rocket of 9K72 missile complex "Elbrus" (Scud B)". Since I'm not that au-fait with my Russian paraphanelia, I'll taker their word for it. Overall this was a fun kit to build, which I have completed all out of the box. The only real difficulty I got into was attaching the two "cabs" at the front, these were an absolute beast to get into the right position, which probably means I had something in the chassis slightly out of alignment. I remember having a similar issue when I did the "Bereg" coastal defence gun, which is on the same chassis, but that only had one cab so I think I got away with it a bit more easily there. Other than that, I managed to fog up most the cab windows during my efforts to get the cabs attached to the chassis and fitting the windows in the first place (I do struggle with that on vehicles especially). Thanks for looking.10 points
-
PK-023 : One Hawker Tempest Mk. II/Mk. VI. Back from the dead. Back from the dead indeed. This Tempest has been reborn. Hallelujah! An old built model, taken apart, stripped down, reassembled, repainted, new decals and finally a photoshoot to let it show off its new look a bit. Build thread here...10 points
-
This is an ancient Alezan 1/43 kit of the GTP Lola T.810, as raced by Don Devendorf's Electramotive team in the IMSA series during 1985/86. It wasn't a fantastic success, but it was the basis for the all-conquering Electramotive-built Nissan ZX-T, which was IMHO the most impressive-looking car of the Group C/IMSA era. The kit was pretty rough, and the decals were like tinfoil. In the end, since they wouldn't react to Micro Sol, Micro Set, hair dryer (set to 'nuke') or anything else, they were attached with diluted PVA. Never had that before. Anyway it eventually got beaten into shape. I love resin race car kits, but this one was a bit more of a challenge than most!9 points
-
Hi everyone, I'm trying to catch up on presenting my completed builds after only joining recently (a process that might take a while as some of the older ones I plan to touch up first). Since I'm sort of going back in time doing more recent things first, here's one I made earlier (as in mid-2021). This is Trumpeter's 1/35 BR52 Kreigslocomotive kit. I've got to be honest, I was expecting it to be a really tough build, but the kit went together really well and I actually wish there were more steam engines in this scale to build because it was so much fun. The only snag I had was that there were three missing pieces, three out of four parts from two of the same vertical links in the wheel mechanism (sorry I'm not really into trains so I don't know the technical terms). I did get a reply from the Trumpeter spare parts email address (apparently that's not always the case) but no spares could be sent, so I had to scratch build what I was missing and even though I rarely scratch build anything, I think I've done it well enough that they're hard to see. Hope you enjoy. And one of the interior, sorry this isn't the best photo9 points
-
LOL, it's an art mate! Have fun away buddy, and be safe. In the meantime, get back to that Wessex LOL Thank you very much. It's my pleasure. Thanks Bertie, it's a struggle for me at time too. But my 'Pig headedness' really wants this done! Wheel well structures are done and I sprayed Mr Surfacer on them last night. In the meantime Kerry has helped me out with a tricky piece He was going to make me thread the wire myself! @Gene K has been busy too! Gene has been working really hard on these. He has been extensively using photos and factory drawings to achieve this. This is the final incarnation of the lower outer wing strengthening mods as used on Brit Tooms. There is a whole development/history on these when you dig deeper. Thanks Gene, I am indebted to your help and expertise. I will update the wheel wells progress on the weekend. Getting close to plumbing them Cheers Anthony9 points
-
PK09 - Bell HueyCobra A1-G9 points
-
With the Hawker Tempest now done and in the Gallery, I find a Victor sized gap on my workbench. I can usually justify pretty much anything with a bit of creative thinking, and in this case I've decided it all depends which end of the binoculars I'm looking through. Here's the kit itself: A full size plan is included which will be a big help with laying out the cammo pattern. A nice bit of thinking there from Matchbox. All the parts were removed from the sprues ages ago, so work can start whenever I like. This evening sounds good to me.8 points
-
With my Revell rebox of PK-78 nearly finished it's time to add 100 and get this big boy on the bench. DSCF2995 by timothy jones, on Flickr Until this GB started I didn't know that this kit existed so it'll be a journey of discovery.8 points
-
Wow! The GB scene is really beginning to bubble around here. I'll start in on this one tomorrow. I may have to finish something first to clear the bench...Anyway. The will, I hope, be one of two IL-series ground attack aircraft, the other being a standard IL-2 from the USSR. We shall see how I manage it all. Here's the box art...with the North Korean plumage... The sprue looks clean, with a bit of resin too. Note the captured USA option. Weird, but not for me. And here's the profile. In typical PLAAF design, nothing fancy, no flashy slogans. Probably the same green they painted their trucks. See you all soon! --John8 points
-
Hello mates I would like to present you my newest tank - T-72 M1 in service of Polish Army. I added to the model barrel and clasps from Aber, PE parts from Eduard, tow cables from Eureka, road priority signs and decals from Toro, workable tracks from Trumpeter and antenna from RB model. From my own modifications I made the whole electrical system with wire, sculpted the mantlet cover, extended cargo holders, rear fuel system section, headlamp guards, optics interiors and registration plate. Working with this model gave me a lot of fun that I didn't want to finish, but his time has come. I hope you will like it8 points
-
I may well have shown these models before but these are new pics. My reasons for the mini theme are, the unit was formed at Shoreham airport back in 1915 ish( could be wrong but local to me) and secondly, my ATC camp to RAF Bruggen in RAF Germany was the base for the first Phantom squadron to be based outside the UK in 1970 and I had the chance to clamber in to the cockpit of the one I have modelled here. Airfix Canberra B(I)8 ( decals Model Alliance I think)and Revell Hunter( decals by Modeldecals) Tornado(Revell), Jaguar( Italeri) and Phantom (Fujimi). All decals from Modeldecals and some kit markings.8 points
-
Hello guys, I finished my Ta 154 in 1:48 from Revell yesterday. Decals, which were issued in 1999, worked pretty well.8 points
-
So today's update and I've managed to attach a few of the many cockpit parts to one half of the fuselage. I've test fitted the two fuselage halves together and so far so good as they line up really well. Still some weathering and fettling to be done to these parts but the plan for now is to get the parts in place and tinker with them at a later date. Here's a couple of pics of today's progress So it may not look like a day's work but it has taken me a while to fit this little lot together and I'm happy with the results so far. Thanks for looking back soon 🙂👍8 points
-
Didn't like it when it first came out. Now I think that it's brilliant.8 points
-
So a while ago I asked on here for some recommendations regarding the purchase of a Spitfire kit. It seemed to be a choice between two contenders the Tamiya kit or the Eduard offering, well i chose the Eduard kit and other than the kit decals, which caused me to purchase an aftermarket set, I can thourghly recommend this kit. I'm no expert on any aircraft tbh infact the total opposite but with my limited knowledge I think the end results are ok and I'm certainly happy with how the Spitfire turned out. I can now fully appreciate the attraction of building aircraft and thourghly enjoyed myself with this kit infact I've built up a reasonable stash in a short space of time 🙂. So enough waffling here's a few pic's of the final result So time to move onto the next one thanks for looking back soon 🙂👍8 points
-
New boxing in 2022 - ref. 144-033 - Myasishchev 3MT or VM-T Atlant Sources: https://www.facebook.com/mikro.mir.dnepr/posts/4976017989142564 https://ua-hobby.com/products/1-144-myasishchev-vm-t-atlant-mikromir-144-035 https://amarket-model.com/en/vm-t-atlant-myasishchev-soviet-transport-aircraft-plastic-model-kit/ https://www.aviationmegastore.com/myasishchev--vm-t-atlant-mikro-mir-mm-144035-aircraft-scale-modelling/product/?action=prodinfo&art=185294 Box art, sprues, decals & PE V.P.8 points
-
The first model of 2022 for me and a change in scale and subject. This is the 1/350 Trumpeter, Type 23, HMS Lancaster. In addition to the basic kit I added the great sets from Peter Hall's Atlantic Models, these included the Type 23 Etch set, the Update resin and brass for the Sea Ceptor upgrade (including a Wildcat helicopter) and a brass barrel for the 4.5 gun. To allow me to pick the ship I wanted I also added the decals from Atlantic with a set of deck markings finishing it off. Getting the correct grey for the current RN ships was made easy by using Sovereign Hobbies Colourcoats Paints and because i wanted no mistakes I used the recommended Thinnner from Sovereign. I have to say it was brilliant, the guidelines were followed and the paint went down a dream with minimal drying time, awesome paint. It has no below waterline detail because its going on a seascape. Thanks to two very helpful members on the forum, ExFAAWAFU and Fishbed a type 45 is in the wings ready to be tackled. Thanks for looking. Further addition with a sea scape. Had a nightmare using modelling clay and Modgepoge, lesson learned, never again. So here is my Polyfiller and acrylic painted base with Delux materials water. Thanks again for all the nice comments, onward with my Trumpy Type 45.7 points
-
Good Evening Comrades Not exactly armoured but still brutal in its way, the Zil-131 Soviet truck from Trumpeter. Very nice kit but with resin Miniart wheels and scratch improved engine. I believe its petrol V-8 returned about 5 mpg if you were thinking of buying one! This 1960s truck is still in use around the world And in its early days Hope you like it? Andrew7 points
-
Finally (for tonight) another one I made a few years ago, italeri C-119 Flying Boxcar in RCAF markings with decals by Leading Edge that included the nose as a resin extra with the decal set. I have got another set of the decals but no resin. I am hoping this will inspire those who have signed up for the upcoming Canadian GB!!7 points
-
There seems to be a rush of RS500s lately, so I thought I'd join the fun and post a few bad cell phone pics of mine. I found it on a certain auction site last November for $50 and placed the minimum bid, just for laughs. I expected the kit to go for at least twice that, but I ended up winning and found the kit also included the Labatt's decals from SK and a resin RHD dash board! You can still find a bargain every now and then there. I painted it with Gravity Colors - Spain's Labatt's Blue, which looks darker than Zero's color. I made seat belts from painted medical tape and hardware cut from thick foil, because I'm too cheap to buy photo etched hardware. The decals were very brittle and were flaking off before I could get a clear coat on, hence the damaged L in "Please." I've never had trouble before with SK's decals, so I'm guessing these had spent some time in a hot attic. Ben7 points
-
Some more of my past models. \All 1/72nd. Featuring Airfix Gnat T.1( new tool), JP T.5 Sword kit and decals, Magna Riley Dove but a bit of 'what might have been' going on with this one. The serial number I chose for this was never allocated but came among a batch of regular Devons. So I used it here for this as a one of chosen by the RAF as a station commanders hack. Or whatever story you might like. All the decals came form my generic decals bits and pieces. The JP and Gnat will be among my next batch of model disposals. I might replace them with better builds if I can source another Sword JP or Airfix one of the same type. The Gnat I have another in my stash.7 points
-
Thanks for stepping in there @Tony G and answering those questions! Better not waste a post without posting something. Wheel well in progress. Lots of little ribs, flanges and doublers in first Mr Surfacer on to see where I need to tidy up I'm just tidying a few gaps n cracks then on to rivets and hydraulic rams and a couple of small details Than plumbing Cheers guys Anthony7 points
-
Quick little four-evening build of a Tamiya Spitfire Mk.I 1/72 scale kit that I received in a club gift exchange. I decided to build it as an early production Mk.Ia after scrounging through my spare decal bin. IMG_4830 by Evan Bailly, on Flickr IMG_4854 by Evan Bailly, on Flickr Spitfire Mk.Ia Serial K9099 wasn’t even two months old when she was photographed already looking well worn in a lineup of other No.65 “East India” Squadron machines in May of 1939, wearing the code FZ-O. Apparently she had an early stroke of bad luck as apparently she had her oil cooler fairing and pitot tube replaced with black-painted parts and a yet un-repainted port forward wing root fillet. K9099 ended her existence in another stroke of bad luck when, recoded YT-O, she was shot down by a Bf. 109 over Bazinghen, Pas-de-Calais with the loss of her pilot, Sgt Michael Keymer, on August 22nd 1940. IMG_4849 by Evan Bailly, on Flickr IMG_4852 by Evan Bailly, on Flickr IMG_4847 by Evan Bailly, on Flickr IMG_4839 by Evan Bailly, on Flickr IMG_4853 by Evan Bailly, on Flickr The model was built mostly out of the box with an added Eduard seat harness and brake lines from fine wire. I also replaced the later style gunsight with the early ring style one, and scratch built the idiosyncratic early style pitot tube and antenna aerial. Prewar markings were put together with a mix of spare decals from the bin. Paints were mostly Vallejo acrylics.7 points
-
The horizontal stabilisers were glued together and fixed in place… …and then the elevators attached. Then the “pointy” type rudder glued in place. Both ailerons were also attached to their respective wings. I’m making this Spitfire with “clipped” wings, Eduard give you the choice of using either solid plastic wing tips or clear versions, I used the clear ones and masked the wingtip lights with some liquid mask and then glued them onto the wings. she's beginning to look like a Spitfire now, albeit without the iconic shaped wing. Next I’ll be adding the remaining pieces, mainly to the underside of the airframe. until next time as always, any suggestions, criticisms or comments will be gratefully received. rgds John(shortCummins)7 points
-
Good evening everyone … Today was wings day on all my builds. Im pretty impressed by the Matchbox stuff, it didn't require a lot of effort to get them lined up correctly. The Cowlings and main gear well thats another story. The wings mate up well enough to the fuselage. However you have to add the main gear struts early and that is usually a recipe for disaster. Again matchbox surprised, my gear struts free floated in the sockets. Well enough that I’ll be able to swing them up into the bays and tape them out of the way. The cowlings/engines are attached but the outer cowling is just compression fitted at the moment for alignment. Once they're set solid I can pull the outer’s off and paint the engines and interior of the cowlings. As you can see the dihedral is pretty steep on these. I do love the Douglas hotrod attack bombers, they just scream speed and power. Please feel free to ask questions, post comments or thoughts. Dennis PS - Oh quick question for those interested, the 410th BG operated from before, through D-Day, and beyond. Im trying to decide wether freshly applied D-Day stripes or the later lower fuselage only ? Maybe toning down or covering up the upper stripes ?7 points
-
All the underside stencils done. Phew. All have been hit with softener and I will continue with the uppers tomorrow. Thanks for looking, Cheers, Alistair7 points
-
Filters and washes were applied to tone down the markings and liven up the monochromatic finish.7 points
-
And now for something completly different. Looking back at @Col.'s original post, this Group build was to be about ICBM's and artillery. I'm not sure if this was planned to get away from 'the usual subjects' but it seems like a great idea. So just as I was reaching for another Airfix Buccaneer I remembered this kit which I bought from Hobby Bounties in Singapore about 4 years ago. It fits better to the original theme so shall be my first build in 2022. I might get round to the Buccaneer as well since this looks quite straighforward. Although Mach 2 are not known for the great fit of their kits. Lets see.... Decals and everything Luxury!6 points
-
Hello again.I have finished this one last week.The old Testors YF-23.Fully rescribed.The cockpit has been upgraded a little with some scratch details.Painted in tamiya and ak interactive paints. Regards,Dragan6 points
-
To break things up, I did a little work on the Carley floats today. I'd noticed in a couple of pictures that these floats don't have wooden plank bases, they actually had netting so I made up a small frames and wove a net section. I use a thin crochet thread, stained down with teak wood stain for this. The net is woven and then the intersections are fixed with a blob of cyno, slips off the frame and glues to the underside of the printed float. The grab lacing is then threaded in the groves in the printed float, the paddles are just sanded from some 3mm by 1 mm lime wood, will be stained down with Tung oil to finish She carried two floats, so repeat, these will be lashed down to the support beams in the end. Just visible at the end of the torpedo tube are the rather tiny ladder hooks where the raised timber gangway bearer sits on the deck. The sea ladder will be stowed on the Carley floats The unpainted support beams and a few other details I missed earlier are awaiting primer, tomorrow, final colour painting coming soon Cheers Steve6 points
-
I received this kit back at the end of January and completed it mid Feb. Its one of the Airfix test shots I built for an article in the current (May 2012) edition of Airfix Model World magazine. I was asked to keep it under wraps until the magazine hit the streets. Built OOB apart from a couple of wires here and there and bits of a PE panel. If you'd like to see the work in progress, buy the magazine A very enjoyable build and from my point of view, 98% accurate from Airfix. Well done! Next to my Belcher Bits heavily modified Lynx AH9A Next to my other recently completed Airfix HMA8 (see more of that later ) My next Lynx (already on the go) will probably be a TOW equipped aircraft. Thanks for looking.6 points
-
The other part of the build that I would like Eduard to “simplify” is the exhaust stacks… …my “issue” is the lack of location tabs, getting the “back” of the sub-assembly aligned while “balancing” the exhausts. With practice, this is my 3rd or 4th time I’ve built an Eduard Spitfire and I think I’m getting the hang of how to do them. Eduard (Brassin) do supply resin versions where the “back” is a single piece and each exhaust pipe is separate, I think I’ll try these in my next build. Having said all that, the moulding of these exhausts is very nice, I especially like the way they’ve made them appear hollow. Anywho, the exhausts were assembled and then given a coat of Stynylrez black primer. A “base” colour of Xtreme metal AK488 matte aluminium. The ends of each pipe was then dusted with some AK486 pale burnt metal… …followed by AK484 burnt metal, towards the “root” of each pipe… …and finally, all pipes except the front one, a light coat of AK486 jet exhaust. Next I’ll be finishing the fuselage assembly. until next time as always, any suggestions, criticisms or comments will be gratefully received. rgds John(shortCummins)6 points
-
6 points
-
Off to a slow start…. In an effort to avoid complete mental collapse, I’ve decided I need to find ways to reduce the rivet count in the build-up of this beast and so my first thought was “what bits can I cast in resin?”. When there are only two or three similar parts I tend to scratch each one, but where I have smaller items that repeat more than this, I consider breaking out the silicone and resin. For this one, there don’t appear to be too many components that are repeated unfortunately. There are the track links, which are a no-brainer for casting, and “trolley” wheels/rollers for the gun frame (which I’ll need to research a little to determine quite what they look like in detail). There are also, in the cardboard-template kit I have to work from, a number of applique rivetted strips – 3mm wide with either single or double rows of rivets. After splurging out on my new tiny, tiny balls and even tinier drill bits, I’ve actually come to the conclusion that the 0.8mm nail caviar I used for my last build is appropriate for this vehicle after all. 0.8mm scales up to 28mm in real life, which doesn’t seem unreasonable at all for a heavily armoured tank like this. A bit much for the thinly armoured Pierce Arrow, but fine for this I think….. anyone out there know what size WW1 tank rivets are/were? Track links first: I cut a strip of 0.5mm card the correct width of the tracks, marked out positions for the (flattened) rivets with a pin and drilled holes using a 1mm bit. Lengths of rod were pushed in and set to a regular height by pushing it face-down onto the world’s simplest jig of 0.2mm card to get the penetrations regular – the aim is to get them just proud of the plate. A slosh of TET and snipping off the back bits and (almost) done. They just need sanding at the back to remove the stubs, adding the leading curve and cutting into individual links. When I first tried this track-link casting for my Whippet, I only made 4 prototypes, so had to cast at least 50 times (50% success rate), so in order to reduce the number of casts, I’m making up 12 links this time, with 8 of them in a strip, and 4 individuals. Say 160 links at 50% success should mean no more than 26 castings which is a big improvement. Next up, the applique strips. I cut (3mm wide by 0.5mm card) and drilled (0.7mm holes) the first one at a random (but longer than the longest needed) length. The whole strip was glued down onto a slightly wider 0.2mm card strip and the balls were glued into place. The idea of the 0.2mm backing is to provide a guide in sanding them down to the correct thickness. I’ve found when using a single-face “open” mould, that the resin will need sanding back, so this “flash” should give a guide as to when to stop. I’ll use the same plan for the track links.6 points
-
Hello everyone, This was my penultimate build for 2021: Classic Airframes' 1/48 Grumman OA-12A Duck. A lot of modifications went into this one: scratchbuilt forward lower fuselage, missing wing strut replaced, props shortened so they clear the float, corrected upper cowling, and the missing aerials added. This was my first biplane and attempt at rigging since the early 90s, when I was a young teenager, and it was a challenge. Most of the markings are masked and airbrushed; only the national insignia and prop stencils are decals. A full build article is in the latest edition of Scale Aircraft Modelling (Feb 2022 44-12). Comments welcome and thanks for looking. Jon6 points


.thumb.jpg.cfc129272ffec824439b15e6013d5952.jpg)


This leaderboard is set to London/GMT+01:00