Leaderboard


Popular Content
Showing content with the highest reputation on 30/09/19 in all areas
-
Just finished this one today (2 in one day...!!!). The old and bold Trumpeter 1/72 IL-28. These kits can be picked up for peanuts. Fit is a bit off in places but with the usual effort scrubs up pretty well. Do not follow the instructions for the pilots cockpit as the seat would be way too low. I wanted something to go with my Vietnam collection so used spare decals from the stash rather than the box options. Airbrushed using Tamiya paints (which I totally adore for airbrush work). Weathered using a Flory dark wash. EZ Line used for the radio wire. Very pleased with the way it has turned out and has decent presence on the shelf. Here we go with the photos: Cheers all, Phil24 points
-
Yes, I heartily agree: the American health care system is in many respects quite poor, and in others actively hostile to the elderly or small children, unless of course a lot of money is thrown at the problem. Had I more money, I might notice it less, but I don't. Winston's sitter, an engineering student from Belize, makes fun of it quite a bit, always bitter medicine to take from a country that has no air force. Sometimes I feel like poor Grant here: (He'd woken up from a nap, but clearly wasn't quite ready to be awake. Same, Grant, all the time.) Anyway, after a long weekend, or rather a weekend of normal length which felt long, during which Mrs P was surprised with a new (small) diamond ring and I received A Hero's Reward (pizza, probably), I finally managed to get down to the Lanc tonight. This technically wasn't the only modelling I did this weekend, though, since I recently and on a whim used my rapidly-depleting funds (I fear my sojourn in England is going to be rather more tightly-budgeted than I hoped, at the present rate of dental expenditure) to purchase an Accurate Miniatures 1/72 MQ-1A Predator, and on Saturday I asked Winston if he wanted to build it with me at the kitchen table. DID HE?!? Did he ever. Unfortunately, I keep forgetting that at two Grant now speaks English fairly fluently, and he burst into tears of rage and immediately ran to me and began pummeling me until I placated him with an invitation to join us. Winston did most of the major assembly work of what is a delicate but fairly simple kit, and Grant amused himself by bending my sanding sticks in half. Winston did well, though he had to be restrained from gluing bits of sprue on to make extra propellers, or indeed from attaching the actual propeller immediately so he could spin it. Anyway, back to the Lanc! After an immense amount of masking, it was ready. He who hesitates is lost, so I dug out the Colourcoats and got to it. And then, my favourite part! Ta-daaaaa! Need to fix that starboard side window, I think. But puttering along!19 points
-
Hello all, This is my latest build: my second 1/48 AH-64D this year, this time as an Israeli AH-64D-I Saraf. The basic kit is Hasegawa and the conversion is from Wingman Models, including the decals. Gun, pitots and tail aerial are from Master. Paint is Hataka lacquer applied freehand. A full build article, describing how this all went together and what is wrong with it, is here: https://jonbryon.com/hasegawa-1-48-boeing-ah-64d-i-saraf/ Thanks for looking. Jon17 points
-
I chose this model as I used to fly on them from Lands End in the 70's when BA had their S-61NM fleet out of service on the Lands End route over to St Mary' in the Scilly Isles. This was the livery flown on, sat next to a big bag of mail and parcels bound in and out of the islands at the time. My Dad was a BA skipper at the time and always got preferential treatment of the front left seat to talk and play pilots during the short trip across the waters stretch. Phew - I'm really relieved this build is over. Firstly its way out of my normal comfort zone and secondly, the kit fought me 110% of the way through the build and secondly, the kit lacked the decals to produce the box art. I can't really fault Valoms model (other than that the tail plane does not sit parallel to the wings if built without modification) however the flight deck windows screen was too wide for the kit once the fuselage halves had been brought together - I slip a 0.5mm sliver between the 2 main fuselage halves to overcome this rather than cut the window piece down. The biggest issue was the decal set - or rather lack of decals. This is the Aurigny boxing which also has the Coast Guard decal set option. The decal set I had did not include the correct red and black stripes so every line you see has been carefully masked and painted by hand - a real challenge for me but I think it looks OK. A quick note to anyone considering building this, website and online references of the Aurigny fleet will show that these early aircraft had a lot of non-uniform consistencies in their appearance over the lifetime of the planes registration. The model I have built looked as built for a short time period only before having external changes made. Assembled, this 1/48 model makes a decent sized display. Don't forget your nose weight on this one if you fancy a crack at the kit - mine is nose deep in solid lead right up to the rear of the flight deck control bulkhead.17 points
-
Thanks to Marcin Ciepierski - Arma Hobby I`ve got the model of the most beautiful Polish aircraft - PZL P.8. Bulding it was a really pleasant experience. Painted with AK Extreme Metal.16 points
-
Churchill Mk.VII 34th Tank Brigade, 107th Royal Armoured Corp14 points
-
Tamiya Spitfire Mk1 downing an Airfix BF109 Over the channel during the battle of britain.13 points
-
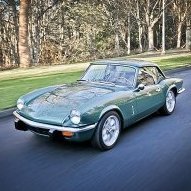
This was made from the Trumpeter kit, and like all Trumpeter kits it isn't 100% accurate. Strangely, they don't give a wing fold option in the kit. but include the wing end blanks! I made some hinges from brass strip bent to shape, and the wing support rod (The red poles) from brass rod inserted into holes drilled in the wings to support them. Painted using a mix of Vallejo and Tamiya, using Montex masks for the windows and main markings - which are useful as Trumpy give you white underwing serials!?! I also reduced the size of the canopy window for the Observers coal-hole to the correct in-service size. Dave12 points
-
M4 Sherman H Company, 66th Armoured Regiment, 2nd Armoured Division12 points
-
Focke-Wulf Fw 190 A-8 (unfinished)12 points
-
LCM III and Cromwell (unfinished)12 points
-
You must be a holy terror at Christmas putting your shiny balls on the tree.... In the light of your kind comments Rob I'm prepared to overlook the 'polish' crack. Elgar must be rotating in his Malvernian acre.... No sweat Bill but can anyone explain why foil is so damned satisfying? It's beyond accounting for - watching Tomo do his Hart that time I just used to look at the page grinning with (obviously very manly, not at all fey &etc.) pleasure! Mersey Buckets Ced. On the subject of pannelling, just passing this on as a thought about redecorating your spare room? 'The Buftonian' (Obviously for the modeller judging by the thoughtful provision of those bench surrounds to the bed itself) Ahh Equinoxe. Ethereal. Coming out about the same time that Star Wars was released in the UK and Dr. Who comic in the shops there were moments back in the late 70s when it seemed that the much-delayed Space Age was re-emerging around my 13 year old self. Of course punk was prominently kicking the the doors in to remind us that a whitewashed technofuture free of politics was just naive and stupid when you looked at the society you actually lived in, rather than a moonbase fantasized about.... Nice links. Thanks Ben. Kind of you Roger. Thanks. You're absolutely correct Giorgio, it was. (Sincere apologies for brutality done to your fine language. 🤦♂️) Forgot to post this too yesterday - Vetebrod! A sweet cardamom filled bread from Sweden that we're all addicted to and that has largely replaced the concept of birthdays cakes in this house. Her making this delicacy is one of many reasons I worship Mrs. B. (There were actually two loaves about 10 mins before that picture was taken... ) Working from home today. Sky been incredibly dark all morning and storm due to hit later this afternoon. You can feel the claws of winter reaching out through the autumn on days like today. Managed to squeeze in a few more tidying-up jobs on Annie over lunch (cheese&ham toastie, strong tea). The cabin roof windows cleaned-up nicely. Very little residue to worry about from the thinned Gator's Grip and what there was rubbed nicely away with a moistened cotton bud: What isn't too apparent from that OH view is the amount of damage that the gun mounting for the Vickers had received several months back when I'd managed to catch it with a cuff and wrenched it off completely, gun and all. In the early days it would have been head-in-hands-build-it-all-again time but experience has taught me how infinitely repairable brass can be - as well as how to use solder as both a filler and joining agent. Before going there though, there were two matters to attend to. First job was to add the reinforcing collar that lies around the fuselage opening that the AW turret fits into. This is another characteristic minor detail of the aircraft that needed clearer definition through adding a ring of foil: You can see more clearly the damage to the gun arm in that photograph too.... Second modification is also related to the rear armament where (as with similarly rear-armed aircraft like the Swordfish et. al) there is a longitudinal opening along the top of the fuselage to allow the gun to be pitched down inside the fuselage. On some Anson photos this slot is clearly open, on others it appears to have be faired over with doped fabric just leaving the outline visible. I've no information to explain these variations or how N9945 may have looked in this respect so plumped for the faired-over appearance. To give me some kind of scale template I cannibalized scrap runner from the PE set (I think this was the one that held the control collumn part): I then used a round-headed diamond birr in the Dremel to excavate a shallow trench along inside of that piece like so: The guan arm and Vickers have as you can see been reinstated also. That part needed soldering at three distinct locations so to avoid heating the structure enough so that existing bits would drop of required some rapid 'touch & go' procedures with the iron on a cool setting with mere flakes of solder being melted into place. On the starboard side of that curved arm there was a gap of about 0.5mm due to the part having been so badly mangled but I was able to bridge this successfully by sculpting a blob of solder along with the merest of touches each time until it dragged out into a tube shape of matching diameter to the brass of the arm on either side of the gap. The gun moun ting also got a lick of fresh paint, though this time some Sky Blue rather than Black, which looks more slightly more convincing for those dark structures at this scale. Before plonking the protective dome back over the top of that I had to plonk the actual AW on to make sure the repaired gun mounting still fitted: Seemed to be Ok so another job to mark off the snag sheet. Later Alligators. Tony11 points
-
LCVP "Higgins Boat" plus Jeep Cargo - Airfix / Academy 1/72nd scale. The recent Airfix LCVP moulding painted in the RN colour scheme option using Vallejo and Tamiya paints. Academy "Jeep" built as an afterthought and brush painted using Vallejo. LCVP Build log Here KR's IanJ11 points
-
Inspired by the model 1/144 Cathay Pacific Airbus A350-900 Revell (built by Columbia20713) I also show a weathered "airliner". It is the Lockheed C-121C Super Constellation (Revell 1/144), to me the most beautiful airliner ever. I painted the metal finish with model master (testors) "steel", "aluminum" and "chrome". Decals of the '' Fuerza Aérea de Chile '' are my own production. This original photograph of a Connie parked somewhere on an airfield, apparently forgotten, had caused me to make my model worn out. But I did not want to make my model look broken, just worn and dirty. That's the result Best regards Peter10 points
-
Hi folks, almost completing my third model model in this year, the weekend box of Eduards 190 A-4, a fast build but a not so fast paintwork10 points
-
Hello There is another one Japanese aircraft, Mitsubishi A6M5c "Zero" (Tamiya scale 1:48, the old one from 1983). Like my "Betty" with some parts from Eduard and Master Model, and painted and weathered with Testors and Revell colors. The pilot is from Plus Model. Best regards Peter10 points
-
Well, I'm back into scale models for the first time in 15 years and I've found it very meditative to sit in a quiet space and slowly work through the pieces and painting - a nice break from a busy work and family life. I had an idea to do a scale model history of Formula 1 in 1:20 scale as there are so many models available to cover the history of engineering and design. I've started with the Tamiya RA272 as I got it for a good price and seemed like it would be a good place to start. Built pretty much out of the box and sprayed with a custom mix for the racing white and then topcoated with Tamiya X22 clear. I want to improve my skills and finished models so please feel free to comment on any tips/tricks/suggestions that you think might help.9 points
-
Another F-4 crops up, this is a 43 Sqn FG.1 from circa 1970, the well documented XV574. Remember the photo being on the cover of an issue of Airfix Magazine back in the day, stalking a Soviet 'Bear'. From the currently still running STGB . Fujimi 'Silver Jubilee' boxing. OOB, I had to carve away the electronics fairing off the Tail-fin. Xtradecal markings, Eduard 'Brassin' Sidewinders, PJ Products Pilots. Xtracrylic's paints airbrushed over Ultimate Grey Primer. By no means perfect, I still have trouble airbrushing these particular paints, but happy with the overall finish. I did weather the bottom a bit, but it doesn't really show in the photo's, was a bit scared to go over the top even though photo's show they get really dirty underneath! Comments and queries welcome. Davey.9 points
-
Hello Here is my first post of finished work, it is the Mitsubishi G4M Hamaki Typ 11 "Betty" in scale 1/48 from Tamiya (with some parts from Eduard and Master Model). Painted and weathered with Testors and Revell colors. Best regards Peter8 points
-
Hi all, Next up is the Special Hobby Fairey Barracuda Mk2 in Home Fleet finish. Painted with Vallejo this time. Bit of a fight with this one, but I'm more than happy with the end product. First time using EZ-line for the wires, what a good product! Dave8 points
-
I'm sure there will be several when we meet up Bill Gardening? What! Not me matey… Ah, getting old… not enjoyable but so much better than the alternative! Speaking personally the bits of your body that stop working (brain included) can sometimes cause frustration and it's tricky not to let that influence your interactions with others. Hopefully things will get better for your current situation Ben Good plan Chris - I need to get back to that ceiling in a minute and it's not something I'm looking forward to! Thanks Giorgio It does look bad in that photo but actually the seam's pretty good - it will need taping at the top as it's one of those irritating warpy things that makes the sides bow up when clamped. Fingers crossed though. Standing up all day yesterday has made me achey and grumpy this morning, not helped by starting on the fiddly turrets. The kit parts should lead to a fairly realistic result but getting them together is a pain. I've decided to glue in the the left post for this: …making sure it's upright and true. Took ages and lots of Anglo-Saxon. When the paint's dry I'll insert the gun, curse some more and glue in the other support. Other turret bits have been painted too: Doors have been glued in and painted so the internals are complete: It looks like there are some bits still to do but there aren't - in this version I guess the crew had to leap from section to section8 points
-
The masking has been a real challenge, I'm rapidly running out of tape...and patience ! However, a late session last night has got me here so, definitely on the downhill stretch now. cheers Pat8 points
-
I shot a coat of Gunze Medium Sea Grey over the gal, so now I can find all the spots that need fixing. I've already found a few. I added the landing gear but maybe I shouldn't have. She balances OK, but the gear (especially the front) looks awful spindly. I applied a coat of thin superglue over the spindliest parts, hoping that it might reinforce them. I'm not worried about the gear not withstanding the weight of the model, I'm just worried about old fumble thumbs here knocking them off. I overdid some of the scribing, mostly on access panels, and some of them need to be filled with some Mr. Surfacer. I don't want folks to think this is a Matchbox kit! Cheers, Bill8 points
-
362nd fs p51d. I’m not sure I should really be putting this up here as I couldn’t find any evidence that the 362nd were active over Normandy other than long range bomber escort and I certainly couldn’t find any evidence of full or even partial invasion stripes but none the less - got to,love a mustang with stripes! 😁8 points
-
I have been busy, for quite some time, with a rather large project: good (?) ol' Custom Dioramics railwaystation and signal tower. I Wanted to populate this station with a locomotive. First Baluard tpy 75 with coach came in to mind, but then I came across the much more detailed BR-52 from Trumpeter. Though no place for a coach left, I decided to use this one instead. During the war, the German propagande engine reportedly made a short movie, to be shown in cinema's, called "Lasst Ihn Sausen". This can be translated as "Let them whiz". The idea behind this dio is that the locomotive is just doing the opposite: wait till higher powers decide to let it pass. In the mean while, the driver does some maintainance and the stoker cleans up some of the mess he made. The plattform is filling up with passengers, as other trains are delayed in their turn... The figures are a mixed bunch of resin and plastic from different manufacturers, such as Preiser, Stalingrad, MiniArt, Mk35, etc. Same goes for the accessories..7 points
-
Sorry for the drama title but it's close to what happened here. This is the story of my 20+ year old (forgot actual purchase date) 1/12 Tamiya Caterham cycle fender. Started by assembling the chassis and then languishing while I went overboard on 1:1 projects, it has slept in the basements of two homes I've lived in. Certainly there have been presented here better and more detailed Cats of late, by experts. So why bother now? Especially after I've 'resigned' from modeling after the Rolls? I have recused myself because my worsening health issues had convinced me that I could not work to my standard anymore. Indeed, I declined to finish dear Paul Calvert's wonderful Eagle for those issues and enlisted the capable help of Ron and Sam. But of late, other voices have led me to wonder if I could work through my maladies as others like Thierry have. At least they tried just to see if they could. My undying respect to him and them for now I know the struggles involved when you do not have all your body's tools. So after passing by the Cat downstairs for years, I plucked it as a likely candidate to try. A relatively simple kit of 300-odd parts, and a large enough scale as to be manageable (the Eagle is smaller 1/16 and Paul had added minute rivet and other details-a seeing and handling nightmare) and I didn't have to go buy this now- expensive though reissued kit. So - how hard could it be? Heh, heh, heh,,,,it kicked my duff.... Enough blather - this is not a WIP but shows some steps and pitfalls along the way: Chassis started two decades ago. A milestone kit by Tammy with .025 ally body panels and many-screw construction. A bit of simplification but not much, inviting scratch details as others have accomplished. But I decided beforehand to cut my usual un-cut corners - not any hidden details when closed, simplified wiring, no brake lines, caliper detail or electrics. Loving the look of the car closed, that would dictate my direction. I felt a miracle if I just got paint, screws and glue on it and damn the smoking details. Here primer being applied - red lead style. Paint and primer by MRP. Clear by Testors. Bare body panels ready for prime: Rosso Corso at 12 psi straight from bottle goes on as thin as ink, which preserves details like louvers: Decanted clear cut 1/3 also at 12 psi: Alclad pale gold shot straight at 8 psi on Replica and Miniatures resin Minilite wheels. I had bought their aftermarket PE kit (OOP) but now found I could barely see much less handle their tiny, thin parts: The disturbing thing (but really the nature of the real car) is that you must mount finish-painted body panels before assembling the bulk of the suspension and small parts TO them. This invites handling finished paint with the accompanying 'hand damage' or possible scratches from slipped screwdrivers (easy to do on this: the bulk of the screws are 1.2 x 2.5MM) . Plus turning the chassis over and over to get to things and install minuscule stamped steel brackets and screws. I put down a thin foam base and used chunks of thicker foams to support while working. Plus I was lucky - because the shaking was fatiguing me constantly: After a while, I went back a bit on my original intentions; I tried plumbing the hoses and wires as much as I thought I could just to see how bad my conditions are. Held 'feet-to-fire' despite hating the struggle and taxing my vision. I learned I was right to swear-off and decline Paul's model for this was more than challenging my patience. Trying for an hour to get one screw in place (many times) almost had me ready to epoxy everything instead. But with breaks between, I persisted. I was not liking the results I was getting and the struggle did not feel as good as solving the Rolls' challenges, when I was physically better. This nice kit would take at most a few weeks to build especially OOB but it took me over eight. Tamiay's legendary joins and quality were present in this milestone kit. It has a nice weight to it and feels like quality. It mates nicely with my 935 and GT. A spritely little scamp among dreadnoughts. Importantly, it got rescued from the basement oblivion. Here's an example of my whining; the spring that holds the bonnet 'closed' gets looped onto a stamped latch. This get screwed to the body (in an impossible place) and then HOOKED onto a bit of the bonnet which is stamped out of the panel. It took me about four hours to get to the point where I CA'd the spring to the latch, screwed (1.2 x 2.5MM) to the body and hooked the latch to bonnet. Then I layed a drop of clear parts cement on it. Shaking like an earthquake is not fun model building. One huge difficulty was the inability to place that screw, paint brush or glue drop precisely where it needs be : I'll conclude with a few finished pix. I wound up doing a (rare for me) near OOB build. I scratch built better seat belts, and grille screen and monkied with the exhaust (which I hate) a bit. I had visions of doing a whole Cobra side pipe like mine with collector and flanges but despaired. I did cut one coil from each spring to lower it - but - forgot to shorten the inner rod of the shock - duh. I even found I could no longer take photos as well as I used to and that's clearly evident here. My apologies. But my purpose here is to salute those who work through their maladies and handle the stress so much better than I. Hats off to you all. I'd give myself maybe C or C+ grade for this. I certainly wouldn't put it on the same table as the real-deal Caterham guys...7 points
-
Tamiya M8 Greyhound, with a couple of extra figures from the MiniArt US tank crew set and a selection of stowage from Redog. Front wheel hubs removed, pinned and reset at an angle. .50 coaxial barrel drilled out to give a better impression of depth. Painted with Ammo mig US Olive drab and colour modulation achieved with lightened tones of OD, weathered with various Ak and Ammo mig products along with a little Mig pigment. Stowage secured with E Z line. Typical Tamiya no problems with construction and decals worked fine. Hope you like it and thanks for looking. Cheers Darryl7 points
-
This is my Unicraft 1/72 McDonnell (now Boeing) X-36. The X-36 was a 28% UAV "Tailless Fighter Agility Research Aircraft" with no vertical fin or rudder and with cunards. I thought it was really cool looking. Unfortunately the only kit of it available is from Unicraft, which means that what I got was a bunch of shapeless blobs of resin filled with pinholes that had to me shaped into an aircraft. This is an example of the wheel well doors which I didn't use: but in the end it took just 10 days, of mostly sanding, filling and priming to complete. The decals looked like they were printed on a medium resolution ink jet printer and came with a note saying they needed to be sealed before use. I used Testors Decal Bonding spray which seemed to work well. Not one of my best efforts but here it is: Being a UAV the canopy is just there for show and hold a camera for the remote pilot to use. The 2 figures are named Stick and Rudder. For size comparison here it is in its place between my X-32 and X-47 Next up will be the Sharkit X-31 which will be my first Sharkit kit. Enjoy7 points
-
as response to a question about the kit on a different photo. And ... YES, it is a pretty simple kit YES, i did manage to misread the instructions for a simple kit and somehow s*****d up the undercarriage YES, the pilot is from a set of Soviet personnel and not the original test pilot YES, it was one of my early 1/48 kits YES, it was my first kit with a lot of metal finish and YES, all this shows ...7 points
-
Just finished this full resin 1/72 Anigrand VAK 191B. This was a commission build and is an aircraft I had never even heard of. First ever full resin build. My personal thoughts are that resin is great for smaller items like ejector seats, cockpits etc that allow the extreme detail come to life. I don't think its suited to a full air frame as injection moulding allows much finer details. Build instructions were for an in service machine rather than a prototype. Anyway, here is a link to the Wiki about the aircraft and a few photos: https://en.wikipedia.org/wiki/VFW_VAK_191B Cheers all, Phil6 points
-
This month's project has been the futuristic looking Piaggio Avanti of the Italian Navy (as seen at this year's Yeovilton Airshow), using the AModel kit. As with all AModel kits, it needs a little care to complete, but captures the "Gerry Anderson" looks of the real thing well. Indeed, I briefly thought about painting it white and using a set of spare Spectrum decals instead of the kit ones! The kit includes a comprehensive interior layout, but this is a little wasted due to the small and not entirely clear windows. ... and the real thing at Yeovilton: FredT6 points
-
During the height of the Cold War, squadrons of sub-hunting P-3 Orions operated from the US Naval Air Station located on the former site of Kindley Air Force Base in Bermuda. Their role was to intercept and shadow Soviet ballistic-missile carrying submarines in the Atlantic and moving toward the US's east coast. In addition to sub-hunting aircraft, NAS Bermuda operated a number of HH-1N Twin Hueys as utility aircraft, and in the vital Search & Rescue roles. BuNo 158290 seems to have been among the last of these choppers, serving until the base's closure in 1995. Two online photos I found seem effectively to 'bracket' the former Marine helicopter's service with the Navy in Bermuda: one was taken during a base 'Open House' day in 1990; the other, taken in 1995, shows the bird on its way to retirement at the Davis Monthan AFB 'Boneyard.' The consistency between those two photos lends a wonderful confidence to the would-be model builder, showing a number of particular features that seemed unchanged throughout that term of service. Panda's well-known 1/35 UH-1N in its non-gunship boxing made an impressive-sized basis for the bird. The kit's cockpit detail and rear-compartment seating were adequate, but I 'dressed up' both areas slightly with added cables and fixtures. The rear cabin received belts and headsets, a scratch-built rescue hoist and assorted SAR equipment bags. The exterior got some added antennas, beacon lights and reinforcement braces for the cable cutters on the roof and underside. Particular features shown in the 'bookend' photos include the older-style 'towel rack' tail-boom aerials instead of the zigzag 'long line' VHF aerial; no mounting of the underside cargo hook; and the absence of any 'safety' markings on the all-black main- and tail-rotor tips. The kit's rather crumbly decals supplied mainly white markings, solely for dark-colored camouflage schemes. For the red and white SAR scheme, I made up the black lettering and an assortment of service stencils (along with the NAS Bermuda seals) in MS-Paint, and printed them on my faithful old HP inkjet. I did use the kit-supplied 'stars and bars' (to which I added thicker bars) and the jet intake and rescue arrows. All received a coat of Micro Decal Film before-hand, which limited...but did not entirely prevent...the cracking and flaking of the decals. A roughly 50/50 mix of Future Clear and Vallejo Matt Varnish sealed those troublesome decals, and was a good match for the 'shine' shown in the photos of the prototype, without looking quite as 'toy-like' as Future alone often seems to appear. For those interested, the WIP may be found here. It's not a museum-piece by a long stretch, but I'm pleased with the result. It's an eye-catching scheme with an important pedigree, and just enough neat details to make it a little different from everybody else's. Hope you enjoy the photos.6 points
-
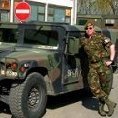
I built this in the 80s front line asia gb, to represent red 23 from the Afghanistan conflict ,built oob The zvezda mi-24p kit 1/72 And here with another helo i built in the same gb,the hobby boss 1/72, mi-17 hip6 points
-
Ok guys. Here is a progress image of the fuselage together and the canopy installed. Looks a bit rough, but I should be able to smooth most of it over with Tamiya putty. I just noticed. Looks like I forgot the seat belt. Well to late now. It is what it is. Beltless........6 points
-
Hello Everybody! I recently finished the 1/48 Hellcat Fighter in the rarely seen scheme which is the British Fleet Air Arm version. OOB build but some scratch details like seat belts, gun barrels and engine wiring are added.6 points
-
Airfix Dakota Mk.III converted to a C-47a. Decals were Kits-World Warbirds KW172124 C-47A 42-100882 'Drag em Oot' 87th Troop Carrier Sqd, Greenham Common Sept 1944, Now resides at North Weald as part of the Aerolegens fleet operating out of my local airfield Headcorn. Glad to now have made an aircraft ive been in, just need to to the Spit and the Harvard now. Just 3 photo as my flickr account has reached its limits even thought ive deleted albums within in grrr. Will upload more as i think it needs to refresh. Build Thread here DSC_0023 by stuart wellard, on Flickr DSC_0019 by stuart wellard, on Flickr DSC_0015 by stuart wellard, on Flickr6 points
-
Hello to all! So the model of my Hurricane is ready. This is not an exact copy of the Hurricane fighter on a 72 scale These are pieces of molded plastic assembled from a NOVO box with minor modifications Thank!6 points
-
Here's my Freightdog Models 1:144 BAC (EE) Canberra E.15 I built back in 2010. It represents WH948, of No. 98 Squadron, RAF, based at RAF Cottesmore, UK, in September 1972. It's the OzMods kit repackaged with a new decal sheet. The kit was painted with brush and the varnish was airbrushed. Thanks for looking Miguel5 points
-
Sprues DH.88 Comet 1/48th wing, glass and hood details. Source: https://www.facebook.com/mikro.mir.dnepr/photos/a.1416729748404757/2657402051004181/ V.P.5 points
-
Hello All, I enjoyed a day out at St. Ives Model show in Cambridgeshire, fantastic atmosphere and I met so many people, chatted and the time ran out, where did it all go? RV'd with Bentwaters and Julian at their table, BCWM. I was able to get a look at Wolfe Aerospace, 1/48 Avro Vulcan on Rikki's stand, with all the extras that come with it. We will be collaborating on a 1/32 TSR.2 (to be announced at a later date). Any way lets get back to the subject of the Vulcan, I have received so much encouragement and praise from fellow Britmodellers and the like, and I have decided to continue production of the 1/48 Avro Vulcan to avoid a panic that I seem to have created of my own doing. So there is no October deadline; this will give modellers and collectors alike to plan more efficiently rather than panic. Like I said new laser decals will become available. I am looking into creating a 1/48 B.1 Vulcan and I realise the task will be substantial, considering the differences. Over the years I have spoken to some Vulcan test pilots and I believe only one of them is still around but he never flew any of the B.1s as was I able to design and build the B.2 by studying a lot of the test pilot notes. It gives one a feel for the subject. Keep an eye out for new Vulcan developments and remember, you heard from here first. Alan Icelandic Fine Art5 points
-
Thanks Thom, glad to have you along Thanks Clive, there certainly are some very delicately moulded parts, I shall be very careful when removing and cleaning up those Thanks Dennis, I hope you will carry on with the Hasegawa Raiden, it is a lovely kit. Regarding the Zoukei Mura kits, you can only avoid them for so long, I doubt anyone else will be doing a large scale Ki-45 in the foreseeable future, but you never know. If the Zoukei Mura crew aren't too busy at Telford I might suggest to them that they visit the Ki-46 at Cosford as well... I got my paints sorted out: From the top left they are: ACJ03 - IJN D2 Green Black/IJA #27 Blue Green for the uppersurface camouflage, ACJ07 - Mitsubishi Navy Grey for the underside and ACJ08 - Mitsubishi Cowl Blue Black for the anti-glare strip. From the bottom left, ACJ18 - IJN Interior Olive Green (mine is an old tin still labelled Mitsubishi Interior Green but it's the same stuff) for the interior, obvs, ACJ19 - ID Yellow for the leading edge ID marking and ACJ20 - Hinomaru Red because occasionally I like to kid myself I am going to paint the national markings myself this time. So I'm about ready to kick off; the first section of the instructions deals with the assembly and painting of the engine up to the firewall - here's how it looks, I don't think I am infringing anyone's copyright here as I believe the instructions are downloadable from the Z-M website: A couple of general information pages describing the purpose and nature of the aircraft: Paint guide and photographs of the completed engine: ... and two double pages of assembly instructions: Right, I'm going in... Cheers, Stew5 points
-
Good morning folks Bit of a disaster last night. I masked off around the cockpit to paint the back before glueing the rear canopy section in. Unfortunately the tape went onto the decals and, Well, ripped part of them off 😥 I've had to cobble together parts from decals left on the sheet. Not perfect but some work should see then blended in. Gutted. In other news work has started on the engine. It's relatively straight forward but the pipes and hoses are fiddly. A couple from the bottom have broken in half when cleaning them up but as they're on the bottom it doesn't matter so much as they won't be seen. Here's how the pipes and hoses come in the box Engine at the stage of being ready for semi gloss black. I won't add the mourning brackets etc until later on. The whole lot got a coat of semi gloss black last night and has been left to dry fully. I'll have a look this evening at any bits that the paint hasnt got to and 're paint of necessary. Then it's paint the aluminium and silver bits the work out how to attach the wires. Should be fun...5 points
-
For a second I was a bit baffled as to the assembly of the cockpit interior and all the little bulkheads, etc...I am so used to having plans that detail each slot/tab, etc...I had forgotten the older style instructions wherein one really had to read through the text to figure out what to do. For those of you following along at home, I have completed steps 1 through 9. I wanted to do this so I could glue the interiors together and then prime the inside. I will insert the cockpit module today and prime it. 8 pieces make up this assembly. The glass is in, the wheel-well bulkhead is attached and the instrument panel is glued in place. I have also put together the wing pontoons. Busy work really. --John5 points
-
Keith has described the frustrations far better than I could. The purpose of my post was to pay tribute to those that now struggle to enjoy the hobby they've had for decades and continue to press on. And still produce excellent work. As he and several others here have. Advancing age is a two-edged sword which affects us all differently. My experience was not as fun as we all do this for but I managed a result. You have all been most generous with your comments and 'likes' and I thank you. Seen with its brother in scale, the Cat juuust fits with the 935 in a case without touching. Not pleasant for viewing but effective for keeping the dust off and the cat out. Again, thanks to all. Now did I spy that Doyusha Countach from the past in the dark down there....?5 points
-
sorry, all I can see is a big white lily. Gardening were you ?5 points
-
Another golden oldie from my collection, I received this model as a Christmas present in 1973 from my dad. I originally built it as the Coastal Command option but a couple of years later I repainted it in the first of a number of Bomber Command colour schemes that it would sport over the many years. This boxing is the same as mine was with the parts being moulded in white plastic. I could never understand why the nose turret has two guns. I thought my model was wrong at first. The typical inspirational FROG full colour painting guide on the back of the box for the two optional versions in the kit. I made a new bomb aimers nose glazing from clear plastic, and opened up the entrance hatch underneath. I replaced the kit's nose turret windscreen with a turret from an AIRFIX Anson. I replaced the kit's prone bomb aimer with a seating one and built a bomb sight. The kit's bomb aimer looked like he was frightened of heights the way he was peering over the edge of the floor. Extra glazing added behind the turret aperture Bomb aimers window, entry hatch and camera porthole. I scratchbuilt a rear turret using the kit's turret glazing and guns. The original white plastic and the kit's wing spar visible I can display the model on the ground or in flight mode by using the kit's optional landing gear configurations Brush painted with Humbrol Matt Black and depicted in the markings of 10 Squadron based at RAF Leeming in Yorkshire in 1941. Caught in searchlights at Scale Model World That has been my 46 year old FROG Whitley. regards, adey5 points
-
You're quite right Keith, you did. No hendie, really he did! Chris I hope you've never had to re-decorate… That's pretty amazing! Keith Very precise indeed and, as Keith says, amazing. We had our two closer together than that to avoid new baby / old toddler problems; 1 year 9 months between them which means 1 year before we, er, planned Not much done today as it's been the annual Scouts' County shooting competition. 8 o'clock start (with a bacon sarnie) and then eight hours standing around watching the Scouts pop their airguns at various targets. It's the longest I've stood for ages. Sore feet but good fun and the rain stayed away except for a downpour around lunchtime. I have been fiddling and the crew have now been inserted with minor surgery: The OHP film windows are pretty clear: … and I'm happy with the slight rims around the opening windows so time to glue the floors in. As usual I wanted to glue them to one side making sure the fuselage would still go together. Can you see here that the floor fits into the other side's locating steps? Just. The front floor with its stairs helps a lot so that's been glued to one side as well and the whole lot clamped to dry overnight: The pilots look pretty happy about it: Well, one of them anyway…5 points
-
Kit - Hasegawa 1:48 Paint - Cockpit, seat etc all acrylics - Camouflage all Xtracolour enamels. Decals - Eagle Strike Extras - True Details resin seat, Eduard kit-specific 'Zoom' set. Fuse wire, fibre-optic cable and plastic card details in cockpit, air-brake and undercarriage wells. Canadair Sabre Mk. 4 Assigned to Sqn. Ldr. T. H. Hutchinson C/O 3 Squadron RAFG Geilenkirchen, 1955/56 So, a thirty year old kit, painted with thirty year old enamels and wearing twenty-five year old decals.... bit of an 'old skool' project wouldn't you say ? There honestly isn't too much to say, the kit really does fall together and is (happily) typical of those superb Hasegawa releases from the early 1990's, crisp detail, faultless molding with fuss-free engineering and construction - I really wish they would tool-up again and release some new kits, I know that's not going to happen, but there's nothing wrong with hope is there ?. The Eagle Strike decals behaved as if they were printed yesterday - utterly flawless and superbly printed by Cartograph, again, a company I really do miss. That's just about it. Please feel free to criticise, ask a question or make any sort of comment. Have the rest of a great weekend folks, best from Middle Earth. Ian.5 points
-
Adapted from the newer Airfix kit, painted using Vallejo paints and finished with Xtradecals. The fuel filler points were altered, windows blanked, and two blades altered so they hung the correct way. Although we were more used to seeing the Yellow Crab cabs in East Anglia, I do like to RN scheme. And lets be honest - if you needed one you didn't care what colour it was! I hope I got the yellow blade in the correct position for when they're folded. Dave5 points
-
Lockheed P-38J Lightning 'Lou-E-Z-Ann' 392nd FS/367th FG USAAF. 1/100 Eldon kit made OOB with just a few additions (mainly the superchargers). Decals were scanned/reduced/reprinted from a 1/72 SuperScale sheet. The build thread is here. Cheers Cliff5 points


.thumb.jpg.ad2b820bfdebfdb8541e9255a05f38c7.jpg)


.thumb.jpg.0bac681e0da8e4ed7557610e98fda908.jpg)


This leaderboard is set to London/GMT+01:00