Leaderboard


Popular Content
Showing content with the highest reputation on 24/01/25 in all areas
-
I always wanted to build a grey British Sea King in 1/48, but could not find any of Hasegawa's releases. Finally, I found that the Japanese "Antarctica Ship Shirase" release included at least most parts necessary to build a Westland Sea King. I also found the Flightpath conversion set. A couple of months later, Airfix suddenly released everything that I had searched for... I decided that if I did not build this one now, I probably would never do it. So here it is: Those of you that know British Sea Kings better than I do, will found plenty of errors. But at least it looks like a Westland one to me, especially regarding what I had to start with, I was pretty pleased with the result. All decals came from my spares box. I never managed to find the correct squadron badge, so I used the one that was closest to the real thing. Painting was made partly with salt to achieve a worn look. I used Mr. Paint colours. The winch and rotor hub was detailed a little extra: Thanks for watching!60 points
-
1/48 Airfix Sea Fury with Barracuda Studios Engine, engine cowl, exhausts and Spinner plus diamond and block threaded wheels and the sublime Gear bay. Model is finished in MRP paints and Barracuda Studios decals. Also included in the build - Eduard Exterior PE, Aims Oleo locks and FAA wheel Chocks and finally the CMK 500 Lb bombs (long tail) and racks designed for the Eduard Tempest kits. Oriental Stork is from a company called Evemodel. Note: the kit comes with main gear bay covers with the tear-drop fairing molded on; I have yet to see such an example in Korean war photos. The gear cover is also provided without this detail - obviously - in the Eduard exterior PE set however the inner frame work does not come with the front shield that you will never see missing from an in-service aircraft - so remove kit teardrop or add shield to the inside of the PE - one or the other! Thanks36 points
-
Kinetic 1/48 Harrier GR3 finished. Out of the box except a resin seat and resin exhausts. Really enjoyed this kit. I lost the probe on the nose, so I raided the missus' needle box.15 points
-
Just finished this one was entered in the GB But in did not finish before dead line. Now it is done. Cheers Jes14 points
-
For some unknown reason I decided to build the last two Hasegawa 1/48 Fw190s in my stash. This particular build is the Fw190A-3/4, which appeared to be the Dragon kit or a copy of it (personal opinion). I had decided to use the Aires Fw190 Resin Engine detail set, this was actually intended for the Tamiya kit but I could make it fit the Hasegawa kit 😖. I won't bore you with details of the build that didn't work very well and that I eventually lost interest in. Needless to say it nearly ended up being binned. Then I decided instead of having wasted my time I would include this model in a small vignette! I used Eduard etch for the cockpit detail and used wheels from the Eduard Fw190 spares of which I have quite a few!! The Fw190 I chose to represent was an A-3 variant I found a couple of photos in a copy of Luftwaffe Im Focus which captioned this machine as being on the Eastern Front in early 1945. The fact it has what appears to be factory codes and a completely yellow 04 cowling took my interest. Finish is 74/75/76 (real colours used) decals from my store. Well at least I didn't waste my time completely, mind you I notice all the mechanics have disappeared probably in disgust!!!!! Thanks for looking, cheers Andy13 points
-
Finally I'm stuck in the 3D swamp, I bought a printer in 2023 and have had fairly little hassle and some good results, when I'd passed my first learning curve. I started with some tanks in 1/72, the result was amaizing and I was hooked. After 5-6 of these I tried my wings with my first aircraft. I bought stl files from Denys "Aircader" on cults for this Antonov. This aircraft had gone threw a very long development phase from the passanger Antonov 148/158 to this transporter 178, which sadly just became a unique piece. Given the current situation, I believe this will not change. Nevertheless in my opinion it is a very good looking plane, looks almost like a Dolphin in its shape. That said the Embraer 390 is quite similar and has some more commercial luck. The model consists of about 100 parts, some enhancement were made, like sanding down all trailing edges to a more sharp profil and adding a bunch of my own small parts. Fit of it was great and it went togehter nice, offcourse some minor sanding was required in the joints. It was finished last autumn and I was so pleased with it, so I've already finished my second of his models now, working on the third.... Enought of my bad english, to the pictures. //Anders Thanks for looking13 points
-
Hello all, Here is my recent completed 1/48 Tamiya P-47D-10, marked as 42-75207 'Boche Buster/Rozzie Geth' of the 62nd Fighter Squadron of the 56th Fighter Group in early 1944. The build thread is below. Extras used: Eduard - mask Eduard Look - Instrument panel and seat harness Furball - stencils Kitsworld - decals Paint is from MRP, with the weathering a mixture of Abteiling oils, Flory wash, dry brushing and Tamiya sets. My first ever jug, so go easy! This will be part 1 of a 3 part 56th Fighter Group project. Thanks for looking. Dave13 points
-
A little more over the past day or two. the “Victim” got masked. And now with added post it notes. The Martian body got a gloss coat so it’ll be ready for washes. I decided to go army painter quick shade. Here we are still wet. This is the colour scheme I’m headed at. Arms and legs hung in position as not to drip. Next up I makes the collar and wanted a blue tone to the metallics. So I sprayed with med blue. Glossed and found out this paste. A little while later we have this. Looking pretty good. A bit more buffing and the masks can come off. look @CedB a dead one!! 🤣🪰 You can just see the the first pass at a wash. Very subtle light brown wash. I’m going to add stains and blood splats too but not go too far. Really happy with the shiny collar though. Looks just right. more soon. ACKACKACK Happy modelling chums. 🌍💥 Johnny.13 points
-
Hallo The Flettner 282 Kolibri was one of the most successful German helicopters. In opposition to the FA 223 Drache it did not have structural or dynamic unsolved problems. It was a stable aircraft, easily to fly and even fast to learn to fly properly. It was produced too in small numbers. The limited production capacity was one issue and the jealousy of the Luftwaffe versus Marine was the second issue. So, just successful trials were flown during the war. After the war it was honey for the Allies. The aircraft, or helicopter by itself in this configuration is a stable platform. No need of a counter torque. The build, as the second of the early rotary aircraft from Germany. The next model I will build is the FA 223. The kit is quite well, and there are no issues to remark. Have a look around: happy modelling12 points
-
This is the Hobby Boss kit of the Intruder. I nice kit with plenty of detail inside and out. The only thing I added was some Multiple Ejector Racks from Reskit, everything else id out of the box. Mr Color acrylics were used to paint the model. Thanks for looking All the best, Angelo10 points
-
Finally finished a project that's been sitting dormant for far too long. Even with many mistakes, I'm pleased with the result and I've learnt a lot. Work in Progress thread:9 points
-
9 points
-
Two beauties: a Morris Isis Series I and a Volvo PV445 Duett.9 points
-
Oman strikes again - This time it’s a Hawker Hunter of the Omani Air Force. When i saw a photo of an Omani Hunter, i fell completely in love with the heavely sun bleached bluish/grey camo scheme. The model is built a few years back, but since i lately have posted quite a few Omani birds here on BM, i thought this should be posted as well. It’s the well known Revell kit, built mainly out of the box. Thanks for stopping by 🙂8 points
-
This is the Lift Here! Models 1/72 Cessna LC-126A. The LC-126A is the military version of the Cessna 195 Businessliner. and was used as a light transport and for search and rescue in Alaska. Lift Here! is a Serbian company that I had never heard of until I went searching for a 1/72 kit of the LC-126A for my Air Forces search and rescue collection. The box said "High Quality Resin" and I have certainly seen worse. Overall the resin quality was good with minimal pin holes. The fuselage, wings and floats were molded as single pieces. There were 2 vac windscreens and a resin buck so you could mold your own. The fit of the windscreen was non trivial and required a lot of dry fitting and trimming. There was supposed to be a sheet of clear that could be used to cut the side windows out but it was missing from my box, (I read a review of this kit where the sheet was included but the oars for the floats were missing). Luckily I had a sheet of clear styrene that I could use. I made a template but putting a piece of masking tape over the windows and cutting out the opening. Neither my sheet nor their vac proved to be very transparent. A very nice decal sheet was included. They looked very thin so I gave them a light coat of Microscale decal film. This made them easy to work with but it also caused them to want to curl up at the edges. In the end they went down fine. The instructions were very minimalist. Also included were 2 resin strips molded to fit the bottom of the floats and act as a rudimentary stand. I did not use them. Total build time was 16 days and I think it looks cool. Next up will be the Hasegawa F/A-18B for my trainer collection Enjoy8 points
-
Here is my attempt at the Airfix 1/48 scale Bristol Bulldog. The kit is one of Airfix's best in my opinion, this was the easiest bi-plane kit I have ever built. The only issues I had were with aftermarket parts and even then they were only really niggles. The main colours were painted with AK Xtreme Metals Polished Aluminium and White Aluminium. The top wing markings were painted with Mr Color Red Madder and Mr Paint RAF Oxford Blue after I made a mess of the decals. I used the SBS 3D printed engine parts which gave me the correct rocker covers for the aircraft I was modelling and added a little more detail. I also used Xtradecal markings for the 23 Sqn. Bulldog that P/O Douglas Bader had the misfortune of crashing and seriously injuring himself in (not that he ever let a little thing like losing both his legs get in the way of his ambition). I really enjoyed building the Airfix Bulldog and if the quality and engineering of this kit is an indicator of things to come from Airfix then we are all in for happy days to come. Duncan B p.s. thanks to the members from the BM Interwar section that answered my many questions.8 points
-
Some more progress. Cutting out the roundels from the uninterrupted carrier film: The decals behaved impeccably with a drop of Decalfix behind each one: A very useful site popped up in googling here, showing the L9 markings attached to an A.100 (not an A.101). The site also decodes the markings: the chequered Moravian Eagle denotes the 2nd Aviation Regiment; and the "L" denotes the 66th Squadron in Olomouc. The decals were a very pleasant surprise: They were thin but tough and easy to apply, and bedded down over the delicate ribs straight away. The white is opaque and the varnish bleached out a lot while taped to a sunny window. The borders get a bit dark where the white underlay stops just before the edge of the decal, but I'd rather have that than have to touch up a white crescent. Wheels are on so it must be time for varnish and then rigging! But first it's dinner...8 points
-
Whilst a fair bit has been achieved this week there's not a lot to show for it (yet!). Further work has been done on the 600 bodyshell, adding headlamps, rearlamps and side-stripe decals, followed by a third coat of Quickshine... I've put that shell to one side to harden off again and restarted work on the 500.8 points
-
Picked one up today from Hannants and made a start on decals. The windows look fairly straight:8 points
-
I am almost done with this one. I have to add the front bumper and decals and decide if I will leave the hood open or not...hence possible wiring...not sure. In any case, I am waiting for something to arrive in the post before I finish it so I will let it sit for a bit. --John8 points
-
Thanks Gruntpa. I broke two off today but they can be reglued. I enjoy adding these bits but Inshould probably spend more time on sanding Thanks CC! It's fun to see what's possible and it distracts me from the more basic important stuff 😛 Today was one of those days that felt like a struggle, even with cookies. But I later relaxed with some model time. I got some Mimaki replacement blades for the dspiae cutter. They came with a manual handle. I tried a blade in the handle with a drafting template, and I was able to cut a hexagon out of cardboard.... so this might be a solution for any non circle shapes I want to add, like panels or whatnot. The replacement blades were too short for the dspiae (barely came out enough to cut), so I cut some sprue and added it into the adjustment knob (which has a spring-magnet-spring inside) so now it will adjust the new blades down quite a bit. Primed the floats... which revealed lots of roughness to fix Managed to break off the front tiedowns but found the pieces and rescued them to reglue later Looks promising But needs some thinned putty applications and patience as TJK advises Still... looks more interesting to me than the kit parts Got some more primer onto the plane... a relief to get away from the white and yellow and black combo... ick I think the sanded down ribs (and faked ribs on control surfaces) are looking pretty good Not bad... though my finger gets sore on the two stage trigger... and the primer starts to gum things up over time. Hm... suddenly it's clear that the chord on the stabs is off, just as vags pointed out. Baby steps! I guess next steps are fixing blips on the floats, build a jig. wife suggests using foam... which I think is a good idea to cradle the fuselage... then maybe tape down the floats and plane onto the foam then fit struts Some nice news is we got 4 extra shelves in acrylic for my display case and the shelf tabs should be coming in a week or so... at no cost thanks to her generous boss. Whee!8 points
-
Hi All, Some good progress today - I've taken a day's leave to make an extra long weekend (ahead of the Australia Day holiday on Monday). I've now got the basic form of the fuselage: Now I've got that in a state I'm reasonably happy with I can start thinking about how to engineer the fuselage to wing join (alternatively I might just noodle around with fun interior detail ) Thanks for looking, Roger Thanks gents - I'm rather enjoying this!8 points
-
Here is my first finished build for 2025. It's Hasegawa's venerable 1/48th F/A-18A, using an aftermarket sheet from Cam Decals to create a machine operating with VFA-132 ('Privateers'). It's a nicely moulded kit, with fine surface detailing, a sharply defined white metal undercarriage, a set of photo etch but not without some fit issues (probably made more challenging by choosing to use resin seamless intakes). It's finished in Light Ghost Grey FS 36375 (top and bottom) for which I used MRP-038. I created a simple display base using photo-etched tie downs spaced a scale six feet apart (one and a half inches). I wanted to create a subtle variation to the camo. I did this by firstly spraying dark grey through a mottle mask and then overlaying with Light Ghost Grey. I was able to rectify one self-generated problem. Due to all the fit issues with the resin intakes, I managed to clog up the detail on the starboard splitter plate (too much test spraying with primer, I should have masked off the splitter plate). To get round this problem without paint stripping, I tried rubbing a bit of kitchen foil on the corresponding part in another kit. I then glued the foil rubbing over the clogged up intake and hey presto, it looked fine under a thin cost of Light Ghost Grey. I do like the ship markings on the tail end! 🙂 This model was a bit of a 'test bed' for me as I have been commissioned to build the 1/48 Hasegawa F/A18C. At least I now know what issues to look out for. "Fore-warned is fore-armed" as the saying goes. Cheers Richard C.8 points
-
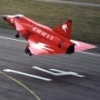
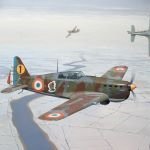
Good morning fellow modellers, Herewith the start of my Heller MS225 build, a nice subject but regretfully not-so-nice kit... First issued in 1967, the kit has some issues that needs to be addressed if we aim at a decent representation of this nimble fighter. The box art is quite attractive, as most Paul Lengellé paintings are: The content is up to the standard someone can expect from a kit of that time: Reference material will include old issues of the French magazines "Le Fanatique de l'Aviation", "Replic" and "Avions" (nbrs 75 to 79 - good 1/72 drawings), the "Morane Saulnier" book from Lela Presse and pictures found on the web. A photo-etched set for the kit is available from Brengun, however most of it will not be usable if you decide to correct the kit flaws. What has to be done precisely? Actually almost all pieces of the kit will require some corrective work. See below a non-exhaustive list of the most conspicuous points that needs to be addressed: 1. Fuselage: the kit provides a barrel-shaped fuselage while the actual one had an oval section. The sagging between the ribs on the aft part is overdone. Cockpit to be made, cockpit opening to be modified (should be rounded, without angle on the back). 2. Engine cowl: lack of details, poor representation of the exhausts, wrongly shaped gun troughs. 3. Tail surfaces: overdone ribbing effect, wrongly shaped elevators. 4. Wings: oversize span (has to be reduced of one rib on each side). Ribbing effect is better than on other parts but has to be reduced anyway. Ailerons contour to be scribed on the undersurfaces. 5. Wheels: spats shape to be improved. 6. The propeller turns in the good direction, however the blades are wrongly molded and should be inverted, with the rounded part as leading edge instead of trailing edge. As a seafarer, working on a 6 weeks on / 6 weeks off schedule, I'm unable to keep a regular work pace on my models but I'll try anyway to finish this project in time... Cheers, François7 points
-
Finally finished, kit was from Black Cat Models, resin hull, 3D parts, photo etch and some turned brass, only extras were some Uschi line for the rigging and a lot of swearing😝. Oh, and a few beers😁. Oh, and some wooden decking kindly donated by @Faraway, thanks Jon. Build log here7 points
-
This is one any self respecting IAC fan should have in their collection so when I saw KP was going to produce one I was a happy chappy. I must admit its a big improvemnet on their IAC SIAI Marchetti SF-260D which I found to be on the chunky side. (IMO the Special Hobby one is much better) Anyway, for the price this is quite nice but because the different boxings available you get the same sprues in each box. This is all very well, but, because of the various variants of the PC-9 you need different wing roots, and vertical stabalizers. The VS's fit OK but I had a right tussle with the wing roots. Maybe it was me? I don't know. Anyway they eventually succumed with the help of super glue and filler. (After I'd taken these photos I noticed the slight join line on the top of the roots which I have now remedied) Cockpit detail and the ejection seats are quite basic but in this scale just some generic seatbelts were added. The canopy tho' is nice and clear. Just make sure to put plenty of weight in the nose. I replaced most of the decals from the kit with ones from the Max decals sheet as I thought the Celtic boss orange was too dark. So, all in all not a too bad result and all we need now is for it to be released in 1/48th... Thanks for looking. 20250118_192440 by [url=https://www.flickr.com/photos/158464274@N02/ 20250118_192454 by 20250118_192540 by 20250118_192514 by7 points
-
I think you're looking for a 1/24 scale thread with that font size 😂7 points
-
Pleased to have your company Rob. So here we go with the first post in this thread. It doesn't look like much, but just about every protrusion that can be seen, is a separate part. In all, there are twenty stages in the instructions for the chassis. I'm at number 10, so half way. So far I've found that the plastic is very soft, typical short run plastic. Some of the smaller parts are very close to the sprues, which makes removal awkward and can result in some damage to the part. Anyone buying this kit with the idea of detailing things such as an engine, forget it; there isn't one. Just the lower section which can be seen from underneath. That doesn't worry me though as I didn't intend doing that. Another update once I've got something more to show. Thanks for looking. John.7 points
-
Working through my first model since getting back into the hobby recently after 15 years. Learning a lot of new things and trying different weathering techniques which I've never done before. A wealth of advice from on here and a lot of inspiration. Anything I can do differently, better, do more or less of? I'm planning on trying to make my first small diorama using this model with some basic grass, tress etc.7 points
-
A man’s fear of needles led to a rather unconventional solution at the dentist’s office. As the dentist began preparing the nitrous oxide, the patient quickly objected, citing his inability to handle the gas. The mere thought of wearing a mask made him feel suffocated. The dentist, understanding the patient’s concerns, offered an alternative solution. “Would you be okay taking a pill instead?” he asked. The patient agreed, thinking that a pill would be a more manageable option. However, what happened next was unexpected. The dentist returned with a pill, but it wasn’t a painkiller. With a mischievous grin, he handed the patient a Viagra tablet. The patient’s surprise was palpable as he exclaimed, “Viagra? I didn’t know that was a painkiller!” The dentist’s witty response left the patient in stitches. “It’s not,” he said with a chuckle. “But it’ll give you something to hold on to when I pull your tooth.”7 points
-
Primed and the newly revealed gaps are, for the most part, filled. Masked for the white... And airbrushed white. It's easiest to paint these sections first, then mask them and paint the camo. --John7 points
-
Hi all and decided to jump in with a second build This is Heller's CM 170 Fouga Magister in 1/72 first released in 1980 Heller_CM_170_Fouga_Magister_box_1 This is the 2020 boxing with extras by one of our local hobby shops in Dublin Heller_CM_170_Fouga_Magister_box_2 Standard Heller kit but with some lovely extra decals courtesy of Joe Maxwell of Max Decals for an Irish-operated Fouga. Heller_CM_170_Fouga_Magister_box_contents And this will be my build reference, great book by Joe and Radu Brinzan Heller_CM_170_Fouga_Magister_Refs Will be OOB all the way! Thanks for looking. Dermot6 points
-
My first batch for 2025. The airliner models from Hasegawa are always a treat to build.Easy going together,nicely detailed for 1/200 and in most cases very accurate. The DC-10 was among their first range of airliner releases and came out around 1980. Its for its age quite detailed and catches the shape of the real thing well. Built OOB with decals from Liveries Unlimited. The modern follow up to the DC-10 , the MD-11 was first released by Hasegawa in 1995. It has fine recessed panel lines and was,at its time of release,the only MD-11 kit available. It was released with several liveries through the years but sadly was never reissued since around 2002. Thankfully I have built up quite a stock of those. Built OOB as well and using the kits decals. It allows the build of all 13 MD-11s Swissair had in its fleet in 1995. I opted for HB-IWN ,which joined the fleet as the last factory fresh MD-11 for Swissair ,and it was christened "Basel-Landschaft" in late august 1994 at our local airport,where I photographed her as a youngster. The A320NEO is a newer release from Hasegawa,around 2017. The colourful livery of japanese airline PEACH immediately cought my attention and I bought it right away. Its a very detailed kit for its tiny size. The whole livery is done with decals,which are nicely printed and the fit of them is good. There is also instructions for mixing the different colors,which work surprisingly well. I had to paint the engine nacelles,as the decal for them are not usable to good result. These kits will go to the Philippines next month with me as a gift for my girlfriend,who requested some models built by me 😊 I hope they will survive the trip... Cheers Alex I will also take this chance to let all those who followed me on BM for the past 10 years and enjoyed my pictures where my cats participated in as well sometimes,to inform you,that my beloved lady cat "Dukdik" went to the rainbow,she sadly passed away unexpectedly on january 16 ,2025 at the age of 15. She's greatly missed. Almost 3 years ago,my buddy "Sakura" passed away as well,aged 12. They are reunited again. As a last tribute some pics of them for those who enjoyed them on my postings. Dukdik Sakura6 points
-
Some time ago I scratchbuilt an Ma,k Falke. I wanted to make it a high altitude version so it got a pale blue colour scheme. I then went further with that and added squadron markings etc so that it resembled a Le Mans Porsche 917 from the seventies. Recently I noticed a slight up cock, I'd made the cabin entry hatch too small. It had to be changed. Brave pills helped me to attack it with a cutting disc in the Dremel. I made a new Cabin from the clear parts of a 1/24th Revell BMW Mini and a new hatch from a plastic spoon. As per Ma.K lore. There's a strip of plastic covered wire around the join. A step and a sensor plate on the side with extra armour on the front. This paint is a homebrew of red oxide Tamiya acrylic. Then today I whipped up some more pale blue and it all finally came together. In the cockpit is Rolf. He's just been adjusting the dwell angle on the Dynasticrator gauge with his favourite red screwdriver. Now he's moaning at Helmut about how long it took. Tsk! Rolf is from a Tamiya1/20th pit crew set. His body needed some alterations to get the right pose. I'm rubbish at figures 😄 On the left side I've fitted the big scoop as per the original kits. The sensor plates are Nato black. Weathering is on the heavy side but that's what I wanted. At the back I've added this vent. It just seemed to be right at home there. The non slip mats are fine mesh glued into place. Close up on Rolf and his screwdriver. The extra armour plate on the front is just card with Meng nuts and bolts. Here's the original cabin that I cut off along with the spoon I've used in the rebuild. The next project is in planning and will start soon. More Ma.k. Many thanks for looking and your comments are always welcome. Here's a link to the WIP6 points
-
Friday Fun fact.... We've never found cave paintings of salad6 points
-
With the completion of the dashboards I was now able to assemble the 500's interior - as mentioned previously the design is a good one but quirky in that one can't fit the centre console until the dash is in place, which in turn held up the fitting of both front and rear seats. Once the dash was in place all these were added to complete the interior apart from the door trim panels... The rear bulkhead was fitted at the same time. The door panels were fitted after these pics were taken but due to the inward-facing nature of them it's difficult to get a decent photo of them in situ. Once again I'm really impressed by the fit and quality of the parts, assembling these models is a real pleasure as everything goes straight into place with no fettling or bad language required! Offscreen (so to speak) I've also prepared the headlights, taillights etc. and painted the window frames using the supplied window masks - first time I've used them. They're damn' difficult to place accurately but once there they're an absolute boon to one with slightly shaky hands! All this will become apparent with the next batch if pics, hopefully soon.6 points
-
Pre-ordable - ref. 70080 - Curtiss H-75 A1/A2 Hawk Sources : https://www.armahobby.pl/70080-curtiss-h-75a.html https://www.facebook.com/ArmaHobby/posts/pfbid0kEREM7SFfyBd1QfVxQEa1EPRfbDrbDhQAisUSV9TB5Nd8Nro7WwM8NCQGxJXwLG5l V.P.6 points
-
Thank you all for reading. Could you now please rate Mike's joke.6 points
-
Good afternoon, guys Yesterday and this morning I've been very busy working on the hexagonal mesh that goes on the back of the grille. I chose the HASEGAWA 0.47x0.55 mesh. It wasn't too difficult to cut it out of the sheet, but I had a lot of trouble fitting it to the body with the grille frame and bonnet at the same time. First, the front of the bonnet inside, where there are stampings that have to rest on the bonnet front silent blocks, hit the hexagonal mesh and I had to sand them hard to reduce their thickness. Then there was the rear grille spur, which has to touch the centre angle of the mesh, which was too long and pushed it back. So I modified my grille design again to correct this problem. And once I'd finished printing and cleaned up the part, I noticed that the grille mounting plate at the back of the grille spur was too high. So I modified my design again, ran the print, cleaned the part, which was fine this time, and all the tests were OK. Feeling quite proud of myself, I took some photos to compare with the front of a 1965 Ford Mustang, and then: disaster! The central part of the grille, where the horse is placed, was too high and the horizontal bars connecting it to the surrounding frame were actually a bit crooked. So I spent all evening and part of the night redoing the design almost from scratch, taking into account all my previous mistakes. I printed it out and this time it's right and I think it's final. Some photos of the hexagonal mesh piece: Photos of the quite right grille, compared with a true one: And photos of my last design Photos of the printed part and comparison with the wrong one (on top in second photo) And now, all that stuff put in place to check the whole set: The grille hasn't completely dried and therefore hasn't shrunk (in my experience, with my usual resin, the prints lose about 1-2%). Which explains why it is a bit distorted when mounted on the body. This will be sorted out in a few hours. Now that I've taken these photos, I know the dimensions of the space that remains between the front of the radiator core support and the hexagonal mesh, so I can consider the design of the bonnet latch. See you later for next episode 😉6 points
-
Very broadly speaking, it's an export designation of the Bf 109E. In practice, it depends on which export order for the Bf 109E-3a we are talking about, as there are differences between them (both external/visual and internal). The 80 newly-built Bf 109E-3a for Switzerland had the more rounded windscreen and canopy of the earlier Emils, different machine guns (resulting in a visually different engine too cowling) and different radio sets than the German E-3s. The Swiss 109Es are well documented, with scale drawings available online. The 12 newly-built Bf 109E-3a for Bulgaria were, in fact, standard E-4s assembles by WNF but using the DB-601Aa engine. These were originally ordered without the pilot armored plate and without high-altitude flight oxygen equipment. The planes were delivered in May 1940 and, if I remember correctly, the oxygen equipment was ordered in Spring 1941. The second batch of 7 Bulgarian machines delivered in 1941 were rebuilt to the same standard from various other E- marks, with DB-601Aa engines installed, but they had the armored plate and oxygen equipment installed from the factory. Externally, these would be standard E-4s (boxier canopy and windscreen), some with, some without the armored plate behind the pilot's head. Romania had both E-3s and E-4s, I have seen both types of canopies on Romanian machines but I do not have much information on these or the Slovak ones. Hope that helps!6 points
-
Years ago, I picked up (in a Post Office I think) the ‘A to Z’ Corsair. I was intrigued by the box-art - a Korean-era F4U being attacked by an ice-encrusted Bf109G. As a ‘Build and Play’ this is obviously aimed at kids who will never understand history. I didn’t expect much - opening the box, I found even less. The Airfix Riveter and Matchbox Trencher had been taken on by this by this snap-together-kit manufacturer and they really went to town. As for the decal sheet…. Well, sticker sheet. A choice of WW2 and post-war stickers with a Dutch option thrown in. Lots of skulls and even ejection seat warnings. How stickers would have settled over the Everest size rivets I’ve no idea. Only a fool would take this one on. I am that fool. Throwing history and accuracy to the wind I needed a vaguely plausible story…. Autumn 1943. Fishermen in a village near Vladivostok come across an aircraft washed up on the shore. The local party official reports back to Moscow on this strange ‘bent wing American machine.’ He receives orders that the aircraft be taken to the nearest factory and reverse engineered. The result was the Kilemov KTF-5. The agricultural nature of the KTF-5 is easily explained. The party official interpreted Stalin’s order literally. So rather than an aircraft factory, the wreck was taken to the nearby 'Kilemov Tractor Factory 5'. Ivan Kilemov protested but as this was a direct order from Stalin, he’d no choice. In just one month a prototype had been completed. First flight was disappointing. Difficulties with the folding wing mechanism resulted in both wings falling off as the aircraft left the ground. The second prototype employed a fixed wing, while the first was put to work as a tractor on a collective farm. Once airborne, the KTF-5 displayed its agricultural heritage. Underpowered and overweight, it was said to ‘plough through the air.’ Production went ahead but it was clear the KTF-5 was barely airworthy never mind a fighter. With winter setting in, a use for the KTF-5 was found. 15 were fitted with drop tanks filled with vodka and flown to troops on the front line. At least that was the plan. The aircraft took off into a December snowstorm and neither they nor their pilots were ever seen again. It was said that the pilots sampling the contents of their drop tanks the night before was the cause. We will never know. Finished in whatever paints I had laying around and a Halfords white rattle can. Soviet stars from the Fly Bf108 (underwing stars fell foul of rivets and, as I was losing interest, not replaced). Numerals from an Irish Hurricane. If you see this kit, just walk on by. Do not attempt to make it for fun. Because it isn’t. If it’s aimed at kids then they’d be put off modelling for life. Imagine all the aspects of your most difficult builds and roll them into just one kit. That is the ‘A to Z Corsair’. Having said all that, it does actually look something like a Corsair. Thanks for looking.6 points
-
Crack-ack-acking progress James6 points
-
Hi All, Another brief update. More detail has been added to the fuselage: In other news I've found a scheme with invasion stripes other than the oft-modelled P5*S: A highly evocative photo, though without the aircraft serial. A quick Google turned up this image: Now that's evocative. Scheme selected, Thanks for looking, Roger6 points
-
AFV workable tracks as used on my Salamander CVRT build although based on the Scorpion used the later Scimitar tracks No real problems with building the tracks Roger6 points
-
Hi all. I'm making precious little progress on the 1100 at the moment, but have at least grappled with the clear parts. As expected, they're not great - they're pretty clear, but have a horribly rough surface texture. You can maybe see it in this picture. Being flat, I can easily replace the side windows with acetate sheet, but doing this with the curved front and rear screens would be beyond me. So for these I've polished the surfaces using micromesh and Tamiya polishing compounds. This gives a big improvement, but doesn't help with the windows' poor fit. They touch the bodywork in places (enough to glue), but have plenty of gaps too. It will be out with the Kystal Klear to fill these. Beyond this, I've been looking at paint choices. I'll be using a Tamiya Lacquer paint (LP-39 'Racing White'), for the Old English White, and I've bought another of my favourite colour-matched touch-up paints for the Connaught Green (it is indeed very dark!). I've almost finished prepping all the parts, so hopefully will start painting shortly . Cheers6 points
-
Ready to close up now & start fettling the seams. It looks quite good all taped up like that, some of the fit is still a bit weird & the vague instructions aren't helping but I think it'll be OK. Steve.6 points
-
I had set aside some nice 1/72 Eduard etch seatbelts for the Fennec, but as I cleaned up the interior parts I felt they wouldn’t have been a good fit. I decided instead to try and keep this a classic Gallic build in every sense, and keep any modifications more impressionistic. To that end, I built up some belts using tape, electrical wire, and styrene. Perhaps a little over scale, but the big canopy distorts everything anyway, so think of it like stage makeup. With another coat of primer then lashings of NATO Black, the seats looked pretty good to my eyes. Details were picked out with a toothpick and fine brush, and the whole piece given an oil wash. I feel the final effect is more sensitive to the overall model, whereas the Eduard etch would have stood out too much. Ive found a ball bearing that both fits behind the firewall, and seems heavy enough for ballast, so who knows, I might have the fuselage together quite soon.6 points
-
So, it's not saying bad things about someone very quietly then? Oh goody!6 points
-
with the Christmas cake (I do love a proper Christmas cake, at any time of the year. Rich fruit cake, with thick marzipan stuck to it using cherry jam and all covered in deep, crisp Royal Icing. Lord I'm slavering just thinking about it!)6 points
-
My wife says I'm cheap, so I took her out for tea and biscuits. It was quite exciting as she had never given blood before6 points


.thumb.JPG.2ce06c4ff2300a5faba93aaeacbdab25.JPG)


This leaderboard is set to London/GMT+01:00