Leaderboard


Popular Content
Showing content with the highest reputation on 12/08/24 in all areas
-
Hello Everybody! This is the ICM P-51B with the same Aires resin conversion and old Verlinden engine set, Squadron vacuum Malcolm canopy. And this is a small black-DIO37 points
-
Here is my Mach2 Armstrong Whitworth Argosy C1, XP450 of 70 Squadron based at RAF Akrotiri in circa 1974. I wasn't going to post this as its no where close to most models posted on this site but it kinda looks like an Argosy but as there are no other 1/72 kits on the market, and it filled a gap in my quest to build every RAF type in 1/72 since 1950 so i thought I'd share. It is agricultural to say the least (which i knew from reviews), didnt realise how much filling, sanding and whittling would be needed and patience finally ran out but I did learn a lot from the near death experience. The paint did hide more than I thought and a lot of the mistakes are not noticeable on the tablet camera. Learnings can be taken on to the Mach2 RAF Comet 4C that I've just ordered 🙈25 points
-
The French manufactured C.M.170 Fouga Magister was the world's first jet powered training aircraft that performed its first flight in 1952. In addition to France the Fouga was also manufactured under license in other countries. In Finland the manufacturer were the state owned industrial conglomerate Valmet and in Israel the Israeli Aircraft Industries. In Israel the Fougas were mainly used in IAF Flight school units but the planes also participated in combat operations during the Six Day War in 1967. I decided to get the 1/48 scale Fouga Magister dual kit of Kinetic after I saw the Finnish Air Force Fouga perform at the Helsinki Air Show. The trainer is really sleek and elegant and the characteristic feature of the Fouga is the high pitch sound of its Marboré jet turbines. I first built the Finnish Air Force trainer and decided to assemble the Israeli Fouga or “Tzukit” later. The Kinetic kit included very good decals for both the IAF trainer and the combat fighter versions. I chose to build the trainer model since I actually sat in the cockpit of the white and orange coloured Flight school Tzukit when I visited the IAF museum in Hatzerim. Well, as to building the IAF Fouga I totally forgot it in the stash of unbuilt models. Now, after ten years, I found it and decided to accomplish the mission. The quality of the kit was quite good. There were some difficulties with the fit of the parts, though, and some putty and sanding was needed in building the model. The instructions on the other hand were disastrous, full of errors and omissions and the drawings were cryptic. Without various reference material and pictures I couldn’t have been able to finish the models. I first primed the model with white Tamiya Fine Surface Primer. I then sprayed it with Tamiya’s clear gloss varnish. The masking of the orange coloured areas was a bit tiresome but with a lot of patience I made it. The orange I used was Xtracolors International orange X104 Tzukit in the IAF museum in Beersheba, 2005 Happiness is to sit in the cockpit of a Tzukit 🙂23 points
-
I've wanted to do a 72nd F-8C for some time to go with some VF-111 decals. You can get resin conversions (in 72 and 48) but they're not great and CAT4 have just released a 48th 3d print conversion which @Rando is messing with here But back to 72nd. The main differences are: windscreen, intake, radome and no dorsal hump. The hump is easy to sort, remove it & fill the gap. The windscreen is 'bodge-able' for some of us who can live with the difference (I can). The big problems are the radome and intake. Early Crusaders had a smaller, pointed radome (& oval in cross-section) and the intake was shaped to match the radome (see the Rando link above for drawings etc). You could stick the front end from Sword's RF-8 onto another kit but I decided to experiment with an old kit and change the radome to see if I could get an easy win. I used the old Hasegawa kit because it was expendable. I removed the hump, scribed the kit and shaped a new radome from a Hobbycraft 48th A-4 fuel tank with some help from epoxy putty. So, was it worth the effort? I can't decide, it looks closer to an early Crusader but it's not quite there, the radome looks bigger than I thought it would, though being painted in white doesn't help! Here's a pic of the converted nose and the Academy kit. The nose shapes are different ... but not different enough for my liking. As it didn't turn out great I dropped my plan to do VF-111 and I went for an alternative early F-8 decal scheme that's been waiting in the wings. I had planned to try the same nose job on the 48th Hasegawa kit but as CAT4 are improving their 48 conversion and also planning to do in 72nd (according to rando), I'll wait for those.20 points
-
Boeing 757 British Airways 'Whale Rider' Zvezda 1/144 with 26Decals The Zvezda Boeing 757 is a lovely kit, one of the very best airliner models available. It comes with decals for the previous Icelandair livery, but I wanted to do mine in one of the 'World Tail' schemes. (They should have done one called 'Marmite' as people seemed to love or hate them at the time!). Personally I liked them. If you can spot them, the cockpit is crewed by a couple of CRM 3D printed pilots. I would have liked to have done the Tartan 'Bennyhone' one but couldn't find a set anywhere. Fortunately 26 Decals do a fair few of these schemes for the 757, so I chose 'Whale Rider' as it was on the only 757 I ever flew on, on the Manchester/Heathrow shuttle in 1998. It's as good a reason as any! I'll give a shout out for 26 Decals here as these were absolutely superb. The Tail and British Airways elements were laser printed and fitted with precision, the most stress free decals I have used in a long time. They also come with a sheet of silk screen printed standard 757 items for all the details. It is a hugely enjoyable combination of a superb kit with a set of superb decals, and one that doesn't happen often enough! Of course I have to do a 'with something else', so how about a DACO 737-400 in 'Blue Poole' I'll have to get on with that Revell 767 in the 'Chelsea Rose' scheme now 👍 Thanks for looking, John19 points
-
BMs Find below pictures of my recently completed, scratch built, Scale 1:1, Barr & Stroud Elliptical MKII gunsight for the Spitfire & Hurricane (Battle Of Britain type). The 2 items were designed in Fusion 360 and printed out using x2 Creality CRS10-Pro's and an Anycubic Mono 5: The design in Fusion: The 1st prototype gunsight print: Followed straight away with a second gunsight with the rubber cushion instead of the leather type: Both items together: A Real later MKII sight which gave me the inspiration to try and replicate the earlier model: First Gunsight in build: Hope you enjoyed the thread:17 points
-
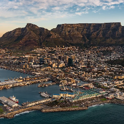
Hi Here is my completed SAA 747 Jumbo model acquired from my husband's collection of dust covered un-made models. My daughter was sorting through his box of water decals and spotted a set of SAA decals which prompted me to have a go myself. This took about 8 weeks to make around mom duty and work commitments. I grew up as a child in Durban on the KwaZulu Natal coastline and had initially wanted to pose the model over Table Mountain, but chose instead to try and depict the long sandy beaches I grew up swimming from (inside the shark nets!) north and south of Durban in SA because the water decals supplied the registration number code and aircraft name for 'Durban' - so 'Durban over Durban became the theme. I chose from the start to make the model flying as I was wary of all the fiddly small wheel parts, but having now learnt how to mask, cut and apply decals, airbrush and sculpt and work with liquid resin water, perhaps I could have managed the wheels too. I hit a problem with the type of jets along the way of the build, luckily my husband had some correct spare RR jets. And here is my completed jumbo 747-444. I had to ask for help with the wire support as I was not strong enough to hold and bend the wire support rod. I apologise for the poor photos but I used my mobile phone to take them. The model build is here for anyone interested to see how I coped with making the jumbo:17 points
-
Hi All , here you are my latest built! Modelvist Mirage 2000 C in 72nd scale straight from the box except ladder and pitot! hope you will like it.17 points
-
I have documented this build under the thread below and it is now more-or-less complete, certainly ready to present to this august group. You can find a full set of images for the build here: https://www.flickr.com/photos/26690797@N02/albums/72177720318477513/with/53870864441 Best wishes, Neil14 points
-
A few months back, I bought a book called "Combat in the Sky: Airpower and the Defense of North Vietnam, 1965-1973" from the US Naval Institute Press. It's an interesting perspective of the war from the North Vietnamese side. To be honest, the book is a little drier than I was hoping, but it still gave an interesting overview of what I was looking for. So that naturally made me want to build a model from that era. Thankfully, Airfix was there with a lovely MiG-17F. I am very happy with this kit. Airfix kits continue to just be an absolute joy for me to build. For one, I love their gear up pieces! So few companies make it easy to close up the damn airplane if you want to display it in flight (which I do, very much so), but Airfix does. They also included a pilot, which again makes things easier on me, even if it's not the highest definition lil' guy. It all adds up to a build that doesn't really cause me any problems, and I can just relax with. I enjoyed being able to mostly free-hand the airbrushing. Not a lot of masking, which some models can just be full of. Overall, super enjoyable. IF I had a critique, which I do because as an artist that's how you grow, I would say that I wish the panel lines on the wings matched the lines on the fuselage. I noticed the discrepancy and could have tried to fix it, but I think I kind of rushed myself. I felt momentum, the model was progressing, and I was excited to see it finished, and I just said 'Good enough'. Looking back, I think the panel lines on the fuselage were deeper than those on the wings and it held onto the oil paint way better. So next time I'll try and take my time, and try to make sure the panel lines were of similar depth on the model. Whether that means a little bit of vallejo putty to fill them in on the fuselage, or attempting to deepen the ones on the wings with a scribing tool, or both, we'll see on the next model. Thanks for looking, hope you have a great day! :}14 points
-
Terence (Terry) Spencer was born during a Zeppelin raid in 1918 – and after that start in life the rest was never going to be boring, was it? He applied to join the RAF from the Royal Engineers in early 1941 and was first posted to 26 Sqn in late 1942, flying Mustang Mk.Is, and then in early 1944 to 165 Sqn flying Spitfire Mk.IXs. In May 1944 he was posted to No. 41 Sqn, flying Spitfire Mk.XIIs. Between 23 June and 28 August 1944, he claimed seven V-1 flying bombs destroyed, with an eighth also recorded in his logbook. One he destroyed by tipping it up with his wing - sketched into his logbook by a fellow pilot who titled it "Tip 'em Up Terry". From Squadron records: 9th August: “F/Lt Spencer caught the usual dawn wave of flying bombs and dispatched another of them. He made a perfect interception and a half second burst sent it down to explode in a field” 23rd August: “A (cash) prize had been arranged for the pilot to destroy the Squadron's 80th flying bomb and it was awarded to F/Lt Spencer who . . . destroyed the 80th and the 81st” In early September 1944, his section of four encountered two Luftwaffe aces, Emil "Bully" Lang, the Commanding Officer of II/JG26 (173 victories), and Alfred Gross (52 victories), in Fw190s. Although one of his section was killed, the two aces were shot down, with Lang credited to Spencer. In January 1945 and now a Squadron Leader, he was posted to No. 350 (Belgian) Sqn flying Spitfire Mk.XIVs. On 26 February, he was hit by flak and captured. Just over a month later, he escaped by bicycle, and then motorcycle (sound familiar?) and made it back to Allied lines. He resumed command of 350 Sqn on 2nd April 1945 (his escapades being marked with drinks in the mess). But on the 19th he was hit by rocket fire while strafing a trawler. His good fortune saw him blown out of his cockpit with such force that his parachute deployed at a height of just 30-40 feet. Amazingly he survived - but was captured again. The Guinness Book of Records recognised this as having been the lowest authenticated survived bail-out on record. Spencer was liberated approximately two weeks later and was awarded the Distinguished Flying Cross and, in 1947, the Territorial Efficiency Medal and the Belgian Croix de Guerre with Palm. Upon his return home he romanced the actress Lesley Brook, who starred in 23 films between 1937 and 1948. After a whirlwind romance, they married in August 1947 and moved to South Africa in July 1948, shortly after her final film release. What a couple they must have made. Spencer and his wife then started a successful aerial photography business. In 1952, he started shooting for Life magazine, covering war stories in Africa, including Sharpville, the Congo Crisis and many of the independence struggles. Plus Nelson Mandela on the run and Jomo Kenyatta in detention. In 1962 he returned to England and, at the request of his daughter, Spencer followed the Beatles (at the time largely unknown) for several months shooting more than 5,000 pictures. Commissioned by Life he covered the Vietnam War, crises in the Middle East, Indonesia, and Cuba after the Bay of Pigs Invasion. He also shot celebrity stories for People magazine including Freddie Mercury, Bob Dylan, Ava Gardner, Katharine Hepburn, Princess Grace of Monaco, Richard Branson, and John Cleese. Have a look at just some of his images here : https://www.gettyimages.co.uk/search/2/image?page=4&phrase=terence spencer&sort=best&license=rf%2Crm Terence Spencer DFC, Croix de Guerre with Palm, died in February 2009, aged 90, less than 24 hours after his wife of 62 years. ==================================== This then is my attempt at F/Lt T. Spencer's Spitfire Mk.XII as at 6th June 1944. The kit is the Airfix 1:48 Mk.XII with Eduard p.e. interior and Quickboost resin exhausts. I used the kit decals plus stencils from a Barracudacals set. Paints are acrylics: Ultimate grey primer with Xtracrylics and Tamiya. Some thinned Winsor and Newton oils for details, smeared felt pen for the gun stains and chalk pastels for the exhaust stains. I originally built this for the D-day group build – here's the build thread: I wanted to post here as I felt his story worth telling (and didn't really fit in a GB) - I think it can be said that he lived a full life (or two). All the best Mark13 points
-
My contribution to this, a Hasegawa Tornado IDS in the colours of MFG2 of the German Navy in the late 1990s from photos of this machine on the net. Build thread. Thanks to @vppelt68 for proposing the GB & hosting it, @JayBee for help along the way & to all who dropped by & offers assistance & encouragement, especially @Chrisj2003, @PattheCat & @PhantomBigStu If nothing else I know more about Tornado's than I did before this. Steve.13 points
-
I'm seeing mottles in my sleep!12 points
-
Hello Britmodellers, This Revell F-104G was built more or less oob, except for the two AIM-9J's on the fuselage launching rails, which came from the Hasegawa Weapons Set III. Thanks for watching! Luka12 points
-
This is utising the early G hull from the Vespid Sperber Infra red night fighting kit (VS720008). I added Zimmerit, the MAN variant with milliput and a stamp tool, long job. Otherwise pretty straight forward, added road wheels are from a Dragon kit kindly donated from a fellow Braille scale member. Jerry can and racks added to rear, gun cleaning tube shifted to rear deck. Life Color paints via Harder & Stienbeck infinity, usual weathering stuff used for the finish, oils, pastels and mud from VMS. Kit: Vespid After market Adler lifting hooks set Adler stowage lids, loaders hatch and engine louvres set Adler Tank crew. L11 points
-
Evening BMs I began by designing my early gunsight in Fusion 360 and came up with a design for the elliptical MKII sight. The main body would all be printed on my x2 Creality CR10-S Pro. Comparison with the later (real) Sight looked good: Early prints were very encouraging and a comparison against the original looked good: A good clean up and a bit of spray paint brought out the details: I was not happy with the flat projection lens I cut out and searched the internet only to find a 95mm optical condenser lens of the correct diameter and shape, £10 down the line...... This really made the sight look the part as did the leather head guard which took me a good few hours to stitch. Other details such as the data plate were added: The completed replica was mounted on a wooded display with the electrical cable it would have used: Having completed my prototype I noticed that the same sight was also issued with a rubber head guard instead of a leather covered item. Still hot from the first build I decided to build another with the other type of cushion. I also noticed from looking at internet pics that the Reflector Glass was too long, so I made the next sight with a smaller glass: Once I had tested this new glass on the second sight I re-cut the first sight to follow suit. I also made the wording on the sight data plate larger and more readable. The rubber version looked realistic enough simply painted in NATO black (this was printed on my latest acquisition, Anycubic Mono 5): Im just missing some cable for the second sight but the effect looks good for this 1 to 1 3D printed MKII early Barr & Stroud Gunsight: Hope you enjoyed this quick weekend build?11 points
-
Hi there , This was a build going on in the background and I thought I'd just stick it up to give my thoughts on it. My previous experience with Dora Wings was their 1/72 Lysander which was challenging to say the least. The fit was not stellar. However, this kits absolutely falls together. I used a smear of filler on the underside seam and some canopy blending was needed on one side. The vinyl masks given for the windscreen had a tendency to lift in one place and the nose pitot is way too delicate but these are minor niggles. The decals were a different story. They are extremely thin and brittle. Indeed the starboard nose decals completely shattered on me. Those got left off as it will be positioned in the cabinet to show off the port side. All in all a cracker of a kit that I have no problem in recommending. In the photos the forward part of the pitot was replaced with some stretched sprue and brass rod. There are no vanes on the pitot yet as I've put the PE frame in a safe place and can't find it at the moment. When I eventually stumble across them I'll get them fitted. Primed with Mr. Finishing Surfacer 1500 Black. Painted with Rainbow Railways First Group Magenta. Tamiya Rubber Black, Gun Metal and Gloss Aluminium. Finished with Windsor & Newton Galeria Satin Varnish. The Rainbow railways Magenta is a fairly good match for the real colour in normal light but in strong sunlight and LED lighting goes a little pink. It looks ok in the cabinet. Thanks for looking, Cheers, Alistair10 points
-
Good day to all, After a long delay, I am finally able to submit my fourth project for the year. Here are some of the highlights of this kit………. 1. Colors & paint brands used A. Airframe : Alclad Dull Aluminum, AK Extreme White Aluminum, AK Matt Aluminum, Tamiya Flat Red, Flat Black, Flat White, Olive Drab, Interior Yellow-Green & Flat Yellow. 2. Washes : Ammo Medium Gray, Tamiya Black, & Brown 3. Built straight out of the box including provided decals. 4. Uschi Fine bobbin thread for antenna wires. 5. Weathered with paint, pencils, washes, & chalk pastels. 6. Eduard canopy mask is a MUST HAVE for this kit. This one turned out to be a challenge and it was all centered on the nose section in front of the top gunner`s station. Understandably so, Hasegawa separated the nose sections on their Liberator kits to provide an early D / Delta variant and later J / Juliet version. I had to perform surgery inside the nose section to get multiple lead fishing sinkers for ballast so it would not turn into the dreaded “tail sitter”. That wasn`t enough so I added more sinkers under the top gunner`s turret and it proved enough. The nose section comes in three main clear parts and the interior pieces do not fit all that well to get a proper alignment. The decals turned out to be a nightmare as the first green - yellow ID bands broke into no less than 12 pieces . After a considerable amount of time, I was able to repair the damaged decal and proceed after spraying a clear gloss coat over the remaining sheet. Oddly, everything behind the top gunner`s turret went together very well and the wing spars help greatly when handling the model. Due to the complex nature of the nose section, I can only recommend this Hasegawa B-24 kit to those with some experience. Thank you in advance!!! Mike10 points
-
This one is a really nice and simple model to do.I enjoyed every second of this build.I upgraded the cockpit a bit and the rest is oob.Painted in gunze and tamiya paints.The decals came from the spares box.10 points
-
Thinning down the cockpit edge from around 2mm to 0.5mm: Should look better under an undercoat of cockpit colour. I will be going for RLM02 (Humbrol 240 acrylic).10 points
-
My second build for this GB is the Chieftain Tank Mk.11 using the Takom 1/72 kit. Build log here: Stuart10 points
-
My first build for this GB is Chieftain Tank Mk.10 using the Takom 1/72 kit. Build log here: Stuart10 points
-
thanks chaps very kind now I will say I never want to see another pipe or wire again... I have pretty much done the U/C bay which is an amazingly complex arrangement on this aircraft - even so I have probably got about 80% of it and where I can see it the pipework is routed correctly. Tried to match 'Hawker yellow' but not sure if I did very well - i can see a few things need doing in the photos so here we go.. also skinned upper and lower wings... so it's getting there - I think I will do the undercowl next, or maybe the wing roots - the undercowl looks intimidating as it's a bunch of louvres so I might try and crack that first TTFN Peter10 points
-
Hi @modelling minion, @Keeff & @bigfoot. Thank you all for the comments. Quick update. Sorry it's been a while again. So, camo applied. Very thinned acrylics applied with a small stippling brush and then dry-brushed over with the lightened version of the Desert Yellow. Then I cut out all the decal numbers and crosses and applied them with loads of Humbeol Decalfix. They seemed to go into the Zimmerit okay. Finally I did the same with the wheels, sprockets and idlers and got them fitted in place. The upper hull and main gun are not glued in place yet: Finally, you may notice from the title, above, I have had to abandon the idea of doing the Spifire and Panther kits. There is no way I can get them completed in the GB's timeframe. I still want to do the base for the Tiger and Sherman if I get time. Comments and suggestions welcome. Kind regards, Stix9 points
-
Spitfire Mk1 1/72 01071 - (Taga Taga Taga) - 74 Squadron RAF -BoB Finished as Flt Lt Adolf Malan's aircraft in June 1940. Decals are from an old set produced for the Southern Expo on RAF Hornchurch based BoB aircraft and their Luftwaffe counterparts. The aircraft was an older K series (perhaps Malan don't have much clout at that time), so I used a pole aerial and two pronged pitot. According to the decal sheet notes, Flt Lt Malan shot down two H111s at night in one sortie in this aircraft. I didn't do much weathering, to keep it in the 1970s (feel). There was some basic rescribing of the surface detail. And I forgot the aerial wire. The aircraft had been recently repainted underneath from the B/W demarcation to Sky. I used light blue as suggested by the decal sheet. Thanks to the mods for the GB, I hope next to do the MkVb.9 points
-
The model is finished and I already invite you to the gallery. I made a few changes to the model compared to what IBG offered in their kit. But these are all cosmetic changes. Based on the photos and plans I made an open cockpit but without the windscreens and in it I added a few small details, on the engine cover I changed the locks for opening it and on the underside of the wings there is a top coloured leading edge and wing tip. I described everything in the workshop thread. Model of a Polish aircraft used by the Bulgarian Air Force. PZL P.24 B, 1st Armejski Orliak (1st Army Squadron), Bozurishte airfield near Sofia 1937. The inscription on the fuselage (Simeon Kniaz Tyrnovskiy) was applied on the occasion of the birth of Tsar Boris's son (16 June 1937) The aircraft in such markings took part, among others, in the ceremonial dedication of the banners of Bulgarian aviation units on 27 June 1937.8 points
-
This is the second of a pair of Tamiya Jugs that I used to continue my personal theme for 2023 of "Pairs." It's painted with Alclad, AK Real Colors, MM and Testors enamels. I used Eduard wheels and Master Model blast tubes and pitot. Its decals are from the old Superscale sheet and is weathered using the salt technique, oils, and pastels. Honestly, I'm not 100% happy with the results, but it looks pretty good on the shelf next to my other 3-footers. I'd love to hear what you think. All comments, questions, and criticisms are welcome. Please drop your two cents into the bucket on your way out. Thanks for lookin'! -O8 points
-
Hi All I haven't built a commercial aircraft before, and never anything in this small a scale either (unless you count the 1/350 aircraft on my carrier builds). I got handed this one for free literally over the fence, I was chatting with my neighbour about hobbies and when she heard the model making, she went and retrieved this one from the loft. Apparently it had been acquired more than a decade previous, and wasn't ever going to get built, so they were happy to get shot of it. The box was falling apart, but otherwise there was only one fairly significant obstacle, one half of the fuselage was broken in half, with the rear half nowhere to be seen. A quick email to Revell spares sorted that though, replacement part delivered about a week later (no charge, awesome). I enjoyed this one as a little side project, I've probably overdone the panel line wash, and almost certainly got a couple of decals in the wrong place (the instructions were a bit vague), but had fun, so that's the main thing. Anyway, here she is, my first 1/144 airliner, hope you enjoy. I might have to get a 747 to go with her (the Iron Maiden livery is very tempting), but don't want to get too into another genre - the stash is big enough as it is8 points
-
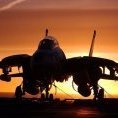
In my new member introduction I mentioned that I started the project to "consume" my stash after 25+ years of modeling abstinence. Major victim of this pause was this 1/48 Jaguar, that was lying around and collected dust, partially assembled (only fuselage and wings), and painted. In my earlier career, I painted models solely with brush, but now I acquired a decent airbrush, hoping to raise my level of modeling quality. And to start using that new tool, I thought an overall black aircraft would be perfect, since what could possibly go wrong when painting a plane black? Well, you all know that a lot can go wrong, and it did. I messed up several things, was unable to get a smooth finish as base for the decals, completely messed up the canopy, using liquid mask that let through the paint, and many other things. Yet I like it somehow, the special paint scheme with the decals from a Xtradecal sheet looks good on the Jaguar. I think. Marcus8 points
-
Hello, I've been working on the biggest detail here. To be honest, it was the first time I tried to depict a calm sea and I was afraid it would be boring. For more transparency (and on photos from those places the water is often very transparent) I put a sheet of 3 mm plexiglass, in which I sawed the outline of my ships. What an abyss of emotions I experienced, sawing this contour with an ordinary hand jigsaw, will understand only those who tried to do it themselves) Acrylic transparent glue was applied to the plexiglass, the texture was made with a teaspoon. Now the glue is almost dry, but in some places it is still cloudy. Let it dry some more. I'm in no hurry. What did I do while the glue was drying? Mostly crates on the shelterdeck. I also built an armoured main calibre director, redid the rangefinder bridge a bit and did a bit of brushwork on the quarterdeck to improve the texture of the deck Cheers;)8 points
-
Here's the very ancient Cattle Wagon, in it's Dapol iteration, having also been Kitmaster and importantly Airfix. Build thread here I could've done far better (like my school reports when I first built it, so that's nostalgic), but thanks for all the encouragement peeps.8 points
-
I've squeaked in with this, sort of finished, not necessarily as I'd have wished it but enough for now. It is too clean for a Tornado, especially around its tail end & too shiny but that will be attended to at my leisure, maybe rate another photo in this thread later on. So for now, one to be going on with, the rest are in the Gallery. I finished this in a self decided brew of Humbrol 104 + 25% (4:1) of Hu 27 for RAL5008, Hu 240 for the RAL7009 & HU64 with 33% (3:1) of Hu27 for RAL7012, these colours being my idea of how these appear to me after some fading in service. A bit more grot about the tail would improver the look too. I found the Hasegawa kit a fair mix of quite nice & bloody frustrating. The instructions were maddeningly vague in areas where you needed them to be more accurate. maybe an indication that Hasegawa were a bit vague about things too. I found there was no way the main gear doors were going to fit & look right the way it appeared they were meant to so some tinkering occurred here after downloading useful photos, not the first time I did that. I see that my efforts are all but invisible in my photos. Oh well, I know I did it. Steve.8 points
-
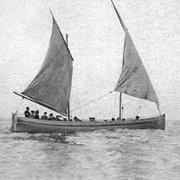
Hi all this is the 1:72 scale kit, actually a fairly easy build as long as you test fit everything first, The only real issue is a gap between the top wing and fuselage a fairly easy fix just add a shim in the gaps. There are a few errors in the instructions and I would recommend reading the article in tailhook topics as it has some good tips and reference material. Hope you like it.8 points
-
The model is good, but there are errors. The front wheel housing is without much detail. It is necessary to add strips to strengthen the lower part of the wing and a target attachment on the left TIESO wing. I did a slightly modified scheme. This one is from 1983 and has no red stripe on the vertical. Also, the white shadow for the letters SP is not correct out of the box, so I modified that as well.7 points
-
Afternoon folk's built for the Classic Airfix GB Airfix's 1979 tooling of the Spitfire,now replaced by a newer tooling still easy to find and despite some fit issues especially the re-tooled Snap fit editions once fettled still looks like a Spitfire.Many thanks for looking.7 points
-
Thank you very much! Now, the stowage bin aka the Rommelkiste. I started with an Aber PE set that I had for this purpose. It turned out pretty nicely except early side mounts that had to be made of scratch. Only after attaching it on the turret backside, it was clear that the shape was not quite right - the topside slope wasn't steep enough and the asymmetry of the bin wasn't too clearly defined either. Here it is - beautiful and useless at the same time: So came to play the next best option - plastic bin that was in the kit. That turned out not too shabby either. And that's how the tank look now: The commanders cupola is a placeholder at the moment as I have The New TMD one coming. Cheers! Kristjan7 points
-
I checked again, and can confirm i am not going mad 😄No decal. Thanks again for the info and i have had a look at your build. Have added the camera control panel from a bit of sprue with a dot of paint. Also added some "ribs" in the wheel wheels. Thanks Col. Thanks. Your's turned out nice. I think the blue and grey results in an attractive paint scheme. A few pics. Camera control box. Ribs from masking tape Not alot to this kit, so you soon have something resembling a Spit. Bit of a gap at the wing roots and the underside at the back. I have already filled the gaps where the upper and lower wings joint together with some Vallejo plastic putty. Next up a bit of filling, then look at getting the canopy on. George7 points
-
CF-100s The curiously clunky Avro CF-100 Mk.V in Canadian and Belgian colours from the equally clunky Hobbycraft 1/72 kit:7 points
-
Not exactly a refreshingly different subject but I needed to build something familiar and simple to get back into the swing of things. This old Hasegawa 109 fit the bill. This model is completely OOB. The only things added were aftermarket decals and masking tape seat belts. Other than the mottling coming out too soft, I'm pretty ok with it. This is what it was supposed to look like. Thanks for looking. Ron7 points
-
My third and final build, the 1/72 Revell F-4F Phantom II, in JG71 markings, using the decals from two different kits. Thanks for watching. Also thanks to the hosts and everybody who participated.7 points
-
No not possible7 points
-
Good evening you lovely lot. Let’s begin by going through the part trees. As you can see the detail is really nice and crisp. The nose bump is quite evident but nothing a bit of sanding won’t fix. 👃 The flaps and what not all look really good too. You get some brass parts for the wing innards/ seat belts and nose intake. Also the lovingly wrapped clear parts. Are a thing of beauty. And you wouldn’t believe it but the tyres are….. you guessed it. Rubber! Shhhhhh🤫 not a word to the hound. 🤪🙃 The instructions seem good and strangely not that many steps. well I better get on with some actual sticking things together eh? I did spend some time researching the cockpit and this kit in particular. For some reason or another it seems to get a lot of bad press. It’s a little bit much I think as looking at the ref and checking the parts there’s not bad. The seat seems to have a few different variants, some with more round and some totally square. And some that look a bit like this. It’s not goi g to win seat of the year but it’s pretty well detailed , with some decent paint and the belts in place will look pretty good The walls and floor look pretty good. The detail is crisp and as far as I can see quite accurate. I don’t think there are four dials but I can sort that out. With more of the detail parts dry fitted it looks ok. The IP also looks really nice. The target sight is inaccurate but I can fix that. A quick dry fit of the parts proved that everything looks rather busy and with paint and decals in all the right places will do the job nicely. I even heard someone calling the control column a “baseball bat” looks ok to me. With the ip and pedals in even in its naked form I think it’s really good. I’ll add some extra details and some lead wires but overall I’m happy. ok that’s it for now. I’ll need to get some detail parts in place and get that wiring sorted. Watch this space. 😀 Happy modelling chums. Johnny. 🥳7 points
-
This is my rebuild/refurbishment of my old RA-5C Vigilante which I broke down into component parts, stripped the paint off, and then started again, adding a bit of detail to the cockpit, new seats and an Aeroclub undercarriage. Here is a link to the build thread. I have since straightened out the Master nose probe which I could see was bent in the above pics! As I mentioned in my thread the decs are not technically accurate as they are actually for one of the 36 "new build" versions produced when the production line was re-opened in 1968 to replace losses, and which had a few differences to the Airfix kit of the earlier version. Pete7 points
-
afternoon ladies 😄 thank you for taking the time to drop in.. I took the plastic card wing cores and added foam & filler to generate the blanks, careful attention paid to the leading edge intakes & radiator shapes. Chopped out the landing lights and added vacformed clear replacements and then the last few weeks have been busy skinning the forms... ..I started with the cannon blisters and worked outwards - these are the hardest part and it is much easier to make panels fit things like this, than try and make the blisters fit in existing panels.. ..because of the wing fold, the panel & rivet layout is quite complex.. ..also started on the radiator skinning, though not much done yet.. ..starting to look like an aeroplane ..think I will finish the tops and move onto the bottoms, which are even more complicated - prolly 30 - 40,000 damned rivets on this one... TTFN Peter7 points
-
The Nissan Sunny GTi R is a somewhat forgotten Group A rally car , that should have been a world beater , but was sadly let down by poor packaging that let the engine overheat badly . Always a cool looking car with its huge bonnet vent and roof top spoiler it only lasted about two years as a Works rally car . I have built my kit of the car as driven by one of my heros David Llewellin . There's a full WIP if you want to look at the build process , but suffice to say , it went together really well , just a few window fit and spotlight problems to be overcome. Here's the photos Thanks to all who looked and followed Gary .6 points
-
This is the ACE Citreon 11CV Traction. Bonnet hinge was a bit ill defined so replaced it. Added AK lenses for the headlights ( yes I know they should have covers ) Number plate decals from the excellent Pedinghaus set. And congrats to ACE for producing a template for the glass work in the instructions, scan print onto self adhesive paper and then stick onto the acetate and away you go. L6 points
-
So am I since 1976...6 points
-
I decided to mist a little ocean grey over the dark spots and then the whole model. I think it tones down the big dark areas and restores a little bluishness. Wow this is tricky! The variation is more subtle now. I think I will stick with this. Once it cures I can mask and paint the markings as well as the exhaust area. Next, I assembled the landing gear with covers And an oil wash to weather with brown and yellow ochre... And then I wondered if I could paint the stripes on the prop rather than use decals. This is called the 3-stripe method. You can tell because of the billion pieces of tape 😛 Peel out the stripe masks I taped around... (tape is tricky and is not easy to align) Then lots of red...I will use it for the other markings later... Then peel off the tape to see the stripes. Not horrible for a first try at this. Later I will mask this side and paint the back of the prop reddish brown which they did for anti glare I guess.6 points
-
Hi Rob, Yes it certainly looks like the same plane - pity it does not say what unit it was. Anyway, I have made a start. The phantom riveter has been at it - although they are somewhat more subdued than on say the old Frog Shackleton I will probably sand them down a bit. The interior is very basic - just what you see above plus 3 figures and seats and a stick up front. These are the Airfix instructions- And here are the Revell ones for their much better version. Given the amount of glazing I will have to do quite a lot of work. The real thing was unusual in that it did not have an IP as such, just side panels and overhead ones something like this apparently. The late Do-217 were similar as perhaps the Ju 188. Although early versions were perhaps painted RLM 02 inside, I would imagine the A-5 would have been RLM 66. Anyway on with the story. Rather than proceed chronologically, it perhaps makes more sense in this case to talk about the engines next as they were the main “Achilles Heel” of the Greif (Griffon). The more engines you stick on the wing, the more weight and drag you create – at least in theory, so instead of going for 4 normal engines, both Avro and Heinkel decided to go down a twin engined route. However, as there were no sufficiently powerful “normal engines” available for the Manchester and 177 they both opted for untried “double engines”, namely the R-R Vulture and DB 606, and both had serious problems as we know. Avro fairly quickly opted to go for a modified 4 Merlin design (Lancaster) as R-R did not want to spend time sorting the Vulture, being too busy with the Merlin and Griffon development, which would soon be generating as much power as the Vulture anyway. Heinkel however persisted, though they did suggest a conventional 4 engined version as early as 1940. For whatever reason the Technischen Amt of the RLM refused permission – Green suggests that at that early stage they felt the problems would be overcome and that they did not want production to be suspended whilst a new version was introduced. However, their continued refusal not only to switch designs, but even to allow a pause for serious remedial action to be taken beggars belief. Even when they did finally consent the change had to be hidden from Hitler, though Heinkel continued design work under the cover name Heinkel 177B. 3 prototypes of the 277 as it was later called flew in 1944, and permission was finally granted, but only a small number of production models were build before production of all bombers was stopped in 1945, and probably only 2 or 3 actually flew. The performance of the modified plane was nearly up to the original Bomber A spec! The DB 606 consisted of 2 DB 601 inverted V 12 liquid cooled engines mounted side by side as shown in this overhead view. The later models used the DB 610 made up of a pair of DB 605 as shown here courtesy of Wiki. This is a front view and actually looks quite neat. They drove the prop through a common gearbox and the composite engines were “handed” so the Port prop turned clockwise and the Starboard anti-clockwise. The 606 generated about 2100HP and the 610 around 2700HP so they were much more powerful than the R-R Vulture. There was nothing intrinsically wrong with the engines themselves as was proved later, but the installation was a real mess. To save weight and space they were shoe-horned into tight fitting cowlings with all the related services for fuel, oil and electricals squeezed in, and no firewall was fitted – engineers at the Rechlin test centre called the installation of the 606 a “sardine can”. During testing of the He 177A-02 pre-production prototype it was already clear that changes were needed. The two engines shared a central exhaust manifold which got very hot and could cause any accumulated oil and grease in the cowling to catch fire. To make matters worse, when the pilot throttled the engines back the fuel injector pump produced excess fuel, and the pipe joints tended to leak. Throw in a lubricating system where the oil tended to foam at high altitudes and the oil return pump was too large anyway, and lubrication became inadequate causing the connecting rod bearings to disintegrate. The net result was a firebomb waiting to explode. Suggested changes were to extend the engine mountings forward by 8 inches creating more space, moving the oil tank away from the engine, putting in a firewall and modifying the exhaust, fuel and oil systems but with the RLM refusing to allow any delays in production, Heinkel kept putting off the changes. The oil tank was moved on the A-1, and when crews demanded flame dampers for night work, the exhaust system was modified, and when the A-3 started production the engine mounts were lengthened, so things did improve somewhat, but the engines remained suspect. In 1943, Rechlin were given a Greif to play with and identified no less than 56 problems. Once all of these were addressed the engines performed flawlessly it seems. If a short delay in production had been allowed earlier to resolve the problems. who knows what might have happened. So that covers the main problems with the 177. Next time I will cover the actual development of the plane itself. Pete6 points
-
When first introduced, Series 5 kits cost all of 7/6 (37.5p) though by the time the 177 appeared they may have cost a little more, so what did you get for your money? The decs are decidedly "iffy" - solid black crosses with a very thin white outline and a dubious set of letters. Airfix never said which unit they thought it was but K9 is I believe one of the recce ones and surely the "N" is the one that should be in the staffel colour, not the 9? The kit comes with both bombs for the bomb bay and up to 3 Hs 293 missiles, so I am considering either a maritime strike aircraft from KG 40 or a night bomber from KG 100 in Operation Steinbock. Before I start on a bit of background, a couple of corrections to my earlier post. I mentioned that the delays with the Grief caused the Fw 200 Condor to be introduced as a stop gap, which I believe is partly true, but the fact that Hitler went to war earlier than his military had expected was another factor. Also, even if the plane had been operational in time, there must be some doubts over whether or not Goering would have released any of "his" air force planes for maritime recce based on his attitude towards the Kriegsmarine, which was similar to that of Arthur Harris towards Coastal Command. Also, I said that the Luftwaffe did not look at any other strategic bombers but it could be argued that the later spec for the "Bomber B" was for such a plane, the requirements being similar to the "Bomber A" spec but rather faster. Of course none of the planes offered for the Bomber B requirement ever really got into service either. OK, this is going to be another of my long rambling rants lectures discourses for which I apologize in advance – of course you don't have to read it if you know it already! However, although much of the story is well known, a lot of the written information/opinion is old and I hope to cast a little new light on the saga. I am as ever open to any feedback/new information of a constructive nature. When Hitler started to build up the Luftwaffe the initial emphasis was on tactical support for the Wehrmacht, and this resulted in bombers with a relatively small payload and short range such as the Do-17, Ju 88 and He 111 which were more than adequate until the Battle of Britain and later the invasion of Russia, when their lack of range and hitting power became obvious. Some elements in the Luftwaffe had anticipated this problem and this resulted in 2 new designs of 4 engined bombers – sometimes unofficially named Ural Bombers, rather prophetically as it turned out. Initiated in around 1934, the Do 19 and Ju 89 first flew in 1936. Neither of the two planes were particularly impressive, the Do 19 for example being intended on paper to carry up to 16 x 220lb bombs or equivalent for a maximum range of about 1000 miles with a max speed of around 190 mph, whilst the Ju 89 could carry a similar payload a little further and faster. It has often been claimed that following the death in a plane crash of their main supporter General Wever, interest waned but Green thinks that unlikely. The idea was clearly not forgotten because, as it seemed that both the previously mentioned bombers would have inadequate performance, a new requirement was issued in 1936 for the so called “Bomber A” and in 1937 Heinkel were ordered to proceed with their 177 design. The Bomber A specification was for a machine capable of carrying a load of at least 2000lb over a range of 4160 miles with a top speed of no less than 335 mph and it had to be strong enough to carry out “medium angle dive bombing attacks”, and frankly was rather over-optimistic in terms of performance and the dive bombing requirement was to cause major problems. During the early 1930's, dive bombing was popular with the US Army and Navy, and it is sometimes said that whilst touring the US as a stunt pilot Ernst Udet was impressed enough to push for similar planes on his return to Germany – in fact I have read that Goering offered to buy him two Curtis Hawks if he would join the Nazi Party in 1933. Whatever the case it certainly caught on in the Luftwaffe and initially proved to be the most accurate way of delivering bombs, though as shown in the Battle of Britain it was not as good when faced with determined opposition. Using Hs 123 and Ju 87 as dive bombers was fair enough, and it seemed to work quite well on the bigger Ju 88, but there were major problems with the Do 217, and expecting the even larger He 177 to operate in that mode, even at a relatively shallow angle was probably unreasonable. In order to meet the requirement Heinkel had to make the whole structure stronger and therefore heavier, which in turn reduced the speed, payload and range, and perhaps more importantly put an increased strain on the engines which were already unreliable. More next time.😄 Pete6 points
.thumb.jpg.d3635a7ef6507d35f372dd09671fe96f.jpg)


This leaderboard is set to London/GMT+01:00