Leaderboard


Popular Content
Showing content with the highest reputation on 18/12/16 in all areas
-
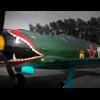
Fairey Swordfish Mk.1 1:72 Airfix Every now and then I like to go into a mdel shop and just pick up something on a whim. The new tool Airfix kits, particularly the 1:72 kits, often appeal as the are small enough to be realtively quick builds while I am working on bigger projects, and also reasonably priced. I've always liked the Swordfish, and it needs no introduction other than to say it is an 824 Sqn machine from the Taranto raid. So here it is, a random choice bought and built just for the pure fun of it like when I was a kid! the kit comes with a torpedo handling trolley. And finally, a 'With something else' shot for comparison. A Tiggie, also 1:72 Airfix, which helps show how big the Swordfish was. Thanks for looking John25 points
-
Hi folks, I always wanted a decent Spitfire XIV in 1/48 scale. As I was not very happy with the Academy kit I did try kitbashing a couple a years ago. This is the Airfix Spitfire XIX coupled with the ICM Spitfire IX wings. The result is far from perfect but it may look more like a Spitfire XIV than the Academy one.24 points
-
Another outstanding year on Britmodeller! With amazing builds and WIPS being shared in this great community. So heres the culmination of my efforts this year. With a message to you all:- Have a safe and happy Christmas and heres lookiong to an even better 2017! Jan 2016:- 1:48 Hasegawa Spitfire MKIX T (with Brigade Models twin cockpit conversion). Double build! April 2016 1:48 Hasegawa Curtiss P40 Kittyhawk May 2016 1:48 Revell Eurofighter Typhoon FGR4 with custom decals. June 2016 1:48 Airfix Spitfire MkVa July 2016. 1:48 Airfix Spitfire Vb with custom decals August 2016 1:48 Airfix Buccaneer S2B (PE, resin and scratch building): the reason i havent built many kits this year! and something started in 2016 but, wil most definatley continue into 2017! You can follow WIP on Britmodeller or on my FB site: Richard Spreckley Scale Models!21 points
-
Finished at last, after a ten month build, and my first RFI. I really wanted to do this kit justice as the Vulcan is my favourite aircraft. My first encounter was in the early 70's when as a 9yr old we moved to Pontefract, Yorkshire and I remember the daily flights of Finningley's Vulcans over the town. Then there was the Vulcan scramble I witnessed at the 1977 Finningley air display to mark the queens Silver Jubilee. Anyone who has seen a Vulcan scramble will remember the sound waves travelling through your body and the ground shaking beneath your feet. The Vulcan was and still is, awesome in the truest meaning. I last saw XH558 flying at the Yorkshire air show at Church Fenton last year. I admit now that I had a tear in my eye as I watched it fly away for the last time until it was out of sight. So as you can appreciate I really wanted to do this kit justice, abs make it as accurate as I could as my own personal tribute. Hopefully I've achieved that. I started by rescribing the whole aircraft before I even began to glue anything together. I thought that it would be easier, then it would be a job of cleaning it up to make sure they meet when the parts were joined. I did think that I'd scribed them too deep, but looking at it now I'm happy with the results. Then there are the corrections to be made to the kit to accurately depict XH558 as she is now. First job was to remove the TFR radome off the tip of the nose. And at the other end, the cooling air intake (the elongated box) that fits on the right hand side of the tail is not fitted to XH558. I've also hollowed out many of the various air intakes and made the ducts inside the splitter plates inboard of the air intakes. I replaced the engine jet pipes with resin replacements. The kit comes standard depicted with Olympus 301 series engines and XH558 is fitted with Olympus 201's, the 201 jet pipes being narrower and longer. The other thing I wanted from the outset was to display her wheels up in a way that shows off the iconic Vulcan wing shape. I also wanted the underside to be clutter and hence stand free, so I had the idea of brass tubes up the exhausts and thanks to a friend who made the wooden base I have managed to achieve it. If anyone is interested, the work in progress thread is here - Vulcan WIP Here are the pictures I've taken so far. I managed to get some outside today as well. Hope you like. And finally here's a couple of pictures of her in her new home in pride of place. Thank you very much for looking, hope you liked it. Mark16 points
-
Almost certainly my last completed build of the year... dragged from the shelf of doom and finished over the last week is my Kawanishi N1K1 Rex. Built completely OOB, painted with Tamiya acrylics and weathered with AK washes. Not perfect by a long chalk, but it's finished at last16 points
-
Hi friends!16 points
-
Hello All, While you lot in the Northern Hemisphere rug up and spend those long hours of darkness undertaking quality time at the bench, we in Southern climes sweat it out! Tamiya's 1/72 scale offering - My interpretation of the Kagero folio of Brown 18. Gunze and Tamiya Acrylics, Alclad II and some Games workshop paints and finished off with some oils. Hope Sanite is good to you and there is some plastic goodness under the tree or in the stocking. Happy Modelling all Ian15 points
-
Hi all! I've been rather absent around BM parts of late, PhD demands plus having to clear all my childhood stuff out of my parent's house before they downsize (don't ask...) are increasingly limiting my modelling time, and so in a desperate attempt to build an acceptable number of kits this year I've been doing more modelling and less forum-ing (I've now managed three completions in 2016!) Anyway, this is the result - it's the Airfix 1:72nd Defiant. I have always found the "Daffy" fascinating, and so I decided to lavish all the available aftermarket and as much care as possible on this build. I've added: Quickboost gun barrel set Quickboost fishtail exhaust set Barracuda wheel set Eduard Interior and exterior photo etch sets Xtradecals for N1801 "Coimbatore" of 264 sq. There's much controversy over whether this aircraft was PS-B or PS-Y with no conclusive proof either way, so I went with Xtradecals' suggestion. I also added a tiny amount of scratchbuilding for a few things Airfix had forgotten, namely the prominent details behind the pilot's bulkhead (radio, bracing supports for the bulkhead, and retraction jack for the fuselage fairing). It very much looks the part accuracy-wise to me, apart from a couple of minor quibbles: one, the trailing edges are a bit thick, and two: I suspect that the spinner is a touch on the small side and the nose behind it is a little pinched. Paint is Humbrol 33 from a rattlecan, with a mixture of Humbrol rattlecan and Revell aqua brush-painted varnish. Having spent much of this summer clubbing the 1/72 Vulcan into submission, this went together like an absolute dream, even with all the aftermarket gubbins. The Eduard wheelbay walls were a bit of a PITA to fit and all the rivet details are almost invisible under the paint, but ho hum. The only other surprise issue was the Xtradecals, which fought me every step of the way, particularly the tail flashes which refused to sit down. This is most unlike my usual experience with them, so I think I may have been a bit over-tentative with the gloss coat. On the whole, however, I'm pretty chuffed with the way this has come out. Hope you like it! The flash makes this look hideous, but it was the only way I could show off all that lovely pre-coloured interior PE! P.S. Does anyone know whether Defiants carried a wire antenna strung between the two ventral radio masts? Every profile under the sun shows this, and the prototype K8310 definitely did, but I've never been able to find any evidence from photos of production machines carrying the wire.14 points
-
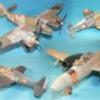
Hi mates, I started this build nearly four years ago, but it was one of those builds that kept being stuck back up on the shelf of doom. The Tigercat was a beautiful, elegant twin engined design from Grumman's Iron Works that was just too late for WWII, but saw combat in Korea at the hands of the US Marines. Most missions were recon, close air support and ground attack, but the Tigercat managed to knock a couple of biplanes out of the sky. I always wanted a Tigercat in my 1:72 collection, but I got tired of waiting for someone to produce a modern tooling. Therefore, I pulled out the old Monogram kit from the mid 60s and decided to tart it up a bit. Since the Monogram kit has raised panel lines, this meant a complete re-scribing. And, since it lacked detail in the cockpit, wheel wells, and engine departments, it meant I would be visiting the aftermarket section of my favourite hobby dealer. I settled on the Aires "Super Detail" set (read about it and weep over at the WIP), the Starfighter wheel well set, some Quickboost props, Aires tyres and wheels, and some Brengun wheel chocks that help keep her on her nose wheel. I ran into a lot of issues with the Aires detail set, but I finally decided enough was enough - let's just finish the thing! So here it is - all the fun details of the WIP can be found here, and if you read between the lines you'll see why I kept losing my mojo trying to finish it. But perseverance pays off...eventually. Project: Grumman F7F-3 Tigercat Kit: Monogram F7F-3 Tigercat (kit numbers 6062 and 6813) Scale: 1:72 (but a surprisingly large model nonetheless) Decals: Representing HEDRON One at Marine Corps Air Station El Toro in 1950. Stencils from the kit, national insignia, squadron modex and other markings from the Island of Misfit Stickers Photoetch: From the Aires detail set, and an occasional bit from the Drawer of Fiddly Stuff Resin: Aires Detail Set 7018, Aires tyres/wheels 7208, Quickboost Propellers 72381, Starfighter wheel wells 7212, Brengun wheel chocks 72093 Vacuform: Squadron Tigercat canopy 9118 Paint: Model Master 1717 FS15042 Dark Sea Blue, 1169 Flat Yellow; Gunze H58 Interior Green, H90 Clear Red, H93 Clear Blue, H92 Clear Orange, H94 Clear Green, H12 Flat Black, H11 Flat White, H47 Red Brown; Alclad 101 Aluminum, 111 Magnesium, 115 Stainless Steel, 314 Klear Kote Flat; Floquil 110015 Flat Finish Improvements/Corrections Detailed nacelles with resin engines and photoetch parts such as the ignition harness and plug wires. Port exhausts from Aires set did not fit, so new ones were scratchbuilt. Over 26 grams of weight in the nose, but it was just barely enough - sometimes she sits nice, sometimes not. Wheel chocks prevent any propensity for tail-sitting. Cut open the kit canopy, and used only the windscreen. The sliding canopy and fixed rear portion came from the Squadron vacuform. Detailed cockpit with Aires resin and photoetched instrument panel and seat harnesses. Resin propellers and hubs Starfighter resin wheel wells with oil and glycol tanks Resin wheels/tyres - all landing gear received photoetched scissors links Used scrap pieces of clear plastic to make new navigation lights and lenses Oil cooler vents opened up on top of wings 5" High Velocity rockets from Hasegawa F9F Panther kits Added communication antennae with 0.005" diameter Nitinol wire Build thread: Link - anyone wishing to use the Aires Super Detail Set please have a look at the WIP. It may help you when you get to the tricky parts. So on with the pictures! And some family shots: I think that last shot shows you just how big the Tigercat was. That's an appropriate picture, too, since the F7F was originally supposed to be called the Tomcat. At the time, the US Navy brass rejected the name because it promoted "female promiscuity." I guess that wasn't a problem later on after "The Summer of Love!" Cheers, Bill12 points
-
Hi all, a fairly busy 2016 model wise. Most of the builds have been for magazines but a few of my own, mainly for our Bomber Command SIG crept in. I've actually finished a few more but these have yet to appear in print so will be tied over to next year. Many sincere thanks to all those who commented on them, it's very much appreciated and valued. Have a great time over the festivities..... Melchie First out of the traps for 2016 was the wonderful AMK MiG-31BM Foxhound kit. A real joy to build.... Then Hasegawa's 1/48th red tailed J35 F-1 Draken SBS's lovely little 1/72nd resin DH Comet racer finished in that wonderful Brunswick green for a change, First ship model for 20 odd years, Trumpeters diminutive 1/700th Dreadnought 1907 fit, certainly wont be the last. Great fun, more already in the pipeline.... Next were a few test shots of the new Airfix releases which included the updated B5N1 version of the Kate torpedo bomber. The latest version of the Airfix Whitley GRVII/V finished in wartime BOAC colours, And the new 1/72nd Martlet VI, great little kit, nice quick build.... Then a few for the Bomber Command SIG table, firstly an Airfix Whitley Mk V cross kitted with the excellent DB Productions Whitley Tiger set to produce a Mk III, nice easy conversion job, (personally I prefer the look of the Tiger version).... Built in time for the 2016 Telford show Monogram's old 1/48th B-24J model converted to a Liberator Mk VI (RCM) of 223 squadron Bomber Support squadron, 100 group RAF Bomber Command....a LOT of work but ultimately well worth it. And finally the Airfix test shot of their magnificent Victor B2 (Blue Steel) finished in factory fresh early camouflage colour scheme of the Wittering Wing, (Central servicing period) circa 1965. A great model with some very clever engineering solutions that blasts the old Matchbox kit out of the water. I already have two more in the stash for our SIG table.... It's been a fun year, hopefully the same again next year but with a lot more sci-fi, rocketry and ships...thanks for looking, Andy12 points
-
and now for something completely different... A different project, and a request from the wife... Happy Holidays to all the plastic community!11 points
-
Here's my (as an AFV modeller): Right now I'd suggest using a flat brush moistened in thinners to drag everything into alignment with the airflow, don't try to simulate the general smoke staining with oils, they're the wrong medium. For that I'd be inclined to use Mig's P023 Black Smoke dry pigment, but much later in the weathering process (after the matt coat). I understand that airbrushing Tamiya Smoke can work well for this too, but I've never tried it myself, so I can't honestly recommend it. I'd definitely suggest trying the dot and drag technique I described above for some of the more prominent linear staining.....Place a dot of neat oil paint (much smaller than a pinhead, it's strong stuff) where the stain starts, then use a brush just barely moistened with thinners to drag it out in the direction of the airflow. Be very careful not to overload your 'removal-brush' with thinners, you don't want to flood the area you are working on (think of it as a bizarre back to front form of dry-brushing). Be sparing with the paint to start with as you can easily build the effect up in layers, personally I'd do the browns first with a mix based on Burnt-Sienna and then I'd use a Lamp Black based mix over the top for the really prominent stains.....Above all, don't rush it, you have the best part of a day to work before the oils start to set up, and even then it's advisable to put a thin coat of Klear between layers, to avoid the risk of removing your earlier work. Remember I normally do tanks, so my advice may not be the best for the subject.....We'll find out shortly as I'm just waiting on a coat of Klear to cure on my Bf.110, I'll be weathering along with you in a bit.11 points
-
Houps... I forget a shot Sorry, 2 photos. Have a nice day. Corsaircorp.11 points
-
Oh, completely forgot! Yes, I've used both regular and Model Air Vallejo. It sprays beautifully, but it will flake off the model at the slightest provocation. I also have some (strong) doubts about how accurate the historical colors are. Here's a Lancaster that I did, using Vallejo for the upper colors: 20161217_221022 by Edward IX, on Flickr Mighty Ropey, how I love you so. Anyway, I used Vallejo but don't see myself ever doing so again if I can avoid it, since I do a lot of masking (because I'm careless). I respect that. If I had to pick between the two -- bit of a Sophie's choice -- I'd go with Modelmaster over Vallejo, because it's behaved a bit better for me when airbrushed. So while the enamels slowly dry (or perhaps, like Dread Cthulhu, they merely slumber deathlessly, never dry nor wet, but dreaming), I'm working on the stores: 20161217_220849 by Edward IX, on Flickr Fun fact about the KAB-500s in the kit -- they have two holes in the bomb that I thought were where it attached to the pylon. 20161217_220909 by Edward IX, on Flickr Well, I was sort of right. A little piece has to go INSIDE the bomb when you assemble it, so that it can link up with the pylon: 20161217_220904 by Edward IX, on Flickr "Wow, what an innovative and unique approach to the stores," I said when I discovered this (heavily paraphrased). But was I downhearted? NO! I stuck pin tips in the pylon and glued them there, then trimmed down the pins: 20161217_220918 by Edward IX, on Flickr Tadaaaaaaa: 20161217_220942 by Edward IX, on Flickr10 points
-
Hello dears, I like accuracy in my kits, but my main point of interest is historical accuracy. And every brand wich have issued a birdcage corsair did represent a birdcage from the VF-17 Jolly Rogers Sqdn shooting at a japanese Aircraft? That's definirely wrong, they never did so ! And there is no birdcage from VF-17 with any Victory markings. Obviously, the Blackburn irregulars have used the birdcage but CONUS only and for training purpose. They also were about the first to try to carqual the F4U-1 with a relative success. They have tested the différents type of oleo struts, the shape of the hook and so on.. So I represent the F4U-1 of Cdr John Thomas Blackburn, I admire the man and I've been Lucky enough to exchange some letters with him before he passed away. And I will make every kind of Aircraft used by the Jolly Rogers. (I get every one of them) So here's the F4U-1 Birdcage, The engine and interior has been modified or replaced, the tailwheel is the short one. And yes ... they are intended to carry bombs from the beggining on. The ones used here are from an accurate miniature kit. The weathering has been kept very light since the Aircraft were brand new at the time. Except for the belly of the Aircraft, since the first PW 2800 were a little oily spitters and the oleo struts since they fail very oftenly. Photo from USNI I know that my kits will be more attractive with a nice background, but I no longer have a good camera, all this is made with my cell phone. And moreover, Knowing myself has I know me, I will use a different and related background for every kit. But whatever, I make my mind about it. Photo from Tailhook association. Hope that you will enjoy the thread. Thank for watching. Corsaircorp9 points
-
Airfix Spitfire Mk1a 1/72 This is my final build of 2016. I wanted a quick and easy build with a back to basics feel to round of the year. This kit certainly fell into that bracket, it practically fell together with very little filler or sanding needed. I am not a fanatic of the Spitfire like many (slander I hear you say) but I really did enjoy building this one. Thanks for looking and I welcome any comment or questions you may have about the build.9 points
-
So I'm trying to weather the underbelly of the Su-24. They get pretty dirty: http://www.airliners.net/photo/Russia-Air-Force/Sukhoi-Su-24M2/2233290 At first I tried to replicate the oil streaking I saw in a photo in the Yefim Gordon book, but Things Did Not Go Well: 20161217_203532 by Edward IX, on Flickr So I dug out my oil pants and all of my enamel washes and tried again. 20161217_210030 by Edward IX, on Flickr 20161217_210016 by Edward IX, on Flickr 20161217_210011 by Edward IX, on Flickr Not quite, but it feels closer, you know? I welcome suggestions.9 points
-
Season Greeting, De Havilland Tiger Moth DH.82 in Indian Air force color, Tail number Hu 784, kits arifix 1:72 scale my only criticism for the kits was the plastic was very soft other than that a way cool kits, Hope by built is okay. Thank you for the peek and time. Cheers8 points
-
Well a bit of a slow start form me this year with a few larger project builds that seemed to take for ever. A modest haul though at 10 aircraft and to make the numbers up two Bandi Star Wars kits too. BB8 and R2D2 (Sorry no pics) All but the Vampire have been featured in SAM magazine and a couple that will soon ( I hope) All the best to you and your family members for Christmas and the New Year. Thanks for looking, Rick G Anyway on with the picture so in reverse order, Just off the bench and took just 10 days is the new Meng 1/48th P-51 D This one took me the longest at around 3 months the new Kinetic F/A-18 C its not even made to RFI yet! Airfix Jet Provost in 1/72nd a nice quick build Airfix Vampire in 1/72nd as another quick build! Great Wall Hobby T-33 again in 1/48th Kinetic 1/48th Etendard another larger build project Another big project in the form of the Kinetic 1/48th scale Harrier FRS1 Airfix again ad the first of the big builds 1/48th Meteor F8 Airfix 1/72nd Scale Beaufighter Trumpeter 1/72nd Scale Mig 298 points
-
OOB, Kits World decals. this was a Ploesti raider, but sadly perished in a midair before reaching its target. The crew reportedly survived.8 points
-
Okay, so it seems that the GS Hypo stuff has worked. I have actually been at home this week but have avoided the Lysander because there was a major operation lying in wait fro me and I did not want to begin the operation without plenty of time ahead for me to finish said operation. She has wings ! Well, bigger ones that the stub wings she already has. Real wings, wiv slats 'n' stuff Sine I had set the entire day aside to work on getting the wings in place, and anticipated a bit of a battle, the wings went on in a few minutes with absolutely no problem whatsoever. Looks reasonable doesn't it ? That said, when I state "with absolutely no problem whatsoever." I am of course referring to the modelers idiom, sorry, downright lie... in that we have what could be considered a bit of a teeny weeny problem ... anybody spot a slight issue here ? (and no - I'm not referring to the fact that I haven't added the solid panel in the greenhouse for the fuel filler access!) [note to self... add that later!] No ? Okay then what about here.... ? Yes, I thought you would get there eventually. We have what is commonly known as an "ohcrap'n'buggrit" We have spaces. What's worse is that we have spaces where airframe structure should be. Though if I am being honest, I had pretty much expected that this was going to be the case given all the cutting, shutting, and butchering I have subjected this little bunch of plastic pieces to. - And if that the worst issues I have to deal with, it's not really that bad is it?. As she sits, there's a little bit of misalignment of the wings though you have to look for it (but once you know it's there....). I may be able to straighten that out a touch more as I wrangle to get the final pieces in place. We'll see what happens I think milliput will be coming to the rescue for filling those gaps although I may just add a touch of epoxy glue to beef up the area first. Then once I have the wings properly secured and faired in, I can get on with the last of the canopies. There's going to be a reasonable amount of touching up but that's unavoidable because of the way I chose to build the kit. Still, for a kit that's mot much younger than me, I'm pretty happy with it.8 points
-
yes... Here is another Shackleton, this time from a Swedish workbench. This was a pretty quick build, about four weeks, almost entirely OOB. The build was surprisingly fast (among other things thanks to Eduard's masks for the myriad of windows!), and I did not bother to correct the small issues. To me this looks very much like a Shackleton, and that is enough for me. Although, there are few more suitable objects for rivet-counting... However, I added seatbelts and a number of missing antennas. Painted with Gunze acrylics. I replaced the roundels, the rest is from the kit's decal sheet. If I would do another build of this, I would probably use aftermarket decals. The rivets are no problem for me, I like them. This is why i decided to go for Revell instead of Airfix. They may be over-sized, but so are most panel lines on almost every 1/72 kit. However, there are pretty difficult to restore after sanding. Another problem is that they are of different size on the kit, for instance they are much deeper on the engine nacelles than on the body. But this is no major problem IMO. I decided to go for a semi-gloss finish. I know that the original was more glossy, but to me this would create a toy-like finish. So it might be a bit incorrect, but I think that it looks far better this way. Apart from some difficulties with the landing gear (which might be my own fault, I decided to assemble them before painting), this was a very easy build. I really recommend this kit. Do I like masking propellers? No, I don't. Next kit will be a jet aircraft, I promise! Thanks for watching!7 points
-
I'm going to make a little base for this and whilst I might still play about a bit with the weathering, I'm calling it done-ish. I won't pretend I'm completely satisfied with it, but then again, I never am. I've built worse. It's the Airfix new tool kit A05129 built more-or-less out of the box with the exception of a replacement resin seat c/w seatbelts and armoured backplate (48019), main wheels (48076) and exhausts (48043) from Ultracast. I stuck to my trusty Squadron green filler and the paints are all from Colourcoats (probably obviously, because accidently buying a 28,000 tin personal stash was really how this business started). Lastly, the antenna was added using the elasticated Infini Model rigging line. I use that for all my models now and every stretched sprue antenna that has been broken this year taking models to various shows (that would be all of them, actually) has been replaced with this stuff which is idiot proof and therefore ideal for me! I intend to take more photos outdoors on its sandy base with a real blue sky but the base doesn't yet exist and the blue sky requires me to not be at my day job on a day the sky isn't Ocean Grey - so it may be some time until the "proper" RFI photos if I don't post these.7 points
-
Thanks guys for all the positive words. I'll have you know my feet are honk free. Probably. Anyway some slight morning progress. I decided to take a "Slice of life" and bring Dexter to the table. the plastic surgery must take place along the dotted line. There are two position pins here but hey who needs those? and off with their heads. There are a few awekward little bits to cut around but mainly it felt quite straight forward. here is the cut wing section fitted into place. I'm deciding whether to use plasticard or milliput to fill and shape. while thinking about it the light in the cave looked lovely again. So photo. Sorry. Any hoo I had time to think and decided on the milliput route. here she is filled and watered. Pretty good and a good weight too, I hope it glues. at this point I had to take the red haired wonder. ( the wife ) to the pub for a girly afternoon drinking and Myself to the local mega mall with the kids for some last minute Chrimble shopping. Hopefully more, (more) tomorrow. I have the day off to watch the kids which means I might get some lovely bench time. thank you for taking time to view my shenanigans. see you all tomorrow. Johnny milliput.7 points
-
Oi! No throwing missiles around in my thread, that's my job! So, the Airfix sub-assembly construction madness continues... Airfix would have you build up the rear fuselage section as a unit and then mate it to the centre section wing sub-assembly. Yeah, that will work not! Doing it that way will inevitibly lead to a prounounced step at the joint. I therefore elected to attach the rear fuselage sans roof such that I could support the joint between the 2 sections. I did this with a piece of scrap sprue whilst the joint set, which was then later removed. Once that was set, then I added the roof: My roof part was a tad warped and fit had to be 'assisited'. You'll notice that the forward starboard joint looks poor - it's not yet stuck down since I am working from rear to front and need to work out a way of supporting the joint as it sets.7 points
-
Got some shed time today, here`s what I did with it! I shot some primer on these bits! This is the floor and right hand side of the drivers compartment and the battery box and stowage box that sit behind the driver. there are a couple of areas to touch up, but I`m happy so far! Here is the drivers seat, the back and the beam it mounts on, I`m going to try and complete this during the week. the beam will sit across the opening in the drivers bulkhead Here........roughly! Here is the left hand side of the compartment, brake and clutch pedals fitted as is the ventilation duct. I think there's excess travel on the clutch! Not an issue though, it moves! So I`m almost done....................well, in the drivers compartment anyway! So here`s the guts of the FCT interior! Turret floor roughed out and the back of the commanders seat, the seat itself runs up and down the rails on the frame that connects the top and bottom of the turret, there`s a bit of work to do here! And all completed whilst running back and forth between kitchen and shed, since I`m "Duty Chef" today! Ta for lookin` no"G" Granto7 points
-
Thanks Alex! I read that article over a cuppa earlier Tomo. Very enjoyable. I'm feeling a little sad this morning that Martian's had to cease work on his Starfighter, so this morning's panto matinee has been put on hold. All tickets are valid for future performances. I stuck a wing on last night, well, a wing stub to be accurate: I did this rather late in the evening after a long and liquid lunch. You know, You feel confident, what can go wrong? Mercifully, nothing in this case. I was a little liberal with the Extra-thin along the join to the fueslage perhaps, but better something that can be tidied-up, than an wing (especially a folded one with extra stresses) that might drop-off later. Lower wing root partially reduced in interior thickness to give a more accurate cross-section: having blocked-in the main sections for the wing roof now, it's time to start adding the interior structure: Those bits need a few hours for the glue to go off so I'll leave that for a bit, rather than tempt fate by fiddling with it too soon. I guess I need to explain the 'additions' in the photo above. I've decided to build the rare late-variant jet AEW version of the Barracuda with a dorsal radome that with all the holding and rotating of the fuselage at this stage, some protection was need over the headrest of the pilot's seat and the cantilevers at the front, otherwise I prognosticate a 'series of unfortunate events' leaving an inventory of snapped bits to clear up later. A virtual mince-pie to whoever guess what the nose-cone is... I think I mentioned it previously (?) but I wasn't happy with the kit part for the facing of the outer wing, so I made my own and gave it a shot of primer: I'm happier with the relative sizes and shapes of those openings now. Not sure how much more I will get done today, if anything, as a busy week looms and I want to lounge around in my Pringle patterned onesie that has been so admired here in the past. Plus there is the annual St.George and the Dragon routine of dragging the Christmas tree through the house, removing paintings and ornaments willy-nilly as it goes.... I hope you're all having a good time in your respective endeavours, or indeed lack thereof, and just relaxing. Tony7 points
-
Lesson from yesterday - be gentle, it's resin. I cracked the fuselage After fixing the above with thin CA I set about sorting the step in to the cockpit. Reference photos showed pretty much what was there, but with a kickboard so that's what I added: And this is the result. When it's properly hardened up I'll sand it down a tickle until flush with the cockpit floor I marked out the cabin floor in accordance with the template provided in the Whirlybird S-61N Mk.II airliner seat set, and scribed the baggage hold hatch And set about with the seat which is most different from the seats provided in the set which is the very back row. This seat is wedged in between the fuselage sides and has a different base to the rest, and different supports accordingly: I made a new base from scrap plasticard ... and used the seat backs from the resin seats And lastly fashioned new supports from brass tube Guests have now arrived for lunch and are talking nonsense downstairs, so I'd best go and act all Christmassy. Hooray.7 points
-
yay, got a little bench time this morning. This is the part that gets attention next. there are a few things I'd like to do. Off the bat I need to reinstate the wells and probably the gun area too. The curved leg tunnel section looks like the biggest chore. I think the main section should be ok, something like this. then cut to shape. I need to think about this. I've seen a few others approach this in different ways. I'll have a ponder. Next and hopefully the final major hurdle will be the wing flaps. The ones on the outer wing are deprecate already. but the inner ones are solid. I've seen the inner ones made from a few sections and possibly in one section too? I was going to leave well alone but I know I'll kick myself if I don't add and lower the closer flaps. The plastic is quite thin and fingers crossed it should go quite smoothly, the hinges won't work on the other flaps but I think the overall look of the final build will benefit. i finished off some of the last parts of the pit while thinking about the wings and wells. the seat got a lick of paint. As did the other bits and bobs. if you look closely you can see the scratched glass section of the sight (nerf packet) the machine gun section got added and the messy guns got a dry fit. For this build the Carpet Monster is in no way feared as all the bits are mahoosive. But as you will see a new foe raised it's ugly head. while super gluing the seat pad to the chair I fumbled and the pad when flying off into the Carpety ones lair, no worries thought I as I when to find it with not a bead of sweat on my brow. Nowhere to be found was the little padded swine, I moved boxes, the bin, the compressor, alas nothing. convinced it had entered the twilight zone I sat on the bed to take the whole room in to see the area from a different angle when I noticed....... yes there it was super glued to my left sock. The cheek of it. Prising said item from my stripy left foot I stuck it in place and did a bit of a dry fit. looks pretty good. The IP started to get glued in but I'll leave that for tomorrow's update. Now belts or wings for Sundays secret lemonade drinker? Thanks for dropping by for a cuppa. Hope you're all having a lovely weekend. Happy moddeling chaps. Johnny sock7 points
-
Time to start a new project; 1/350 HMS Dreadnought with White Ensign & Eduard PE and some resin detail from North Star; and Master barrels; Replacement resin guns from North star; And 24" searchlight for the fore mast, the kit provides a 36" which is incorrect; Made a start, first bit is to correct the port holes and hatches on the port bow area; Add these 2 port holes; Remove this hatch and add another pothole below the hatch on the upper deck; And add a new hatch in the correct position - hopefully a more accurate depiction of the real thing; Name on the stern from the WEM PE before joining the hull halves. There are photos of the ship with the name originally below the upper line of port holes captioned as 1905 and later,1908 above, I'm not sure when the name was moved but went for above the port holes; 1905 1908 Thanks for looking Cheers Nick6 points
-
I am away from my modelling bench due to starting a new job a few months back. I have missed not being able to get much modelling done so I have decided to start a new project which should only require a limited set of tools and not need an airbrush (at least until I get to the white metal parts): Here's what in the box, two photoetched stainless steel frets protected on both sides by clear film: A small bag of cast white metal parts: Fourteen pages of pictorial instructions: Construction starts with the engines: These are all the tools I have, hopefully I've got all the right ones: So here's my start on the first engine: Here is what my temporary modelling bench looks like: Not perfect but I got a new bulb for my magnifier this morning so I'm up and running. I thought this kit looked a bit daunting but I spoke to Jockster at Telford and he said it was pretty straightforward, we shall see.... Bye for now, Nigel6 points
-
Hi mates, Last year I only managed to complete four models, just dreadful. I did a little better this year mainly due to my chemo regimen getting a bit easier. I'm now in full maintenance mode and the specific batch of chemicals doesn't seem to knock me down so much. I think I would have done even more this past year if it wasn't for the arrival of grandchild number four (the first boy!) and the other grandchildren advancing to the point where you can have a sort of conversation with them. Plus it's so cute when my granddaughter comes over and the first thing she does is go to my Keurig machine and make me a cup of Joe. Sweet kid! So here are the 2016 completions - could 2017 bring even more? If wifey doesn't sell off the stash! 1:72 Fairey Firefly TT.4 (completed in February 2016) Special Hobby Technically this one was started at the end of 2015 along with its sister FR.1. I had a momentary lapse of reason on this one, and decided it would be a good idea to fold the wings. Arghhh! Nobody in their right mind ever builds a model of Fairey aircraft with folded wings. I mean, whoever was in charge of wing-folding at Fairey was clearly in charge of the Spanish Inquisition ("Nobody expects the Spanish Inquisition!"). The link above will take you to the RFI page where you can see more photos, a list of all the corrections and additions that were made, plus a link to the WIP. 1:72 Northrop F-89J Scorpion (completed in March 2016) Revell This one came out of left field - a mojo restorer that just kind of happened while I was working on the Sea Venom. I was stuck in my usual paralysis by analysis mode when I decided that I really needed to finish a kit. I was home alone for the weekend, so I pulled this off of the shelf of doom where it had languished for a couple of decades. The cockpit was already finished as was the main fuselage construction, so I just needed to clean things up, paint it and throw on some stickers. Three days later there it was! The link above will take you to the post in the middle of the Sea Venom WIP. The kit was built OOB, nothing was added to it or changed. 1:72 de Havilland Sea Venom FAW.53 (completed in June 2016) CMR Another fantastic, highly detailed resin kit from CMR. Armed with the expert technical assistance from NAVY870, one of our distinguished forum members, this one is finished in the markings of a RAN example that he restored. There is something about de Havilland twin booms - you just gotta love 'em! I think there's a Vampire and another (gulp) Sea Vixen in my near future. The link above will take you to the RFI page where you can see more photos, a list of all the corrections and additions that were made, plus a link to the WIP. 1:72 Supermarine Spitfire F.Mk.XIVe (completed in August 2016) AZ Models What year would be complete without another Spitfire to add to the brood? This year it was the AZ kit of the beautiful F.Mk.XIVe in the markings of Ginger Lacey. I love the AZ/KP Spitfire kits and have a ton of them in the stash. The ones I've built have gone together well and certainly look the part when they're done. I helped this one out with a resin prop, photoetch cockpit, and vacuform canopy. I think next year I should do an F.21 with a contraprop...what do you think? The link above will take you to the RFI page where you can see more photos, a list of all the corrections and additions that were made, plus a link to the WIP. 1:72 Blackburn Buccaneer S.1 (completed in November 2016) Scale Resin This is the beautiful new resin kit of the Blackburn Buccaneer S.1 from Scale Resin. The detail on this is exquisite, and it is likely the most accurate Buccaneer model available today, thanks to the expert help Scale Resin received from subject matter expert Andy White. I really enjoyed building this kit (even though I hate painting white!) and it looks great next to my CMR Buccaneer S.2. Unfortunately, I relied on some bad information and made the jury struts too long - the wing tips should be much closer together than they are. As soon as I get some spare time, this will be fixed! Now that I know about it, it really bugs me... The link above will take you to the RFI page where you can see more photos, a list of all the corrections and additions that were made, plus a link to the WIP. 1:72 Grumman F7F-3 Tigercat (completed in December 2016) Monogram Last up for this year is the sleek Grumman F7F-3 Tigercat. I started this almost four years ago, and it's been on and off the shelf of doom several times. I went a bit out of control on this one, but can honestly say that it was built "OOB." Only, there was a lot more than one box! After a complete rescribe, there is a ton of aftermarket in this bird. The Aires Super Detail Set fought me here and there, but in the end I think the result was worth it. You have to admit she is a beautiful aircraft - just a wee bit too late for WWII but in time for some combat in Korea. The link above will take you to the RFI page where you can see more photos, a list of all the corrections and additions that were made, plus a link to the WIP. Thanks for reading all the way to the end, I hope it was worth your time. See you here next year, and let's hope it's more than six builds. I'll never get through my stash at that rate! Cheers, Bill6 points
-
Supermarine Seafire FR.46 Airfix 1/48 Hi Guys Airfix's classic Seafire, build March 2014. I got this as a present from my cousin so, as it didn't cost me anything, I decided to splash out on a few AM accessories to tart it up a bit. so in no particular order. Quickboost resin seat Quickboost resin exhaust Barracuda resin wheels Rob Taurus vac canopy Montex paint masks (only used for the roundels) The Taurus canopy was pretty much essential as the kit part doesn't fit in the open position and mine was badly fogged anyway. The Barracuda wheels were fantastic, I'll definitely be using their stuff again. I was expecting a nightmare with the Montex masks but in the end they worked really well although it was a little nerve wracking pulling them off at the end, hoping that everything was in register. The only other additions were a few scratched details in the cockpit (which you can't see) and some brass tubing for the gun barrels. Hope you enjoy the shots Thanks for looking Andy6 points
-
HK Models 1/32nd scale Boeing B-17G Flying Fortress This model represents ‘Skipper’; a Douglas-built B-17G 42-238129 assigned to the 367th Bomb Squadron, 306th Bomb Group, based at Thurleigh. This aircraft was one of 234 built by Douglas that had both staggered waist gun positions as well as the factory-fitted Cheyenne tail turret, and were delivered in camouflage finish. This particular aircraft entered service on 25th February 1944, and was still on strength with the 306th on VE-Day. The replacement natural metal starboard stabiliser, fin centre-section, both elevators and tail turret were necessary after the bomber was rammed from behind in a taxiing accident at Thurleigh in November 1944. After repair, ‘Skipper’ went on to complete over 100 missions. After hostilities ended, this veteran was transferred to the 398th BG at Nuthampsted on 28th May 1945, before flying back ‘across the pond’ in January 1945 where it resided at Kingman before succumbing to scrap man’s torch on 28th December of the same year. This model has been built more or less out of the box, with only very minor additions. I made the small 'ice windows' on the pilots' windscreens from careful masking and Archer rivets. Aftermarket seat-belts came from Eduard, and a few additional details were added here and there from Evergreen strip where I felt them necessary, such as under the flightdeck floor. I used Eduard’s exterior set which provided some vents and grills omitted by HK, as well as more detailed fuel filler caps. I didn’t use any interior sets, as I felt that the kit parts were perfectly adequate when painted up, and Eduard have used ‘standard’ US interior green on components rather than ‘bronze green’ used on the B-17. I sprayed on the bomb group markings myself, and used the kit decals for the ‘stars and bars’ etc. The ‘Skipper’ name was printed for me, and I used KitWorld’s excellent stencil set. All paints were from Hannants’ Xtracolour range. All in all a very straightforward and enjoyable build… although it’s an expensive model, if you’re a fan of the B-17 it’s a ‘must have’ kit. Was it worth the money? Roll on the B-17F version would be my answer to that! More detail pictures to follow...6 points
-
Keeping the US Navy dry following prohibition is one of those odd quirks of history that makes little sense. They do carry alcohol - they're allowed a drink after 100 days continuously at sea, or something like that - but for some odd reason almost never use it. As a result their sailors get into all sorts of bother ashore when they over-correct when out of the habit. Jack always liked a beer or six, but in my experience the number of times when it affected performance when it actually mattered could be counted on the fingers of one hand (not bad in 20 years' service), whereas the positive contribution to morale was incalculable. On the "12 hours from bottle to throttle" rule, I seldom drank at sea anyway (only when the cab was very seriously broken with no prospect of the boys fixing it within 24 hours!), so I have never got why the world's second best Navy is so utterly puritanical about it.6 points
-
Hi everybody, This is my latest built...Italeri Kit from the box all détails are hands made no aftermarket! I hope You will like it. Wish you the best for this end of year. Thierry6 points
-
Finally got the last of the decals on the airframe (still six to do on the props, but they can wait): It's 75% coated with Klear ready for some oils, going to try using my usual AFV weathering techniques, but very, very sparingly.6 points
-
Nothing much to report I have been fettling legs whilst making the Wessex for the STGB But whilst making and painting Wessex sonar chaps's seats I also managed to 'shhepskin' the Wasp seats with teabag skins am having some difficulties with my printer settings, I must stop it stretching all my images I have redrawn the Airfix red and white danger markings in red and black but the settings have stretched the images It could be the 'pooter though because it has occasionally altered (by stretching) some of my images from the Wessex bank tssk tssk, the things sent to try us anyway, the newly padded seats, still a trifle dark because the glue hasn't dried out yet The guide frame at the top of the observer's seat HAS been repaired now B6 points
-
FINISHED As you can see this thread started at the beginning of Feb, so this build has been a big part of my year. I know I haven't spent every spare minute on it, but I've racked the hours up. The Vulcan is my all time favourite aircraft. In the early 70's we moved to Pontefract, Yorkshire and I remember the daily flights of Finningley's Vulcans over the town. Then there was the Vulcan scramble I witnessed at the 1977 Finningley air display to mark the queens Silver Jubilee. Anyone who has seen a Vulcan scramble will remember the sound waves travelling through your body and the ground shaking beneath your feet. The Vulcan was and still is, awesome in the truest meaning. I last saw XH558 flying at the Yorkshire air show at Churchfenton last year. I admit now that I had a tear in my eye as I watched it fly away for the last time until it was out of sight. So as you can appreciate I really wanted to do this kit justice, abs make it as accurate as I could as my own personal tribute. Hopefully I've achieved that. I will I'll take some proper pictures later for the RFI section, but for now here's a few to be going on with. Thanks again to to everyone who has followed and commented on this build thread. Your help and assistance is hugely appreciated.6 points
-
All feedback, both good and bad, gladly received Tom6 points
-
Hi, This is my 3rd model after return to hobby. IMHO the best one from all of them (i think it was time to do it right) Biggest minor is that i had unforunately once again put some paint on canopy despite using maskol and Tamiya masking tape My masking was very carefull and paint marks are in the middle of glass so maybe my maskol get into reaction with paint? I don't know, maybe someone will be so keen to write little tutorial how to good mask such clear parts in attack helos? Another mistake is vivible connecting line of 2 hull halves which i wasn't able to delete using various sand papers. During building i also cover my preshading to much and i was forced to do postshading (base color with couple drops with of Humbrol sand). Anothe chemicals which i used were: Model Master Enamel Helo Drab-base colour Mr. Surfacer 1200-primer Some Humbrol enamels for cockpit and missiles Humbrol gloss and matt varnish Gunze decals fluids BTW I paintned Hellfires missiles in Olive Drab because dacals for them were black... Any comments ale welcome5 points
-
As a change from things with propellers on and 72 scale, I've just completed this in 48. It's been an enjoyable build (HERE) which apart from a bit of extra plumbing in the cockpit and some additional surface riveting, it's OOB including the decals. Painted mainly with Citadel Chainmail silver and Tamiya rubber black for the anti-glare areas. XS452 entered service in 1965 in the scheme it is modelled in here. It's career followed on with 11, 111 & 56Sqn before ending the first chapter in its life doing fast taxi runs having been delivered to and restored at Cranfield. 452 lived a charmed life compared to many as it was then purchased by Mike Beacheyhead and flown in Capetown with several other classic jets along side its sister XS451 which was tragically lost in 2009 resulting in the grounding of the fleet. XS452 took to the air again in 2014, although from what I can gather is currently up for sale again. Thanks for looking, Neil5 points
-
You could always build this John5 points
-
Here's how far I have got with the engines, all eight compressor stages installed: I may get more done before Christmas but most likely the next update will be after the festivities. I hope everyone has a great Christmas. Bye for now, Nigel5 points
-
Ah the old " if you'd tried harder at school" chestnut! I remember a snotty nav on 27 saying that to me whilst I was strapping him in a Tornado once! He wasn't expecting the reply of " suppose so but if you'd tried harder at Biggin Hill you'd be sat in the front wouldn't you!!" Made the rest of the day bearable that did! Got to agree about the sanitary provisions on hercs tho!5 points
-
Thanks Tony, especially for "Cedulous" - hilarious! Metal splints - good idea, stored for future use... Thanks also for the links which sent me off on some more researching... HMAS SYDNEY GETS NEW PLANES FOR AUSTRALIA. 17 OCTOBER 1950, KING GEORGE V DOCK, GLASGOW. AIRCRAFT BEING EMBARKED ON THE AUSTRALIAN CARRIER SYDNEY BEFORE THE SHIP'S DEPARTURE FOR AUSTRALIA. THE AIRCRAFT WERE FIREFLY MARK VI AND SEA FURY MARK XI.. © IWM (A 31739)IWM Non Commercial Licence HMAS SYDNEY IN ACTION OFF KOREA. OCTOBER 1951 TO JANUARY 1952. WITH THE AUSTRALIAN AIRCRAFT CARRIER HMAS SYDNEY IN KOREA.. © IWM (A 32000)IWM Non Commercial Licence The first image shows that the holes seem to be there when the racks aren't fitted (although that might be just for transport) and the second shows that the fins are at 45o to the wings? All a bit academic after the dry fit (which required the holes to be drilled out a bit): Pathetic. I think I might leave them off, fill the holes and just have a 'nice' model of a Sea Fury (with luck).5 points
-
Okay we have to start somewhere......first job was to individually shape and fettle each porthole clear part to fit it's individual opening......probably no two the same. The appropriate beaver tail of the RAF version has been attached as has the cargo bay floor. Plastic card strips around the fuselage edges to provide alignment and somewhere to apply the glue. Cockpit bulkhead on kit is in wrong place. It should not be right behind the pilots seats but farther back as the flight deck needs extending to accommodate the flight engineer . Location and amounts of nose weights are also being tackled.5 points
-
Thanks Roy. You made a good job to confirm the beam position. Good to see it is in accordance with Drawing 2. Hope your "hibernation" won't last too much, cause I (and we) need you!! Yes, there is still a lot of work, but all (or nearly all) is OK up to now. Another photo to show that the transmission tree (sky blue line is now correct, horizontal like in Drawing 2). I replaced the 02 nuts by 04 ones, smaller (green arrow). Another arrow is missing to see the 124D cut piece, that will be modified to allow decreasing still a bit the steering column and get the good angle, 16°. Sorry, not very nice, the filling on the column, this is yet to do, after precising the good lenght... I made a top view comparison: the frame should be a bit wider and the engine - that seems a litlle big on this comparison - should be more left centered. But we must take in consideration that the body will give a wider shape on top view.5 points
-
And before that it was fine point black technical pen panel lines. It looked incredibly crisp, but utterly unrealistic.5 points
-
Remember hearing about that, along with just about everybody else in the British military I think, later that evening. "Oh look, the ultra-expensive invisible stealth bomber isn't invisible, just ultra-expensive" So long as that hapless hamlet isn't in Turkey... I'm with you there fella. Stopped buying magazines when the black panel line wash became officialy The Only Way To Finish A Model since I hate the jigsaw puzzle look it gave them. Keep up the good and subtle work PC. This one is looking grand.5 points


.thumb.jpg.158e2e086d45b8f96b7d93b8bee8dc21.jpg)
.thumb.jpg.0bac681e0da8e4ed7557610e98fda908.jpg)


This leaderboard is set to London/GMT+01:00