

Nigel Heath
-
Posts
8,773 -
Joined
-
Last visited
-
Days Won
62
12 Followers


_5.56mm_Rifle_MOD_45162138.thumb.jpg.053e4f85b299efc3857bfa5c1911dc3c.jpg)
Recent Profile Visitors


Nigel Heath's Achievements
")
Completely Obsessed Member (6/9)
14.2k
Reputation
-
Hi Ced, I hope you are still well under these difficult times. I look forward to hearing from you. Nearly 60,000 likes, that's bonkers.
-
Hi Tom, I hope you are keeping well. It's a shame SMW has been cancelled this year and we don't have a chance for a catch up.
Regards,
Nigel
-
That is an exceptional looking model. Pretty much as we have come to expect from Igor. I love the cockpit and U/C detailing, very nice. Best regards from the 🇬🇧.
-

1/72 Flying Banana Refuelling Diorama
Nigel Heath replied to Nigel Heath's topic in Ready for Inspection - Aircraft
Thank you for your kind comments gents. I have not been very active on Britmodeller in recent months due to a fractured spine and the Corvid19 working from home thing but I really would like to add some figures to this diorama at some point as supplied to me by @perdu. -
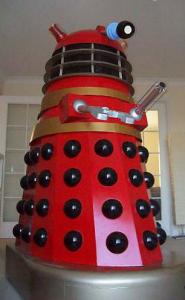
Dalek, 1:5 scale, SEVANS Models
Nigel Heath replied to Robert Stuart's topic in Film, Fictional and Speculative GB
Please let me elucidate you, here is a link to the start of my Sevans Dalek build, please enjoy responsibly: -
Heller 1/72 Alouette III Irish Air Corps
Nigel Heath replied to Dermo245's topic in Ready for Inspection - Aircraft
That's a little smasher, lovely work. Glad that my mesh idea helped. Nigel -
CH-46 U.S. Marines-Vietnam (Academy 1:48)
Nigel Heath replied to wimbledon99's topic in CH-46 / KV-107 STGB
Well, you got my vote, a lovely model to be sure. -
Looks very tasty and my heart is filled with warmth, I do like the cheeky inclusion of a pretty full glass of red wine there, I think we need to meet up soon and I would like to cook another recipe for you (maybe steak based this time, your call). And yes @Tomoshenko is an extraordinarily fine modeller and nice chap to boot. Great company along with @Billydick and @CedB Best Regards, Nigel
-
1/72 Hobby Boss CH-46E/F SeaKnight in a Japanese Scheme
Nigel Heath replied to Nigel Heath's topic in CH-46 / KV-107 STGB
This gives much pleasure, thanks @wimbledon99 -
1/72 Hobby Boss CH-46E/F SeaKnight in a Japanese Scheme
Nigel Heath replied to Nigel Heath's topic in CH-46 / KV-107 STGB
Vera sounds a bit old fashioned, how about Vixen (the Vertol)? -
1/72 Hobby Boss CH-46E/F SeaKnight in a Japanese Scheme
Nigel Heath replied to Nigel Heath's topic in CH-46 / KV-107 STGB
Thanks guys, @modelling minion I am also gutted - any chance of pulling a few strings?? I will of course finish her off but with the pressure off maybe not until next weekend. I have enjoyed this build and the GB in general with its good banter and excellent exchange of information but I didn't like the self imposed pressure to get it finished at a deadline - and I do fully appreciate the extension given so any fault / blame is laid firmly at my feet only. Modelling should be a pleasure and not a stick to beat yourself with. Ho hum, I do look forward to getting her finished and post some propper RFI pictures - her? Maybe a name is required, any ideas out there? I think I will be putting this on the competition table at Telford if anyone wants to see the final result in person. And @modelling minion, @CedB, @azureglo and any other interested parties I have forgotten to mention it would be spiffingly lovely to meet up there again. Bye for now, Nigel -
1/72 Hobby Boss CH-46E/F SeaKnight in a Japanese Scheme
Nigel Heath replied to Nigel Heath's topic in CH-46 / KV-107 STGB
How frustrating that I just missed the deadline. Today I got the legs and wheels added, I like to use a glass surface to make sure the tyre flats are in the correct place: Having sprayed all the remaining parts I started to assemble, the rotor drive shafts were quite a tight fit so elected to use Gator Grip on them: More work on the lower side door, gingerly sanded to reveal the Bare Metal foil on the edges of the treads and a wash added: After a coat of Galeria matt varnish I removed all the remaining masking apart from the glazing:: I then added some Bare-Metal foil to represent the mirrors: Using some fan brush bristles given to me by @milktrip I coloured them black using a permanent marker pen ready to be added to the front aerials: This is how they looked glued in place and trimmed to length: Next after running a curved blade over the edge of all the canopy masking this is how it looked on removal: What a mess, I don't think I have had such a bad result for a while. But that was not the worst of it, this piece of side glazing had been hanging by a thread for weeks, I thought maybe I could hinge it in position and apply some more epoxy but on trying to unmask if finally gave up the ghost: Interestingly this one has delaminated on the paint side, all the others failed on the glazing side. The first job to sort was to reinstall the glazing which I did with this custom made tool with a small blob of Blu Tack on the end: To rectify the awful canopy glazing I cut some thin strips of masking tape and applied to the worst areas: Fast forwarding a bit this is how it looked after I had re-applied all the primer, colour and varnish coats and removed the masking: Not perfect by any means but good enough I think. Now I could start on final, final assembly, on went the wipers and temperature probe using a length of 0.2mm nickle silver rod and Gator Grip: Then the pitot tubes and rear view mirrors: By now it was past midnight and a bit panicked I took my five photos: By now I had added the lower side door, front T aerials, whip aerial on the rear end, red light on the rear pylon and the aerial wire supports on the LHS. It was still not quite finished, I still have to add the navigation and squadron lights, sort out the retracted upper door and add the EZ line wire aerial (as well as do a final check over things like you do) but I felt this was good enough for the gallery. Here are my other Gallery shots, I would have liked to have taken them in daylight obviously: Bye for now, Nigel -
1/72 Hobby Boss CH-46E/F SeaKnight in a Japanese Scheme
Nigel Heath replied to Nigel Heath's topic in CH-46 / KV-107 STGB
Those pictures are a real help and although I had started down a route I basically scrapped that and took a different trajectory. Based on the mirrors on @modelling minion's model this is the sketch I came up with to work on|: Oh and here is the model with panel line wash cleaned off: As I suspected most of the panel lines were too faint to take a wash, I had thought of rescribing more but it's not my favourite job and with the GB deadline looming let it pass. For my dinner I made a puff pastry, Reblochon and mushroom tart: It was a little disappointing, the base was soggy and it didn't taste much of cheese, it should really have been blind baked first I think. My new plan for the mirrors involved finding some surplus PE parts with a small hole, sure enough I found some that looked almost ideal. On a bed of Blu Tack I inserted some 0.3mm brass rod ready for soldering: After soldering I cut them out and sanded the first one to a rectangular profile for the mounting plate then bent and trimmed the wire like so: On searching through my PE spares box I realised I already had some PE mirrors of pretty much the right sort left over from my Flying Banana build: I think I thought at the time they were well overscale, and I still think they are a bit but the mirrors on the Japanese machine are actually pretty big and I think these can be pressed into service. Note that the PE maker has apparently made an attempt to make them handed - as they should be (the recess round the mirror in repeated on the underside) but they have in fact made them single handed (if you look and think about it), something I have to deal with later. Those that know me will know I don't really like 2D PE trying to imitate 3D sections. I thought I would try to give the parts meant to be of circular section an application of solder to see if that circularised them through surface tension: That proved to be a bit of a failure and the rectangles of Bare Metal foil I applied to the mirrors as a solder repellant turned out to be much more plastic than metal and just melted away. Anyway, not a major set back, I sorted out the other mounting bracket and then completed the joining operation with some 145C melting solder to avoid disturbing the first joint: This was my set up for getting the PE mirror attached to the mounting bracket, I had tried to thin the rod part to accommodate the thickness of the PE first: I have to admit I didn't have a clear plan at the start how I was going to get these things made, I was basically just making it up as I went along. This was how that first one looked temporarily placed in position: Fundamentally looks OK I think. For the next soldering operation I changed the bit on my iron to this pointy one as some dexterous application would be required: The final part to add was this diagonal brace. Using 70C melting solder it is quite possible to make joints in situ on the model without troubling the plastic at all: So here we have the first completed rear view mirror assembly: I then completed the soldering for the mirror on the other side: That looks like a nice strong joint, the one on the other side I am not so sure about. I will be happy enough if it hangs together for painting, after that there is always superglue. I then chucked both mirrors in some cellulose thinners to degrease them of the lanolin flux residues: The final job for tonight on the mirrors was to fill the redundant mounting holes with a mix of PPP: I will make all the paint retouches just before the final varnish application. Next I think I will start on the undercarriage assembly. Bye for now, Nigel -
1/72 Hobby Boss CH-46E/F SeaKnight in a Japanese Scheme
Nigel Heath replied to Nigel Heath's topic in CH-46 / KV-107 STGB
I don't think its bubbles, more likely a knit line where two material flow came together but didn't fuse properly, maybe. Last night I unmasked the inside of the lower side door and applied a coat of matt black to the treads: I had thought of using black decal strip for that but I think paint was the best option. I also started work on the wipers. There is still a ghost of the moulded wipers on the front glazing and I wanted to have a look at it so I partially unmasked the main front windows, first carefully running a curved scalpel blade around the edge of the masking to try to get the cleanest possible demarcation line: For the wipers themselves I cut some strips from some think (0.4mm) brass sheet: This was my set up for soldering the wipers, the thick sheet for the blade and a small rectangular mounting pad crossed by 0.3mm rod and a thin strip of a scrap PR part for the actuator mechanism: I looked at various reference photos for this, this one was probably the most useful: Some time later I had the two wipers ready for some paint save for a degrease with cellulose thinners: Next I sealed in all the decals with a protective coat of Aqua Gloss: The showery weather today prevented my from airbrushing outside so did this kneeling on the lounge carpet. Next I made up the front aerial rods, this time using some 1.15mm plastic rod for the "finials" so I knew it was from a different batch than the 1.1mm stuff: Minor thing this but I curved and mounted up some 0.2mm nickel silver rod for the whip aerial on the rear end ready for painting black: By now the Aqua Gloss was dry so I made a start on the panel line wash using my usual go to of diluted Payne's Grey oil paint: I thought I would give this interim update while the solvent flashed off (about 20 minutes). Once that is done I think the next jobs and the rear view mirrors and final assembly. Bye for now, Nigel -
1/72 Hobby Boss CH-46E/F SeaKnight in a Japanese Scheme
Nigel Heath replied to Nigel Heath's topic in CH-46 / KV-107 STGB
Before I paint the central rotor drive shafts it is a sensible point in the build to complete all the other things which need fabrication and then paint, the list I have in mind is as follows: Pitot tubes Wipers Front T aerials Rear view mirrors I picked up where I had left off on the pitot tubes, here's how the first one looked after soldering and cutting off the tubes: When fully trimmed up here's how it compares to the kit parts: This was the main reference picture used: I did put some thought into just keeping with the kit parts but I think the above result justifies the effort. A little while later I had the second one finished, after a degrease to remove any lanolin flux residues I mounted them on the tips of cocktail sticks and used liquid masking to mask off the aluminium portion of the main tube, all now ready for some paint: Next I made a start on the T aerials. I had already drilled the mountings with a 0.4mm hole but using 0.5mm and then 0.6mm drills opened this up further as I think 0.6mm brass rod looks about right for the job: The reference picture on the Print Scale decal instructions is quite difficult to make out so I made a little sketch of what I thought the end arrangement should look like: I then shaped the end of some 1.1mm plastic rod and drilled through with a 0.4mm drill for the aerial rods: I was parting that off with a sharp scalpel blade when the plastic split in a weird and most unexpected way: I have never seen anything like that before. Anyway I glued it back together and with it cut off started on the second one and I was just centre punching with a pin tip ready for drilling and the plastic split again: I'm now thinking this length of rod has a flaw running through it and should cut my losses and start over using fresh material. I will have a ponder. Bye for now, Nigel


