
Leaderboard


Popular Content
Showing content with the highest reputation on 30/05/23 in all areas
-
CAUTION: PICTURE HEAVY Hello rotor fans, here are 2 little Kiowas that I built to fit my theme for 2023, "Pairs." Both were built (mostly) OOB with some minor additions used to repair some broken or missing parts. Speaking of missing and/or broken parts, I didn't add the curved antennas attached to the fuselage sides behind the crew doors. Those were broken beyond repair. And even if I could get them repaired, their assembly would've been dicey, at best. Also, I didn't notice the stinger's tip on the OD airframe was broken until I was taking the photos. AK Real Color, MM and Testors "little square bottles" were used to paint. Decals were from Print Scale's "OH-58 Kiowa" sheet, and they behaved beautifully. Weathering was Flory washes and oils. Despite their size and simplicity, these were not easy builds. Still, I think they're solid 3-footers and will look OK...from a distance...on the top shelf...behind other builds... Comments, questions and criticisms are welcome. Thanks for looking! Cheers, -O22 points
-
Typical Special Hobby fare with this one. A fair bit of care, attention, dry fitting and sanding and it goes together well. WIP Here. Primed with. Tamiya Neutral Grey. Painted with. Colourcoats Interior Grey Green, Extra Dark Sea Grey, Sky S Type, FAA/RAF Red andFAA/RAF Yellow. Tamiya Flat Aluminium, Rubber Black, Nato Black, Khaki, Italian Red, Clear Red, Clear Green and Clear Yellow. Washed with Flory Dark Dirt, Citadel Nuln Oil, Seraphim Sepia and a mix of Windsor and Newton Burnt Umber and Burnt Sienna thinned with Lighter fluid. Finished with Windsor & Newton Galeria Satin and Gloss Varnishes. Thanks for looking, Cheers, Alistair20 points
-
Howdy all, Thought you wouldn`t mind me bothering you with some photo`s of my latest creation My attempt at AMP`s 1/48 Huskie kit Finished to represent an early S.A.R. chopper operating from NKP over Laos and North Vietnam in the first year of the official war Mostly from the box but with a few tweaks, including...... .....deletion of the rear clam shell doors and replaced with webbing made from strips of manila envelope,..... and deleted the megaphone/speakers from the nose Patches of grey primer over the yellow and dayglow rescue markings and elsewhere, Had to replace some of the thin and tiny etched etched bits that my sausage fingers destroyed ( and also some I didn`t even attempt ) Decals were some from the kit and a few from the stash. Hope you enjoy, thanks for looking Cheers Russ14 points
-
Hello gents, I'm pleased to share these images, of a project which I started as personal challenge, as I tried it once before - with, well, what you'd expect from a guy with 10 years less experience! 😄 Here is the build link to the current build: This time tho, we have some good results - please have a look: On the left, first attempt - while ambitious, not that great. The project involves a few kit parts, and lots of scratch work. The new version, on the right is a much better representation of the truck, and turned out to be an interesting and complex build. A small victory is getting the front fender right this time - in real life, they are indeed majestic and big! as you can see on the right. While if you look at the truck on the left, well, a guy tried.... If you look at the WIP thread, you can see how it came together. With it painted up, I decided to take her out for a test drive: She's a beauty and a beast - I'm really glad I decided to try this again - fun project. There is a lot of scratch work here, some of which will make me rethink what I do in the future, as much of the body, and various smaller parts, like the CROWS is scratch and while a bit of a headache, there's no reason I can't do the same on future builds. Thanks for having a look 😀 Cheers, Nick13 points
-
13 points
-
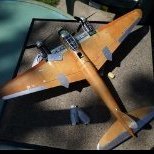
This was built from Revell`s "Technik" boxing of its huge 1/32 Ju88A-4. I converted it into a reconnaissance version using Profimodeller decals and scratchbuilt camera windows. I chose the subject because of its interesting camo scheme. Paints are mainly Gunze (RLM 78 and 79) and some Tamiya, camo was sprayed freehand. It was made for the "Reconnaissance and Scouting" GB. The installation of the lights and motors takes some time and effort and some of it looks good in the end. Unfortunately the cockpit lighting is very dim and I misplaced the right position light. So it is hardly visible. Well, better next time... Unfortunately the kit comes without a sound kit, so the engines run silently. The model has wing and rear position lights, landing lights, cockpit lights and two electric motors. A programmed circuit board starts the lights and motors and shuts them off in sequence. Landing light on: Thanks for looking Volker13 points
-
Hi all, about time I put something up on here so here's a build I did for Airfix Model World in August of last year. Now, while I'm not really a huge chopper fan, I do like oddities (you may have noticed) and this contraption certainly falls into that category. It's the Italeri 1/72nd Piasecki H-21 Workhorse/Shawnee, also known as the 'Flying Banana' for obvious reasons, a fairly successful design used by several armed forces around the world. Back in the sixties US Forces agreed to provide CH-21Bs to support military operations of the Forces Aérienne Congolaises (FAC) during the ongoing Congo crisis between 1960 and 1965. All six aircraft were flown by Belgian crews, based at Kamina airbase in the south of the province. Interestingly a CIA front company, Ansalt WIGMO provided maintenance support to large parts of the FAC between 1964 and 1968. Sadly the CH-21Bs were found to be unreliable and underpowered in the harsh conditions and all six were lost to flying accidents during the first six months of 1965. Overall, I found Italeri's H-21 a decent little kit that provided a solid foundation for a CH-21B conversion. This was furthered by the Whirlybird resin set, which included all the components required for the conversion including an excellent decal sheet for each of the six aircraft operated by the FAC. While Eduard provided some excellent PE goodness, I found the kit parts detail to be a little too basic so quite a few of the details were scratchbuilt. Along with my own 3D printed barrels, ladders, and "cargo," which these machines may well have carried during the more covert CIA-backed missions. I also made a scenic base that represented the typical concrete platforms used by the aircraft when operating from the African tundra. At some point I may well add a few suitable figures, if I comes across them.... I'm quite tempted with its 1/48th big brother, maybe as an abandoned/crashed airframe, in a jungle setting. . Hope you like and thanks for looking. Cheers Melchie A few detail images. Basically I scratchbuilt the interior including missing fuselage ribbing, new doors and floor, roof centre conduit with lights, engine bay and missing upper prop-shaft structure which can be easily seen through the grill meshes. Also worked on the cockpit, adding scratch seats, seatbelts, anti torque pedals and various pieces of ancillary equipment including a fire extinguisher.12 points
-
Hi As I posted here we selected 12 models to do. Marauder (RAF - SAAF) next project - Hrubisko Series - Aircraft WWII - Britmodeller.com 1) Martin B26 Marauder Mk I FK115 Heelzapoppin 45 Group Communications Flight (later 231 Squadron) Dorval, Canada 2) Martin B26 Marauder Mk I FK130 F 14 Fayid Egyptlate 1942 3) Martin B26 Marauder Mk I FK138 Cap Don McVicar Uk September 1942 4) Martin B26 Marauder Mk I FK158 Miami Florida July 1942 5) Martin B26 Marauder Mk IA B-26 FK375 D 14 Fayid Egypt late 1942 (desert scheme) 6) Martin B26 Marauder Mk IA B-26 FK375 D 14 Fayid Egypt 1943 (TSS scheme) 7) Martin B26 Marauder Mk II B-26C-30-Mos FB482 Uk March 1944 8 Martin B26 Marauder Mk II FB485 10 OTU Shandur RAF Egypt 1944 9) Martin B26 Marauder Mk III HD402 Uk June 1944 10) Martin B26 Marauder Mk III HD500 Z 30 SAAF Sqdn Italy April 1945 11) Martin B26 Marauder Mk III HD511 H 30 SAAF Sqdn Pescara, Italy September 1944 12) Martin B26 Marauder Mk III YY 3 Wing SAAF Lt Col A.C. Jandrell DSO DFC SAAF 1945 My father took two B/C version of this aircraft in order to get these to Mk I (RAF). 1) Martin B26 Marauder Mk I FK138 Cap Don McVicar Uk September 1942 2) Martin B26 Marauder Mk I FK158 Miami Florida July 1942 Cheers Santiago12 points
-
Here is my recently completed build of the Bisnovat SK-1 High Speed Research Aircraft using the Jet & Prop 1/72 resin kit. Built OOB and it built beautifully all the way through. The resin was nice and crisp with very little clean up required. The canopy is of clear resin, lovely. The kit masks were applied to the canopy before being painted overall with Tamiya AS-12. More masks applied before the red was applied. No decals. mounted on a simple base with a figure. Build log here: Alongside its contemparies, Heston Napier V on the left and the Me 209V1 on the right. Hope you like Stuart11 points
-
This is the venerable and old Panzer 38(t) from Italeri, code 212, released in 1980, with 1/35 Commander Series Panzerkampfwagen 38(t) A/B Tank resin Conversion (code 2-008). I added Dragon links, some photoetched parts, metal machine gun barrel, and many other improvements. I also changed it to a command version.10 points
-
This was my first 3d printed project, I download the files for this and made the model smaller then the original printed version this is about 6" long.10 points
-
Nice little build in 1/72 vacform. Lots of injection molded parts too, particularly cockpit and main cabin details. I built it as a New Zealand example (rego ZK-NSN) operated by Air Nelson in the late 1990s and early 2000s Not too difficult to build for a vacform and comes up quite well. 1I7A8726 by Harry Follas, on Flickr 1I7A8743 by Harry Follas, on Flickr 1I7A8727 by Harry Follas, on Flickr 1I7A8735 by Harry Follas, on Flickr10 points
-
Evening all, After a glorious weekend away walking in The Lakes... ...I thought I'd have a proper test-fit of the gear as well as take some piccies using the decent camera set up. The undercarriage isn't attached yet as there's lots of detail still to be made and added to the bays - not to mention the painting of both the bays and legs - but a set of metal pins inserted into the spars as mounting points and holes of the correct size drilled into the upper-most past of the gear legs means they are a snug push-fit and support the model without glue. I've also made the basic twin-rear wheel set up by utilising Beaufighter tail wheels and legs, which with some mods have done the job. Not perfect replicas, but once the bays and doors are finished off not much will be seen anyway. It all looks very gangly at the moment, but when the undercarriage doors are added as well as the bomb bay doors, it should look the part. What to tackle next? The bomb bays or engines? Decisions, decisions. Onwards and upwards, as the old saying goes... Until next time, Tom10 points
-
Built as a Battle of Britain 1940 example. OOB with after market decals.9 points
-
Little madam not acting like a young lady just about a few seconds before ending up on the floor thinking what happened9 points
-
Airfix new tool Heinkel 111-P 1/72 converted to Battle of Britain movie Merlin engine CASA `Einkels`. Replaced the Jumo's with Airfix old tool Lancaster engines. Scratch built target winch, cable gear, engine surrounds, smoke generators and aerials. Added dome aerials from spares box. Crew modified Revel hard plastic Luftwaffe crew and green stuff. Rear canopy modified chopped kit parts. Painted with Humbrol enamels and pro modeller washes. Decals aftermarket. Yes, I got the stripes the wrong way (doh!) up but I like the finish so will live with it for now. "No, they're Einkels"8 points
-
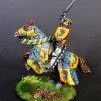
Hi all This is a 54mm metal kit of a French Guard Foot Artillery officer from Pegaso that I finished last month. Sculpt detail is crisp and clear and the few parts fitted perfectly. Figure was primed black and airbrushed white in a 'top down' position to create lights and shadows prior to actual painting. All in Vallejo acrylics except for the gold braid and brass items which are in AK true metals. Hope you like this one. All comments and visits appreciated Mike8 points
-
I see what you mean. Actually, I think it's mostly the visual effect of the photograph highlighting the contrasting textures/colours. I've given it a squirt of Tamiya white to even out the visuals: Where the nose joins the fuselage the panel line underneath is definitely a bit on the Airfix trench side and a bit wobbly - and that'll need a bit of filling; but there's no major contour mismatch/deficit. The rest is as Airfix intended - which I hope is vaguely Defiant like8 points
-
I should like, if I may, to depart ,however briefly, from the learned debate that has been occupying these august pages. and, shock, horror, report on Zeppelin worrying activities that have been occurring here at Martian Towers. I have made a start on sorting out the gondolas for the L.70 build. Nothing too exciting yet. However, there has been some considerable progress on the 1/48 Torpedo Glider. The first thing the more attentive of you will have noticed, is that the nose of the glider has got shorter. We have had quite a few visitors to our pad over the last week or so and it appears that a certain Mr Cock up sneaked in uninvited, resulting in my getting the dimensions of the nose wrong, Having firmly evicted the said miscreant, it was "Muster razor saw party" and the appropriate proboscis surgery was performed. I was wondering what I was going to do about the wings, or more precisely, the under-camber that was a feature of the wings of this particular machine. I thought about bending some plastic card round a bottle and pouting hot water over it but a quick scout round the house revealed that the only suitable bottles we had were expensive wines in the Martian wine cellar. Fortunately, I remembered that someone had given me the remains of an old Contrail Fairey iiif which had a spare set of wings. These were duly unearthed and cut down to size and shape and we now have a set of wing blanks. I have just divested the Martian person of a mountain of plastic shavings that only @Navy Bird would find attractive, word is that he actually takes baths in the stuff, 🛀 and will decide overnight as to whether I want to add the ribs individually or skin the blanks with scored plastic card. I am a bit white styrened out at the moment. Next up will be to cut out the tail surfaces and solder up the wing spars and supports. Thanks for looking Overworked of Mars 👽8 points
-
Thanks Keith. It was sort of flying together but only because I'm avoiding the hard bits. Thanks Simon. The next awful bit is below! Thanks Jont. She is quite pretty but also annoying! Thanks CC. Paint soon if I manage to maintain my sanity. Thanks Giorgio. I left the nose to look at the next tricky bit. Once the holes had been drilled out a bit to fit the pegs I pondered how I could assemble this without going insane: Tube glue. obviously, for the wiggle. But then I realised I'd have a problem if the nacelles didn't fit over the frames. Let's check that they fit without it: Ha! The rear bulkhead is stopping the close up. Sand it. Better. Best have a dry fit. Try to balance the frame sides. Drill out the holes a bit. Try to balance the frame sides and fit the main leg. Ha ha huh. Of course everything falls apart but persevere. Wait! I'm assembling the parts on the left: D11 and D12 are slightly different - don't get them mixed up! D15 finally balanced between the frames. D10 inserted - the slots in the wing are on the wrong side! I have the model upside down. I'm using the instructions on the left to assemble the parts on the left. Wrong side? A ha ha ha ha… blubber… Move to this side: Repeat. Huh ha huh huh… nurse! Better take a break and re-visit when I've calmed down.8 points
-
No need to be sorry Jeff, I have been following this particular thread drift with great interest and couldn't agree more with the assorted comments. When looking at the modern world, I sometimes think I must have come from another planet. Hang on a minute! Martian 👽8 points
-
Well here we go again, at last I have had a chance to do some fiddling (dont titter), I have decided that I need to fix the flightdeck on permanently, the hull sides are pretty much there, but I cant progress upwards and start detailing the sponsons and boat decks without joining it all together. But herein lies the problem, I really did a chapuza (wonderful Spanish word for a botch) on the aft lift, I had the bright idea of squeezing the radii in with car body filler, as I should have anticipated, it all fell off, plus the flightdeck was 3mm styrene which was too thick, so I had been carefully avoiding the issue and building cranes and stuff, what a wimp I hear you say, well I have bitten the bullet and chewed it to death, and I think I have it sorted now. This was my shame, but of course it had to be even more complicated by the "C" section around the lip on the real thing ! As can be just made out here, which also shows an “oil drum” storage rack tucked into the corner of the lift well. Sadly I believe that the crunchy Naval aviator in the picture was one of the many that lost their lives flying Seavixens, an accident rate worse than the Starfighter I believe, but I may be wrong. After a couple of false starts involving bending sections to shape I reluctantly decided that the only way forward was going to involve a lot of filing, so I laminated a couple of 0.75 sheet together and cut out the shape of the lift opening about half a mm too big all round, then sandwiched it with two roughly cut bits of 0.15 sheet which I then (carefully) filed back to give the correct section round the lip. Finally I had to cut out the old disaster and replace the new bit and make a slightly oversize little box to form the basis for the inside faces of the lift well, I’m going to model the lift slightly down with something on it, either a Gannet or a Whirlwind I think, but that is a decision for years hence !! At least now I can get on and make up some detailed "billboards" that can go around the inside of the lift well box, and then finally I hope to stick the flight deck down permanently !!! Thanks for looking, its great to be back ! Cheers David8 points
-
Finaly all the detail painting is done. I applied a coat of semi gloss varnish so it can dry overnight. Then it's time for oils and enamels. All the grenades are painted but i still have to put the markings on before i can place them in the ammo racks. It's nice to spend some decent time at the workbench, slowly getting back in the flow.8 points
-
Thanks Bill. Treat the iron? Can I just prime it? Thanks John. Spent rounds as fishing weights? What are you fishing with, you naughty man… While I wait for the weights, wings on: The main wing locating tabs needed a bit of fettling on the edges but the wings were still out of line. Bit of filler sorted that. The tailplane tabs were tight too but needed no support to get this angle: Hope that's right. Looks OK from reference shots. Bit of filler on those too: I thought I'd check the nose ready for the weights: Hmmm. With the tip on? Ah. Is the main bit a good fit? Tape it here: Then: Oh dear. I'll probably need to shim that then. For the nose tip I glued it to some 0.5mm card: Then chopped it out: Better. It'll need some work but getting there.8 points
-
This one has been looked at quite a few times and then put down as I've heard it has it's challenges but it's time. I feel the need for another survivor from East Fortune airfield and so this will be done as Katrina Jane XZ119. Plastic should be cut soon. Cheers, Alistair7 points
-
This is the Polar Lights re-release of the Adams Thor IRBM with launch pad. From what I was able to find, there was another, much simpler, launch pad where the missiles were deployed, but I went with what was in the box with the exception of substituting a British roundel. Now, If I could get a 1/87 Thunderbird or Bloodhound rocket as they were used to defend the Thor sites. I did modify the nose cone by blunting it as the one in the kit is from the experimental ones. Adams also did a Vanguard rocket on the same launch pad, modified to accept the much thinner body, but there's no sign of that from Polar Lights.7 points
-
I saw that label on a hairdryer when I last visited @general melchett at Melchett Towers. I assumed that it was just for Baldrick's benefit rather than for the general populace. Most species around the universe tend to evolve and progress. It would appear however that, along with the Plonkerites of the planet Dipstick 13, yours has peaked and has now begun to regress. Concerned of Mars 👽7 points
-
I know you are experimenting with the windows -- you might try this to get smooth on both sides. Cut a piece of tape slightly larger than the hole of the window and place it sticky-to-sticky on another larger piece of tape. Then when you stick the larger tape inside the fuselage it will be the non-adhesive side that meets the resin. If there is a tiny amount of seepage it won't matter as much as it will be inside the fuselage. But it should allow for a smooth surface on both sides of the window.7 points
-
I like to confirm the print integrity when I scan from a drawing, see whether scale creep has crept in if I am about to rely on sizes from it. This seems spot on, huh? Knowing that Colin is dismayed by the size of the Italeri kit fuselage I did a 'look down' through the cargo bay door to make a comparison. Allowing for the vagaries of drawing down in a hole with a reasonably sharp HB you can see the difference just behind the door here That thin grey line is the evidence against the Italeri moulding. Mr Landi's project returns a profile that aligns exactly with the drawing. As the Matchbox one has the ability to model with the tail folded in modeller's choices I measured from the rear of the tail cone to the cabin rear wall, which left me an easy comparison job. I make it just over 2.5, maybe 2.75mm too short. Hence I will be following the dimensions to make my Wessexes but at just under 3mm some might choose not to be as picky as me. The Italeri does have other drawbacks, including the underfloor previously mentioned and the apparently random placing of the fuselage side steps for crew access, they're bizarrely off set. I do not like the nose air trunking for either kit but for that portion of the nose I have doubts about the 4+ drawing. It shows the intake mesh as 1.35cm wide which would equal 97.2 cm wide Observing only, sadly by eye on photographs but over a massive range of examples I calculate a wider opening is needed so I am using 1.6 cm (for now) Sadly my old buddy XR525 at Cosford which used to be my go-to fact checkable Wessex now lives high up in the dust above her home hangar in the Museum so I cannot go and cajole the guides into letting me run the rule across the hole I used to spend many happy hours running a lens across her nether regions, e.g. It was all so much easier then... Still, investigation proceeds.7 points
-
Seem to getting more idiotic ??? Come on spend some hours with me in my service van 40 years ago, the owner manual of a car taught you how to adjust the valves clearance... Today, one can read that ... "Do not drink the liquid in the battery" No wonder then.... Sincerely. CC7 points
-
Hi all I haven't forgotten this one, I was trying to decide whether to do one of the overall yellow FB31s and added the squared wingtip but then I thought what attracted me to the aircraft is 876 the one at the museum and although it is pieced together from different parts of various airframes, I love the look of itcwith thexstance of the shorter undercarriage and the rounded wingtip and the Aluminium painted tail booms, so cut off the squared off tips for the rounded ones. Windscreen also added . Just some tidying and the Nav lights and may be ready for some yellow. Thanks for looking in Chris7 points
-
I visited the charming World War One aerodrome at Stow Maries this afternoon for their "Wings and Wheels" event. A lovely display of American and European cars and some wonderful flying on a gorgeous afternoon!6 points
-
I've been working on a diorama for a few of my trucks. I decided I wanted an old truck yard(obviously, its me), where old or almost run down trucks and trailers can be parked. I wanted the old concrete look and miscellaneous objects lying here and there to give more visual interest. So here is the start of this theme I have in my head. I intend on spreading the wall further down the diorama with more concrete and brick work for more added details and visual interest. But this is just to show you all the results of how I made the concrete road. Note: I did not see an option to add this in the tips forum, so I added it here. My methods were: 1. I mixed the tile grout very heavily with moderate water to allow for quick drying. 2. I Spread it on the area of the diorama. I used grout (thick consistency). I did this outside, when the sun was out and let the heat dry the surface of the grout. As this dried quickly, it slowly produced the minuscule cracks you see. 3. Even it out with spreader. I used a metal spreader which gives better control and smoothness to the grout. 4. Took a sponge and dabbed certain areas with it. I continued to sponge certain areas to give the grainy patches you see in a few of the photos 5. I used a small spreader to draw over the grout to produce some of the half broken concrete patches; sub-levels, and other small u level, rocky crevices you see.. 6. Then I used a black wash and let that dried for a day. Then went over it again with the same black wash. Then let it dried for an hour, then went over it with a brown wash. I will go over it again, to knock back the brown again. Will post the complete diorama when done. Hope this helps those who are probably wondering how I achieved this results. -----------------------------6 points
-
When I started building this model, I wanted it to tell a story. About a machine piloted by allied pilots bravely fought on the front of WWII. About a plane that, despite having more than fulfilled its task in the skies of Great Britain defending it in the Battle of Britain, when it came time to give way to others, was not put back in the hangar. Instead of a well-deserved retirement, this machine returned to the aircraft factory where it got a new life. Like a phoenix from the ashes, Hurricane was reborn as Sea Hurricane. The carrier-based fighter was born. A difficult task was set before the rebuilt aircraft - to face the Regia Aeronautica and Luftwaffe aviation over, among others, the waters of the North Sea and the Mediterranean. The conditions in which these machines operated left their mark. Airplanes, like people, bore the scars and traces of quick repairs made on aircraft carriers by their crew. This is the Sea Hurricane I wanted to show. An aircraft with a rich history, on which a long service has left visible traces, nevertheless being a deadly weapon in the hands of an experienced pilot. The machine I chose was, in my opinion, uniquely suited to this story. This aircraft served, among others, in the Polish 317th squadron where it was damaged. After repairs, it was converted to a Sea Hurricane and assigned to the aircraft carrier HMS Eagle. Unfortunately, it sank with the torpedoed ship during Operation Pedestal on August 11, 1942. You can watch whole build process on Youtube:6 points
-
Haven't made a model in about ten years so thought I'd get back on the horse with a 1/48 Airfix Hurricane Mk.1... Just been informed it's in the shop ready to collect6 points
-
Brewster Buffalo (A02050v) 1:72 Airfix Vintage Classics The Buffalo was designed by the Brewster Aeronautical Corporation in 1935 to a US Navy requirement for a carrier-based fighter to replace the Grumman F3F biplane. The prototype first flew in 1937, and the initial customer, the US Navy didn’t like what it saw, so curtailed their orders, and further deliveries were diverted to secondary operators. The type received orders from several overseas customers such as Belgium, who had ordered the aircraft but received only one before the country fell to the advancing Nazis. That order was subsequently transferred to the British, who sent them to Australia and New Zealand, as well as using them for the RAF in the Far East, where it was plagued with reliability problems in the hot, humid climate. Performance was poor and the pilots did not have adequate training on the aircraft, which sent its already awful reputation into a further nose-dive. The Finns however made great use of theirs, casting doubt on the epithet “worst fighter of WWII” that has proliferated over the years, but then the Finns also thrashed the Soviets in the Winter War using similarly second line, borrowed and captured equipment. The Kit This is a reboxing of the old tooling under the Vintage Classics branding, having started its life in 1972, suffocating in a bag under a header card, most likely on a rotating rack in Woolworths or your local newsagent. It arrives in a small top-opening box, and inside are two sprues plus four individual parts on their own runners in grey styrene, a separately bagged clear sprue, the decal sheet and instruction booklet in A4 fold-out style with spot colour throughout. The sprues are small and without a protective runner around some of the edges, so take care when pulling it from the bag to prevent damage or loss of parts. The kit is surprisingly well-preserved considering it’s almost as old as I am, with a few raised panel lines, and the majority of the exterior surface covered in neat runs of raised rivets, while the flying surfaces have a subdued material texture where appropriate, all of which is worth saving if you can, so get the alignment right when putting the major assemblies together. It must have been quite an impressive sight in 1972. Construction consists of just five steps, as there are only 42 parts on the sprues, but then it’s a small aircraft in a relatively small scale, so that’s unsurprising. Construction begins with the U-shaped cockpit floor, which has the pilot’s seat plugged into a turret near the rear, seating the pilot that’s twiddling his thumbs in his lap, as usual. Before installing the cockpit in the lower wing part, a greenhouse window is inserted into a large gap in the floor that assisted the pilot when bombing and strafing, allowing him to see through the floor below him. The two upper wings are glued over the lower, and have the tips, part of the leading edge and the trailing edges moulded into the uppers to achieve a sharper edge. The fuselage is made up from two halves after painting the cockpit sides interior green. A tubular tank is glued to the shelf behind the pilot, and a simple tubular sight is fixed to the cowling in front of the cockpit, adding the elevators and arrestor hook at the rear. The gunsight is optional, and informs your decision on which of the windscreen parts to use, the slotted part accommodating the sight. The canopy opener and rear are both separate and all have good clarity. I’m not going to say “for their age”, as the clarity is good. Simply good. The fuselage is dropped onto the lower wing, which also has a short section of the underside and the main gear bay recesses moulded into it, and taking care to align these parts carefully should reduce clean-up later. The engine is a single part, with just a few slips of flash to give away its age, and the two-part cowling is closed around it, adding a lip to the front that attaches on a substantial flange. The prop and its moulded-in shaft are slipped through the centre of the engine and secured at the rear by gluing a washer the back, then topping it off with a spinner before mounting the cowled engine to the fuselage, adding the radio mast to the starboard side in front of the cockpit for maximum lack of visibility. Inverting the model and avoiding breaking off the mast, the landing gear is made next, starting with a choice of a faired or bare strut moulded into the tail-wheel at the rear. The main struts retract into the wing, stowing the wheels in the depressions moulded into the fuselage, adding a captive bay door to the struts along with a retraction jack. The wheels are held on the axles by their hubs, which are separate and insert into the hollow centre of the wheel. Markings There are two options on the decal sheet, in markedly different schemes that show the Buffalo at war, and in the innocence before it, unbeknownst to them. From the box you can build one of the following: No.67 Sqn., RAF, Mingaladon, Rangun, Burma, early 1942 Third Section Leader, US Navy Fighter Sqn. VF-2, USS Lexington, 1941 Decals are by Cartograf, which is a guarantee of good registration, sharpness, and colour density, with a thin gloss carrier film cut close to the printed areas. Conclusion Given the vintage of the moulds, she’s looking good for her age, and the barrel-like stubbiness of the type is quite appealing. Highly recommended, bearing in mind it’s a 1970s kit. Review sample courtesy of6 points
-
Anyway, enough of postal woes. Here is the progress so far. I've added the fore and aft winches as well as the bollards. Also a couple of lengths of anchor chain and pick out the raised detail on the gunwales, there is a picture online with this so I thought it might look nice here. Next I'll be spraying the buff colour on the superstructure and deck fittings, prior to fitting them.6 points
-
The Alclad Duraluminum is now on the topsides: and looking very nice and shiny! I had wrapped the landing gear in plastic bags for protection while painting, but later discovered one of the bags had come loose. These rear tires now have a metallic sheen (perhaps appropriate on a SR-71, but not here!) I re-painted the tires (in situ, not the easiest thing to do), so all's well again I also had to repair this twin-blade antenna, which had lost the brass rod across the blades: Tail skid and a few antenna 'bumps' were then added. These will get paint when I do general touch-ups to the finish. There are a lot of little sticky-out things that go on the nose and forward fuselage. I'm not sure how many of these I'll add . . . the moldings from the kit are pretty crude, so I'd have to scratch anything I decide to install:6 points
-
A lady goes to the doctor and complains that her husband is losing interest in sex. The doctor gives her a pill, but warns her that it's still experimental. He tells her to slip it into his mashed potatoes at dinner, so that night, she does just that. About a week later, she’s back at the doctor, where she says, "Doc, the pill worked great! I put it in the potatoes like you said! It wasn't five minutes later that he jumped up, raked all the food and dishes onto the floor, grabbed me, ripped all my clothes off, and ravished me right there on the table!" The doctor says, "I’m sorry, we didn’t realize the pill was that strong! The foundation will be glad to pay for any damages." "Nah," she says, "that's okay. We're never going to go back to that restaurant again anyway."6 points
-
It's about time for an update, and it's going to be a bit of a ramble on a pretty dull and esoteric subject I'm afraid. So hold on to your hats, and prepare to enter the fascinating world of bonnet latches. Yes, really, bonnet latches - bet you can hardly contain your excitement! Looking at reference pictures it would appear that there were (at least?) two different styles of bonnet latches on the L4500. The first was this style that looked kinda like stubby pick axes sitting parallel to the removable central bonnet panel: The second style looked more like mini claw hammers, these sitting perpendicular to the removable panel: I can only hazard a guess as to why there were two styles, one no doubt being an incremental improvement on the other. The 'claw hammer' style could possibly have appeared later (but I have no real evidence to support this). Whatever, Zvezda seemed to have a stab at the 'pick axe' style, which is an OK effort, but rather chunky and out of scale: Never fear, Voyager provide replacements in their update set - great, we can use these. Erm, perhaps not, as I'm not really sure what Voyager are attempting to replicate. I think they're aiming for the 'claw hammer' style, but the latch looks flat and weedy, and the bracket looks odd and bulky: Hmmm, so what to do? Well, we'll run with the etch, but make some modifications to try to approximate to the 'claw hammer' style. Firstly, we'll bulk up the latches by adding a brass tube sleeves in an attempt to make them appear less 2D. Here we see a production line with (from left to right); latches as they appear on the fret, slimming of the shafts to accept the sleeves, with the sleeves in place, and a kit latch for comparison, Next we need to do something about the bulky brackets, these being flipped upside-down, and trimmed to get rid of surplus structure. We end up with a compromise, but close enough to give an impression of a latch on the real thing: Looking at reference pictures, however, we see that the latches don't simply hang down when the bonnet panel is removed, but protrude at weird and wonderful angles and orientations. This was worrying, as attaching the latches at such angles would leave them very vulnerable, giving a life span measured in nanoseconds: Fortunately I noticed these pictures which show the latches hooked over the top of the lower bonnet panel. This seemed like a much better option, giving the latches a better chance of survival: OK, so what do we end up with? Well firstly let me apologise for the quality of the pictures, but my ability to photograph shiny brass on shiny brass is sadly lacking. Here we have the latches on the passenger side: ...and here we have the driver side. I rang the changes slightly by having one latch dropped down rather than hooked over the top. I may live to regret this decision: Once the latches were in place I noticed that the inner face of the lower bonnet panels were a tad featureless. The ends of etch tool clamps where therefore used to replicate some kind of internal fastening for the latch brackets. There is no evidence for this, it being a total fabrication on my part. It does add a bit of interest though: And finally, a quick picture to show the latches in context when the cab and bonnet roof are in place: And that brings things up to date. Somehow I've managed to waffle my way though a long post that could simply have said 'I added six bonnet latches'. 🤪 Cheers, and thanks for looking, Paul.6 points
-
Another one for my collection of 1/72 scale versions of warbirds that I've had the opportunity to sit in, either static on the ground or in the air. Latest is the Airfix P-51D "Contrary Mary", representing the TF-51D from Ultimate Warbird Flights I flew in earlier this month. Not a bad little kit, for just under £9. Had to buy two tho, as I massively messed up my first attempt at the blend of natural metal finish fuselage and painted silver wings, so the first got sacrificed as a test mule. I used Humbrol metalcote polished aluminium for the fuselage and some panels on the lower wings, burnished with a gentle action on my multitool, and good old Humbrol no.11 silver on the wings and tailplanes. Gloss finish to the wings, satin on the fuselage as its not that shiny on the real aircraft. Decals are Lifelike, which went on fairly well, even on the compound curves. Just the vertical tail ones split a little and needed some touching in. Only major fault on the kit is a huge amount of flash on the aerial, so I had to cobble together one from scrap. All in, it served as a nice warm up and practice for the 1/32 scale version I will build later this year.6 points
-
Here we go again then. I did some work on the motor and then the replacement wooden parts arrived so I've made a start. This time I've made much more use of a mini set square and clamps, going one small piece at a time. The longerons were a pain to fit because they tend to twist the spars and move them out of alignment. It needs four hands and three sets of eyes. I think I have a good idea go where it went wrong before and the tailplane in particular was misaligned because I took my eye off the jig assembly and assumed it was all in the right place, which of course it wasn't. I managed to dismantle the previous version and rescue all the PE parts so they're good to go again. Let's see what happens. Thanks for stopping by. Nine cylinders attached I think the valves may need adjusting Oh dear me. Debris and wreckage6 points
-
Schemes. Source: https://www.facebook.com/permalink.php?story_fbid=pfbid0o8v7WZb6Wcbdg6rjkSEUtK337b9aemh4uctpYTveQPtieWkidjPtPPVWJ4sCuV1cl&id=100084846155184 V.P.6 points
-
#12/2023 After the F3F-1, here´s my dad´s next little chubby yellow winged fighter. Accurate Miniatures kit, decals from this kit, the F3F-1 kit and the sparesbox, fuselage painted with Mr Paint White Aluminium, wings with AK RC Yellow and Aluminium. True Blue and Insignia Red are selfmixed. EZ Line used for the antenna wires, kit PE parts for the rigging. Like with the F3F-1, my dad didn´t apply a panel oilwash. These planes were usually mostly pristine. Build thread here https://www.britmodeller.com/forums/index.php?/topic/235124494-yellow-wings148-grumman-f3f-2-vf-6-fighting-six-usn/ Model shows the Section 1, first wingman aircraft of VF-6 in 1937, flying from NAS Floyd Bennet Field NY, NAS Norfolk, NAS Pensacola and later stationed on the 1938 comissioned USS Enterprise. Later on this aircraft was assigned to the USMC, VMF-2, where it was destryoed in a ground collision near Mooring Mast Field, Eva, T.H. on April 11th 1941. Grumman F3F book by Richard S. Dann, David Ginter series, used as reference. DSC_0001 by grimreaper110, auf Flickr DSC_0002 by grimreaper110, auf Flickr DSC_0003 by grimreaper110, auf Flickr DSC_0004 by grimreaper110, auf Flickr DSC_0005 by grimreaper110, auf Flickr DSC_0006 by grimreaper110, auf Flickr DSC_0007 by grimreaper110, auf Flickr DSC_0008 by grimreaper110, auf Flickr DSC_0001 by grimreaper110, auf Flickr DSC_0010 by grimreaper110, auf Flickr DSC_0011 by grimreaper110, auf Flickr DSC_0012 by grimreaper110, auf Flickr DSC_0013 by grimreaper110, auf Flickr DSC_0014 by grimreaper110, auf Flickr DSC_0016 by grimreaper110, auf Flickr DSC_0018 by grimreaper110, auf Flickr DSC_0019 by grimreaper110, auf Flickr DSC_0004 by grimreaper110, auf Flickr DSC_0021 by grimreaper110, auf Flickr DSC_0022 by grimreaper110, auf Flickr DSC_0023 by grimreaper110, auf Flickr DSC_0025 by grimreaper110, auf Flickr DSC_0002 by grimreaper110, auf Flickr DSC_0003 by grimreaper110, auf Flickr DSC_0027 by grimreaper110, auf Flickr DSC_0028 by grimreaper110, auf Flickr DSC_0029 by grimreaper110, auf Flickr DSC_0030 by grimreaper110, auf Flickr DSC_0031 by grimreaper110, auf Flickr DSC_0001 by grimreaper110, auf Flickr DSC_0003 by grimreaper110, auf Flickr5 points
-
When I was about 8 years old, I first learned of the PZL P.11c either from a Warlord comic or perhaps one of the Battle Action comic booklets (probably the latter). Being a bright lad, I took the redundant wings from a wrecked Ju-87 kit and glued them upside down on the fuselage of a Gloster Gladiator. I added representative struttery and then applied the Polish national markings from the Airfix MiG-15, replete with a childish attempt to hand-paint the white portions of the markings. I suspect converting a Mossie to look like the Calquin may be a relatively more accurate representation...but not by much. It's alright....I'm already wearing my coat. I know when it's time to leave!!! 🤪5 points
-
Congrats Mr Dragon! Lovely details... With some bolts added, it's really convincing, isn't? Now, other details, as the windshield bracket... Or that, both sides of course: Wing blackout light, may contain Dragon's parts... More fun with this kind of part: Dan.5 points
-
An illustration of the difference between the two halves here This is the grey Italeri 'half' at the top with the green Matchbox. 'half' underneath. The size difference is quite obvious to me.5 points
-
'Scuse me, do you mind if we use your gym to practise socially-distanced boxing? Go ahead, mate, knock yourselves out.5 points


.thumb.jpg.d17ff607fc7e89ed057e63fcb6f2a888.jpg)


.thumb.jpg.1b7e0b29f0d6300d78c7f03e6d716b61.jpg)


This leaderboard is set to London/GMT+01:00