Leaderboard


Popular Content
Showing content with the highest reputation on 20/12/13 in all areas
-
Here is my F.M.Models H.P.Hampden 99% done , airbrushed freehand with gunze acrylics with Iwata HPC ,still a few paint touch ups and aeriels etc that need attending to and...... i do realise some things are out of alignment etc but have chosen at this stage to live with them and say to myself it looks good in the cabinet the way it is , My love of the Hampden can be traced to a traumatic episode in my childhood where i was given an Airfix kit of the same to build as therapy, it worked !!!!, i loved that kit and remember sitting in the passenger seat of my Uncles old Black Vanguard using the front qtr panel window to let in some ''wind'' to spin the props as i bombed the Huns and anyone else that got in the way, Fast Forward 50 years and i built the F.M. kit and wind up needing therapy !!!!........just joking, but it did take me almost 5 years of start stop etc, it is in my mind far far far.....from perfect , But its a 1/48 Hampden and its mine, What a journey, there were soooooo many muck ups both my doing and the kits , way too many to list, one of the last was when i was about to install tall tail fin flashes only to find a pic or series of pics in an old mag of the actual aircraft in its many guises i.e , with black demarcation line below and then above the wing ,then different roundels and different shorter fin flashes, it was around 1940 and there WAS a war on and local units did the painting amendments the ministry issued so i guess thats the reason for the variations, anyway this is MY interpretation and mine alone i do not profess to be an expert on the subject just a lover of it Comments welcome http:// http:// http:// http:// http://16 points
-
Hello Guys, Here is my second finished model for you, & a bit more of a British model! This is the Airfix 1/48 scale EE Lightning F.6, a really lovely model to put together, & a joy to paint. I'm really happy how this one come out. C&C welcome. Lightning 1 by tonyrichard24759, on Flickr Lightning 2 by tonyrichard24759, on Flickr Lightning 3 by tonyrichard24759, on Flickr Lightning 4 by tonyrichard24759, on Flickr Lightning 5 by tonyrichard24759, on Flickr Lightning 6 by tonyrichard24759, on Flickr10 points
-
Some of you will remember Ray Hanna, who at the time of his death in 2005 was the most experienced Spitfire pilot in the world and also at various times a Hunter and F-86 pilot, also having experience of many of the earlier jet fighter designs. Back in the 1980s I once made the mistake of being rude about the Swift in his presence. I was a completely wet behind the ears baby pilot and based my erudite opininon on little more than having read about the problems of the F.1 and F.2. There was a long silence and then a deep Kiwi sigh, following which he very quietly and graciously pointed out the largely forgotten success of the FR.5 as a low level recce machine, and how much he had enjoyed it in his time on 79 in Germany. (This was long before the Nigel Walpole book came out), For him it was the definitive low level jet, the aeroplane on which he really learned the skills which he later used through his long display career. In his eyes it was every bit as good an aeroplane (in FR.5 form) as anything else available at the time for low-level visual flying, and as much fun to fly as his Spitfire, MH434. The Swift was undoubtedly a failure at its originally intended design role, just as the Typhoon was - both intended as high level interceptors, neither satisfactory for that task. However in both cases they subsequently did sterling work in the low-level roles that they both happily turned out to excel at, and deserve their place in history. Aeroplanes can be judged successes or failures on many criteria. Some are pretty and some are ugly, and both those aesthetics can make compelling models. Some like the Battle and Defiant were very pleasant, viceless flying machines that were simply militarily ineffective because at the time they came to fight, their specifications no longer made sense. Some are mad, bad and dangerous to know, but were so interesting that they make up for it (Me163 perhaps). Some have really quite serious safety and/or handling problems judged purely as flying machines, but are so capable in other ways that people are happy to work round those problems because they can do a job militarily (late Beaufighter, early Halifax, late Mossie, almost all Meteors, F-104). Some are just unpleasant to fly but soldier on and eventually gain some affection (Javelin). Anyway, all this reminiscence has made me realise that I'm going to have to buy a Swift when the new kit comes out, something I didn't realise a couple of days ago.9 points
-
Hey folks, this is the Airfix kit built together with some Airfix re-supply set bombs for a feature article that should appear in a future edition of Model Airplane Int., together with technique description how to produce Lancaster's stressed skin. Cheers Libor8 points
-
Almost OOB model, I added only resin Quickboost exhausts. Painted with Gunze Paints, I love their olive drab tones...6 points
-
Hi folks, Greetings. Apologies to anyone expecting more Suez stripes, they are planned for early in the New Year. However, I needed a break from masking stripes and also the Swift had been languishing around since early in the year. Not my greatest, but pleased to get it completed, albeit on the day Airfix announce a Swift for 2014! Fit was, what one would expect for limited run, not the best, especially at the join between the lower wing and fuselage. But after much sanding and filling I got there in the end. Belly tank is from Freightdog, IIRC. I added seat straps from wine bottle foil and use Albion Alloys sleeved tube for the pitot, otherwise out of the box. Decals were exceedingly thin, but fragile and prone to breaking whilst being coaxed into position. Applying the lower wing serials that overlap the undercarriage doors was challenging to say the least, especially as the doors don't fit well. Paints, the usual Xtracrylix, the upper grey and green airbrushed freehand, hasn't turned out too bad, though most of the pre-shading has vanished. Weathering with Windsor and Newton mix of Paynes Grey and Burnt Umber. On with the photos. Best regards, Darren6 points
-
Hi everyone, This is my attempt at the new tool Airfix Hurricane, built on a tray on the couch and brush-painted, all very 'old skool' I was very impressed with this kit, some parts are incredibly well done (the undercarriage bay for example, which using about 7 parts produces a result not much less detailed than the one on the 1/24 Hurri) and some parts need the amount of care and attention required by any kit - I have to admit, I should have spent a bit more time on the trailing edge of the wings and the join to wing the fuselage underneath at the back, I should have Kleared the model before decalling and paid more attention in the application of the decals, particularly the underwing serials which looked fine individually but compared to each other after application suddenly became sort of wonky, and finally I think I went in too fast and too thick with the second coat of matt varnish, and as a result got some chalky bits here and there. None of these things detracted from a really enjoyable build, the only question remaining really is how many of these I will actually build Anyway, pics below, apologies for the (lack of) quality of these, thanks for looking: Cheers, Stew5 points
-
Banana Build - Day 24 With work on the engine bay at a halt, I reopened another front. The main undercarriage struts. The new rod I had was not 1.2mm but actually 1.25mm in diameter: But with a bit of sanding it could be made to mate with the wheels. Not sure how to proceed with the struts, I drew out a few ideas: I was probably over thinking it and came up with this simple arrangement for soldering: Here it is soldered: But that joint felt far too weak so I set up again and applied more metal: This now feels much better. Tomorrow I will use my Dremel with a cut off wheel to trim the stub axle to length. You may remember that at the start of the build I said I would not be using my soldering iron or Dremel, how wrong I was. Bye for now, Nigel5 points
-
4 points
-
It was a quick build but a slow post. I'm putting this one to bed now, it's hanging from my ceiling and that's where it will stay for the foreseeable future. A truncated WIP thread can be found at http://www.britmodeller.com/forums/index.php?/topic/234950909-revell-c17-1144-quick-build/. Note that it is hanging next to a 1/32 Sea Venom and is approximately the same size, which I feel gives an interesting sense of scale to the plane. I like the monstrous shadow that this one casts: Cheers Liam4 points
-
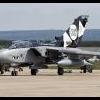
This is my current project. More shots of tornado as requested Hope you like4 points
-
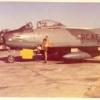
Hiya Folks, Although I don`t usually dabble with diddy models I had a go with this 1/100th scale Tamiya kit to use as a desk top model and although the cockpit doesn`t look too good, apart from that I was quite happy with it. While taking it into the back porch to be photographed I snapped the nose pitot and the carpet monster (well lino kitchen floor covering monster actually,....a very annoying and surprisingly active beast!) has not given it up yet!; I`ve always liked this scheme on the Lightning and will build the Airfix 48th scale kit as such when I get around to it, Cheers Tony4 points
-
I'm very happy with this one. It is an opportunity to build something different from the grey F-xx. To model ocmpanies: WE DO NOT NEED A NEW TOOL KIT OF THE F-16 EVERYTIME THERE A NEW SWITCH IN THE COCKPIT UNTIL WE HAVE A DECENT KIT OF EVERY IMPORTANT AIRCRAFT!!! I am not British I am not particularily fond of the Swift But I am a 1/72 builder I love the jet golden age of the 50s/60s I love nice little kits not too expensive that let you add the amount of detail you want but wich is still pretty nice oob such as the old F-100, F-5, Harriers or F-104 by Esci, back in the years. Therefore, my hat off to Airfix. I really like the way they do their business since a year or two. I have a dream that some days, Heller... (copyright: Martin Luther King...) ;-))4 points
-
And then I cancel the build,throw away all the pieces, pop down the model shop walk to the counter with an F111,before putting it back and buy a buccaneer instead!4 points
-
Hi mates, I've decided to take a bit of a breather from my PB4Y-1 project. I've been working on that for three months or so, and I need to refresh my modelling mojo with a smaller project. Something to clear my mind so to speak. So I figured I would take up this nice little 1:72 scale kit of the Blackburn Skua by Special Hobby. The rules say I need to have an obligatory shot of all the stuff: Not much to it, as you can see, so this shouldn't be a long project. The kit includes a small PE fret with goodies for the cockpit, engine, landing gear, machine gun, rudder pedals, and bomb (or is it torpedo?) rack. In addition, nicely moulded resin parts are provided for the engine, tyres, and exhaust collectors. Panel line detail is recessed, but maybe a bit on the light side. Hopefully it doesn't disappear. As you can see, the marking schemes are for silver birds from 1939, both 803 and 800 Squadron from the Ark Royal. I'll do the 803 Squadron leader's mount, L2887/A7F, as it's a bit more colourful than the others. Did this plane participate in the downing of the Do 18 flying boat in September 1939? First is the cockpit, and as is typical with these short run kits it wasn't immediately obvious from the instructions how everything fits together. There are very few pegs and holes in this kit, so butt joints are common, even with the cockpit floor panels. But do the bulkheads mount on top of the floor panel, or to the end? It's shown one way in one illustration, and the other way elsewhere. However it goes together, the bulkheads need to be positioned where the small cutouts in the horizontal ribbing are: What looks like a huge ejector pin (which it probably is) will help locate the cockpit floor, but will be hidden by the fuel tanks. I decided to start by gluing the forward bulkhead in place (there are raised bosses to align it against) and then work my way aft, gluing each piece to the sidewall, one at a time, rather than trying to assemble the entire cockpit at once and then attaching it. This method seemed to work, as the bulkheads lined up to the small cutouts and it became obvious how they attached to the floor. Next up is a nice coat of British cockpit grey-green, or whatever it's called. I grabbed my handy jar of Model Master RAF Interior Green and found it had turned into, well, rubber by the looks of it. And no amount of Testors thinner would reduce it back into a liquid. No problem, stop by the LHS on the way home from work and pick up another bottle. Nope, sorry, there's been a run on that colour as it seems like everyone is building a Skua this week (which is really quite odd over here in Rochester New York). I decided to mix my own home brew, matching the Model Master paint. I used Gunze paints and the final mix consisted of H41 Pale Green, H48 Field Grey 1, H312 Green FS34227, and H322 Phthalo Cyanine Blue. Testing this against an old Revell Hurricane cockpit that was painted with the Model Master colour showed a really good match. The cockpit was then sprayed: With the vagaries of PC monitors, digital cameras, and the lighting in my photo booth, the photos are not an accurate rendition of the colour, which has more grey to it in real life. But it's gloss (the Gunze paints used to create it are all gloss) so this will take a wash without having to apply a separate shiny coat on top. Being generally lazy, I like being able to delete a step! Well, that's the start. Dry fitting things together shows no really problems (unlike some short run kits) so I'm pleased so far. The canopy even sits down over the pilot's roll-over frame/headrest, and I've read on-line that some folks had trouble with that. I'll keep my fingers crossed for the rest of the build! A Skua! Woo hoo! Cheers, Bill PS. To deepen the insanity, there's a Roc and Defiant lurking near the top of the stash! Yikes!3 points
-
Hi All, This has been an on-off project for a couple of years since I busted up my knee in a football accident very early in 2012. Build thread is HERE. The sheer size and scale almost put me off it for months on end, and it seemed it would never get finished, but a late burst this autumn saw it finally completed. The kit is very impressive, if a little under-detailed for the scale. The Eduard Big Ed set saw to those deficiencies, along with some scratchbuilding of searchlight mounts, deckhouse details and hose reels. I also used BMK metal barrels for the 5in turrets. The ship is painted in WEM Colourcoats enamel for the camouflage (5-H Haze Gray, 5-O Ocean Gray and 5-N Navy Blue), the black is Lifecolour acrylic, the hull is Halfords red primer. The deck blue is Tamiya XF-17 Sea Blue. I used Gator masks for the hull pattern. Despite the longer drying time required for enamels, these Colourcoats are the best paints I have ever used, and I was so happy with them, I spazzed about £60 on the full range! The ship is portrayed as commissioned, and represents the look of the Fletcher when she went on shakedown trials in July 1942. This is definitely the best model I've ever made, and I hope you like it too! All pics courtesy of Farnborough IPMS website, taken by the polymath Dr Flangemeister!3 points
-
I started this about April this year and because of it stressing me out with fitting issues and other things, kept putting away in the naughty corner. But I kept at it, it was detailed up with the Flighpath brass upgrade and has engines installed from Engines'n'things added to make it look more realistic My first post so.................I hope its a good one lol All comments welcome3 points
-
Which one? Fleegle, Bingo, Drooper or Snorky?3 points
-
All this talk about the new Airfix kit prompted me to dig out one I made years ago.......... It is 'converted' from a Hasegawa Grumman F11F Tiger.......... honest! I turned the Tiger fuselage upside down to make the Swift fuselage - and bodged up the rest of the Tiger kit to make the wings, tail etc.. I wrote an article about it in the Scale Models (IIRC?) mag under the (editors) title 'The cat that got the bird'... or some such nonesense. I can't even remember when it was - so if anyone has a copy of the mag ??? Ken3 points
-
How on earth do you work that out - it's hardly your fault if suppliers let you down?! And the soldering of those undercarriage struts really doesn't look like the work of any amateur to me...!!3 points
-
As someone who loves modelling 1/72 Airfix, new or old, I'm delighted, long may it continue. As I didn't have to fly one or look after one, I don't care if it was fat, slow or ugly, it's a plane, that's all I need to build one. Well done Airfix, more please, Sean3 points
-
Been spending the last few years gradually replacing my old Bomber command builds with newer ones and today had the photo booth out so thought I'd get some up to date pics done. Also been dabbling on Photoshop and used the fancy gizmo buttons to reduce the intensity of the blue card colour to a somewhat more greyish blue! They've all been on here at some stage, but thought it be good to stick them all in one thread as to where I'm up to. A bit of a mix between old and new, hope you find the thread a bit of inspiration to dig into the stash and get more BC stuff up here at Britmodeller Starting with a couple of Matchbox kits... The ungainly Heyford made with some scratch building to the cockpit, but largely straight from the box The Wellesley using the Falcon canopy set, resin engine and scratch built cockpit and main gear interiors New Revell Halifax B.II using the Matchbox wings and Aeroclub props & radiators. Just noticed the inner props had dropped forwards...doh !! Airfix Halifax B.III with scratch built interior, bomb bay, WEM gear bays and Falcon canopy set robbed from it's older deceased sister! Hot off the Bench, the Airfix Blenheim Mk.IV with lots of work done to it Trumpeters Wellington Mk.Ic with a bit of internal scratch building and home made bomb bay doors. These are the original RFI pics CMR's resin Lancaster B.II conversion using the Revell kit as a donor Revell donor kit again using the HBM Manchester Mk.Ia conversion kit. Still need to change the wheels and somehow create an accurate Fn.4 turret Airfix Stirling Mk.III with Resin Art wheels, Falcon canopy and a ton of scratch building Revell Dambuster built for the Bomber Command SiG where we displayed all the aircraft that okk part in the raid Frog Whitley using HBM resin engines and Falcon canopy set mixed with blood and tears! Last but not least, Airfix (Bilek actually) Fairey Battle with Falcon canopy, scratch built cockpit and extended nose Next BC off the production line will be the Hasegawa Grandslam. Edit..... Here's the grandslam a few years later! And another Manchester - Revell / Planet lovechild... Update April 2016 - a couple of additions ... Italeri's Stirling - McRoberts Reply Blackbird's Manchester conversion... Thanks for looking2 points
-
Tamiya kit with CMK detail set.2 points
-
OK The Swift wasn't The Hunter BUT it has been the subject of a bit of criticism on here for some reason. There also seems to be a certain amount of dismay on here as to why its important enough to warrant a brand new tooling from Airfix..................... Well, first of all - Why not? It was a mainstay of FR operations in RAFG. It was also the FIRST RAF Swept Wing fighter and the FIRST to enter service with Reheat. Those facts alone are a cause for celebration, and therefore IMHO warrant this kit! Furthermore, it wasn't the dog that many believe it was. Certainly not In the FR role where it won many awards/competitions, particularly at low level, under radar , thanks to its robustness. The type also pioneered terrain following techniques. It had relatively high endurance. By all accounts the FR5 version was very popular and despite what some may say was a very effective aircraft. ... AND I have to ask..was the Hunter F1 any better as a fighter than the Swift F1? Was the FR5 any worse in the FR role than the Hunter FR10 (OK no real need to answer that one!!) So lay off!!!!2 points
-
2 points
-
Revell Germany 1/72 scale F-4F Phantom 50th Anniversary Manfred von Richthofen scheme2 points
-
Nicolson was 23 years old and a flight lieutenant in No. 249 Squadron, during the Second World War when he was awarded the Victoria Cross. On 16 August 1940 near Southampton, Nicolson's Hawker Hurricane was fired on by a Messerschmitt Bf 110, injuring the pilot in one eye and one foot. His engine was also damaged and the petrol tank set alight. As he struggled to leave the blazing machine he saw another Messerschmitt, and managing to get back into the seat, and continued firing until the enemy plane dived away to destruction. Not until then did he bail out, and he was able to open his parachute in time to land safely in a field. On his descent, he was fired on by members of the Home Guard, who ignored his cry of being a RAF pilot. Nicolson was the only pilot of RAF Fighter Command to be awarded the Victoria Cross during the Second World War. His Victoria Cross is displayed at the Royal Air Force Museum, Hendon. Victoria Cross Citation: "Air Ministry, 15 November 1940. The KING has been graciously pleased to confer the Victoria Cross on the undermentioned officer in recognition of most conspicuous bravery : — Flight Lieutenant James Brindley NICOLSON (39329) — No. 249 Squadron. During an engagement with the enemy near Southampton on 16th August 1940, Flight Lieutenant Nicolson's aircraft was hit by four cannon shells, two of which wounded him whilst another set fire to the gravity tank. When about to abandon his aircraft owing to flames in the cockpit he sighted an enemy fighter. This he attacked and shot down, although as a result of staying in his burning aircraft he sustained serious burns to his hands, face, neck and legs. Flight Lieutenant Nicolson has always displayed great enthusiasm for air fighting and this incident shows that he possesses courage and determination of a high order. By continuing to engage the enemy after he had been wounded and his aircraft set on fire, he displayed exceptional gallantry and disregard for the safety of his own life." The Nicolson cabinet in the Battle of Britain Hall at Hendon: Nicolson's medals: This is the new tool Hurricane straight from the box with the addition of Tamiya tape seat belts, EZ-Line aerial wire (I haven't got the hang of using CA and accelerator yet, resulting in big blobs on the masts!) and painted ModelDecal Black Trimfilm for the canopy framing. I'm not sure if this machine is a totally accurate representation of Flt Lt Nicolson's. The only issues I had were with the fitting of the canopy and windscreen and propeller. I wasn't inspired by the decal choices in the box, so I raided my Airfix Victoria Cross Icons set (picked up for £15 from Toymaster.) It was a weekend build to test my newly-bought the LifeColor Battle of Britain set, but I was so unimpressed with the shade of both the green and brown, that I oversprayed with my old faithful Humbrol enamels! The decals were sealed by a brush-painted coat of W&N Galeria Matt Varnish. I have not applied any weathering, but I may do in due course. Despite today being bright, my conservatory is north-facing, so there is insufficient daylight for any decent pictures. Thanks for looking.2 points
-
Hi all, Just finished these as a bit of light relief while I mess about with my first resin job, trying to graft the Daco improvement set onto an Academy mk XIV in the hope that on the 18th Airfix are going to surprise us with a new mk XIV... These are my 2nd and 3rd builds of this kit and as im sure a lot of you will know they are a nice fun build and I think produce a nice looking little spitfire at the end of it, both were picked up for about £4 each online from Jadlam racing which I think is a bit of a bargain for a few hours of good fun. I decided to add the Rob Taurus vac canopies to both, which were great to use, and added some tape belts to the seats to busy it up, also dropped the elevators as I believe this is fairly standard for a parked spitfire. Anyway enough waffle and on with the pics, any C&CC kindly received Cheers, Stu2 points
-
Hello every body, after I begun here with my first model, the MiG-21M, I want to show you my second model here on Britmodeller. Its the Bf109F-2 from Zvezda in 1:48 scale. Hope you will enjoy the pics!2 points
-
Another great subject from AZUR, the kit is not up to the standards of the more modern AZUR kits but it is the only game in town if you want an MS406 in 1/32 scale. Lots of test fitting is required and a lot of care taken when handling the clear parts, I managed to crack my windscreen. I did the same when I was building the Hawk 75 in French service so they must be a tad delicate. The decals are from Kagero Topcolors 17 "Fighters over France 1940", and very nice they are too, but beware they are very thin and do not like being moved around much once applied, in fact I'm sure that plain water would be better than the Micro set (blue) that I used. National markings are painted on using Miracle Paint Masks for the roundels, paints for the main colour scheme are WEM Colourcoats and Xtracolor with details painted with Humbrol. All mistakes and bodges are mine. Cheers Dennis Just spotted the missing landing light, done now.2 points
-
Hi Guys, I'm in the mood for posting one more. This one is a labour of love, a MH-60 from Academy with scratch built bits to make it a Lakenheath machine that operates with the 56th RQS as part of the 48th FW. I also extended the refuelling probe, & scratch built the gun mounts, added the door handles & scratch built the chaff/warning receivers. The side pilot windows had a frame that needs to be removed too, which was sanded out and then repolished (with a nail polisher) back to being scratch free. That was the most nerve racking part. The decals were from the kit, and various F-15E decals I had in the scrap box, along with a hand made moustache. C&C welcome. DSC03877 by tonyrichard24759, on Flickr DSC03880 by tonyrichard24759, on Flickr DSC03875 by tonyrichard24759, on Flickr DSC03876 by tonyrichard24759, on Flickr DSC03879 by tonyrichard24759, on Flickr2 points
-
"Gripen wins in Brazil"....so glad it's not that Vettal again, not that I know much about F12 points
-
after reading some of the posts in this tread I'm beginning to feel a little bit sorry for the Swift, the same way I would for the tubby kid being picked on at school . so STOP bullying the poor little mite! he couldn't help the way he looked...bless!2 points
-
Banana Build - Day 25 I had a big Christmas lunch today, kindly provided by my company (I would have taken pictures but I forgot my camer this morning, I could of course have used my new phone if I knew how to work it). I left before things got too boisterous so I probably don't need to make dinner tonight and I can put all my creative energies into my build. Excellent news. Using the other hand for reference I bent the stub axle the right sort of angle: I exicuted my plan to cut it off with my Dremel: What I did not record through the shame of it was that, even though I thought I was being careful, enough heat was generated to make the axle fall off. I quickly resoldered it and finished the cutting job with my JLC razor saw. I did a test fit with the wheel: Looks all right to me. I cleaned up the wheel and spotted these two sink holes: I thought Mr Dissolved Putty might be the best way to fill these. I had not used mine for a while and it had gone rather thick: After a quick compatibility test I determined this acetone was fine to use as thinners: I first wet the offending area with some acetone using a fine pipette and then added the putty using a sharpened cocktail stick After it had dried out I am not sure if this is better or not: The other wheel had just one sink hole: I was not entierly happy with the putty so I tried Mr Surfacer 500: Using a similar process this is what it looked like immediately after filling: And once all the solvent had evaporated: That is much better. I hope future generations can benefit from this important information I am gaining for humanity (well Billy anyway). I made the other pair of struts avoiding the Dremel pitfall and glued them both to the base plate. I used the alternative part, rescued from the spares box, to get the angles correct: Here is a clearer view: I will dab on some more superglue for extra stength later but otherwise my work here is done. More to follow later.2 points
-
I recover this one from the bin of doom in this state Depainted with oven cleaner And refubrished it to this, it's far from perfect but it's better than it was before Hope you like it Saludos!2 points
-
Given I have an extra month I should be able to beat it, plus I will be building mainly OOB. Looking back at my OKGB I did an awful lot of research on Concorde, Cuban F-47s, HueyCobras and the Arado 96. I would say over half the accumulative time spent on those 5 builds was taken up researching information and studying photographs and PDF files. Add to that the time taken to learn how to use Photoshop to design and print my own decals and it all added up. Nothing I'm planning for this group will need much research and beyond adding seat straps, or alternative armament the builds should be straight forward. I'm not out to break records or anything, I just love to build2 points
-
Okay unless real life intervenes my aim for this GB is to build and finish the following kits Airfix McDonnell F2H-2 Banshee bought second hand for 50,- DKK or 5,60 £ 20 years ago Airfix McDonnell F2H-2P Banshee bought second hand for 65,- DKK or 7,28 £ 2 Hasegawa F9F-2 Panther bought new 20 years ago for 59,50 DKK or 6,66 £ Heller (Airfix) Skyraider bought new some years for approx 50,- DKK or5,60 £ 2 Airfix Fairey Firefly Mk V bought new for 39,50 DKK or 4,42 £ Pioneer2 Hawker Sea Fury FB.mk 11 new for 30,- DKK or 3,36 £ Frog/Novo Fairey Firefly FR.Mk 1 bought second hand for 40,- DKK or 4,48 £ KP Il-10 bought second hand for 15,- DKK or 1,68 £ Airfix Auster AOP bought new for 38,50 DKK or 4,31 £ Airfix Bird Dog bought new for 29,50 DKK or 3,30 £2 points
-
Time for another update... I had been a little concerned about the fairing for the rear turret, as this area of the fuselage is poorly represented in the ID kit. The first job was to cut out the turret itself - here it is offered up against the plans and as you can see the shape is pretty close: However, when put in place the problems are clear - gaping holes and no sign of the distinctive fairing that holds it snugly in place on the real aircraft: My solution was simple: using 0.5mm plastic card I cut out a basic fairing - there is still a fair bit of shaping to be done at this point: This was then attached to the aperture and blended in with filler - I also added the smaller fairing for the pivot from sprue sanded to the correct shape. After some sanding this was the result: And with the turret fitted now you can see the improvement (I hope!): Before priming I'll reinstate the missing panel lines. This is another headache out of the way... now what to tackle next? Tom2 points
-
Thinking out loud; What slows me is paint drying. I prefer enamels for most of my painting, although I do use acrylics too. If I start 3 kits on days, 1, 2, 3 and 4 thats 12 kits on the go. Initial painting of small parts, cockpit, wheels etcetera, minor assembly on each first day. By day 4 paint on kits of day 1 will be dry, so some building on them, and day 2 = day 5, day 3 = day 6, day 4 = day 7. Assembly work done on kits of day 1 done on day 4 should be good and dry by day 6, final assembly and maybe first coats of main paint. This paint ready for final coats on day 8. Decals put on on day 9, Final varnish say on day 10 So: kits ABC started on day 1 finished day 10 kits DEF started day 2 finished day 11 kits GHI started day 3 finished day 12 kits JKL started day 4 finished day 13 add two days to each finishing time for; breaks, or lack of mojo, slow drying paint, out of paint, fighting the carpet monster for parts its still 12 kits built in 15 days. Now if one was to keep that pace [unlikely, unless one is really mad ] that would be 24 per month, or about 96 in the time of this GB. Thats if one starts the sequence fresh after every 15 days, its much more if one kept starting three kits every day and had a continuous sequence. [anyone want to work it out?] Crazy idea isnt it? even I'm not stooopid enough to try it. Naw, I'll do a few, as many as I can.2 points
-
I think this one is a Korean War Auster AOP.6?; Hope it comes in handy. ps- nice find re the old magazine article,..very interesting and those figure `6' style aircraft bays are totally new to me,..didn`t know that Austers used these in Korea! Daniel,....great pics of the Japan based Auster and Dakota. The Dakota is particularly interesting,...have you any more pics of this aircraft? Cheers Tony2 points
-
Well ... played around a bit and tried to keep it as general as possible: Sugestions welcome... Can also certainly be something completely different... Rene2 points
-
Right chaps and chapettes, With Chrimble round the corner and still woefully under-prepared, it looks as though work on the bus and van will have to temporarily stop. I fully intend to get some work done over the festive holidays and will post a progress report in due course. If, however, you want an idea of the direction the van is going in, please see below. There is still weathering to be applied to the decals, but that's where i'm up to. Have a very merry Christmas. I hope you've all been good boys and girls and get what you wish for. See you on the other side. Thanks for looking.2 points
-
Well I just put 4 Merlins on it. How much more magic do you think it needs?2 points
-
Not sure I'll buy one but I'm sure Airfix have done their sums on it. To me it's a more legitimate subject than any Luft '46 WHIF and is deserving of a mainstream manufacturer's attentions. Trevor2 points
-
Now that's the question that's been lurking in the shadows. What subject qualifies for a place on my shelf? Solely the fact that I want one there. And if the question is entirely subjective, the answer is entirely absolute. Like true love I cannot define it but I will surely know it when I see it. And yes, there is a Swift in my future. Two in fact, gotta finish the old Hawk one first. I am looking forward to aftermarket decals and won't that make the Hawk kit a winner? It will to me.2 points
-
I say well done to Airfix for this one. Not exactly a priority for me but it's good to see them do a mix of things. Going through their old kits and doing new tools, like the Hurricane Mk I, Tiger Moth and Blenheim IV, then doing brand new kits of fairly popular aircraft like the Do17Z and Blenheim I, and to top it off something completely different - the Swift! If Airfix keep this up sooner or later they'll do the kits that some people are longing for ie new Beaufighter, Vulcan etc etc. People should be glad of what Airfix is at least trying to do and the fact that they will do something like a Swift might mean they do other not so mainstream aircraft too at some point. thanks Mike2 points
-
Looking at this I just think "whats not to like" Its just beautiful.. I wonder if the cockpit frames are separately molded or just primed... It Is also an attractive shape for whiff schemes too.2 points
-
It's not a bad kit, made one , budget more than £10 , you will need some milliput too. Added some resin to mine, the budget could get out of control very quickly , but then it is a TSR-2.2 points
-
Latest updates: Finally got a coat of primer on the thing! A couple of layers of Alclad Gloss Black, then polished back up with Micromesh. I'm just waiting on some Airframe Aluminium in the post before I can continue. I did have a (near full) bottle, but after leaving it for a few months at home to finish Uni off, I came back and found it inexplicably and completely empty I'm sure I'd done the lid tightly... Despite all the filling that had to be done, it appears pretty much unnoticeable on the model If I might pick your collective brains - I switched from Tamiya putty to Squadron White because I found it to be softer, slower drying and generally easier to work with. However, it doesn't polish up anything like as well as Tamiya's does. I presume then that Tamiya's putty sets harder and is less inclined to be roughed up? The MDC(?) on a Sabre canopy is quite complex and since I have no liquid mask, it had to be done manually. Once the tape was removed, it needed a little touch-up but otherwise came out well. Layer of Dark Gull Grey, followed by gloss primer. First time using Eduard masks; they seem to have gone on reasonably well. The bay at the back of the canopy frame is quite hard to find detail on and exists in several different configurations and colours. Fortunately, the Aires version has the same configuration as 'Mig Mad Marine.' As there are almost no clear photos of the area, I have not detailed it further. The red beacon was done by painting the clear part with a mix of Alclad Aqua Gloss and Citadel Red Ink. The landing gear is well underway and should be completed tomorrow. Tim2 points


.thumb.jpg.76f12b87ce9ca9929c9aabdcf8f9d2dd.jpg)


This leaderboard is set to London/GMT+01:00