
Leaderboard


Popular Content
Showing content with the highest reputation on 19/04/18 in all areas
-
Hello All, Just finished this. It's the Monogram 1/48 AH-1S, with Isradecals decals, Werner's Wings resin exhaust and a ton of scratchbuilt additions by me. The kit has been rescribed and all the rivets are Archer Fine Transfers. The final finish is Tamiya XF-59. A full description and more photos are here: https://jonbryon.com/monogram-1-48-bell-ah-1s-cobra/ Comments welcome. Thanks for looking. Jon24 points
-
Hi, it's my first posting here so might as well go with one of my favorite USN aircraft of WW II. Bu.Aer 2106 survived Midway and finish her days as a training aircraft on lake Michigan. She was fished out of the lake and now reside at the Navy Museum. This is my most recent build and for that I used the Trumpeter kit with Black Box interior. Montex masks where used for the rondels. The chipping was done as a multi layer with the hair spray technique. It was a first for me and I must say, the results are quite pleasing! Colors are Model Master PRU blue for the top and Hataka white-gray for the bottom. So hope you'll like it. Cheers Andre22 points
-
After ca. 10 years is it first kit in French colours Marcin thank you for the painting masks!21 points
-
Hello folks. Today i introduce my new model, was built in this year. Best regards. Michael.20 points
-
Hello Everybody ... after seeing the start of the B-25 mitchell Group build. Its killing me that i cant participate yet. The B-25 is my favorite Medium bomber of the war as it was so Versatile and adaptable. I saw a few PBJ’s started ( USMC B-25 not Peanut butter & jelly ) in the group build. I had a minor Discussion with @JOCKNEY in one of the Threads. Both the build and discussion inspired me to dig this out of storage. I did some clean-up and touch ups. I think considering it was started 24 years ago its doing ok. The seams have started popping but not to bad. I started this Monogram B-25H in 1994. I had to shelve it many times while trying to dig up info on Camouflage and markings. Pre internet era was not easy to find things out. Eventually I came across Jerry Scutts “Marine Mitchells and found this the “Magic photo” that solved my issues. Sadly that was in 2001. It would take another 18 months to ultimately finish this in 2003. Yes thats right a 9 year build up until 2014 it was my longest. Sadly now #2 to my RAAF Catalina build which is 14 and growing. Well without further talk here is my PBJ-1H from VMB-613. The business end with the 75 mm. Ive built maybe 5-6 of the Monogram Mitchells since the 1980’s. This is the last survivor and my favorite. If i can get my other obligations taken care of I will be building another for the Group build. Hopefully a Revellogram but maybe another. Dennis18 points
-
After a long time I built a 1:72 model again. So here some pics of the new CASA.212-100 by Special Hobby. Built it just out of the box.17 points
-
Hi, During last couple of months (OK, nearly half a year) I made 8 Finnish machines (Blackburn Ripon, V.L.Pyry, Morko Morane, Fokker CX, Fokker DXXI, V.L. Myrsky II , Shavrov Sh 2 and Gloster Gamecock) . With three I made within previous 45 years (Westland Lysander, Brewster Buffalo and Junkers K 43) it made all together 11. In last days I re-painted green on those old three to uniform it with what now I am using for Finnish dark green. All of them (including those three in previous too bluish green) were already in past on RFI but I hope you will find them a bit interesting brought together, espacially in uniformed colours: And two more takes of Junkers K-43 Comments welcome Cheers J-W16 points
-
Hiya Folks, I made this one quite a long time ago as part of a Falklands War special issue of a magazine,... but I have a feeling that it might never have been used as I had also built a 1/48th scale version too, wearing a darker colour scheme. Anyway,... I have never taken digital photos of it and as it was outside the cabinet today I thought I`d snap a few and share them with you, just to prove that I sometimes build something `different'; DSCF2919 by Tony OToole, on Flickr DSCF2918 by Tony OToole, on Flickr DSCF2920 by Tony OToole, on Flickr DSCF2922 by Tony OToole, on Flickr DSCF2921 by Tony OToole, on Flickr This kit was later released by Airfix too but without the resin seat parts etc. This one was brush painted as usual,...., but I really cannot remember which colours I used,....I seem to remember using Humbrol enamels, but I could well be wrong after all this time,.... I`ll see if I can find my old notes. The wreck of the real A-511 still remains in the Falklands, or the penninsular of Lafonia to be exact, which is 20 miles from Goose Green and where it was shot down by a Sea Harrier flown by Sharkey Ward,....while flown by Major Tomba who was lucky to survive his extremely low ejection. And here is a painting of Tomba being shot down and ejecting; Cheers Tony14 points
-
This kit was started over a year ago as a mojo restorer. Unfortunately late on in the build I made an error of judgment and decided to use an aerosol gloss directly from the rattle can. The gloss coat reacted badly with the paint and basically ruined the kit. I threw it in the bin but Mrs B persuaded me to rescue it. It sat in it's box for a year before I could be bothered to look at it again. This is how it looked a year ago before the aerosol incident. ...and after the attack of the rattle can. Fast forward to today, painted with Colourcoats US Navy paints using Montex masks for the markings. I also added Nav lights, home made seat belts, aerials and gun barrels. ....and what it looks like behind the wings She turned out alright in the end and I had great fun (at the second attempt). The HobbyBoss kit might have it's accuracy issues but it's cheap and it fits together really well so other than self inflicted issues it's a fun build. I hope you like it. Duncan B13 points
-
Hi guys, Here is my current project, the old but good Airfix 1/48 Seafire FR46/47. Just to mention that it`s my first build since 10 years so be gentle! I count on you for good advises & support during that project. I had this kit in my inventory for years & since my last spitfire was built when I was 13, it was a good timing to get back into it! Since the overall base kit is pretty good, I decided to raise up "a bit" the detail level with some after-market goodies to adress also some little flaws. It would be a FR.46 No. LA546/900 LM, from 804 Squadron based at Lossiemouth Station Flight in 1946. The decals are coming from the "Grand Phoenix" kit that I have & will be built as a FR.47 in "all-open" configuration. So, enough speaking, here is the beast... -Some dry-fits of main components. I was quite surprised by the overall good & precise assembly... The "Quick Boost" resin top cowling is very nice & fits pretty good! -I decided to show the right wing armament bay so I started with some surgery. I will used a mix of CMK & Aires resin components for that area. Ailerons will be replaced as well. -I continued by riveting the whole kit surfaces with "Rosie The Riveter" wheel. It works very well. I used a 0.75mm pitch here. Still have to finish up the opposite fuselage half & wing bottom. Next step should be the Aires cockpit! I already performed some dry-fit & I can tell you that`s gonna be challenging... Cheers! Frank12 points
-
So, after a lo-o-ong week of this: Trade shows in Vegas are not as much fun as one might imagine, especially when you are providing tech support for several other stands. The good news is that when you get back to your hotel at 11pm, you can still get food and a drink ( or two...). I got back to this: So I'm back on the case. The hatch for the spin-a-prop battery has now been reduced down to 7mm parallel, offset to Port, to represent the torpedo tunnel. I've mashed a bit of stretched sprue into the join with Revell Contacta to reduce the need for filler later. When it dries, I will have to extend this fore and aft, which will take out the last remaining fuselage locating pin. Thanks for looking, Adrian12 points
-
The other night I finished my Italeri Sunderland which has been on the stocks since February - thus messing up my plan of a model per month for 2018. There has been some (a lot of) frustration along the way. If you'd like to read more about how I built the kit please see my article in this issue (pages 31-33) of our group newsletter. I assume early war bombs were painted in an early "its health and safety gone mad" bit of bureaucratic nonsense - bombs are dangerous so paint them yellow? A good portion of a tube of Squadron Green was used up on the plane, trying to level out the nose in front of the cockpit and even worse on top of the wings. The mainplanes are 1-2mm thicker than the stubs on the fuselage, so the filler was slathered on, for some reason I forgot to tape off the good side of the joints to ease clean up. Oh well. The top and bottom half of the wings weren't the same chord either so brute force was used! I didn't recall ever using such brutal methods when I read about them on Britmodeller, but obviously I had previously attacked models with this file as there was a goodly amount of squadron green on it... Another niggle was that the guy who did the panel trenching on one side of the aircraft was very heavy handed, whilst somebody else with a much lighter touch did the other side! Once the camo paint was on I also discovered there are very faint lines where there are mould inserts to change from Mk.I to Mk.III - needless to say I decided fixing these by that time would cause more damage than would be justified, but worth watching out for anyone else - I wonder whether the Mk.III ends up similarly afflicted? Although you get a good selection of decals, Italeri obviously didn't look closely enough at the famous photos of DAG as the code letters should be wider and the tail stripes thicker - at least as an emergency unit level paint job there are no stencils. Overall I'm pleased with the look of the plane, but I think it will be a while before I do another large flying boat. I usually avoid weathering, but I'd like to think I made a reasonable stab at the appallingly dishevelled state of DAG in period photos. I don't know where I'm going to put it now though. My main annoyance was clouting bits of it on the light or whatever in the workshop area, as it takes up so much more space when manoeuvring compared to a 1/72 Spitfire. Cheers Will PS for those concerned about such things I cut the grass tonight!10 points
-
On Saturday, The Martianess thought it would be a good idea if I went and treated myself to something nice at the LMS to celebrate by passing my RYA Day Skipper exams. This was clearly one cunning plan that could not fail and before you could say little green men from Mars, I was down at the local emporium. I was instantly struck by the new Valom De Havilland Albatross and cash soon changed hands. Valom market the seats and tables for the passenger cabin separately but the shop did not have this set in stock. Initially I thought about not bothering to fully furnish the passenger cabin but having taped the fuselage together, could see at once that the large windows and overhead skylights made this an imperative. A swift trip to the Big H website soon saw the upgrade set winging it's way to Martian Towers. So taken was with the kit that regardless of all the other projects cluttering up my bench, I just had to make a start right away (if I'm not careful, I will wake up one morning and find I have turned into Corsaircorp) Being a limited run kit, with all the potential fit issues that this might bring, I decided to take a slightly different approach to this kit from the usual "start with the cockpit" and tackle the areas where the fit might be a problem first. I glued the cabin bulkheads to the floor and these proved to be a reasonable fit, certainly nothing that a small amount of sanding won't put right. Having reassured myself that things will be OK with the fuselage I turned my attention to the wings and wheel wells. The part supplied for the wheel well roof was clearly undersize so a larger replacement was cut from plastic card, along with an inner wall to each well. Although the kit provides a sturdy main spar for the wings, I decided to add some locating tabs to ad strength to the join of the centre section to the mainplanes. Next up will be to start fitting the various intakes and outer parts of the wheel wells to the wing parts. Thanks for looking Martian9 points
-
MOD's can you move to the Gallery? Hi, This is me done with this kit. I managed to get a spare decal or two and so after a few tense hours have this to show for it. Thanks for looking. FLY NAVY..FEAR the BONES.9 points
-
Hey All Here’s a wee project I’ve been working on for a few months now, the first of my 2 RAF Liberators. Hopefully this is fair interpretation (with a smidgen of artistic licence) of Liberator GR.V. BZ862 that flew with 354 Squadron from India between September 1943 and May 1944. The kit is the Revell boxing of a B24D, Jerk’s Natural. Additions to the base model include: · Belcher Bits belly radome · Squadron canopy. · True Details wheels. · Quickboost engines. · F.M. Halifax Bolton Paul rear turret transparency with scratchbuilt internal gubbins for the Quickboost B.P. Defiant .303 machine guns. · Lots of lead fishing weight ! I was looking for a Coastal Command Liberator wearing SEAC markings to build when I came across a photo titled ‘Geoff Tomlinson’s aircraft – Early 354’ on Ron Quirk’s website, in Jim Badgleys album ( 354 Sqn photos ). There is also a second in-flight photo of this aircraft in the album titled 'On Patrol over Bay of Bengal'. From the grainy photos I could tell that it was based on a ‘D’ variant, that it had the code letter ‘A’, and that it should make a suitable subject. With no decals available in 1/48, my subject had to be reasonably easy to model. From there I discovered: · Code letter ‘A’ belonged to Liberator GR.V. BZ862 and it was usually flown by Sgt Tomlinson (later P/O) and his crew. In June 1944 the aircraft was replaced on 354 Sqn by Liberator MK.VI. EW319, however it was transferred to 160 Sqn where in August 1945 it would go on to complete a sortie of 24hrs and 10 minutes with F/Lt Jack Muir and crew; this was a record at the time and definitely a subject worth modelling. · 354 Squadron was a general reconnaissance squadron that flew Liberators from airfields in India and Ceylon from its formation in May 1943 until disbandment in May 1945. They carried out armed patrols and convoy escort duties using Liberator Mks IIIA, V and finally VI. First, here's my attempt at recreating to pose of 862 in the photo. There was something bugging me about the roundels shown in the photo, particularly with the relatively small centre circle. I think the answer came in a recently purchased (when I started the project) copy of Eyes for the Phoenix by Geoffrey J. Thomas. The book details a period between Jun and September 1943 where the national markings evolved from the European style to the familiar SEAC two-tone blue. Apparently, when faded, the blue of the RAF Type B roundels blended into the surrounding camouflage leaving only a visible red circle that was sometimes tragically mistaken for Japanese markings. The book details the colours and measurements for the markings and after first applying roundels and fin flashes in the early trial white/blue (as they look to me in the photo), I later changed them to the later light/dark blue to better suit the timeframe. However I can’t be certain that this aircraft did actually wear this style of marking. I wanted the addition of the belly radome to be a feature of this build so I wanted to help minimise the clutter at the back end by making sure that it wasn't a tail sitter. It took a lot of lead ! And here's where it all went. Lastly, I'd bought the Belcher Bits conversion that also came with a Leigh Light. I think it's a great little addition to the CC Liberator and this is my only opportunity to use it, so I have. I'm sure no-one will notice. Thanks for looking, comments, corrections, good, bad or indifferent welcome Cheers Gaz9 points
-
The for'd part of the strake is now at least cut & filed to the right shape. It needs a drop of metal primer, then I can fix it into place: And speaking of fixing into place, the I-band transponder "can" is now re-fitted (IFF aerial on the left as we look): ...as are the tail wheel and lower UHF & VHF aerials (sonobuoy receiver blade aerials on the left) Coming on nicely. Thanks for all the compliments! More soon Crisp9 points
-
In hindsight, I'm not sure that they would listen either... Like much of their generation they are busily watching two screen at once. Well I'm furious, quite furious, at Pastimage not allowing me to see the current visuals for hendie's Pullman. Only being able to to catch up with the conclusion of Crisp's awe-inspiring drawings of Fearless permitted me to settle down to some methodical work on fixing the crew of Pelican 9 into place over the last couple of evenings. First, it was necessary to re-drill and align the various recovery-pole supports, as a couple of the original holes I'd made were lost when re-building parts of the interior: As previously, using a bit of 0.8mm tube as a template. Next up was afinal dry-fit of the rear crew: You might notice that I switched the positions of the two rearmost figures from when I'd layed these out previously. Seeing them in painted form made me realize that repositioning like this gives a better expression of them looking out of the rear of the aircraft to do a visual check on the run in. With mounting holes drilled out for the locating pins in their feet, the guys were then epoxied into place and steadied for drying overnight with some white tak: The flight deck crew received similar treatment: Hopefully in these last shots you can see that I did remember that I needed to build the seatbelts and harnesses. The harness buckles were just knocked out of a 7Up can with an 0.8mm punch: I left it at that for tonight to avoid knocking any of those bits out of place as it was starting to get a bit crowded in there. Still to add are two more seats to the flight deck and one in the rear for the winch operator. I'll do that tomorrow along with adding the supports for the recovery poles, some splayed bracing for the winch, plus I need to knock up a small electrical patch bay to go beside the winch into which a remote control for it appeared to be tethered. Slowly we are creeping closer to the point of fuselage closure..... Tony9 points
-
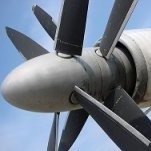
All the rough covering is done. The kit´s nose tip and prop axle are used: The stringers that go under the front fuselage are glued on, together with yet another partial part from the kit (the removed section is where the exhaust goes): Proper curvature of the cheek: Al this, naturally, has now to be sanded a bit and smoothed out.9 points
-
The build as today, vertical stabilizer added: tailwheel goes on (an Aeroclub item with a small spring added to it): One by one, the sections that span the bulkheads are measured, cut and glued (in this case the cockpit coaming and the cheeks). Later, where necessary, small touch-ups can be performed: Nose top and half the cabin roof in place:9 points
-
The RAF operated the Sabre as a stop-gap measure during the early 50s until enough Hunters had been delivered, as it had become evident that the Meteor was by then obsolete as an air defence fighter. Although there was one wing in the UK, most RAF Sabres were based in Germany, and flew with cerulean blue undersides. One of the more colourful squadron markings were those of no. 4 squadron which flew the aircraft from RAF Jever.8 points
-
Here are just finished two my wooden desk top models of J-22 Orao, ex Yugoslavia markings8 points
-
Just completed te new tool Airfix FG.1 I used the Aerocraft intake splitter plate set and they worked fine. I also used every stencil on the decal sheet. Took me about 4 to 5 evenings doing about 30 at a time. The 1977 Jubilee flashes on the nose with the unit badge in place of the '77' donated by CTModeller and from a Fujimi kit. To make it a little different I painted the underwing drop tanks in the odd ball fashion I saw in a few photos in my old Ian Allan hardback on British Phantoms. Found them to fit at an odd angle so I trimmed the tabs on the tanks so they would fit more in line of flight. Anyway, hope you like the pics... Still mystified why Airfix did the nose gear doors in clear plastic and total lack of any kind of detail8 points
-
This is likely going to be my last build for a while as I prepare to move back to the UK. I've been in Paris for almost six years, and I've heard UU974 fly overhead nightly from Roissy to Saint-Denis, Île de la Réunion. Even as it sailed south overhead at 10,000 ft, those GE90-115B engines have a very distinctive sound, easily distinguishable from the countless Airbus jets that fly over, and I'm going to miss hearing it. So here is my Zvezda Boeing 777-300ER, with markings from 8A Decs of Mexico, whose decals were, frankly, superb. The decals portray Air Austral colours since their livery change in 2016, in which each aircraft has a scene from Réunion Island painted on its tail. There is only one aircraft depicted, F-ONOU. As far as I know, F-ONOU is no longer in their fleet, and they only operate F-OREU, F-OLRE, and F-OLRD today. I'm sorry, there is no WIP thread on this one; I want to wait until I have a proper workspace to take decent photos of a build. I think this kit is the same as the Revell kit, but I haven't built the Revell version (yet). I have another set of decals for Turkish Airlines (I see TK2 fly over most mornings - when it's clear...), so I will do a WIP topic on the Revell version, hopefully when I'm back in the UK.7 points
-
Work on the seat is progressing. Below are the instrument decals and the instrument binnacles. I polished the binnacles. The smaller decals are 4mm (0.16") in diameter; the larger decal is 10mm (0.39") in diameter. Here are the decals installed in the binnacles. I used tweezers, toothpicks, Micro Set and Micro Sol. Below are the instruments installed in the dashboard. I have to install the lenses to complete.7 points
-
- A small model from TARANGUS in 48 in Swedish colors- A very refreshing little kit after a bunch of screaming iron just to catch my breath .....the respite won't be long......It's size doesn't mean an easy kit. Opening canopy could be made easier with a thinner material which, as a welcome bonus, would add realism to the open parts by reducing their thickness which made them look as armoured glass doors.6 points
-
Just finished... )))6 points
-
On we go with the RAF Cold War jets; hot on the heals of the Sabre comes this tiny Vampire FB.5 from Heller. On opening the box I was pleasantly surprised by its neatness and simplicity - though I bet this is actually a harder kit to build well than it looks! Could be interesting getting the booms straight and finding enough space in that tiny nose for enough weight! Here is the obligatory opening shot. I'm undecided on the decals. I'd like to build the kit option OOB, but the decals look quite old, and I understand that the shark's mouth should actually be black inside with a red trim, does anyone know if that's correct? I've also read that this particular aircraft didn't even carry the mouth, or if so then just for a few days!? Again, any information would be welcome. In the meantime I'm going to consider some alternate markings in case I don't go with the kit ones.6 points
-
Hi everyone This is my finished Zvezda SU-27 SM kit in 1/72 scale Kit was a great build. Took about three weeks to finish. I use the Hataka red line SU-33 paints, using UN blue and dark grey/blue for the camo. Dream model etched for cockpit and ejection seat. Kit decals were a dream to use and settled so well.6 points
-
I have always had excellent results from this stuff, though others on here have said it doesn't always work for them. C6 points
-
And the gracile lines of the DH83 start to emerge:6 points
-
Just a quickie today as I thought I ought to show you where we are at as of this moment. All the main joints have now been filed and had their initial rub down and the fine sanding and polishing of the airframe has started. Obviously, with this being a natural metal finish, it is crucial that I get this spot on and it may take some time. Still, I do have the canopy detail to get on with, Daco supply some pretty comprehensive parts for this and there is also my new toy................ Thanks for looking and thanks @Mike for sorting the Postimage crisis out. The pictures are also going on my Flickr account just in case. Martian6 points
-
These are the BRASSIN sets you have been looking for! School holidays and spending time with the kids (away from their devices) lowers my work rate. I am slowly getting the cockpit together. I am as yet undecided whether I will use the PE or resin and d cal version of the IP. I did make the PE one up this morning and it does look good bit I want to see how the decal performs. I have added some PE bits and bobs. It is the first time I have opted for PE belts in quite a while, having been put off by the problems associated older style of belt. The BRASSIN set contains the new steel belts and I am impressed. They are far easier to remove, place and seem mostly to retain their painted aspects. There is some touch up needed but that may be me. In 48 scale at least, they look quite good but I think I will stay with textile from RB or HGW for the big scale whenever I get back there. Anyway, some photos: Regards for now,6 points
-
Hi all!My little Me-262 from Eduard. I have used Mr Hobby paints.6 points
-
I'm back - been a while, but have been following some great posts on here. You may have seen my other 1/24 Scale Airfix diorama: Very pleased to win with it at Telford this year, a very nice surprise indeed. I said I would give aircraft a rest and get back to rusted cars & zombie stuff, my usual bread and butter when it comes to modelling. Well it didn't last long, I have had my eye on the Airfix 1/24 Scale de Havilland Mosquito for a while now, but something else normally got it the way. So I was happy to come across it again at Poole Vikings on Saturday 14th April (18), and at the price, how could I resist. Bring it back to the club stand I got the usual banter, "You cant rust that, its made of wood", etc. Well I had already formed an idea in my head as to what I was going to do with it - another museum restoration diorama. A quick search on the interweb and an idea had formed. I need to get a few models out of the way, a Revell London Taxi diorama with a couple of Nutsplanet figures and the excellent Italeri 1/9 Scale German Motorcycle with Side Car in a barn find diorama. Once these are done and dusted then its onto the Mosquito. As a said before, a quick look around the interweb and found some great resource images: Another source of inspiration are the Valiant Wings and Haynes books on the Mosquito: Plenty of reading with these two. I'm looking forward to this build and sharing its progress with you along the way. Thanks for stopping by. Richard5 points
-
My final 1-1 scale Halcyon Vinyl kit(actually thats not strictly true,I do have the alien queen foetus knocking about somewhere ) The Dog buster from Alien 3 . Handsome little fella isnt it the base is a homemade job with extra added fleshy bits. Right,Back to Batman and the Joker ! Cheers Andy5 points
-
Hello from Canada! Let`s introduce some of my work with one of my last project before my temporary retirement! Here is the old Hasegawa 1/48 kit built 12 years ago! Aires engine & cockpit, True Details wheels, Eduard PE set & Eagle Cals decals. The all riveting work is made by hand with a needle & millimetric paper strips! Few scratch extras like plumbing & electrical lines in engine bay! « Mickey Mouse » from II/JG5 based at Alakurtti in Finland during spring 1944 & flown by Major Horst Carganico. Hope that you like it! Frank5 points
-
Tip: it was a wooden aircraft.5 points
-
Hiya Folks,..... well I removed the excess watercolour today, using a damp paper towel,...... and here is the result,..... having also removed some of the silvered decals and a bit of detail repainting, which I could have done without! DSCF2915_NEW by Tony OToole, on Flickr I`m trying to keep the weathering to a minimum as they appear to be very well maintained in service. Cheers for now, Tony5 points
-
Hi, Let me show you my last model I just finished. This is how this '41 plymouth was when I bought it ! And now, just after its transformation into a kryptonite powered drag ! New frame, new paint, new engine ! I hope you'll enjoy this model !5 points
-
Hi folk's coming on a treat now, as you can see up on her feet and blu tacked the prop on to show progress I'm painting the tri-colour prop tip's rather than the decal's supplied.5 points
-
Gradual progress is, I'm afraid, the order of the day - as it always is when you are dealing with little details (and especially ones which involve lots of pieces of PE!). The weapon carriers are still coming along nicely, but not worth photographing again yet, so today you will have to settle for two other areas: 1. The strake is 50% done, with the fitting of the rear section of the PE version: a major improvement to my eyes (though maybe not to yours, since I'm not sure I ever showed you what we are comparing this with!) 2. The I-Band transponder (also regularly knocked off in the past, so I have taken the opportunity to paint it rather better than before). It will be re-ftted tomorrow: Oh, and one of the rear weapon carriers with a new NO STEP transfer (upside down in this photo - it really does say NO STEP, honest!). More soon Crisp5 points
-
Hello, My last project completed, the "15" Rde Parrot. Some pics Best Regards5 points
-
Small update tonight from last night if you catch my drift. happily content that I was moving forward I noticed this!! what The Who the what??? Another ruddy window. and the bomb Aimers window is different from in the kit too. So not to be deterred I cracked the halves apart and started doing this. looks like the right place. The still came out. A wee bit o’ sanding and we have this. not bad. every thing got a tidy up and I made a window like before and TET bonded it in place. That’ll do. I just noticed that the fit of the two halves that got glued isn’t quite straight so I’ll need to sort that. I’d actually planned not to cut the aimers window as the missing bit is clear plastic but it’s just too small. I’ve done the rest of the stupid fixes. I may as well do this one too. Any tips on drilling clear bits? If you look at the pic at the start of this post you’ll see what needs doing. About 2/3 of the window is on the clear part and the rest is on the fuselage. Hmmm that should be fun. That’s it for now. I said it was short. Thanks for popping in. All the best and as always. Happy Modelling chums. Jont.5 points
-
Guys I've just seen a trumpeter post on Facebook of an Avro Vulcan, no scale or anything. It was in test shot form https://www.facebook.com/TrumpeterModel/?hc_ref=ARSNDRWxBzsZGlWxarLKpKmB1eoZ9i7o9dke8llzuDUnm_O6AcuEgvQNUhs-sUThwBU&fref=nf4 points
-
Having added the props, exhausts, pitot tubes, masts and other tiny pieces, last night I began weathering. I mixed up some black and earth weathering powder with thinners, and did a pin wash over the panel lines. I have also added some exhaust trails. Next I plan to add a little Chipping, and seal it all in with a matt coat.4 points
-
A beer can with jet in it instead of beer. Never heard of the Bristol Stella which became the Olympus?4 points
-
I agree that it’s the airfix kit but I don’t believe it’s a hoax as it’s the official Facebook page for Trumpeter and Hobbyboss. What I think is that it’s the airfix kit they’ve used just to give an idea. What they have done however is blurred out anything around it that gives a sense of scale. Therefore I do think they’re doing a Vulcan only they’re rescaling it either smaller or larger because they wouldn’t of done that without a reason. Knowing Trumpeter’s idea of go big or go home I would like to hope that they’re scaling it up! Sam4 points
-
4 points
-
Simon, not sure about the actual ratio because I normally eyeball it, but I would say 1 (talc) to 5 (CA) maximum. What I do is to pour some CA on a small piece of alu kitchen foil, drop some talc just beside it and drag some into the CA with the point of a toothpick - then I start mixing till I reach the consistency I need, adding talc only little by little. You don't want it to turn white, because in that case it will set immediately, no way to use it on your model; a few attempts should give you the confidence to use this technique Thanks Massimo PPP is interesting, not an all round putty but very helpful in some cases I guess it is Thanks Johnny Ciao4 points
-
another of Bandai's excellent Star Wars kits... an easy and pleasurable build4 points


.thumb.jpg.87669a5ffb8b13672a3d675087a46d42.jpg)


.thumb.JPG.3498f40362ff13ebfc4b2e45abbd545e.JPG)


This leaderboard is set to London/GMT+01:00