Leaderboard


Popular Content
Showing content with the highest reputation on 24/01/13 in all areas
-
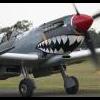
Just completed a double build of a couple of Tamiya 1/48 P-51's. For Lt. Francis W. Horne's mount, Snoot's Sniper, I used the kit (Cartograph) decals that came with the 'Blue Nose' special edition boxing. For The Millie G, flown by Major Edward Giller, I have used the Barracudacals decals for 44-14985, the first of the two Millie G's to appear in this colour scheme. Construction is OOB, the seat belts are the kit decals on lead foil, the wings have been filled as per the factory and exhausts drilled out. I used Modelmaster Buffable Aluminium applied with a brush for the bare aluminium, a mix of Alclad Aluminium/Dark Aluminium for the painted aluminium and Gunze H309 for the fuselage and empennage on The Millie G to match the nose checks. First here is Snoot's Sniper as she appeared in August 1944 by which time only the under fuselage D-Day stripes remained - previously they had been applied to both lower and upper wings, and also the original canopy had by this time been replaced with a Malcolm Hood. I have found a couple of colour photos on the net...I do not know who the original owner is as they have been copied many times:- all credit to whoever is deserving of it though. I have tried to replicate the same worn but not abused finish as seen in these pictures. And now The Millie G as she appeared in summer 1944 with only the under body invasion stripes remaining and before she had a rear view mirror added. Again, I have managed to find a couple of reference photos on t'interweb, and all credits to whoever is due them. And now onto the pictures, and as with the Snoot's Sniper build I have tried to replicate the worn but not worn out look of an aircraft in the middle of a hectic operational schedule. Two thoroughly enjoyable builds, hope you enjoy the pics.5 points
-
Straight form the box. 84 Squadron, Akrotiri, Cyprus 1987. XS518 made from old "scrap" decals hence the size is to big.3 points
-
Hello Got the first one of the year out of the way - albeit one I started mid-December. This is the Italeri Tornado IDS, modified to GR4 standard in Operation Telic markings. I have had this kit kicking around for a while, buying it when Paragon stopped trading and I bought a set of their AM goodies 'for the stash'. I have added a NeoMega cockit; Paragon Flaps/Slats, exhausts, fin correction, weighted tyres; Revell Storm Shadows and Paragon tanks tanks - I got these off a club mate without fins, so these were scratch built. Finally a scratch built sensor pod. Finished in Humbrol enamels and Model Alliance Decals. I enjoyed the build, surprised by how small the airframe actually turned out. Thanks for looking. Ian3 points
-
Hi Guys let me introduce you to “Escape from Stalingrad” its the Tamiya 1/35 scale 88mm with some alpine figures, and Resin figure Kit Flak Crew. The story is that the gun has jammed and whilst the crew attempt to fix it the 2 Russian tank crew are trying to escape the through the ruins, but have been heard by the SS patrol. Enjoy Mike2 points
-
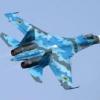
She is a big impressive looking beastie, but she's not really a dogfighter. More of an interceptor.2 points
-
Six feet equals 72 inches, which is why it was never known as the "Three foot scale" Phil2 points
-
Hi, You'll have to careful, if you don't remove all traces of the rivets at one sitting they will grow back! Colin @ the bottom of Africa2 points
-
Opening a thread to build this kit. This kit cost me 6 quid, at IPMS Gloucester show in 2011. Here are the parts. And here are the colour options I'm going for the Air Superiority Blue option.1 point
-
First test-shots of the V-2 mobile launcher:1 point
-
Second model for the year completed. Again this one has been ~90 % complete for the last 18 months or so. Built straight out of the box with brush painted Tamiya acrylics. Not one of my best, but then again not one of my worst either . Thanks for looking.1 point
-
I cannot believe I've finished something!! On 1st January, I just went downstairs to the stash, picked up the first kit and said 'Right, I'm going to build this!' The initial idea was to be completely OOB, but there are a couple of enhancements, such as photo-etched belts, the Eduard FOD cover and after market decals. These are the SuperScale set, SS480883, and represents the North-American F-86D, 23667, of 324FIS flown by the unit's CO, Lt Col Fairbrother in Morocco 1958. The North American Aviation F-86D Sabre (sometimes called the "Sabre Dog" or "Dog Sabre") was a transonic jet all-weather interceptor. Based on North American's F-86 Sabre day fighter, the F-86D had only 25 percent commonality with other Sabre variants, with a larger fuselage, larger afterburning engine, and a distinctive nose radome. (© Wikipedia) This is the Revell boxing of the kit and is the later version with the rear drag parachute housing. Monogram also released the same kit, but of the earlier variant without the parachute housing. The kit is tremendous and is easily on a par with anything that I have made from Japan. Paints are Alclad II (what else?!) sprayed over Alclad gloss black primer, Gunze Sangyo acrylics and the radome (unpainted glass fibre on the real aircraft) was painted Tamiya XF-10 Flat Brown and then sprayed with Hannants' Xtracolour Satin Varnish. Some minor weathering and stains etc. were applied with a selection of washes and pastels. So, here she is, my first of 2013!1 point
-
Modern US Army M1A2 SEP MBT TUSK II Update 1:35 ET Model The Abrams Main Battle Tank has gone through many different upgrades during its long service life, starting as the M1A1 in 1985. The M1A2 improved on the basic design with improved armour and command options, which was in turn improved by the System Enhancement Package (SEP) which enhanced the armour further, incorporating graphite into the mix, with many original M1A1s and basic M1s upgraded at the same time as the new builds. The Dragon kit of the M1A2 Abrams in its SEP guise was a little rare at one point, but it appears to have been re-issued, much to the enjoyment of modellers, and consternation of the hoarders that were getting good money on eBay for their examples. The TUSK II is the second generation of the Tank Urban Survival Kit (TUSK), which adds a huge range of add-ons to improve survivability for the crew and offensive armaments in the urban environment. It adds a remote .50cal weapons station on the turret top between the two hatches, crew shields around the hatches, an infantry telephone, rear slat armour to protect the exhaust for the gas turbine engine, reactive armour and stand-off "shell" armour to protect against RPGs and other shaped charge weapons, as well as thermal sights for almost the whole crew. Underneath is a large keel-shaped section of extra armour that deflects the blast of an IED away from the crew compartment to reduce crew casualties in the event of a strike. The Kit There have been a couple of resin update sets for the TUSK and TUSK II Abrams for a while now, but this set is mostly Photo-Etch (PE), which I feel will give a much cleaner finish, and allow the parts to achieve a more scale representation. The set arrives in a flat brown box with a picture of the set on a kit pasted to the top, and immediately on picking up the box, you realise that this is going to be something special, because it weighs over 300 grams in the box. There's a reason for that though - There are TWENTY sheets of PE of differing gauges and four small bags of resin within the box, and a five page A4 instruction sheet that is printed on both sides. I doubt I actually need to state this, but I will - This set is not for the PE novice. It is for the experienced modeller, and a lot of folding or bending will be required to give a good finish. You will also need an M1A2 Sep kit from Dragon to put it all on, and bear in mind that this set ONLY provides the parts to convert the basic kit to a TUSK II vehicle - any additional kit improvements will have to be scratch-built or sourced from another set, such as ET Model's own that is available under the code E35-067. Construction begins with the keel for the hull, which is made from one single thick gauge part, with the edges folded up to mate with the sides of the hull like the real thing. Then it's a case of building up all of the reactive armour blocks for the side-skirts, which are formed from thinner gauge brass, and made up of the basic reactive block, and the curved shell-like outer section. This part will need annealing before being rolled to match the template shape on the instructions, and you will need to do thirty two of them! There are four slightly different shaped blocks for the front sections, which are assembled in separate diagrams. The front of the kit fenders is removed, and a new PE section is installed full length, with two PE suspension "hinges" for which you will need some 0.6mm rod to complete. Various slotted mounting rails are added to each side-skirt, and a triangular block is added to the front of each one, as well as a number of strips that install at the top of the skirts, ready for the armour blocks to be added. There is a diagram of how to lay out the blocks, which shows where to put the different front blocks, as well as some locking mechanisms that stop the blocks from getting lost if they are knocked off the vehicle. Next are the bullet-proof screens around the commander's hatch, for which you'll need a sheet of 1.5mm thick clear ABS sheet, which oddly isn't supplied with the set. It's easily obtained from model shops or from discarded packaging though, so it's nothing major. The commander's cupola has a three window section on the starboard, with a two window section to port with a high single panel, and a central section that is mounted on the gun pintle. The gunner's hatch is provided with a front bullet screen and two side-panels - he's clearly not as important as the well protected commander! The TUSK upgrade kits have an additional .50cal remote station mounted above the main gun barrel, and this isn't in the base kit, so is built up from a combination of PE and resin parts. Two of the bags of resin include breech, gun barrel and hand grips for this purpose. Its mount, ammo can and the bullet resistant conduit for the control systems is all made up from PE, and a spare ammo box on the front side of the turret is also provided with a mounting bracket, presumably for quick ammo replenishments of the new gun. The side baskets of the turret are covered in the shell shaped armour panels, which are mounted on two frames each side, onto which the individual curved parts are added. Another seven parts for each side will need forming to the afore-mentioned template, and their attachment brackets folded to fit. The final acts are to create a jammer for IEDs that sits between the two top hatches on a plate, and the rear mounted infantry telephone, which is made up from mostly PE parts, but with a resin handset inside allowing it to be posed with the door open displaying the interior. Conclusion This is a truly amazing set, and represents a huge undertaking by ET just in making it. Building it will require focus on the task in hand, otherwise I could foresee the modeller becoming over-faced with the sheer weight of parts. Take your time, relax and get used to handling large quantities of PE, and you'll do fine. It's one of those projects for long winter nights that will pay dividends, and when you've finished building it, you won't want to paint it and lose sight of all that lovely metal. Highly recommended to the PE competent. Available soon from White Ensign Models in the UK Review Sample courtesy of1 point
-
Nieuport 17 Eduard 1:48 The type was a slightly larger development of the earlier Nieuport 11, and had a more powerful engine, larger wings, and a more refined structure in general. At first, it was equipped with a 110 hp (82 kW) Le Rhône 9J engine, though later versions were upgraded to a 130 hp (97 kW) engine. It had outstanding maneuverability, and an excellent rate of climb. Unfortunately, the narrow lower wing, marking it as a "sesquiplane" design with literally "one-and-a-half wings", was weak due to its single spar construction, and had a disconcerting tendency to disintegrate in sustained dives at high speed. Initially, the Nieuport 17 retained the above wing mounted Lewis gun of the "11", but in French service this was soon replaced by a synchronised Vickers gun. In the Royal Flying Corps, the wing mounted Lewis was usually retained, by now on the improved Foster mounting, a curved metal rail which allowed the pilot to bring the gun down in order to change drums or clear jams. A few individual aircraft were fitted with both guns - but in practice this reduced performance unacceptably, and a single machine gun remained standard. The type reached the French front in March 1916, and quickly began to replace the Nieuport 11 in French service. It was also ordered by the Royal Flying Corps and Royal Naval Air Service, as it was superior to any British fighter at that time. Worthy of note is the fact that during part of 1916, the Nieuport 17 equipped every fighter squadron of the Aéronautique Militaire. The Germans supplied captured examples to several of their aircraft manufacturers for them to copy. This resulted in the Siemens-Schuckert D.I which, apart from the engine installation, was a close copy and actually went into production, although in the event it was not used operationally on the Western Front. Like the other Nieuport types, the 17 was used as an advanced trainer for prospective fighter pilots after its operational days were over. The Model Inside the standard Eduard Weekend Edition box with a stylised picture of the Nieuport on the front. Inside, all the parts are well protected in a poly bag. There are two sprues, one in the standard Eduard light brown styrene and one in blue/grey styrene. The parts are well moulded with no flash and only a few parts with moulding pips. There is also a small single clear part for the windscreen. The build of this diminutive fighter with plugging the lower front fuselage with a blank plate followed by an internal panel to the port side on which the throttle and linkage are fitted, and a support strut to each fuselage half. The cockpit floor has the joystick, seat and rudder pedals added, followed by an internal strut through the floor and the instrument panel to the strut. Once the internal fuselages are painted they can be joined with the engine mounting shaft sandwiched in-between. The next stage is to fit the lower wing, horizontal tailplane, rudder and their respective control horns. The engine, best painted first and two part cowling is then glued into place, as is the windscreen, tailplane struts and rear skid. The upper wing, using the wing off the blue/grey sprue, is then fitted with the tubular gunsight, whilst the machine gun and ammunition feed is add to the upper front fuselage. With the interplane and cabane struts are the upper wing can be fixed into place. Two grab handles are then fitted to the upper wing in front of the cockpit. Turning the aircraft over the undercarriage, consisting of the two wheels, support struts and axle/fairing are attached and finally the prop can be fitted, although this may be fitted after painting has been completed. Decals Being a Weekend Edition there is only one option on the decal sheet, that of a Nieuport 17, N3139, ten, Fulco Ruffo di Calabria, 91’ Squadriglia, Italian Front, Spring 1917. They are all very well printed in good register and slightly glossy. There are also four instruments for the panel. The decals are nicely printed, with good colour density, although the green of the rudder colours looks slightly patchy. The paint scheme, of overall aluminium, with the lower port wing in red and lower right wing in green, is really attractive and will make this little aircraft stand out from the crowd. Conclusion This is another very nice little kit from Eduard. Being quite small it will be quite fun to rig, but not overly complex. It will certainly make a nice addition to any collection. Recommended. Review sample courtesy of1 point
-
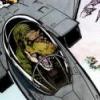
Hi friends. This is my Condor 1/72nd scale Mig 25 P Foxbat It is a hard kit to build. The model represents the machine piloted by Belenko, when he flew to Japan Painted with Gunze and Alclad, with some pigments in exhausts The landing gear is still not weathered with oils. In the afternoon I'll do it I hope you like [/img] Uploaded with ImageShack.us [/img] Uploaded with ImageShack.us [/img] Uploaded with ImageShack.us [/img] Uploaded with ImageShack.us [/img] Uploaded with ImageShack.us [/img] Uploaded with ImageShack.us [/img] Uploaded with ImageShack.us [/img] Uploaded with ImageShack.us1 point
-
Thought I would post up my effort, which I finished yesterday. OOB except for Eduard etched Instrment panel and a few cabin bits. Lead wire for the red armament looms and brake lines, scratchbuilt engine blanks and Verlinden RBF flags. Gunze paint as usual. As for the kit itself, Airfix have definately advanced since my early days of the hobby. Negatives - the sprue gates are quite large which means a lot more work tidying up the small components, the decals for the MRB erosion strips on the leading edges are the wrong colour and were a pain to get right - I removed them, masked the area off and sprayed them gun metal, much more realistic. I did also have snags fitting the inner cabin module to the two fuselage halves, this seems to be a common problem with this kit, I ended up removing some plastic from inside each fuselage half with my Dremel, which seemed to help. Regards Andy1 point
-
Here's the picture I'm referring too, there's some discolouring around where the fairing edged to, hard to say whether it's weathering or perhaps repaint with fresh unfased colour ??? Also, that front turret definitley looks silver inside.1 point
-
Cracking mate any help i can be on the hawk let me know i have a few ref photos of tiger hawks1 point
-
Very nice indeed1 point
-
You can get Trumpeters USS Nimitz in 1:350 and the White Ensign PE set which allows you to modify the kit into any of the class.1 point
-
Neil, I was thinking about this after I posted. I **think** the Lanc had a circular hole for the turret, but the fairing around it (which carried the 'taboo' ring) might have been rivetted round it. In other words, there would be a circular plate over the turret aperture, and the area where the fairing went might have had the red dope paint. All this is conjecture and I don't KNOW. I don't want to mislead you. I like your glass-half-full analogy! The front turret looks fantastic, by the way. No it doesn't ... it's awesome! A brilliant piece of work.1 point
-
After failing to finish this in time for the deadline I sort lost my mojo for a while and didnt do any modelling for nearly 3 weeks. Anyhow after a coat of Klear the decals are now on and progress is being made, hopefully I can get this finished before the end of the month. Yep, its 63Sqn, look like its been zapped, but by who? Really like the way the Archer rivets come out. Some dangly bits to hang under the wings The mods may want to move this thread to the appropriate location. Cheers1 point
-
Thanks for the comments guys! I have a soft spot for Wattisham, did an ATC summer camp there in 1980, camped on a field near the tennis courts, god those FGR2's were noisy!! Cheers Simon1 point
-
Great model to build! O I will love this GB! Cheers,1 point
-
A silk purse from a sows ear.1 point
-
Alternatively, cut about a mm or two OUTSIDE where you need the line and sand back to it, checking the fit every few minutes. Sometimes Paragon's 'cut here' lines were a bit out. That's a lovely kit to work with. Built quite a few over the years and there's a lot of them in the stash for when I go back to doing Mosquitos.1 point
-
Great idea and pulled off well......the worn looks is very convincing great work rgds mr b1 point
-
Imaginative and well executed. This one is well worth the praise1 point
-
Ive found the decals from the original 80s boxing XM607 Serial number, the 3 mission markings on the nose and 44sqdn badge( these were painted out for the raids ) PM me your address and Ill post them to you. During the raids 607 was Dark green 163 Medium sea grey 165 top side and Dark sea grey 164 underneath ( Humbroll colours) She did Black buck missions: 1-runway bombed 2-runway bombed 3-cancelled due to weather 7-anti-troop bombing 4,5,6,was XM5971 point
-
HI Artie, I did try vinegar once before, but it didn't seem to soften anything and just made me want to get a bag of chips for my supper Chris1 point
-
We are preparing two versions of the missile, in the SA72003 you´ll find camouflaged V-2, while in the SA72014 kit will be black&white prototypes. I am sure none of them you´ll find boring, pay attention to special posters that the prototypes carried between the tailfins.1 point
-
For the gauges they can be hard to get anything looking ok. If it was me I'd be buying a set of cockpit decals from the likes of Airscale and using them. For the cockpit details I'd have the base colour and a light and dark shade of it plus a highly thinned black brown mix. I'd spray the cockpit in the base colour and then to add some variation in the tones by spraying the darker shade in the more recessed areas and the lighter shade where the cockpit is going to attract more light. For the shadows immediately on bulkheads you could spray a thin line of the black brown mix and then brush paint an even lighter shade of the base colour on the raised bit. If you use tamiya you may have to invest in another brand of paint for the brush painting For washes I'd stick to oil washes as they are easier to manage, either have a gloss finish for the oil wash or put down some thinner first if its a matt coat otherwise it'll spread out. If you think you've gone too far you can tone it down with a thin overspray of the base colour until you a happy.1 point
-
Cockpit detailing is something that I struggle with. Would Tamiya smoke work? Thinned down of course. If you are going over top of another acrylic, then I think that you need to gloss coat before using the wash.(basic, but never assume). then you would have to flat coat when done. the gloss coat should allow for a fairly easy clean up of the wash though. Edit - I just did some searching, annnnnd some folks have managed an acrylic pin wash over Tamiya base coat. they made sure that the base coat was well cured though. See this link: http://cs.finescale.com/fsm/tools_techniques_and_reference_materials/f/18/t/141198.aspx Post 6.1 point
-
Coming along nicely Rob Cliff1 point
-
Thats nothing! Try storing enough Scalextric track to fill a garage thats big enough to hold two Land Rover Discovery's and is 3-4 layers high. Could never get enough juice all the way around it tho. Seriously tho, I'm running out of room with my stash and all I have is 1/144's a few 1/72's and my first ever 1/48! Dunno how you guys do it. Kind Regards, Dazz1 point
-
Hi Rob, Great job on the Tracks !! Peter1 point
-
If there was ever any doubt about the RLM02 I think that has been dispelled now - that looks spot-on1 point
-
I'm building the revell one. but the re-scribing put me off! Here is something to feast your eyes on. hope it helps. its the best and only raw footage on the thud around :popcorn: :1 point
-
Hi Here is my Airfix 1/72 Hawk TMk2 bought in the recent Jadlam sale for £7. I built it from the box with the only additions being masking tape seat belts, a cut-down dress-maker's pin for the pitot and the very nice Xtradecal RAF Anniversary Update 2011/2012 I sprayed the model with Tamiya X-1, and following the decal application, I brushed on a coat of Klear (removing some of the minuscule stencil decals in the process!) I didn't use all the Airfix stencils, as I felt that they might ruin the look of the model. I'm sorry about the picture quality, but the winter overcast is not conducive to good photographs.1 point
-
Not quite: It looks crap, probably is crap, but we don't know exactly how crap until we fondle plastic, and see how fixable its level of crapness is. Jonners1 point
-
It could be crap; it could be OK; no-one knows.1 point
-
going to beat mine into submission this week1 point
-
This morning I was up before my student, managing to mask and paint the bare metal areas near the engines. As I vacated afterwards, there was an intruder alert over the snowy approaches to mygarden. The Eagle was scrambled for a Such a rush job I fogot to refit the elevators The intruder was identified as this Airfix Eagle testing readyness - both enjoying their . For this model I removed the burner cans and repainted the corresponding area.1 point
-
Trouble is, how would the pilot know what the 'normal operating radius' of the crane boom was? NOTAMs (Notices to Airmen) would show temporary obstacles and their location with the relevant heights above mean sea level. Here's an example: Q) EGTT/QOBCE/IV/M/A/000/999/5227N00145W005 FROM: 13/01/03 07:00C) TO: 13/04/03 18:00 E) LIT MOBILE CRANE OPR 314 DEG MAG/2650M FM ARP. MAX HEIGHT 481FT AMSL.LOWERED TO 450FT AMSL IN LVP. This shows that a mobile crane, with warning light, is situated 2650m in the direction of 314 degrees from the airport reference point the NOTAM refers to; in this case it was Birmingham. I stand to be corrected, but I have never seen reference to the operating radius of the crane's boom. But as always, whenever an aircraft accident occurs, it is big news and invariably the facts are obscured by the sensationalistic reporting styles adopted by 99% of news agencies. It's really good to see that the above BM comments do not speculate and just refer to the facts or reports that are available, as bad as they are. Any number of factors could have been at play here and it is exceptionally sad that the accident and fatalities occurred at all.1 point
-
And managed to get outdoor shots - dubious daylight though. Close but not quite right. Continuing with my Air Superiority blend1 point
-
Managed to put the canopy on last night. Single piece - so no open option with this kit. Oh and the clear green HUD1 point
-
No great problem. The stbd rear edge is a bit proud, but nothing that I couldn't fix. Filled all my joints with tippex and sanded down smooth. I managed to get the nose filled with lead and fitted tonight.1 point
-
A new way to check 6. But now he's looking where he's going again. As I build the plane around him.1 point
-
Not as bad as me - just over 7 days since my cockpit was replaced!! That said, there's barely a difference between the USMC/RAF cockpits so I think I'm OK there, and will probably scratch-build the seat as the Wolfpack one doesn't quite look right to my eyes. I may well find myself investing in the update set though, depending on whether I pick a 100% LERX or not. Great to see them finally released and will certainly make GR5/7/9 modellers' lives easier Tim1 point
-
Yes indeed I was 11 when I walked (to save the bus money which was needed to go to the price) 2 miles to the LHS to find I was one shilling short, walked 2 miles home to tap my mother an advance on next weeks pocket money and then another 4 mile round trip. But I had my Shackelton that I had wanted for oh so long1 point
-
Hope you don't mind me quoting one of your photo's? What do you mean "can't see the rivets"? http://www2.britmodeller.com/forums/public/style_emoticons/#EMO_DIR#/wink.png As you said, a quick rub down until the slightest hint remains should do nicely.1 point


This leaderboard is set to London/GMT+01:00