Leaderboard


Popular Content
Showing content with the highest reputation on 12/03/25 in all areas
-
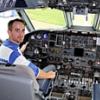
Welcome to Kendari Airport. The plane is ready, take your seat please. The Mitsubishi A6M Zero was first used in combat in August 1940 in China and accompanied Japanese pilots throughout the Second World War until its last day. It was the navy's primary fighter and not only, as it also surpassed the army's aviation machines with its performance. Even after the start of the war against the USA, it performed very well against American fighters. Excellent flying qualities such as fast climb, high manoeuvrability, long range and good visibility from the cockpit, together with experienced pilots, meant that their crews achieved great success over the Americans. This gave rise to the myth of the super fighter, which ultimately turned against the Japanese because the belief in the invincible Zeros caused delays in the development of their more modern successors. Many of the aircraft's advantages were due to its light weight, which was also bought with disadvantages such as poor armour, lack of self-sealing fuel tanks and low firepower. As time went on, the design from the beginning of the war did not stand up to competition to the increasingly modern american planes. The American tactic of using speed and altitude and not engaging in manoeuvring combat also did its part. In addition, the Japanese began to run out of experienced pilots. All this meant that the A6Ms was no longer a challenge to enemy planes and they began to be used more and more for suicide kamikaze attacks. This does not change the fact that the Zero fighter became legendary and remains to this day an icon of Japanese aviation and air operations in the Pacific during the Second World War. The model was made from Eduard's Profipack kit and depicts Lieutenant Kunio Kanzaki's plane from 1944 stationed at Kendari Airfield on Celebes Island. I also used Eduard's flaps, wheels and machineguns, EMP3D's valorisation kit and HGW's seatbelts for the build. This is my first finished aircraft model and I invite you to see the end result of my work with this kit.31 points
-
Hi, With another Cobra Warrior looming I decided to get on with this previous ACMI participant, Austrian Air Force J-35OE Draken. Finished as No.12, of 1 Staffel, Zeltweg, and attempted to make look like how it appeared in 1997 at RAF Waddington for the exercises. Theres was no missiles or correct stores for this kit so i found a spare RB24 and created something looking vaguely like an ECM pod!!! Airbrushed using Mr Color Acrylics, with flory and Mig Ammo washes. Pitot tube was from Master (painted rather than decal) Decals are combination of the boxed Hase ones and the numbers are from Brent Air Decals, after a lot of searching!!! Those are on quite thick film, (so i cut the 2nd side ones much closer to the numbers etc) but i wanted a bog standard frame rather than one of the specials (this was supposed to be the red one). I also feel the wing numbers aren't quite as day-glo as i remember....... Kit went together quite nicely, any defects were my doing rather than its, like me losing one of the wing lights to the carpet monster 🤪 A few pics: Hasegawa 1.48 J-35OE Draken 12-4 by Jonathan Francis, on Flickr Hasegawa 1.48 J-35OE Draken 12-10 by Jonathan Francis, on Flickr Hasegawa 1.48 J-35OE Draken 14 by Jonathan Francis, on Flickr Hasegawa 1.48 J-35OE Draken 12-15 by Jonathan Francis, on Flickr Hasegawa 1.48 J-35OE Draken 12-16 by Jonathan Francis, on Flickr Hasegawa 1.48 J-35OE Draken 12-6 by Jonathan Francis, on Flickr Hasegawa 1.48 J-35OE Draken 12-2 by Jonathan Francis, on Flickr Thanks for looking Jon23 points
-
A "mobilized" Taifun of Dutch East Indies Air Force, Andir, spring 1942. From the box but with Flevo Decals, uppersurfaces "Young Leaf" Jongblad (FS 34079) by AK RC, undersurfaces in grey FS 36440 by Aeromaster. Thanks for looking.22 points
-
Good evening, ladies and gentlemen! I present to you my next model.20 points
-
Decalling has been done (cobbled together from various sheets and the spares box) and flat coat has been successfully applied: It’s always a heart-in-the-mouth moment when the masking comes off, but I’m pleased to report it’s come out ok… A few little touch ups to do, and then it’ll be some weathering with oil and muck on the upper wings. More when there’s more! Tom20 points
-
Greetings from the ROK, This is my depiction of an F-5E in service with South Korea. It's the HobbyBoss kit, which wasn't much of a joy to build (I had started with 2, and only one has made it to completion). It was interesting to learn that the ROKAF operates, or operated, both US made F-5s and indigenous licensed KF-5s, mine is supposed to be an F-5E which are identifiable by their black, round nose cones as opposed to light grey, flat ones as seen on Swiss airframes, on the KF-5E. The serial numbers are not correct as they are for a two seater, they were taken from a rather old looking Microscale set, with roundels from Monokio (think they're gone now), and some stencils from the kit. The obvious silvering on the tail is a little bit of a let down, and I'm certainly still learning with decals after too long. I'm aiming to get all the active jets of the ROKAF done, so this is an essential ticked off. I was waiting for Wolfpack's upcoming release, but this has tamed that a bit (I imagine I'll still pick that up of course!) Thanks for looking, Matt.19 points
-
Recently had the light box set up so thought as display space is getting tight I would create a photo record of old builds. This is a very old build, brush painted, but I really don’t remember much about the which kit it is or what unit it represents. Something in the back of my mind says it’s a Fujimi. Any ideas?17 points
-
Hi everyone, Here’s my 1/48 Kinetic Gold F-16A FAV/AMB "Caza 16 Dragones." One of the many jet fighters in Latin America, with a striking paint scheme. It was a fun build with some challenges along the way. Greetings from Ecuador!14 points
-
WIP here: Thanks for looking Rob13 points
-
This is my build of a Stuart Mk.V, of 5RTR, 22nd Armoured Brigade, in June 1944, and is based on the AFV Club kit. I built it last year a s part of the Stuart M3/M5 GB. Anyone interested in the build can find it here.https://www.britmodeller.com/forums/index.php?/topic/235144580-stuart-v-m3a3-afv-club/ Thanks for looking, and I hope that you like it. John.13 points
-
Spitfire MK IXe Black 58 Hi fellow modellers Here is my recently finished Eduard 1:48 Spitfire MK IXe (8288) I started this at the end of January I must say it’s been a throughly enjoyable build from start to finish. ( I even peeled the carrier film off the decals) My wife picked this kit out of the stash and also chose the markings. Finished as 2058 (ex TE515) 105 Training Squadron of the Israeli Air Force, Ramat David AB Israel 1955 I used some aftermarket for this build to compliment what already comes with this profipack kit. Aftermarket as follows. Eduard Brassin resin 4 spoke wheels (648115) Ultracast spitfire Mk IX top 1 piece top cowling (uc48265) Master spitfire Mk IXe/xvie brass barrels late version (AM-48-103) Primers Mr Surfacer 1000 Mr Finishing Surfacer 1500 black Mr Finishing Surfacer 1500 white Paints: Mr Hobby range H8, SM201. Tamiya range X7, XF-1, XF-69, XF-71 And MRP MRP-122 Varnishes: Mr COLOR GX100 SUPER CLEAR GLOSS and Tamiya X-35 SEMI GLOSS CLEAR. Ammo panel line wash Humbrol weathering powders I’d like to extend my thanks to Troy Smith for his knowledgeable input Thanks for looking and all comments welcome Happy Modelling13 points
-
Another post of another ROKAF type. This time a properly Korean built airframe, which I have tried to model as a TA-50 Block 1 variant of the KAI T-50. The Academy T-50 leans towards to toy side of the market, being snap fit; only coming with stickers; and lacking any landing gear, it's a bit of a shame for a 1/72nd modeller that it's so limited. For my build I heavily used parts from Academy's KF-16 kit, as the landing gear for each aircraft are very similar, but different and I'm well aware of this builds many inaccuracies. The TA-50 Block 1 variant was chosen as handily it shares the same tail as the T-50 and needed not too many modifications elsewhere. The wing tips were sawn off and replaced with AIM-9 rails, the upper antenna reshaped, and a probe added in front of the cockpit. I had added some AoA probes but they were a bit over scale and their snapping off turned into a happy accident. Decals were taken from the decently extensive KF-16's Cartograph sheet, and cut up to form the correct serial. I'm not happy with how poor I've ended up applying them however with a lot of silvering visible, I'll really have to take more care next time. Lastly, just when I thought all was done I unmasked the canopy to find a load of water stains on the inside, knowing I'd never be happy with it, I managed to pry/snap off the cemented canopy, and ordered a new kit to redo it properly (thankfully Academy kits are ridiculously cheap in Korea). Anyway, thanks for looking. Have a great day! Matt.12 points
-
Born from Erprobungskommando 25, Jagdgruppe 10 was a unit tasked with studying the various tactics for using the WGr.21 rockets; some of its aircraft featured a beautiful yellow-red snake running along the entire fuselage. The model (Hasegawa 1/72, to which I only made a few small changes) represents the FW190 A-7/R6 of Uffz. Gerlach, of the 3. Staffel, operating from Redlin between 1944 and early 1945. The paint scheme, as always done only with a brush, is in the classic RLM 74/75/76 scheme. The colours used are Gloy and the decals Eagle Cals EC35. Model completed in 2002. The undersurfaces Hope you like. Thanks for viewing Giampiero Piva11 points
-
I'm trying not to let, Geoff. It’s not easy sometimes. Primer. Yes, I did remember to mask the wingtip lights, thanks for asking. I always seem to get tape lifting on transparencies. I think it’s the particular manufacturer. I just need to remember to use the better sort in future. Now comes the fun part: working out the order of markings, stencils, paint and whatnot. It’s very tempting to return the thing to the Shelf of Doom for a spell.11 points
-
Let´s continuing. The break lasted quite a long time. The reason: I had to make the remaining eight cannons. It was a bit scary. Nonetheless, I finally finished all 16 naval guns and am glad I don’t have to do any more. And now I’ll show you the reason why I made all of them. A user in another forum pointed out to me that the guns were a little too high. That’s why I sanded down the carriage on the second slide a little so that they could look out of the middle of the opening. The remaining eight will be distributed on the upper decks and it doesn’t matter. Let’s move on to the next conversion. Again, I liked the MK set better than the one from Pontos. Since I will be showing all the gun port covers open, I thought the rope shown was very nice. What I changed are the hinges. Since they fold down when open, I simply replaced them with a narrow piece of profile. This is what it looks like for me. I used a slightly lighter grey to accentuate it. And attached to the gun ports. These are the first external structures. Since it is inevitable that the gun barrels will stick out here, I wanted to have them attached already. And so the eight 12 pounders could take their place. A few boxes are still missing. And so I am quite happy with the position of the guns. Now they urgently need the protection of my sheet pile wall. After applying the clear varnish, I will screw it to the dry dock. I am curious to see if I will tear it down again before the construction is finished. 🙄11 points
-
This is my first submission, so please be gentle. It's the Italeri DC-3 kit with Leading Edge decals and and a Starfighter nose donated by my nephew. Pinocchio was used by the CAF for training pilots to use the Starfighter radar.10 points
-
Well, I said I wasn't going to start a WiP yet, but then I've had some paint mixed, so... here we are... Introducing the 1/24 Scale Tamiya Testarossa I've talked about this project in the 'Spotted...' and 'Recent kits...' threads and so now I'll consolidate it into a WiP. So here's how it started... In the ludicrous Ronal Teddy discussion of a few weeks ago, the concept of a Ferrari Testarossa on Teddy drag wheels was born. My first thoughts were of 80s Pro Street cars and specifically the (actually 1990) B&M neon pink Camaro. This is the only photo of the car, at the time, I can find IN. THE. WORLD. If I hadn't sold all my old copies of Street Machine I could have got one from the article. This is my inspiration! The plan is to build a Pro Street Testarossa as it might have been built in the early 90s, if it had been sponsored in part by Ronal: the TEDDYROSSA! (Thanks to @Neddy for the name) I'm thinking supercharger on the flat 12 popping out of the engine cover with a scoop over the roofline, narrowed rear suspension (difficult with the engine in the way) with massive, treaded tyres (drag radials?) and narrow-ish fronts wrapped around a set of Teddies. I might leave the side vents open, a la Willy Koenig, and possibly have smooth, smoked front and rear grilles/light panels... We'll see... As I'm modelling some Teddies for the Ferrari 348tb, I've already started on the centre lock drag versions... And, finally... I emailed ProScale to ask if they could make a suitable pink for me - they offer a custom service at no extra cost. My requirement was for a pearl paint that was as close to the original solid colour as possible. Realising that, being a metallic pearl, it wasn't going to be as 'flouro' as the original. Paul at ProScale really came through with this beauty... It looks red in the photo but, having seen a video of the paint in motion, it looks like the highlights will be bright pink and transition to a red/pink in the shadows, which I think will look amazing! Once the paint arrives, I'll do some spoon tests on white and pink primer. After the spoon tests, this project will probably lie dormant for a while, whilst I clear some of the mounting WiPs I already have! Thanks for looking and, if everything I've written upsets you Martin9 points
-
Hi all, Here’s my latest finished model: 1/48 Mirage IIICJ from Eduard. This kit was part of the #MirageIIIGBcommunity Group Build Greetings from Ecuador9 points
-
A while ago @Iceman 29 asked me about voice pipes. Well, in a break from the bulwark work, I've been drawing the Compass Bridge house and that is crammed with VP's, so I decided to have a go at an initial assessment of the type and quantities needed From what I can see trawling through all my photographs, there are two basic end types, ones with whistles and ones without. There are freestanding and tied to walls, there are floor mounted and ceiling mounted, there are singles and doubles. So, in all I've identified 11 types of VP to print. The free-standing singles have slightly larger bases, the short wall mounted pipe has an oval base wiht two mounting bolts. They are all drawn very slightly larger than true scale for printing and handling When you include those in the wheelhouse and compass house which will just be visible through the windows, there are a total of ~25 marked on the GA that will be visible on the model The compass house (upper bridge) has 8 floor and wall mounted singles (some with whistles I think) and two straight floor mounted pipes that run up and across the ceiling (extreme right hand above) The wheelhouse (lower bridge) has three ceiling mounted, the long right-angled ceiling mounted pipe and four paired wall and floor mounted Beneath the shelter deck by the provision room is a single floor & wall mounted pipe, probably with a whistle The rear deckhouse by the starboard rear door, there is a single floor and wall mounted pipe (probably for the sweep winch crew) Each of the DC throwers has a wall mounted short pipe with a whistle (5th in from the right above) The 4inch gun platform has a demountable free standing floor mounted pipe forward on the port side The midships 2pdr gun platform has a floor and wall mounted pipe attached to the shelter next to the opening The crows nest has a single pipe Some of this is speculation, but the operation and locations make sense. Of course, this arrangement is specific to Alisma, other flowers would have varied depending o the bridge type and equipment fitted. However hopefully this information provides a guide as to how the VP's were used that could be applied to other models I'll post an update when I get around to printing them Cheers Steve9 points
-
Thanks Tomo, Terry, Giorgio, Rob, Ed, Paul and James. Thanks John. To quote Beryl from Bristol "What, another one?!" My airbrushes and booth were packed away for the move and I've sort of got into the habit… So, internals. I chose a punch that matched the surround on the i/p: Anyone tried to handle 1.4mm transfers? Of course not, you're not that silly. After, er, quite some time: I've tried to replicate the dope, like a dope: Perhaps a bit excessive but hey, I'm new to this WWI stuff. Note also that I've opened up the hole for the gun. Close up: I removed the pilot as he'll slip in later and it'll simplify masking. Can you see the i/p? Of course not. That's 30 minutes I won't get back but we know it's there. Crooked dials and all.9 points
-
Unhinged, Ced. Like most of us9 points
-
Thanks Keith Sending kits to Johnny? Certainly for his excellent, artistic shading. I'm up for it (not really Jont, don't worry!) Thanks Giorgio I started with brush painting so airbrushing is my 'new thing' rather than a default. One day… Well this took LOTS of discipline: Klear on the burnished edges. Paint tomorrow. Fingers crossed!9 points
-
I’ve really been looking forward to this GB as it gives me a chance to build this beastie: Inside the box there’s a LOT of plastic: I’m not going to bother with sprue shots on this one as there’s plenty of them out there already. I’m looking forward to finding out how the track assembly works; they’re individual plastic links that go together with pins in a supplied jig to create a moveable track. I say moveable as I suspect it’s not as resilient as a metal track but should be enough to make painting and assembly on the model easier. I’ve got a Tankograd book and some Accurate Armour bits to go with this: As the title suggests, this one will be built in the Berlin camouflage scheme. Roll on the 29th! James8 points
-
Hi everyone, This is a What If project inspired by a bit of reality. Back in the '90s, there was a rumor that the U.S. considered providing F-15s to Taiwan. Based on that rumor, I’ve created a mix of fiction and reality, imagining what an ROCAF F-15 could have looked like and how it might have been armed. I built this model in 2024, and it has been the most enjoyable project of my life due to the artistic freedom it allowed. Greetings to all from Ecuador!8 points
-
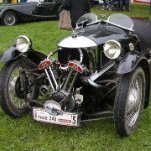
Is presenting that milestone really necessary ( especially because you had it in UK😉) ? It's the great Citroën Traction Avant. The interesting fact is that it seems to be a daily driver ( or at least driven on an almost daily basis ) as it bears some modern bits ( inside and outside )8 points
-
Thanks Jeff. I've got a Hasegawa (well Hobby2000) one here so might do it in such a scheme, need to do some research. Thanks Chris Lol, I'm still learning the schemes on these! Thanks James Thanks Tom, quite happy with them, after researching RLM65, I realised my garage door and front door are pretty much this colour 🤣 Thanks Colin, it's a signature mistake 🤣 Thanks mike, it is a lovely looking aircraft That was my fear too, in fact after getting the paint on, I still had that concern, but weathering and decalling has blended it in more. Between last night and a couple of hours this afternoon, I got the decals finished, varnish on and weathering done! Happy with the look so far, but that worries me as it means there is an impending setback due! I've kept the weathering fairly restrained. It's all soft pastel other than the exhaust stains, they were airbrushed on and from photo's I've seen were often quite heavy. Most of the stencils were toned down by a light overspray of the base colour and additional weathering. Next steps will be the undercarriage and props. Cheers8 points
-
There are aspects of this build that are more than fiddly. The undercarriage retraction struts, for example. Getting them to all line up was a proper fiddle, and I didn’t win in the end. Unfortunately, it isn’t possible to assemble the parts on the wheel bay before it goes in the wing, as the ceiling of the bay is moulded on the upper wing internals. I hope it’ll look okay in the gloom underneath. Anyway, radiator bits next. Then I might be able to get the canopy parts fixed temporarily in place for a blast of primer on everything. We shall see how it goes, because Real Life is tending to get in the way again this week.8 points
-
Do what Bill??!! Now I have to find a penny? What do you think of this? Just a test. I have 0.4mm tape too but this looks right? I need to spot paint the seepage first, obvs, but should be OK burnished down under varnish? Right, tape off: Still have the white to do remember. Don't strain your eyes looking for seepage: Johnny you were right. Perhaps I'll do better on the other side: …but with these done: I'm seeing an end in sight (snurf).8 points
-
I’ve continued with the painting of the Halibag over the course of this week - night black undersides have been sprayed and I’ve started with the decalling: Quite a few decals still to go, but it’s really starting to come to life now… More when there’s more! Tom8 points
-
Brownsing through my files I came to the conclusion that I had not post that old model of mine. In fact we do not see that plane very often and it is a pity as it was a very important one in the IJN. The "Dave" was the eyes of the fleet and was found on nearly every ship during the early time of the Pacific war. Hasegawa has done a pretty job on that floatplane despite a rare documentation. My "Dave"was on board the heavy cruiser Tone during Operation"R", occupation Rabaul and Buka on Bougainville in January 42. fullsizeoutput_22bf by jean Barby, sur Flickr fullsizeoutput_22be by jean Barby, sur Flickr fullsizeoutput_22bd by jean Barby, sur Flickr fullsizeoutput_22bc by jean Barby, sur Flickr fullsizeoutput_22bb by jean Barby, sur Flickr fullsizeoutput_22ba by jean Barby, sur Flickr7 points
-
Not sure about Mike Score hair dos or Pat Sharpe/Bono mullets. Wasn't really my scene back in the day. I was more in this tribe; So with that in mind, I might sort through my stash for a build I can paint black for that moody aesthetic. I'm well sorted for a soundtrack to this GB too. Still got all my vinyl from back in the day....lots of it. And still going strong my Sharp GF6060 bought in 1982 and my Technics HiFi from 1985. Just need a neon Flamingo to hang up on my wall now. Steve7 points
-
I was the happy recipient a while back, of an Airfix Scammell as a present from my girlfriend’s eldest son. As is often the case with kits, I intended this to be a simple OOB build, but I ended up making a few tweaks, including sanding off the ship rivets and replacing framing detail with plastic card strips. I also added a winch and cabling and some glazing which the kit is missing. I partnered the transporter with a much newer Airfix Cromwell, and this gave me a good opportunity to contrast the difference in kits some 50 odd years apart. The fit, engineering and detail of the newer Cromwell is better than the old (1961) Scammell, but both required some of the parts to be carved from the sprue attachment blobs. I was tempted to improve the Scammell using @TeeELL's superb 3D printed update set, but I fancied the challenge of the old Airfix parts to be honest – and they were a challenge. I failed to get the wheels squared up and all touching the ground; the fit is difficult to say the least, so I made use of my sandy groundwork to build up in areas to meet the wheels instead. One big plus point was the decals, which after recent Tamiya experiences were a joy; settling down nicely even on the tank’s roof star using (quite a lot of) microsol. For the groundwork, I made the basic terrain using thick cork tiles, carved to shape, all covered in a mixture of tile grout, “cream” grout pigment, household filler and pva with a dry mix of white tile grout and pigment sprinkled on top. When half dry, I rolled a spare wheel over it to get the track and wheel marks and these were highlighted with a little light brown acrylic wash. The barbed wire is a pair of thin twisted silver wires and bunches of 6mm static grass were glued on to form the dune vegetation. The pigment mix was also dusted and washed over the vehicles to weather them and help them blend into the groundwork. I used a touch of diluted mod-podge on top of a wash of grey acrylic to get the wet beach section in the corner.7 points
-
@SnøMotion @Potsie The ride height is not set in stone/glue yet. That last mock-up was with the hubs blu-tacked on to the mountings. I should hopefully have wiggle room up and down at the front and the rear and I'll only do the actual gluing once the body is finally in place and I can judge it. But yes I agree, the front should ideally be lower than that last mock-up. In the meantime, more progress. The other reason for the high parts count is the interior - and this is not quite all of the parts either - those assembled headrests are two-part and so is the seat back. For painting, this is all very convenient. Likewise more convenience with the glass and it's masks. The rear window is already installed so not shown here. Completed dashboard. The steering wheel decal looks fine to the eye, slightly misplaced under the cold hard glare of a macro camera lens. I've assembled and painted the original wheels anyway. If the wheels come on and off easily after the ride height mods (I imagine it'll be more fragile), I may photograph it with this set as well as the Mazda wheels it'll be finalized with.7 points
-
The plane is small but the shot angle may have emphasized it. I hope this helps prepare me for future bushplane builds that may be smaller. I'll look into other kinds of tape. Have you got a setting that allows you to lift the cutter when changing direction? This made a difference for me on the Silhouette. So today plunged on with the iffy masks and painted red and blue. A tiny bit of leakage and some truncation of the blue circle. Hm.... ok. Also not thrilled with the proportions of the fuselage roundels, which had some damage anyway....Too chubby! So masked up from biggest circle down using the wing masks and redid the red dot.... then masked for a bigger white ring.... and here we have an adjusted roundel (still needing the blue fixed up). I think that is more like the photo. So I did the same for the starboard fuselage roundel (finished version shown, blue still to be fixed up). I also tweaked the starboard wing roundel blue along its bottom to fix the curve, then yellow to dull down the leakage from before. The port roundel needs fixing but I haven't worked out how yet. From a distance, it's not looking to bad! On the underwing fuel gauges, I striped some light gull grey to simulate the open glass area in the middle. Also weathered the exhaust with some drybrushed french blue on its curve (bluing from heat) and drybrushing rust over the rest of it. This toned down the metallic sheen. Lurching along. I try to play tasks off each other... frustration here sends me to work, frustrations with work make me eager to get back to this 😛 I need to tweak the port roundel, fix up the blue in various spots, and start prepping for the big aluminum spray of the floats and struts. And then reglue the pitot tip and paint it. Not sure if I'll bother with underwing stuff... I have pix that have roundels and pix without them. Up to my usual standards of mucking about and redoing 🤪7 points
-
So, lashings of putty (Tamiya white) around the front lower fuselage after installing some 2mm plasticard. Now just have to wait probably a couple of days for it to dry rock solid, then start carving.....7 points
-
I've been meandering along with the fuselage internal structure and added detail and it's now ready for painting. Quite a lot of work and research went into this, which I find rewarding. The kit itself is superbly engineered, love this one. One thing, particularly with the actual a/c I have in mind, is what radio set(s) it was fitted with. I added a boxes and added the rails for a radio but no idea what would have been used. Thanks for looking - Andrew7 points
-
On a similar subject, Ed Sheeran reportedly has a net worth of $200 million. If that's true, why can't he afford a comb??? Ed also produces "Tingly Ted's Hot Sauce". It's available as standard or Extra Tingly. I'm always on the look-out for a nice hot sauce so I got a bottle of of the Extra Tingly. Sadly it turned out to be disappointing and insipid. But then, so is his music so at least there is symmetry.6 points
-
Resuming normal service, 1993 XJS Matt6 points
-
Hello all! This is my new model. Here is another one of my models. It took five days to assemble. As additional sets I used wheels set from SBS, pilot tube from Mater and 3D decal from Kelik. Painting Mr Co;or. Weathering oil paint and washes.6 points
-
Aaaand we're just waiting for the results to come in...6 points
-
Ooh, ooh, I've remembered why I'm brush painting! The airbrush and booth were in a box somewhere and I started, so I'll finish. Not insane then. Probably. Thanks Giorgio, you are my tutor! You're right Keith. I've tried to burnish over the rivets but not easy - count 'em! Thanks Alex. I'll certainly give it a go here Thanks Cookie! Watch this: More later.6 points
-
Thanks for all the comments chaps! I am moving along with the decals, I have added the roundels (from Modeldecal) and the codes a mixture of Modeldecal and Ventura (NZ) decals... No stuffing up this time round, no hot water for the decals just warm!! Under lower wing Modeldecal codes, they went on beautifully! As did their roundels! I know there is supposed to be a clear strip where these fuselage codes are but I was concerned about how the decal would be if I cut of a section for the codes.. so I just left as is... wrong I know! The Ventura Rudder and fuselage codes are a bit large but they fit okay. I hope to have this model completed by the end of the week!6 points
-
It's not just the written word that must be taken with a degree of suspicion. Photo journalism can also be highly manipulative (and no I don't mean the use of doctored photos or creative use of photoshop). 'The camera never lies' is a fallacy. The camera will only ever record what the photographer chooses to record. The way a photographer frames/composes their photos can have a fundamental impact on the story being told. As a qualified photographer myself, I am always reminded of a lecture we had at college during my training. The lecturer in question was a photo-journalist who regularly worked for an extremely left-wing paper (not a mainstream one). One day he presented to us a series of images he had taken during the Miners Strike and a similar set of images taken by mainstream photographers on the same day at the same event. Unlike the mainstream photographers standing behind the police lines, he was standing amongst the miners and had an entirely different perspective of what was happening. His point was not that his images were any better/worse or more/less truthful than those taken by the mainstream guys, but that the same event can be portrayed very differently, dependent on where you are located, how you compose an image, what 'story' you are trying to tell and what you choose (or choose not) to photograph. That one lecture was probably the single most important learning experience of my entire two years at college.6 points
-
I'd nearly completed the inside and was getting ready for the next step, painting the body. Often the body can be done first, but for this car the inside had to be done before the outside, or I felt it should. There is a glued join around the body at the level of the door bottoms, as the other panels didn't have a join here I felt it best to fit the interior, close it up, fill and sand the panels and then paint. In order to do this I had to fit the rear glazing, mask the inside of the side windows as these were open, along with the door cappings; I was ready to glue it all together but somehow thought it worth checking the destructions, just in case I'd forgotten anything, blow me down I had. I'd not fitted the gear stick, the steering wheel or the door cards. Lucky I was cautious, extremely unusual for me. Here's the shiftless, wheelless, doorless interior and despite repainting the passenger seat you can still see where the wash stripped the paint; and the reverse angle, focussed nicely on the seat backs; The original gear stick was just a vertical piece of plastic coming up from the transmission tunnel, so I snipped it off, built a gaiter from sprue and made a lever from metal rod and superglue; The steering wheel seems a bit thick for the era but I'm really not going to do anything about that! Airfix even moulded in the handbrake so I painted that, though, along with the pedals, I don't think they'll be seen again; Door cards on and we should actually be ready to close it all up, I'm quite pleased with that; The interior was stuck into the inferior of the exterior and glued on, here's the join line I mentioned, at the posterior; I decided to call it a day, a couple or three coats of Mr surfacer will hopefully fill the gaps and it'll be ready for a rub down on the morrow, must remember to paint inside the wheel arches; TTFN Ross6 points
-
Ciao her my old Tamiya Panther Ausf A, the kit is very old but not bad at all; due that I wanna represent a Panther in Normandy I apply the zimmerit from Eduard very realistic but not easy to managed. The crew are from different brands Tamiya the commander, and the rest come from Hobby Boss and Dragon. The next step is create a diorama on the way to a Normandy village..let’s see..sooner or later…. ciaoo Paolo5 points
-
The details added inside the canopy include only a few handles and curtains made from shaped food-grade aluminum: And finally the first pilot's instrument panel and compass find their place in the cockpit:5 points
-
A quick pose next to a Heller Constellation, then it's on with a bit of reinforcement action... Here's the area in question. The fuselage can flex in and out thanks to that big gap. The wings are also a bit on the wobbly side, having only the belly panel at midships to hold things together. That might not be much of a problem if everything is glued together as one. I stress the 'might' and the 'if' part of that statement. I'm more in favour of a belt and braces approach. First job was to add a couple of plastic I beams across the wing gap, secured with loads of thick superglue. 40thou plastic card was then cut to fill the gaps between the fuselage sides and wing tops. Braces were added to the sides for the card to sit on and the whole lot glued together. It's all going to get a day or so to harded off completely, then it's on with getting the wings to fit properly followed by a lot of sanding. More as it happens...5 points
-
Welcome Mike. Pretty indeed To be honest I'm a kit builder rather than a modeller. That's my excuse and I'm sticking to it! Pilot finished: My favourite for engines has not survived the move: I must pick up another pot at the next model show. AK pastes used instead: Horns removed as instructed: Things painted: NOW you see them (my poor old eyes): Chiselled off: and repainted. Drying now. More tomorrow if the Freighter doesn't take all my time.5 points
-
Thanks gents. As usual work and stuff gets in the way but managed to do a few more hours on the Lizzie. Just out of interest, this is the top of a Mercury cylinder head looking from the rear. As you can see a tough job trying to add tappets, springs and stuff and as I mentioned it wouldn't be seen anyway. Assembly of the interior structure is straightforward and quite accurate to the real thing. The petrol tank needed a touch of filler, the rest lines up perfectly. On the port outer side of the structure there are a number of small things not represented in the kit that you can vaguely see through the framework. So from from the front I've added throttle control arms and rods, a missing bracket, the trimming control drum directly behind the tailplane trimming handwheel, the wires leading back to the tailplane which are visible in the rear cockpit, some electrical wiring and the pipe to the carb from the petrol tank. Obviously there are a lot more wires around the cockpit, particularly under the instrument panel area, which I won't be able to replicate in scale. I'm trying to be careful here as I've yet to fit the oil coolers and vents either side of the fuselage (the 'trumpets' you can see on front face of the Mercury engine take in air and force it back through the oil coolers, it then exhausts through the slits on the fuselage). Andrew5 points


.thumb.jpg.2c282efcc138b7cf7f1e1586a9c534d2.jpg)
.thumb.jpg.b4a5069fd2c2dd5708ce1694345c5b11.jpg)


.thumb.JPG.761f7f0f11b1272b11a79005d3e368c4.JPG)


This leaderboard is set to London/GMT+01:00