
Leaderboard


Popular Content
Showing content with the highest reputation on 01/10/12 in Posts
-
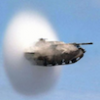
This kit has been around a long while from PM models. It makes quickly and easily into an attractive kit and still only about £4-5.3 points
-
Thanks everyone: @Shar2 - After a lot of looking I managed to pick up 2 copies of the kit from eBay, maybe now I've finished someone will announce one in plastic... @GrahamWalker, no more photos of Sheffield - need to try again with better light. This is the third RN cruiser I've built: HMS Ajax - scratchbuilt HMS Pheobe - Ironshipwrights/Scratch A3 points
-
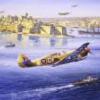
Hi everyone, here's the Airfix Hawk 81-A-2 completed as a Pearl Harbor based P-40 of the 15th PS: Humbrol enamel 116 on top and 156 on the bottom. Decals are a mixture of AML, Techmod and Aeromaster with the prop logos coming from the kit sheet. I used an excellent series of colour photos from the LIFE online archive showing P-40's being built at Buffalo, NY during 1940 as reference for the basic finish. The walkways are painted on rather than using decals and it is weathered, albeit the pictures don't show it too well apart from the paint peeling on the back of the prop blades. Secondly, here's the Hasegawa 1/72nd A6M2 as an unidentified aircraft from DP Casper's "Java Sea" decal sheet: Unfortunately, the light makes the finish more yellow than it actually is. I've again used Humbrol enamel throughout, with H167 "RAF Hemp" used the main colour for the airframe after corresponding with Nick Millman a while back - thanks Nick! Finally, here's a shot of the two together: Comments and criticism welcome! Mike.2 points
-
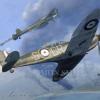
Hello friends, I'd like to show you my latest finsihed kit: the Supermarine Spitfire in 1:144 from Revells Microwing series. Building took longer than I expected. There was no fitting and the Cannopy is to wide. I painted the Spitfire with Revell and Vallejo paint. Not complete now, still need to fix one wheel. Here you can see it on my Hand.2 points
-
After lurking for a long time I thought I should contribute: This is my recently finished WEM 1/350 HMS Sheffield, minor updates were made to represent her 1943 configuration, mostly involving radar and light AA. The colour scheme and base represent the ship as she would have looked going into action against the Scharnhost on Boxing Day 1943. Time for the photos:2 points
-
Ha ha my first German aircraft ever. Been working on this one behind the scenes just a little bit at a time to start building my RLM and mottling skills. Also tried a bit of post shading as well. This one is straight out of the box plus a nice little antenna cable made from EZ Line delivered from Mr Peter Jacksons company Wingnut Wings. I love how that stuff looks and apparently it doesn't loose it tension over time neither. I'll be the judge of that in two or three years time if I haven't decided to do a mock Battle of Britain scenario and take a BB gun to it!!! Not sure what paints I used on this one. I would have gone right ahead and used the Tamiya combinations if it hadn't been for a fellow member of my local hobby group who said try my paints which are RLM colours. He said they were decanted from the original bottles and thinned to an appropriate mix. Whatever they were, they sprayed down like silk. The only problem I had with this kit was the decals. The first decal I dipped in water, just broke apart then found the whole sheet appeared to be cracked up. No problem!!! Just sprayed two coats of Future on there and it saved the day. Pics time!!! Had to make a minor adjustment to the antenna cable to tension it up because according to a fellow modeller, the FW190 A had a retracting mechanism installed. He also found a photo of the exact aircraft I have build here which supported that theory as the cable was taught. More German WWII aircraft to come from me soon as I have in progress an Eduard 1:32 Bf 109 E-7 Trop which hopefully will be ready in time for November when myself and my local hobby club go on the road to participate in the annual Armistice in Cambridge show in New Zealand. I may enter this 190 into competition along with my VF-1 Wolfpack F-14A Tomcat.2 points
-
Hi all, Just wanted to post this and share it with you all. I saw this kit for sale and then realised I had never made a 1-72 Spitfire in my life! I mainly chose it as it was a Spitfire, but something different from the usual camoflage. When I opened the box I was suprised by the detail molded onto the parts and the decals which looked very good. Building this kit was a joy, everything going together as it should and so it didn't really take long to build. I gave it a coat of varnish, then applied the decals, sealing them and them adding a final coat of glossy floor varnish. I suppose the PR variants were glossy for higher speed performance? I weathered it and added watered down black to the panel line recesses, however I may have overdone it a bit, having the black a little to prominent! Anyway for about £7.50 from Modelzone I believe this kit is well worth the money and a stunning kit for the cheaper end of the market. I really like the new Afghanistan Airfix releases available in a few combinations. It is great to see a 1:48 Landrover, maybe one will end up in my to be built 1:48 c-130!! My point though is that these kits are very expensive and therefore not available to the younger modellers, who after all should be the ones enjoying the hobby most. This kit is perfect for them and us and as I said a joy to build. Infact so much so I went and got another version the F MK.22, so well done Airfix Airfix 1:72 Supermarine Spitfire PR XIX (A02017) representing aircraft PS888 of 81 Sqn, based in Malaysia, April 1954. Decals also supplied for 31040 '11/60' of 1 Division Flottilj 11, Flygvapnet based at Nykoping, July 1955. Airfix 1:72 Supermarine Spitfire F MK.22 (A02033) representing aircraft PK433 of 603 (City of Edinburgh) Sqn, RAF Turnhouse, 1951. Hope you like the pics, feel free to comment etc. Many thanks for looking Tommy2 points
-
30 September 1944 a De Havilland Mosquito of Royal Canadian Airforce crashed in the danish forest Gribskov about 10km from my home. This build is meant as a tribute to the brave pilots that gave their lifes for freedom. In the afternoon of 30 September 1944 the Royal Canadian Air Force 418 Squadron had 4 Day Ranger missions to Germany, Austria and Denmark. The mission to Denmark, carried out by 2 Mosquitos, had fatal consequences for one of the planes and its crew. The 2 planes were TH-W, NS906 with Flight Lieutenant (Pilot) R. H. Thomas and Flying Officer (Navigator) G. J. Allin and TH-S, HJ821 with Flight Lieutenant (Pilot) H. E. Miller and Sergeant (Navigator) W. Hooper. These Mosquitos took off from RAF Coltishall at 15.25 hours danish time. Their mission was to shoot down and/or destroy as many German planes as possible at the airfield at Grove (Fliegerhorst Grove - Karup), the airfields at Aalborg (Aalborg West, Rødslet, now Aalborg Airport - and Aalborg East) and Copenhagen Airport, Kastrup. At Aalborg the 2 planes engaged a German Bf109 fighter which was shot down. Another Bf109 was approached but escaped. From here they flew over Sjællands Odde to close to Hvalsø in the central part of Sjælland (Zealand), where they attacked the locomotive of a passenger train. Then the planes flew in a crescent over the Køge Bugt (Bay) and over Copenhagen Airport. When they came over the Sound they were exposed to flak from flak-batteries in Flakfortet and Middelgrundsfortet. At full speed the planes flew to the north following the Sound till they passed the coast of North Zealand at about Espergærde. The two pilots had radio contact when they flew over Esrum Sø (Esrum Lake). They had not been hit by flak. One minute later the Mosquito with Thomas and Allin hit two tall trees near Gribskovlejren. The left tailplane was torn off and the plane crashed. The plane hit the ground in a narrow angle and ploughed a 300 meter long track in the ground. The plane stopped about 800 meters from where it hit the trees. As this point the two crew members where more than likely both dead. The cockpit was completely burned out, apparently because the incendiary ammunition had made a huge shooting flame into the cockpit. Shortly after Miller and Hooper noted that they had lost radio and visual contact with NS906. They took a course that would bring them back to their base in England as fast as possible. When they passed between Skovby and Holse, app. 8 km south west of Bogense in Fyn (Funen), they attacked what they believed was a black German staff car. Actually it was a taxi from Bogense. The passenger was killed and the driver was injured. Miller and Hooper left Denmark north of Rømø at 19.00 hours. They landed after a flight of nearly 2,000 km in Coltishall Airfield to a debriefing at 20.50 hours. The entire mission had lasted 5½ hours and cost the lives of half of the aircrew. For 68 years one of the big questions has been where the bodies of the two airmen are. Apparently the Germans removed them in spite of serious attempts from the local vicar to have them handed over, so they could have a decent burial. However, the Germans refused that. The local citizens raised a memorial stone at the crash site. Translated to english the inscription says something like this: "For the freedom of Denmark we thank God On this place fell two messengers They came from England to the coast of Denmark And brought arms to the fight of the country They bought us freedom with their deaths God give them piece in the womb of Denmark" Short about the model: This is the Tamiya Mosquito 1/48 kit. It fell together without problems. I used an Eduard PE set for interior and exterior, resin wheels and mud guards and turned brass barrels. Paint was xtracrylix, which I have become quite fond of. The roundels and codes are painted, only serial numbers and stencils are decals. The model was weathered using Flory Models dark wash, thin layers of oil paints for streaks and airbrushed alcohol tinted with Tamiya paints. Thanks for watching!2 points
-
Hi everyone Here is Revell's 1/72 Consolidated PBY Catalina, which I have built to depict RAAF A24-10 "Dagwood". This is my first fixed-wing aircraft build for a while now and it's with some reluctance that I post the pics, as my aircraft building skills are somewhat meagre compared to a lot of you guys. It was airbrushed with acrylics and weathered with pastel chalks. It was built OOB with the exception of the aerials (stretched sprue) and I used Aussie Decals. Thanks for looking Greg2 points
-
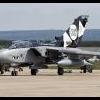
Continuation photos from the Starfighter GB. TF-104F from the Hasegawa kit. I opted to represent an earlier marked '104 as opposed to the post 1968 serial/code system as I rarely see post war Luftwaffe aircraft anyway let alone the numbering. So here you have it a TF-104F of WS 10, somewhere in West Germany 1960s. See Starfighter GB for build and other details regarding this model.2 points
-
This piece of fantasy is based on the Red Roo 1/72 Dart-powered Mustang and was done in response to a request for 'something different'. I hope you will agree that it is different. There is nothing completely outlandish about the idea. The Dart powered Mustang existed and although it never flew its Cavalier and Piper Enforcer brethren did fly successfully without any adverse reports on them. It would still have been a handful though. The Mustang was tested for carrier service in WW2 and performed quite successfully in the hands of an experienced naval pilot. The scheme is obviously based on the RAN's Sea Furies and is coded Q for HMAS Vengeance. The arrestor hook and pitot are heavy duty as are the navaids as these are the bits likely to be called into question in real life. The pilot has got away with his WW2 kills painted up! There is a build thread here with some hints if you are building an Academy Mustang. (If we had known about the Airfix one a year or so ago, that would have been the base of the kit.) http://www.britmodel...topic=234923759 It looks more or less normal here and here But it's all about the nose and the tanks and the exhaust pipe. The yellow is a nod to the original. That hook will do the job. Q is for HMAS Vengeance. R.A. N. in Sea Fury style. RAAF Mustangs were A68, so.... No precedent for underwing markings so had to make it up Thanks for looking. Who is going to be next with a 1/72 one of these or first with the 1/48 (teasing, it's not released yet)2 points
-
Hello all, Here is my recently completed 1/48 Revell B-1B Lancer for the Close Air Support group build. An absolute monster of a kit, the build thread is here I used Twobobs decals, SAC metal landing gear, Cutting Edge exhausts, Shull24 Sniper Pod, ALE-50 Decoy fairings and an Eduard etch set. All 20 JDAM's are from the spares - 10 GBU-31's and 10 GBU-38's. The Conventional weapons module for the GBU-38's was scratch-built. FOD inserts for the intakes are made from fine sponge. She's marked as 85-0085 'No Antidote II' of the 37th BS/28th BW, at Ellsworth AFB. The photos (there are a few!) Size comparison: Yep, that's 2 1/48 F-14's! Comments welcome, Thanks for looking, Dave1 point
-
Hi, this is my first WIP here on Britmodeller I,m going to try to build a 1/48 scale Spitfire PR.XIX, also known as S 31 in the Swedish AF This is what i have to work with: Academy Mk.XIVc Heritage Aviation PR.XIX Aeroclub Mk.21 conversion Daco Producs Mk.XIV improvement set Aires Mk.XIV cockpit set Quick Boost nose and spinner plus eduard detail set and ultracast wheels After reading several forum discussions and build threads, it seams that the main fault with the academy kit is the shape of the nose and that the fuselage generally is to deep, otherwise i think the kit looks good. After comparing with drawings i think that that's the case. Aeroclub's Mk.21 conversion looks spot on in form, but i think that the panel lines are on the soft side and the casting is generally a bit crude (being a short run kit), so the plan is to use the Academy kit for this project. It would be a shame just to throw it away. The aeroclub set will come in handy in an other build. The Daco Production improvement set corrects the most obvious faults with the academy kit, with a replacement nose and spinner among other things. I will use the wing and lower fuselage camera insert from the Heritage Aviation kit, which will save me a bit of work not having to convert the Academy wing (i hope, the casting of the HA's wing isn't the best). The Quick Boosts nose doesn't seem to correct what is wrong with the academy kit (being about 2mm to deep), so i wont be using that. to be continued //Johan1 point
-
Hi all, I don`t build many choppers, I`d like to but they take up too much room, but when this became available cheap I couldn`t resist it. was actually the German and French boxing, so had to raid the decal stash for the markings added one or two missing details in the cockpit but mostly OOB left the rotor blades detachable for storage Hope you enjoy, thanks for looking Cheers Russ1 point
-
Just finished this one. Only a couple of pics for now as it's magazine bound. Build was straight forward apart from main seams.These required some work with CA glue and elbow grease. decals were a bit of work but patience and a little touch up paintwork and all was well. Painted with Xtracrylix and Tamiya paints and finished with Alclad aqua varnish. Decals were by Caracal. Hope you like. Thanks for looking1 point
-
My offering will be a Fiat CR-20: Being a resin kit, there are no sprues - just a bag of bits. Being a Choroszy resin kit, some of the bits won't feature on the instruction sheet! The kit has a nice decal sheet - but I'll be doing mine as a Paraguayan machine (another recruit for my Chaco War collection). Expect a late(ish) start from me - but I'll be following everybody else's builds avidly. Cheers Cliff1 point
-
Hi Folks! Finally finished. I started this build almost year ago (small kid and work don't leave much time for modelling). The kit is well known Tamiya's product with all issues. The biggest problem was the Aboukir which was a bit oversized. Yet in general it was very nice and easy build. The kit is painted with Gunze C and H colours. I used declas made by Sky Models (all a/c and national markings) which are very good and Techmod's stencils which suprised me with the superb quality. The biggest faults are: canopy and windshield which I masked with homemade masks and undercarriage. The last issue I could fix but I noticed it after fitting the wheel.'s Oh yes, it supossed to be I.R. Gleed's a/c but, I think, I put markings in wrong places. OK. That's her - feel free to criticise. Now I have to find some time to finish another Spit and A6M5c Zero before winter comes. Cheers Dominik1 point
-
This is the Williams Brothers kit of the sleek Northrop Gamma craft of the early 1930's. Several versions of this plane were done for various customers and it's done here generally as Frank Hawk's Gamma 2A Texaco "Sky Chief" with the three-blade Hamilton-Standard prop but my model also has the ailerons and extended nose/cowl of Lincoln Ellsworth's "Polar Star" Gamma 2B version. Your guess is as good as mine why I did it this way ! Luckily, Gamma's are good-looking craft and can handle my "upgrades" ! The Texaco "Sky Chief" could approach 250 mph and had a range of about 2,500 miles .... which was quite good for 1932. The "Sky Chief" was wrecked in 1936, but the "Polar Star" Antarctic explorer still exists and is displayed at the Smithsonian Air and Space Museum in Washington, D.C. Photo Series 3-12-11-II 009mod4XCZ by mikedetorrice, on Flickr Photo Series 10-6-11-II 003mod5XCZ by mikedetorrice, on Flickr Photo Series 3-12-11-II 013mod5XCZ by mikedetorrice, on Flickr Photo Series 5-4-12 001mod6XCZ by mikedetorrice, on Flickr Mike1 point
-
My latest creation. Hasegawa 1/72 Voodoo with Airwaves conversion, Aeroclub u/c and seat, Microscale decals for 78 sqn 81st TFW 'Bushmasters' RAF Woodbridge circa 1961, finished with a Spectre Resins Mk 7 instant sunshine.1 point
-
after a lot of faffing about I have finally finished my Airfix 'Mild and Bitter'. I have tried to represent the very tired, weathered appearance these high-time B-26's seem to display in photographs. I have used the excellent salt weathering techniques seen on elsewhere this site which I think worked reasonably well, especially 'fading' the RAF Dark Green which was apparently painted on the wings, nose and tail of this and other Marauders at the time. I am sure I will be open for correction by more knowledgeable experts, but I am pleased, hope you like her too, and many thanks for Wes for providing the markings and to Goose for the kit1 point
-
Well finally finished it but rather, rather late for the Malta GB (again sorry for letting the side down), but just in time for next weeks SA Scale Model Expo! http://expo.saplasti...expoindex.shtml Not a bad kit but not a great one and now 2nd best next to the Italeri offering. Sky decals used,for the Sicily based scheme, but the kit decals are great quality.HS Infinity airbrushed finish. Hope you enjoy. Cheers Stephen1 point
-
Well, let's hope it's true. I myself have numerous ICM, Hasegawa, Airfix and even a couple of Occidentals in my long quest for a good quarter scale IX. I was thinking of cross kitting a couple of them. Something along the lines of an Airfix or Otaki fuselage mated with the Hasegawa wing. A Mk.XIV sounds nice, as well, though.1 point
-
I'm planning on doing S/N 31036, F11-36 (ex RAF PS 909) with blue squadron color on the spinner. I think that the aircrafts with blue (and green) noses are the ones that are most pleasing to look at. The red and yellow noses makes a to harsh of a contrast against the overall PRU blue finish. 31036 is one of only two aircraft (31031 being the other) that i now fore sure had blue spinner. Historical records on this matter is very hard to find since no official records exists on this. Also the color on the fin numbers is up for discussion, as both white and yellow is supposed to have existed. I'm doing mine with yellow numbers late in it's service life. From the beginning all aircraft wore a fin number that was 20+ from the two last digits of the serial e.g. no.56 for 31036, but that was changed to have the same number as the serial, and my thinking is that when they renumbered the aircraft the color was changed from white to yellow. This seems to be true for serials 31001-31040 which would have been marked (in white) with numbers 21-60, serials 31041-31050 got the later numbering from the start. Robert Bergwall (RBD Decals) is doing some remarkable research work on this matter for his forthcoming 1/32 scale decals (and 1/48 i hope) and i have to thank him for providing me with a lot of info.1 point
-
Well, it is a rumour with a name and place, Hyperscale and Mr Haggo, whose output is often seen in SAM. I heard the rumour a couple of years ago, that Eduard was in fact preparing a series of Spitfires. Maybe also a Mk XIV. The market is theirs if they put such a thing out. NPL1 point
-
Thank you very much, everybody. I'm flattered! Robin: Nej, men jeg tror da jeg vil melde mig ind... As a sidenote I can mention that Miller and Hooper, the surviving crew of TH-S, lost their lifes during Operation Clarion on 22 February 1945, which was a major allied attack on german transportation. 418 squadron lost 5 Mosquitos during that day. This says something about the danger these guys worked with. Another sidenote: My wife somehow tracked this story a couple of years ago and gave me a book about this particular plane crash and the Tamiya kit on my birthday. She took me to the memorial stone - which I had no idea existed - where she handed me the presents. I guess I don't have to tell you how stunned I was. Isn't she just wonderful?1 point
-
Good day to everyone, Just back from the E-Day in Prague and it was a fantastic affair. I was lucky to get a copy of the new Eduard MiG-15 in the limited edition Dual Combo version minutes after the show opened on Friday morning. According to my information (facebook) there were just 116 pieces of it made before the accident happened with the press form. Had a lot of discussion with Mr. Vladimir Sulc the chief of Eduard and they are working at the moment to make a new form for the fuselage to replace the one damaged. The biggest surprise for me was in the box. This was not clear from previous communications from the company but now it was there in the box. Yes they did make two versions of the kit, both the early MiG-15 and the late or second generation MiG-15 bis. There are two separate and distinctly different sprues for the fuselage halves for the two versions! This is great! As you will see from the photos below they did make those fine differences in fuselage shape, panel lines and tail cone difference which identify the two versions. It is a “marginal” difference in tail cone shape but it is there and I am glad they did make it as a separate fuselage! (Now why was it not possible for the 48th MiG-21 bis nose . . . don’t ask me) The box has lots of goodies, you get two sets of sprues for the two versions, there are resin parts for the Czech missiles to go under the wings, there is a photoetched set with the small details, a mask (two of them one for the 15 and one for 15 bis) for the painting. Now this is a special Czech MiG-15 box set and it is not a surprise that there are ten schemes for Czechoslovak AF planes included on two sheets of decals. Some are very colourful while others are the plain metal type. It will be difficult to make a choice! And this is only some of the Czech versions, I envisage an almost endless line of MiG-15 kits, there are so many variations world wide! A 16 page instruction gives you all the help needed and it is good to see that at last the name “bis” is correctly written with small letters not as it was on the MiG-21 bis kit. So here is the box. And this is what you find inside it. Or to be more precise almost everything as I have taken out already the DVD of a 1973 Czech motion picture about the pilots and lots of fascinating MiG-15 footage. Here are the parts laid out. More in detail. The most important part of the story are these two frames with the one on the left for the MiG-15 and the other one for the MiG-15bis. I dont remember any company in the past producing the early version! So this is great! Here are some of the other sprues which are the same for the two versions. Of course there are other detail differences that you will have to make yourself but some of them are very simple. Here are the small resin missiles for the Czech versions. One thing which was not available for sale at the Eday was a resin set of the ejection seat but I am sure there will be a lot of aftermarket sets rushing towards us like a Chunami in the near future. Even closer detail view. And here are some of the main differences between the MiG-15 and the MiG-15 bis fuselage as illustrated on the tail sections. I have to congratulate Eduard on this after an initial scare that they will do just one fuselage. They go it right here. I hope you like what you see and as the Mr. Sulc said the kit will soon be available after the new form is put into operation. Best regards Gabor1 point
-
I can't see a problem with that.1 point
-
A great result Simon - congrats on making the deadline! Cheers Cliff1 point
-
It's been muted for a couple of years, they gathered all the info for a 1/32 version then Tamiya beat them to the post, We do need a decent IX in 1/48, when compared to the Eduard Fw190's and Bf109's the current crop do look a bit weak.1 point
-
Great build. Such a strange machine, it's too compelling to ignore! I like the fine sling details and interior webbing too - it's the tiny details that make a model stand out like this one.1 point
-
I cycled over to Staverton - well worth the effort: There was a huge crowd waiting. Eventually the vast numbers turned the road to a car-park.1 point
-
Nice pair, LOU IV needs a weight loss program judging by the landing gear buckling though! Seriously though, good looking pair, LOU IV looks superb.1 point
-
Great job Neil, just love these old kites, so full of character and style, looks even better in silver ! Nice bit of rigging too. I'll be doing an early silver Sunderland too at some point, (in the same vein I must try and get hold of a Side or Overstrand to keep honeybee happy).1 point
-
Hi, today i make the first copy of the capri. i´m not 100% happy with it. I destroyed the hood when i get the body out of the mold.But this was my fault and not the one from the mold. Here you can see the crack,but also the fine details of the air intake. At the back there are some bubbles.I think about a solution of less bubbles in the next copies. This is the inner core of the body. I want to put them inside,use resin and let them dry.After that i want to put them out first.But i forgot that step at the first attempt.The silicon was glue dth ethe inner core and dont get them out.So i had to put out the outer body first and at this step i cracked the body. So i remove the silicon from the inner core and want to make another copy.But now the silicon want stick to the core.The simply fall down because of his own weight! I try to fix it with tape,but that dosent worked. I must think now how i can change this mistake? kind regards Christian1 point
-
This is one of the reasons I hardly ever finish a model. I get lost in the side show. I forgot to post a picture of the cutter I use for the ribbons. Works way better than trying to cut them with a knife.1 point
-
Potez 25 TOE (Paraguayan) Gran Chaco War, 1934. 1/72 HitKit kit The build thread is here: http://www.britmodeller.com/forums/index.php?showtopic=234921030 Cheers Cliff1 point
-
a few more pictures as requested; I'm sorry I didn't take any while I was building it-apart from maybe the weathering I didn't think anyone would be interested. I made a little ammo box and some pretend .50 cals for the front turret, and a home-made mid-upper turret, although this was more because I had forgotten from the 1st time I made one of these that you can't leave the turret out and insert after painting, as the kit piece, with it's little Airfix man with his big circular hands WON'T FIT!!! this aircraft therefore is actually carrying part of an Airfix Lanc's cookie as it was the right diameter! I implore you to read a post from Chuck540Z3 regarding salt weathering, because although I'd dabbled on and off before this piece really made me go for it and I am pleased. there is some oil paint weathering on it too, partly to hide blemishes (no point in lying).http://www.britmodel...p?showuser=7151 a few shots: I hope these pictures work, I may bnot be the world's greatest modeller but I'm better at that than working these forums. fingers crossed............1 point
-
Because I simply can't stay focused on one area for long without losing interest I switched my attention to the upper wing mid section. Here I've fashioned the rough shapes of the gravity fuel tank (left) and radiator (right) from bits of plastic sheet. When a handmade piece fits (almost) perfectly into a handmade opening it's to me probably one of the most rewarding aspects of scratch building stuff. The emergency fuel tank is a copper box shape that looks as if it has suffered an internal explosion. The radiator is ever so slightly recessed into the wing. Both also follow the wing curvature more or less. I've been thinking of a way to replicate the radiator cooling "ribs". In this scale scribing them will probably do. But unevenly distributed parallel lines stand out like a sore thumb. Because of it's prominent place on the finished model it demands attention. So I've come up with this device. It's pretty much self explaining I guess but I'll give you the specs anyway. As a base I used a piece of 5mm styrene onto which I've epoxied two bolts with two nuts each. I embedded the nuts into the base so the bolts push against the ruler instead of passing over it. The piece to be scribed is fixed to the base with double sided tape. I used bolts with a slot head which can be conveniently used for indexing. Not only a poor picture but also a poor result. Though the lines are nice and parallel there is also an anomaly at regular intervals. And there's your problem! For my test I advanced the bolts half a turn for every new line. As you can see there's a ledge on the left side of the bolt end. In order to eliminate the effect 100% the bolt end should be exactly perpendicular to the shank. Not wanting to go to so much trouble I only eyeballed it but also raised the ruler with a few piece of scrap so it meets the bolt end in the center. So errors are minimized providing you make sure the center is the highest point. Much better. Every half turn of the bolt advances the rule 1/3 th of a millimeter. There are of course much more scientific way to calculate this using thread pitch, bolt circumference and maths but who cares. Here's the result so far. For the group on the right I used one quarter of a turn so that's about 1/6th of a millimeter giving me 8 lines in one millimeter. The dodgy one on the left is pilot error. I think this is quite usable for my purposes. I also tried the device to see if I could make accurate strips with it. Lets say one of 1.5mm. 1.5 / 1/3 = 4,5 half turns Close enough for me. You have to start with creating a straight edge before each try and of course every time you mess one up the next will be no good also. As you can see the smaller the ribbons the greater the challenge. Still some of the result is useable. The material is Solartrim a tip from the great Nobby. (where are you man, we miss you!)1 point
-
Some groundcrew would've been shot for letting an RAFVR Spit 22 get that tatty. RAFVR and RNVR aircraft were serviced and polished all week ready for the weekend's flying actvities. Your constructional skills are good,but once again(others have made this blunder too), the joint/ panel lines are way,way overstated for a Spit. Joint/panel lines on Spitfires were filled,smoothed and primed before a final finish was applied resulting in a pretty smooth airframe.1 point
-
gunsight scratchbuilt, and now added, and canopy reshaped. hears the attachment points for the arresting gear too cheers Jonners1 point
-
Todays post i will start with the propeller shaft. I made the prop shaft from interlocking brass tubes. I'm in that category who likes to have the propeller to be able to turn, which sometimes makes for that little extra work. It has taken a lot of work to get the wing from the Heritage Aviation kit to pass as acceptable. My example was very poorly casted with lots of air bubbles and pin holes and excess resin everywhere. And on top of that it had broken in half and was warped. Here is the wing put together and treated to a hot bath after which it was straited out to the best of my ability. All panel lines are rescribed as they where so shallow they could hardly be seen and in some places non existing or in wrong places. The wheel wells where among the hardest places to fix. Here's a before shot (with some work already been made). and after The fairing over the wing fuel boost pumps comes up to short. It should extend a bit onto the landing gear covers. They had to be built up and extended with PC and then sanded to shape. In hindsight i think that converting the Academy kit wing would almost have been easier. The wing and nose have been mated (finally) to the fuselage, using 5-min epoxy glue to make sure it stays on properly and to fill out any gaps that may appear. The fit is actually very good and only a small amount of filler is needed at the wing root joint to fill out a few small gaps. With the spinner temporary in place it's starting to look like a Spitfire. to be continued //Johan1 point
-
Incredible job! Flight of the Phoenix 1965 is one of my all time favorite movies. !!! Words can't describe how cool this is!1 point
-
A bit more progress The "floor" in the cockpit is done and installed What has taken up most of my time is the vacformed canopy from falcon. It's been quite a hassle to get it to fit somewhat satisfactory. They are not really meant to fit the academy kit. Added canopy framing on the aft and fwd sections The rear section finely mounted after some trials. Still it left a step to the rear of the canopy that had to be filled up. The windscreen in its place. I've also added the sliding canopy rails that goes on the outside of the cockpit sides. To get the windscreen to fit you need to add a piece of pc at the front part of the cockpit as the opening on the academy kit is to far fwd to the real thing. I made the gel container that keeps the moisture out of the canopy from the academy kit canopy. This is how it looks like in place when closed And open (which is the way it's going to be) Also manged to add the heater exhaust on top of the fuselage I'm still not 100% satisfied, but it will have to do. In the pictures the canopies look quite smudgy, but that is after all the handling of the parts and will be polished clean later. Stay tuned Johan1 point
-
I keep saying... we should buy the SAAB GRipen!!!!1 point
-
Yup, that's why I've never stopped using them. Andy1 point
-
Thanks guys - I'm sure this will be a great GB. The Fiat is indeed 1/72 scale Max. Despite my jibe about the instruction sheet, Choroszy are actually in the top league as far as resin kits go (IMHO!). I've made a couple of Planet resins too Doug, and they seem to be hassle free. Cheers Cliff1 point
-
Some progress on the spit. To try and do something about there not being anything behind the camera windows I've tried to simulate the cameras in an as easy way as possible. Nothing of this will be ever be seen from the outside except for the camera lenses, so i haven't made any effort to make it look good. A structure made of PC to secure the cameras to is in place. The camera window is made from clear plastic from the box that the Aires pit came in. Added some details to the outside of the camera window. Alignments for the down looking cameras added. This will also work as something to attach those camera windows to. Looks a little better with some paint on it The camera objectives are made from brass tubing of different sizes. The camera "body" is from stock resin just to act as a lid on the tubing and something to attach the tubes to the model With some paint it doesn't look to bad Since there is no landing lights in the wings on the PR XIX, I used the kit lenses for those to act as camera lenses instead for the down looking cameras. The lens for the side looking camera is from clear sprue sanded and polished. Here how it looks in place. Now there's just some minor things left then i can assemble the fuselage halves. /Johan1 point
-
Thanks for your support guys. I've made some progress. The seat harness is assembled and the lap belts have been installed. The shoulder belts will be installed later when everything is in place. I had to make a slight modification to it thou, the attachment point to the bulkhead were taken from an Eduard seatbelt. The oxygen hose has also been installed. It's still quite vague were it goes but you can't see much of it anyway so i wont bother whit it. All the major components have been installed. Note that the shoulder harness is only loosely put in place to give an idea of how it will look. Next up are the three oxygen bottles behind the seat.1 point
-
Work on the spitfire have progressed. The Aires Cockpit has been painted with White Ensigns British interior grey-green. All the details are painted. The cockpit is weathered accordingly (a light wash, dry-brushing and flat coated). I have also managed to apply a few cockpit placards and instrument faces from airscale. Here is the left hand side with a few alterations to the Aires pit: All details where the entry hatch used to be is scratched, the oxygen bottles that where molded in are removed and replaced with new details. Also the control box below the trim wheel is a new item and wiring from led wires. The right hand side. Some alterations to the Aires pit had to be done here as well. Everything that is located at the top is scratched and the fuel booster pump box in the center is also a new item. And the "floor". Here is everything from Aires untouched except from a small addition from Eduard. The rudder pedals and control stick has yet to be installed. The rear pressure bulkhead is a entirely scratched item. The IP is as good as finished. The camera control box is made from sprue. The chair has also received it's share of paint and weathering. I've tried to get the feel of worn leather on the backrest, i think it came out ok. Unfortunately it doesn't show up as good in the pictures. The clear gel container on the rear of the bulkhead is made from clear sprue and the fixings is from leftover PE. This looks to get a bit fiddly, the seat belts from HGW is the next challenge. I'm also gonna try to make the oxygen hose for the pilot, but i have a problem whit this. I don't have any good reference material on how that is connected in the aircraft. All i can tell is that it emerges from behind the seat on the right hand side. If anyone has any info or pictures on where the hose goes i would appreciate that, otherwise i suppose I'll just have to make an educated guess. //Johan1 point
-
Thanks guys A bit of progress has been made. Fitting of the Heritage Aviation PR.XIX wing The general fit is quite good. Actually it's better than with their own fuselage. The only real issue is that the wing is a bit to wide And comparing with scale drawings it needs to be trimmed a bit With that done and the trailing edge thinned down, the fit is spot on. The camera insert also fits without much hassle. Now i need to clean up the wing, the casting isn't the best. There are a lot of pinholes in the front edge of the wing and the wheel wells needs a bit of attention to. But on the plus side you do get all of the XIX bumps and blisters and you don't have to get rid of all the cannon details compared to if you use the academy wing. Chris, how is the fit of the daco nose? Anything i need to look out fore? Stay tuned Johan1 point


.thumb.JPG.3498f40362ff13ebfc4b2e45abbd545e.JPG)


.thumb.jpg.d17ff607fc7e89ed057e63fcb6f2a888.jpg)


This leaderboard is set to London/GMT+01:00