


cookiemonster
-
Posts
122 -
Joined
-
Last visited
-
Days Won
1

cookiemonster's Achievements
")
New Member (2/9)
95
Reputation
-

Supermarine Spitfire MK. Ia 1:72 Airfix
cookiemonster replied to cookiemonster's topic in Ready for Inspection - Aircraft
Yes, I forgot the tips. I could not brush that and I was too lazy to prep my airbrush. But now as my final exam on the job is over, that shall be fixed. -
Hello folks, well, guess who's back. This Spit was finished at the end of last year but I just got to take pictures of it. Now that my exams are over and my aprenticeship is almost over, I got a bit more time for the most interessting hobby in the world. Created during a "battle building" with friends where only minimal equipment is allowed, this thing was brush painted with Vallejo paints. Later it was sealed with Vallejo matt varnish via airbrush. What else is there to say? Not much, nice kit.
-
Hello folks, I have something to show you. It's Revells T-90 A. I started building the kit about 2 years ago, then I lost the motivation and the tank was attending a parade on the square of the forgotten kits. About 2 Months ago I felt sory for this almost completed kit and completed it. Brush painted with Vallejo acrylics and sealed with Vallejo matt varnish which was applied by airbrush. I applied no washing becasue I can't. My tries were complete failures. The so often mentioned problems with these new bending tracks were not present with my kit, I was able to bend the tracks without hot water. All you need is patience, I glued the roadwheel to roadwheel and fixated the part with clamps untill it has dried. An now, fire away the critiques.
-
Photos of my father during his time in the BAOR
cookiemonster replied to cookiemonster's topic in Real Armour
Gentlemen, please, you are as old as you feel. I'm just 21 but sometimes I feel like 90. -
Hello mates, I am moving right now and during the cleanout of our basement I found these pictures of my father during his time in the BAOR. One also shows him in the first gulf war. I will post these pictures with the original german explanation on the back (My mother was german, childs out of these area are called "ocupation childs") and try to translate them into english. Since I am not that familiar with the british army terminology, I can only translate the captions word by word, so if anyone wants to correct me, please. Ein zerstörte Irakische Panzer von Russland. Das bin ich oben. Vorher habe ich einsatz gehabt fur uber 60 Stunden ohne Schlaf A destroyed russian made iraqi tank. That's me in top. Had a deployment earlier, almost 60 hours without sleep Centurion ARV Bergpanzer Centurion ARV recovery vehicle Ferret "Scout Car" reconnisance Vehicle Spähafahrzeug Ferret "Scout Car" reconnisance vehicle Westland Scout beim tankung in "Hill Core" oder Green 23 auf unserer Landkarte Westland Scout during refuleing in "Hill Core" or Green 23 on our map Chieftain Bergpanzer Chieftain recovery tank Chieftain Brucklingpanzer mit No 8 Brücke Chieftain bridgelayer with No. 8 bridge Centurion Gun tank mit minen aufklärungs geräte vorne Centurion Gun tank with a dozer blade installed Centurion 105 mm Gun Tank mit Anhänger mit "Giant Viper" minen aufraumungs explosive System Centurion 105mm Gun Tank with cart and "Giant Viper" anti mine dozer. Ein "Stalwart" Gelände / wasser Fahrzeug nach ein Kollision mit ein Bruckenliege Panzer hat später sein Arsch abgefroren. A "Stalwart" amphibious vehicle after a collision with a Bridgelayer. He froze his bottom off later Hope you enjoy the pictures, have a nice day . cheers, cookie
- 15 replies
-
- 20
-

-
Hello guys, another old build of mine. This time, it's the USS Spruance from Minicraft (more like Minicrap) in 1:700 scale. The kit itself is not bad, but the fitting is. Many sinkmarks and gaps that need to be filled. The worst parts were the sonar dome and the main decks. The fitting of the decks was so bad, I used putty instead of glue to apply them to the hul.. So I could get rid of the different heigh levels on the decks and could keep some of the details. I made some small putty rolls, and put them in the glueing spots. And as I squeezed the deck in there, the putty closed the gaps. Sanding and filling was the worst part of this build. I used Vallejo paints to paint it, it is brush painted. I had a lot of problems with the grip of the paint. I had to repaint it at least 5 times, ebcause the paint came off or was damaged. THis was done after some reworking, I painted the bridge windows and shortened the barrles a bit. Hope you like it. CHeers, cookie (If anyone is interessted, here is my scalemates album which shows more pictures. https://www.scalemates.com/profiles/mate.php?id=11289&p=albums&album=19521 )
-
Thank you guys, I'm really happy that I had not had thrown it away. Well, I'm don't really know how to weather vehicles and stuff. So I left it this way.
-
Hello guys, another kit of mine that I allready finished almost a year ago. Build straight out of box, the Moebius kit is a realy joy to build. Perfectly engineered and with a good fit, this kit knows how to impress. But putty is needed, because it has some nasty sink marks. While the build itself was a vacation from my belowed KP and old Airfix kits, the paint job was not. It is easy, just paint it offwhite and apply decals to it. Well, I had a lot of problems. I used vallejo paints for this, and it would not stick to the kit. the slightest pressure would damage the paint, I could note ven touch it without damaging the paint. I removed the paint 3 times, and it would still not stick, well it sticked at the rear, but at the bow, it would just rip off. I removed the paint on The bow oncemore and applied primer to it. Then I applied some layers of white and it sticked to the kit. It even took a flight to my dustbin because of that, but I started to feel bad after some hours and took it out of there. Some battledamage had to be fixed, a broken wing, thank goodnes there is super glue. The decals were nothing special, they would not stick tot he kit, and they were very strict, they just did not want to bend over round areas or sink in engravings. After this expirience, I can only recomend you Revell decal soft. This Viper is the one flown by Lee Adama, Admiral Adamas son. Hope you like it. Cheers, cookie
-
1:72 Yak 1 M Mastercraft 1:72
cookiemonster replied to cookiemonster's topic in Ready for Inspection - Aircraft
Thank you guys, feels good to hear that from you. ESpcialy the part beating that thing into submission, I have to remember that. -
Hello guys, it's me again. Here is a kit that I finished 1 moth ago. It is the Yak 1 M from Mastercraft, that took me 3 years to build. It took me so long, because this kit is full of problems. And some of them required more thinking, some just more craftmanship. The propeler does not fit and looks like a tumor. There were 1mm gaps betweent he cannopy and the fuselage. The landing gear was too weak and was not looking good. The tailwheel was also too weak. The decals vanished as I've put them in the water. The cannopy took a lot of filler an sanding to fit to the fuselage, there were 1mm gaps, and th sanding and filling had to be done very carefully. Cancer was also a problem, but at the end I could remove the tumor by using a propelerspinner from a Rodden LaGG 3 that I had in my sparebox I've cut the blades off the old prop0eller and glued them to the spinner and glued the spinner to the kit, the spinner fits perfectly in diameter. Zvezda's Yak 3 is amazing, unfortunately, my Yak will never be finished, because a book crushed it. But I could use the landinggear from the kit and glue it to the wings. Yes, I glued it on the wings, the legs of the gear are too small to reach the wheelbay, so the only thing that holds them is super glue. The tailwheel came from the Emhar LaGG 3 and the decals came from my dealers decalbox. This is the most interracial kit I've ever build, containing parts from russia, ukraine, poland and britain. I used Vallejo paints and represnted Lydiya Litvyaks Yak 1. You may have heard of the "rose of stalingrad", she was one of the most famous and sucessfull russian female fighter pilots. She was shot down in this plane in 1943. Vallejo 074 and 094 were mixed for the light green, 168 was used for the black camouflage and 107 for the belly. I'm very proud of my result and hope that you like it too. Happy easter, cookie The area around the cannopy is putty. Fammilypicture with a LaGG 3 and a Smer Yak 3. And with it's sister Yak 3.
-
Hello guys, it's me again. I found the perfect oportunity to build my Phantom. It's the Phantom group build in at modellboard.net. I am going to build a british Phantom. One of the "Tigers" in 1:72. There is some progress already, but it will still take some time. Here are some pictures. The two fuselage halves, requires some putty. The Cockpit: for the ones that are wondering why there is a white and a grey panel, I made a mistake and sprayed everythign white. My resaerch statet white Cockpits, but that was wrong. The decals were allready applied, and I could only get one instrument decal off. As I testiftted the Cockpitcomaprtment, I found out, that the board would be too low. Glued, it looks better. I had to sand quite a bit, some engravings were damaged, I already ordered a Trumpeter scriber. And now how it looks: I am going to use Vallejo paints on this one, and I hope that I will be able toget rid of the problems I have with these paintings. Cheers, cookie
-
I will start to build a Phantom. You guys said Xtracollour 127 is close to the real thing, but I can't get Xtracollor here, or at least, not so easy. Which Vallejo Paint would you consider as suitable alternative to Xtracollour.
-
Sea Harrier FA.2 - AIRFIX - 1/48
cookiemonster replied to LT Motta's topic in Work in Progress - Aircraft
Wonderfull work. You made a very good looking Harrier out of that old kit. -
Another work of mine, the latest by the way. This little kit was a gift for my 18th brithday, 1 year ago. At this time I just started with airbrushing so it is not at my current standart. I put it aside 1 year ago because I've lost a important part (wheel) and I lost the motivation. But this year a good friend of mine made a resin mould of the lost wheel and now I had two again and could finish the kit. This is not my favourite kit but a good indicator for me. I could have done more but I just wanted to finish this kit. The F-106, my 2nd airbrush painted kit MiG 17 from KP, my first serious kit 2 years ago. And in comparance with my latest kit the Spitfire. Here you can see the problems at the air intake I hope you like this little "relic" of mine, because I'm quite happy with it. cookie
- 2 replies
-
- 2
-
-
- English Electric
- Lightning
- (and 3 more)
-
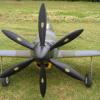
Supermarine Spitfire F. Mk22 Airfix 1:72
cookiemonster replied to cookiemonster's topic in Ready for Inspection - Aircraft
Thank you Séan. Yes, many consider the Spitfire Mk 22 as the "Ultimate Spitfire" , with a top speed of 725 kph and a Griffon Engine with 2420 hp and 4x20mm cannons.