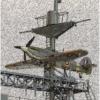
no4mkit Posted April 18, 2010 Posted April 18, 2010 (edited) A generally overlooked and underappreciated segment of the Battle of the Atlantic story is the saga of the CAM (Catapult Aircraft Merchantman) ship, their specially adapted Sea Hurricanes/Hurricats, and the men of the MSFU (Merchant Ship Fighter Unit) who flew them. But for two years they were the only air defense that could accompany Allied convoys to North America, Gibraltar and the Soviet Union (along with a few similarly equipped FCS ships). But as thin a line of defense as the CAM ship Hurricat was the Luftwaffe quickly learned to respect them, and the mere presence of one in a convoy was a strong deterrent. In one particularly impressive action, a solitary and very aggressively flown Hurricat intimidated and scattered an entire wave of He-111 torpedo bombers pressing home their ‘Golden Comb’ attack on the convoy it defended. It’s this courageous ‘David vs. Goliath’ sort of story that inspired me to build a CAM ship & Hurricat diorama in 1/72nd scale. So in setting out to model the forward deck of a CAM ship it was soon apparent how complicated the catapult arrangement was. The truss work in it was a variety of types conjoined to form a single span, not a Pratt style (N-shaped) truss as is often assumed. After months of research I could find no plans or schematics of the catapult arrangement so I resorted to drawing my own from all the mostly low grade photo’s I could get my hands on. Here’s a sample of the references amassed with the catapult layout drawing in the center: The catapult arm was built from Plastruct structural ABS I-beam and angles (L-beam) cut to size and laid out on strips of 2-way tape. The two sides of the catapult arm were built together, one the mirror image of the other, but the process of cutting, fitting and cementing each bit of the truss webbing was mind-numbingly slow and tedious. The number of ‘pingy bits’ lost in the process are enough to build a second cat arm! Once the two catapult arm sides were finished, they were placed upright in a makeshift Lego jig, the blocks stuck in place on 2-way tape, and the process of joining the two sides into one complete catapult arm began. With the basic catapult arm completed, work started on the sled/trolley/shuttle that carries the Hurricat and rockets, and once again it was down to photographic analysis to get the structure as accurate as possible. A diecast Corgi Hurricane repainted on MSFU livery and fitted with scratch built catapult spools had been completed prior to starting the catapult diorama, was then test fitted to the sled and catapult arm. After some adjustments to get the aircraft oriented correctly, final details were added to the sled. The catapult arm was fitted with support towers, walkways, railings, maintenance scaffolding poles, sled stops, and hoisting points. Moving on to the actual ship portion of the diorama posed a bit of a dilemma. Should I make the CAM ships deck the base of the scene or model the whole bow section of the ship with the sea as the base? Not being much of a ship modeler I wasn’t too keen on the later idea, but it did seem the more effective representation of what I hoped to achieve. And so it was, but what was I getting myself into? CAM ships were a mixed bag. Precious few photos of them exist and because they were existing merchant ships within a specific tonnage range that were selected for the refit, no two seemed to be the same. I decided my ship would be a representative one rather than a specific CAM. The focus of the diorama was to be the aircraft and catapult after all, the ship would be secondary and a little less detailed though still as accurate as possible. The hull would be foam core clad with sheet styrene. Since I could find no accessories for a ship of this type and era in 1/72nd scale, all the deck detail would have to be scratch built. Once again I pondered the pain I had set myself up for. Oh well, damn the torpedoes, onward and upward, and all that! Anchors, winches, mast, cranes, holds, railings, ladders and other details all had to be fabricated from styrene sheet, rod and tube. It took some months but things were coming together. Gradually the ship took shape and before the more detailed parts were added it was primed, painted, weathered and attached to its base, a stock 10”x20” photo art frame. I’d have gone for something a little larger but my display cabinets are too shallow for anything deeper. Another first for me was modeling the sea, and I considered this hurdle carefully before proceeding because with the ship glued in place there was only once chance to get it right. I chose to use plaster to model the water, paint it, and then apply a thin layer of clear resin to finish off the look. Having neither the space within the frame nor the skill set to model a heavy Atlantic sea, I kept things simple with mild waves and wake. At last I was on the home stretch. The catapult was mounted to the deck first. Its access ladder joined it, then the support cables made from stretched sprue were attached to points modeled on the catapult arm and ships deck. The mast gained its railings, ladder and radar antenna and was set in place. It was not glued down and remains removable for both maintenance and portability’s sake. With the remaining items set in place the deck railings were attached and the 20 month long project was finally complete. In a few months I’ll be replacing the diecast Hurricane with a Hasegawa kit Hurri Ia modified to Sea Hurricane 1a form with scratch built catapult spools and detailed with etched brass flaps, cockpit and open canopy. A pilot will be in place giving the ‘go’ signal so the diorama depicts the moment before launch. To quote from Kenneth Poolman’s “The Catafighters”: ‘It was the men of the MSFU who were largely responsible for removing the threat by the long-range FW200 bombers which at one time seemed so serious. This was their great achievement’ This is my tribute to them. Edited April 28, 2023 by no4mkit refresh photo links again - 4/2023 24
Shar2 Posted April 18, 2010 Posted April 18, 2010 Stunning, can't really think of anything else to say.
nick Posted April 18, 2010 Posted April 18, 2010 Congratulations that's a stunning piece of work and research. Crying out for a 'proper' Hurricane now (-: Nick
ta152h Posted April 18, 2010 Posted April 18, 2010 Do you have a scale plan for the catapult you can email?
Prop Duster Posted April 19, 2010 Posted April 19, 2010 I, like the others, are in awe of your talent and perseverance. AND It's a darn fine job. Congratulations
AnonymousDFB1 Posted April 19, 2010 Posted April 19, 2010 Wonderful, great idea for a subject and beautifully constructed
Obi-Jiff Kenobi Posted April 19, 2010 Posted April 19, 2010 That's a seriously impressive piece of work. Obi-Jiff
MakingModelsAgain Posted April 19, 2010 Posted April 19, 2010 Excellent! That's one of those set ups you can find something new to gawk and wonder over every time you look at it! Now, if the back end of the ship had been a cutaway too...! Only kidding! Hehehe. Brilliant and I agree, a comp winner if ever a comp winner was!
Spitfire31 Posted April 19, 2010 Posted April 19, 2010 Totally, completely, unbelievably, beautifully impressive! Best, Joachim
dieselweasel Posted April 19, 2010 Posted April 19, 2010 Absolutely stunning, I have just spent 10 minutes moving from picture to picture just admiring your work, well done Jim
Colin S-K Posted April 21, 2010 Posted April 21, 2010 WOW, I feel humbled, a lovely venture, a marvellous model. Superb, well done Sir..... Colin
keefr22 Posted April 21, 2010 Posted April 21, 2010 That is just brilliant, really well built with a great finish. The pics looking up from below are excellent & in black & white would look totally real! Can I ask how you applied the resin 'finish coat' to the plaster sea? Did you just pour it on, or use a brush, or.....???? Really tremendous model! Keef PS can't wait to see the rest of the ship when you finish it.....!!!
no4mkit Posted April 22, 2010 Author Posted April 22, 2010 Appreciate all of the compliments guys, thanks! Keef, the resin was brushed on very thin to keep it from pooling. Knowing the brush would be trash afterwards I used the cheapest thing I could find - a plastic bristled piece of junk from a kid's paint set. My 4 year old will never miss it! (actually he got a better brush in exchange )
keefr22 Posted April 22, 2010 Posted April 22, 2010 Keef, the resin was brushed on very thin to keep it from pooling. Knowing the brush would be trash afterwards I used the cheapest thing I could find - a plastic bristled piece of junk from a kid's paint set. My 4 year old will never miss it! (actually he got a better brush in exchange ) Thanks for the reply, your sea looks brilliant, so I'll have to try that method when I finally get my Airfix HMS Belfast finished (I'll have to write it down though, because finishing that ship will take so long I'll have forgotten by then!!! ) Cheers Keef
Recommended Posts
Create an account or sign in to comment
You need to be a member in order to leave a comment
Create an account
Sign up for a new account in our community. It's easy!
Register a new accountSign in
Already have an account? Sign in here.
Sign In Now