Search the Community
Showing results for tags 'Trumpeter'.
-
Folks, I've been lurking on here for a while and decided to take the plunge and show my latest model for inspection. It's the Trumpeter T-80BV in 1/35 OOB using Ammo Modern Russian Colours to paint and oils for weathering.
-
Just finished the first of two Trumpeter Vulcans today. I'll write a brief summary review of the kit after the images as it's fairly new. I used aftermarket decals from Fündekal and some spares from a GWH Vulcan to improve on the kit, such as the wheels and pipes under the engines. Some small mods were made such as reprofiling the nose to remove the TFR blister and the tail cap to remove the RWR fairing. Ignore the incorrect engine type, these will be replaced with ones closer to Olympus 201s when I get another GWH kit. Next to my first B1a conversion One can never have too many triangles My model flying over RAF Waddington (thanks to @robvulcan for editing this) Here's the WIP thread, still ongoing as I have a second one of this kit I'll be starting on Friday and plans for even for Tin Triangles Brief summary review: Accuracy 4/5 Fit 4/5 (intakes 3/5) Detail 4/5 Quality of moulding 4.5/5 The good bits: .Well shaped intakes .Correct tailcone angle .Fairly easy build .Wing shape is spot on .Option for blue steel missile or conventional configuration .Well detailed IFR probe (not used on my build) .Correct landing gear length an't forget that beautiful box art! Main issues: .Incorrect nose profile .Poorly designed jetpipes, only has jetpipes for Olympus 301s, but decals for 201 engined Vulcans .Bomb bay doors lack detail and are incorrectly shaped. These need a rescribe at the very least. .Missing fin for the Blue Steel Missile (I didn't use this option) . Parts of the engine moulded too the ECM plates- these should be seperate as they should still be visible when the ECM plate is not installed under the left wing as was the case on most Vulcan B2s .Weak landing gear . Incorrect radome shape (corrected on my model) .Incorrect paint guides .Decals should be replaced with aftermarket Conclusion: Overall a good kit that can be built to a respectable level of accuracy with a little effort, although aftermarket decals are a must. Unfortunately, they only moulded one set of jetpipes which limits you to just under half the Vulcan B2s built, and if you can't find a replacement for the pipes under the engines which are moulded to the ECM plates you're limited to a very small number of airframes. Of course you could overlook the jetpipes as I have here. Compared to the Great Wall Hobby (Pit Road) Vulcan in the same scale, it's probably slightly better and slightly more accurate but both have their advantages and disadvantages. I would absolutely recommend this kit to anyone who's built a few kits and has some filler for the intakes- you will need it.
-
Right then, having retired early just before Christmas I should now be on a holiday of a lifetime, but obviously I'm not, this was going to be a project for my return but i thought i might as well crack on with it now. This was a Christmas present from one of my girls and the other girl got me the add on. LAV 1 by phil da greek, on Flickr LAV 14 by phil da greek, on Flickr The kit gives you a couple of options to build, with nice clear instructions and a concise pait guide (it's green). LAV 2 by phil da greek, on Flickr LAV 3 by phil da greek, on Flickr LAV 4 by phil da greek, on Flickr LAV 5 by phil da greek, on Flickr LAV 7 by phil da greek, on Flickr More to follow........
-
Russian T-62 Mod 1960 (01546) 1:35 Trumpeter The T-62 was developed from the T-55, and to the uninitiated could be mistaken for one. On closer inspection there is 115mm main gun with a longer barrel and improved penetration, which required the turret to be enlarged and the chassis enlarged in turn to accommodate the larger turret ring. Despite family resemblance and an almost identical layout there is little commonality of major parts due to the size changes that propagated out due to the change of main armament, which was a world first in respect of the smooth bore, allowing it to launch shells at a substantially increased velocity. The interior equipment however was broadly similar to the T-55, so conversion between them wasn't over-difficult, and even though the vehicle is larger, the crew compartment is still horribly cramped for the four crew. The Mod 1960 was the initial production model that was preceded by five examples of the T-62A, which were stretched T-55s, and as such below par compared to the T-62. It was able to carry 40 rounds of ammunition for the 115mm Molot smooth bore gun, and 2,500 rounds of 7.62mm for the PKT coaxial machine gun. On the turret roof was an optional 12.7m "Dushka" anti-aircraft machine gun, which required the loader to expose his upper body in the hatchway in order to fire. Although not as numerous as the legendary T-55, the T-62 has seen numerous variants and license built "lite" copies made in North Korea, but most began life at the Ukrainian factory, with many seeing modifications at the hands of their purchasers at a later date. The Kit This kit and its box were included in the Hobby Boss kit (85513) of a KrAZ-6446 tractor and trailer as the load, but as it was also released a couple of years back as a stand-alone kit, I have split it out for expediency and to prevent the original review from getting too large. The box is typical Trumpeter with the cardboard corrugations showing through on the artwork, and a divider keeping the smaller parts from rattling around inside the box. There are seven sprues in light grey styrene, seven in brown styrene, four in black styrene, one in clear, two sheets of Photo-Etch (PE) parts, a length of brass wire, a metal gun barrel, decal sheet, instruction booklet and separate painting and decaling guide. It is one of many kits of the T-62 from Trumpeter, so if you have seen any of them you stand a good chance of recognising at least some of the parts here. In the usual fashion construction begins with building up of the road wheels, which are made in pairs with separate black tyre parts that offer the possibility of painting the parts separately to avoid masking. The idler and drive sprocket are both made up of two parts, and each of the two types of road wheel pairings have hub cab parts added to the centre. The lower hull is fitted with a rear bulkhead, final drive housing and axles, then the wheels are glued onto them, with the track lengths created from the individual brown links on the seven sprues. Each link has four sprue gates and no ejector pins or sink marks to fill, with 96 links per side needed. Construction with liquid cement followed by draping and packing the lengths around the wheels while the adhesive is still malleable is your best recipe for success, and you may wish to build each run in two halves for ease of painting and installation. An unditching beam is fitted to the rear bulkhead along with final drive armour, and attention turns to the upper deck, which needs a number of flashed-over holes opening up for this mark. The deck includes the upper glacis, which is detailed with lights, mine roller mounts, and the driver's hatch, plus a bow wave deflector, while the engine deck is constructed separately in two sub-assemblies that include PE mesh parts. These are added later with the fenders, which have been prepared with stowage bins, fuel tanks and exhaust on the port fender before being glued to the hull using the long slots and tabs running along the sides. The prototypical fuel barrels attach to the rear of the hull by curved brackets, but no fuel hosing is included in the kit, which can easily be fabricated if you desire by checking your references. The towing cables are made up from styrene eyes and copper/brass braided wire for a realistic look, with lengths and attachment points marked on the instructions. The T-62's enlarged turret is supplied as an upper and lower part, with only a stub of the coaxial machine gun, mantlet cheek parts needing adding and some holes drilling out before it can be closed up. The holes are for the multiple grab-rails that encompass most of the turret, with the two hatches, shell-ejection port and various vision ports scattered around the roof, plus lifting eyes and a small searchlight next to the commander's low-rise cupola. The larger searchlight is fitted to a bracket next to the main gun, and the snorkel tube is attached to the back of the turret, after which you get to choose between adding a cover to the mantlet or leaving is bare. The main gun is turned aluminium, which is nice to see, but if you don't like these for any reason, you can use the plastic parts that are included, but you are in for a lot more preparation of seams if you go down this route. A delicate linkage between the gun and searchlight is the last task, other than dropping the turret into place on the hull. There are no bayonet lugs, so either glue it down, or remember to put a finger on top if you ever need to move or invert it. Markings Russian Green anyone? There is only one option included, and the designers aren't very forthcoming about where and when White 545 was stationed or saw deployment. The decal sheet includes lots of white numbers in two different styles, plus a pair of Soviet emblems, so if you have a different scheme in mind, this generic sheet may be of at least partial use. The registration of colours on the emblems is excellent, and the white seems sufficiently dense for the purpose, and everything is nice and sharply printed on my sample. Conclusion Another nice model from Trumpeter that will look good next to a T-55 on your display shelves. The exterior has been well done, but unless you plan to put crew in the hatches, you'll need to leave them closed to avoid displaying the empty interior. The part count is sensible, with only a few compromises in detail as a result, such as the exhaust that is slightly simplified and partially moulded into the fender. Overall though, a nice kit that would look super on the back of a tank transporter. Supplied as part of the KrAZ 6446 Tractor with MAZ/ChMZAP-5247G trailer kit 85513 Currently on sale with a deep 35% discount at Creative at time of writing
-
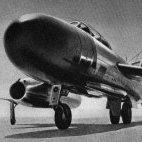
 Good day my fellow model makers, hope we are all doing well, staying safe and washing our hands! Just thought I would show off my latest incarnation. This is the Trumpeter 1:48 Mig 19 Farmer. I bought this kit last year from a trader at the Shearwater Hobby Show here in Nova Scotia (I keep mentioning this show as it is unfortunately the only show I am able to attend over here! Its small but quite decent). The kit came with a resin cockpit (can’t remember from whom) a set of air scoops from Quick boost and a set of turned brass tubes for the missile launchers and a brass pitot tube, the rest is from the kit. The only addition I made was to add some vent flaps mid-way down the aft fuselage. These aren’t represented at all on the kit but are regularly left open. It was painted in various shades of Vallejo air Aluminium, I went for some tonal variations on certain panels but may have gone a bit too dark, I would have liked it to be more subtle but hey ho! I used kit decals but they were really quite poor, they stayed as one piece but took about 10 minutes of soaking and still didn’t come away from the backing very easily. There are a couple of items however that have been transported to a parallel dimension through a worm hole (I have laminate flooring down so can’t blame it on the carpet monster!), one half of the lower nose wheel leg, the actuating ram for the underside airbrake and an internal filler piece for the airbrake area. All in all, an enjoyable build, my first attempt at a Ruskie jet (albeit in East German markings) and my first proper metal finish. My next Russian jet will be a SU-27 UB in 1:48 from Eduard, thatll be more of a challenge I think! Until then enjoy and stay safe! Bob
- 10 replies
-
- 30
-

-
Ready for inspection is my 1:72 Trumpeter British "Wyvern" S.4. I built her straight from the box, the only difference being that I use Vallejo Model Air to paint the build. The invasion stripes are all airbrushed, this proved tricky, measuring and masking but it all turned out ok in the end. Aside from that, the kit went together well, only the canopy causing a little head scratching. I love aircraft with folding wings, so had to build her with them in the folded position. All in all a fab kit! Thanks for looking.
- 19 replies
-
- 53
-
-

-
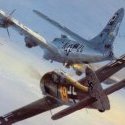
Avro Vulcan B.Mk2 (03931) 1:144 Trumpeter via Pocketbond It is hard to think of a more iconic aircraft to represent the RAF Strike Force at the height of the Cold War than the Avro Vulcan. It is also sometimes hard to believe it design work was lead by Roy Chadwick who deigned the Lancaster. Even though both fulfilling the same role the two are widely different. The Vulcan was the third of the V Bombers operated by the RAF, her sisters being the Valiant and Victor. The Vulcan was the more technically advanced aircraft and was considered a greater risk. The first prototype flew in 1952 with production B.1 aircraft from 1955. The design was improved to the B.2 standard with better more powerful engines making the aircraft suitable to carry the Blue Steel stand off missile. The Vlucans would loose their nuclear role in the 1970;s and switch to conventional support of NATO. It was in this later role and right at the end of their service life that Vulcans would fly their most famous sorties. In a major feat of aerial logistics they along with their Sisters the Victors would Stage from Ascension Island to Bomb, and provide Radar Suppression on the Falkland Islands, a round trip of nearly 8000 miles. The Kit This is a new tool kit from Trumpeter which has been done in collaboration with Bachmann/Pocketbond who are the official imported for Trumpeter into the UK. As well as offered as a Model Kit it is also offered in N Gauge and OO gauge train/aircraft sets celebrating XH558 the last airworthy Vulcan. The kit has fine engraved panel lines and the underside has an insert to build either the conventional version the Blue Steel Carrying version. Construction starts with a rudimentary cockpit, as lets be honest you wont see much through the small windows. Next up the intakes are made up, with representative fan fronts at the ends. Next up the tail is constructed. The intakes are then added to the lower wing/fuselage section, and the cockpit to the upper section. The two can then be joined together and the tail added. At the rear the exhaust can be added, and then underneath the landing gear is made up and installed. For the underside centre the appropriate insert for a missile armed or convectional Vulcan. Lastley the gear doors, canopy and refuelling probe are added. Markings There are 2 schemes provided in the kit; XH558 In the wrap around Scheme XL361 with Camouflaged top surfaces The decal sheet is printed anonymously, and looks like it will pose no problems. Conclusion Its good to see a new tool Vulcan in a scale where most would be able to display it. Highly recommended. Review sample courtesy of UK Distributors for
-
 Starting on my next project - I actually have several in the pipeline, but I'm starting to get the hang of this WIP thing, so... I will probably eschew the kit decals, we'll see. Starting with the fabulous bracing from Nautilus models. This is a neatly engineered solution to the lack of support in the main fuselage, BUT... you cant use the engines. Guess I'll have to find another use for them🤔 hmmmm. Easy to build up with white glue. I used large square magnets and a metal shelf to keep everything at 90' angles. I am using the kit gear assemblies. I bought the Aries set, but it doesn't seem to fit this kit??? Shame, as the detail is fantastic! These small woodworking clamps are really getting a workout lately. Haha. Just noticed the short pants. It was 85'F in DFW today. Tomorrow is slated for 90'+. Let's hope the sun can burn some virus. More updates tomorrow, as I start gluing all the lifting body halves - every wing, tailplane, etc. is two halves with a top/bottom per half. I foresee some problems getting everything lined up. Undecided on folded up, or everything hanging out. Guess I'll sleep on it.
 -
It's been too long since I was last active on this side of the forum... the last half year I did stray away from ships and tried myself in figure painting... but now the itch is back and I started with a whole new project. but wait! There is more: Here are some shots of the sprues and PE frets: I started with what I thought will be the hardest part. the girders under the flight deck. More for fun I did the first half of plastic to see how long it takes this lot took me 30 minutes including clipping them off the sprues filing them clean and glueing all together... then I started the PE one... the first segment took me 3 hours to get to this point (bent, soldered together and cleaned up with a file) Oh boy, this will take some time! But damn it is worth it! both the extra money and the extra time! I'm pleased with this start Thanks for looking, Cheers Konrad
-
While I wait through the paint and decal process for my Sopwith Camel, I figured I'd add an actual navy ship to the mix. I built one other 1/700 ship in the past and this is the only unbuilt ship kit in my collection. The only things I know about the Huron is what I read on Wikipedia a few minutes ago, impressive service history. As the kit comes with as much photo etch as I can stomach, I don't need the extra pack of railings that were included when I picked this up at a swap and shop. If anyone can use the pack of 1/700 railings pictured below let me know via PM and I can pop them in the mail to you.
-
Greetings to all, As we all find ourselves in a unique position, it is my expressed and sincere hope that everyone here remain safe and sound for both yourselves and your respective families and friends. Life is going to be very different for all of us. Let`s turn lemons that we have been given into lemonade together. Lord knows, I`ve got plenty of unbuilt kits that are requiring my attention. I completed this kit a few years back and am now just getting around to posting pictures of it. Here are a list of highlights.......... 1. Straightforward build process with few issues of fit of parts. 2. I guessed at the specific colors from what I had “in stock” via the included instruction sheet, books, and internet sources. 3. Built straight out of the box with no aftermarket extras. 4. Weathering and detailing done with pencils, washes, paint, and chalk pastels. I would recommend this kit to all that have an interest in Cold War era Soviet combat aircraft. As always, all comments and criticisms are most welcomed. With much respect, Mike
-
 Hello guys, here are the photos of my most recently completed model, Trumpeter's Mig 3 in 1:48.
 -
Hello guys, this will be my second 1:48 Russian aircraft (the first one was a Yak 1b). The kit has a low part's count, and I trust I can get this one done in little time. I hope the decals are of good quality and don't stick to the model's surface as soon as they're placed.
-
I just bought Trumpeter’s 1/144 scale LCM(3) as a bagged kit with no box on e-Bay for less than ten bucks - it looks to be a fun, quick build! The LCM was waiting for me on the porch when I got home from work yesterday. Tearing open the package after dinner, I was impressed with the quality of this little molding. The weld seams on the interior bulkhead shown here, for example. Nice. Assembly is so simple I’m going to try something different this time; having cancelled travel plans with the wife this weekend because of the COVID-19 virus pandemic, I think I’ll stay in and see if I can polish this off before Monday! The first assembly was the open interior “box”... then the deck and hull... ...and then fitting them together. I’m already halfway done! Have to work today, but after that I have all weekend...
-
Hi! I started building this 1/32 109 G-2. I won´t use the kit decals. Instead, I got hold of a beautiful sheet from FCM Decals for Trautloft´s aircraft.
- 4 replies
-
- 1
-
-
- Trumpeter
- FCM Decals
- (and 1 more)
-
Hi all, First finished kit of 2020 for me - Trumpeter's big, bad Bearcat! Built OOB apart from Eduard seatbelts and wire brake lines. Used MRP and Hataka lacquer paints throughout with Colourcoats enamel for the details. Here's the (limited!) build thread: Markings were painted using Montex masks - first time I've used these and they were a real revelation for me. Will definitely use again! The other decals (not many thankfully) were the kit's. The kit is pretty nice to build - the usual seam lines everywhere, especially around the wing roots and cooler intake mouths, but the clear parts were excellent both in clarity and fit. The kit gives you a fair bit of open-panel detail but sadly doesn't make the detail fine enough to make it worth opening the panels! A bit hit and miss for a Trumpeter kit, this one manages to really capture the shape and lines of this beast of a fighter. Not a classic kit by any means (it builds, in the words of @gingerbob, like a 1/48 kit blown up to 1/32 without any of the finer details you'd expect in this scale) but it's a 1/32 Bearcat and Trumpy should be applauded for getting the shapes right to enable a good-looking and imposing result. Altogether, the kit is the only game in town if you want a big Bearcat and it's pretty good. For the price (£40-odd) it's very good. Also highly recommend the Montex masks and MRP paint for ease of use vs great results. Hataka Orange Line paint was okay but needs a lot of care and attention to get the paint:thinner ratio right. Thanks for looking in, Alan
-
Hello guy, some picts of a project beginning in 2016 a Voroshilovets but in german army. i find this pict on the net for inspiration Some pict from the beginning and work on the photoedges Some photoedge and friul tracks Cleaning sprue with toothbrush and soap Working on PE
-
and the Chinese junk ship from Trumpeter is finally finished. The worst thing was to tie and tighten the ropes. The scale is estimated to be about 1/60. How do you like it ? now I'm starting the most complicated building I've ever done, the Victory 1/100 from Heller
-
 Like the Iraqi Su-7 this was built in 2016 too. Trumpeter kit with Aztec decals, initially wanted to use the Pavla SK-1 seat but it didn´t fit well (was also too short) so my dad used the kit seat, only stole the seatbelts from an Eduard kit. Added the missing IFF antenna on the belly with plastic rods. Camo done with Tamiya XF-55 Deck Tan and XF-58 Olive Green, underside colour was an older selfmix. Couldn´t exactly tell which colour the cockpit had. Decided for the colourful turquoise, mixed 50:50 with Gunze H25 Sky Blue and H46 Emerald Green. Build thread here https://www.britmodeller.com/forums/index.php?/topic/235008806-yom-kippur-opponents148-mig-21f-13-vs-mirage-iiicj/&tab=comments#comment-2491093 The model shows an a/c of the Egypt elite No.26 Squadron which was considered the best dogfighter unit in the EAF. This aircraft made it through the Six Day War and the Yom Kippur War. The Arab airforces still used this older MiG-21 type because the Atoll rockets were unreliable and the F-13 30mm gun was more potent than the 23mm gun of the other MiG-21 types. DSC_0001 by grimreaper110, auf Flickr DSC_0002 by grimreaper110, auf Flickr DSC_0003 by grimreaper110, auf Flickr DSC_0004 by grimreaper110, auf Flickr DSC_0005 by grimreaper110, auf Flickr DSC_0006 by grimreaper110, auf Flickr DSC_0007 by grimreaper110, auf Flickr DSC_0008 by grimreaper110, auf Flickr DSC_0009 by grimreaper110, auf Flickr DSC_0010 by grimreaper110, auf Flickr DSC_0011 by grimreaper110, auf Flickr DSC_0012 by grimreaper110, auf Flickr DSC_0013 by grimreaper110, auf Flickr DSC_0014 by grimreaper110, auf Flickr DSC_0015 by grimreaper110, auf Flickr DSC_0016 by grimreaper110, auf Flickr DSC_0017 by grimreaper110, auf Flickr DSC_0018 by grimreaper110, auf Flickr DSC_0019 by grimreaper110, auf Flickr
 -
Trumpeter is to release a 1/144th Xian Y-20 kit - ref. 03924 Source: https://www.facebook.com/TrumpeterModel/photos/fpp.103526326472636/1480875935404328/?type=3&theater V.P.
-
Nearly 2 years on and off with this it is the most modern ship I have built and boy it was a challenge with all the extra PE Peter Hall and his mad PE frets tested my patience a few times with this but quite pleased it has come out OK Couple of things I think I could do better but always learning to try and make the next one a more improved build with all the help and support you get from this site and the great modellers who are willing to give advice and share tips. WIP https://www.britmodeller.com/forums/index.php?/topic/235040778-ussr-sovremenny-956-destroyer/ Cheers beefy
- 13 replies
-
- 31
-
-
Hello everyone! This was my attempt back in 2013 at correcting the awful Trumpeter 1:144 Chengdu F-7-II, Chinese derivative of the early MiG-21F-13. It represents Chengdu F-7-IIN "701", of No 5 "Arrow" Sqn, Air Force of Zimbabwe, based at Thornhill-Gweru AB, in late 1980s. I ended up using parts from a scrapped Revell MiG-21PF to correct the major flaws. The tailfin was wrong for an F-7-II being more like an F-7-III (similar to MiG-21MF). The underfuselage fin was wrong too, being too short in height. The tailplanes looked like inflated cushions and even sanding them flat was no good so I used the Revell parts instead. Besides they were somewhat undersized too.The u/c legs were so tall the kit would have ended up looking like it was on stilts! The kit was fully painted and varnished with brush. The markings came from a Berna decals sheet. This represents an F-7-IIN early in AFZ service so it only had 2 wing pylons. The machines were later upgraded and had 4 pylons. These machines were quite clean so weathering was minimal. Not a great result but at least I saw it through and managed something much better than what came in the box! Thanks for looking Miguel
-
Hello all, this is my first post here apart from my introduction in the new member-thread. I want to show you the progress of my current project. Initially started the kit about three years ago, but the project got stalled and forgotten. Recently I discovered it again and heaved it up to my workbench. The kit is an easy and straightforward build with a good fit of the parts. I was only disappointed by massive spruegates in some places, but otherwise there were no big problems at all. I build the tractor straight out of the box. It will get the color scheme that is depicted on the box. Most of the main components were already done, I only had to do the interior of the cabin, attach some small parts and the windows. Unfortunately I did not take pics during the initial building steps. The chassis was already sprayed in matte black. After finishing the interior and attaching the small parts and the windows I masked the windows with the enclosed adhesive masks and sprayed the components with light blue. (Gunze H 417 - RLM 76) This is the current status: This is how it looks like when all the components are stuck together: The next steps will be: - mask off the light blue areas - spray russian green all over - peel off the masks and paint the black outlines by hand I hope that this will work out fine. I'll keep you in touch, if you are interested. Any critcs and suggestions are welcome! Have a nice day Nick
-
Hi, my last finished model. This is 1/72 scale Su-24 from Trumpeter. I haven't made a 1/72 scale model for a long time. Very no problem, nice build. Model was painted with MRP, Gunze, Vellejo and Tamiya paints. Weathering I made oil paints for artists. Few pictures below.
-
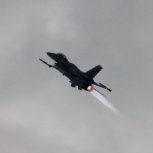
 Back in March, when @trickyrich launched the Specialist GB I wasn't late to join in with the intention of doing a F-100F Wild Weasel. Progress was fairly swift as can be seen here: However, I got distracted by a certain deHavilland Hornet and the enthusiasm for the little WW faded for a while. Also, I had some ideas to add intakes on the bottom of the fin, enlarge/add some RWR on the fin pod and a few other things...and we all know how that goes. Correct, right into the cupboard of doom! Well, we cannot be having that no more, can we? I relaunch the thread here, in the hope of actually finishing it this time. Famous last words...I know, I know I decided to skip all further detailing, since I wasn't really feeling it anymore. Nothing was cut however so I could just carry on. And carry on was what I did...and decided to start painting that lovely burned rear end! I found this image as inspiration: Linky Armed with a sense of exploration, I decided to shoot some Vallejo metallics first The I began to ponder. How to do the burned metal? I needed something that was sort of brown-red but a bit translucent. Tamiya smoke is one way, but I felt that it's too dark. Well, I settled for a mix of Tamiya clear and flat brown, the reasoning being that it should be sort of translucent. It worked after a fashion but since I made it very thin, it was tricky to the avoiding spider runs. The fist coat turned out ok, but a bit light. I redid the mix, but starting with red brown instead. That made a better richer look: The tricky thing was to make the dots up at the wing root. It's T.I.N.Y. in 1/72! What do you think? Should I try to improve it a bit further before masking it all up and slap on some primer?