

USS_ESSESS
-
Posts
130 -
Joined
-
Last visited
1 Follower

Recent Profile Visitors
1,193 profile views


USS_ESSESS's Achievements
")
New Member (2/9)
562
Reputation
-
Well today I finally settled on the colors for this character! I blocked them all in and started highlighting and refining the cape and her chest armor. I tried to achieve a dragon skin armor look by basecoating in dark brown glazing over a lighter and a darker green and then stippling on a very vivid green followed by a dark brown wash an a sandcolored drybrushing. The „horn parts“ on her armor will get some proper horn colors later. With her cape I settled on a violet and her pauldrons will be leather with iron edges. The padded undergarment will be blue. anyway here are some pictures: as always thanks for watching Konrad
-
I usually print prep and prime a few models at a time but paint them separately one after another… only when I do a couple of similar figures, e.g. a squad of spacemarines I paint them all in a batch going color after color.
-
Well… change of plans… in 32mm scale most of the details shown in the bigger ones are just non-existent! So I decided to start with the bust and work my way down to 32mm… this way I can at least guess where details are supposed to be. I started with her face (obviously)… as this is my first attempt at painting a face bigger than that of a spacemarine I was very frustrated at first but somehow managed to get semi smooth blends and an overall acceptable skintone. Details like eyes and brows are just at the beginning and need some more attention. Just blocked in a baseline for the hair to get a feeling whether the eye color works or not. All sort of comments and polite criticism is welcome! thanks for watching Konrad
-
I recently started a subscription at loot-studios to get some nice Fantasy Miniatures for printing at home. I decided that I want to improve my painting skills with this glorious lady. after printing, cleaning and curing I primed with Vallejo black primer and gave her a zenithal Highlight with white to bring out the details. It‘s just amazing how detailed the figure is! I mean… look at her face! just kidding! loot gives you files rendered in 32mm 75mm and as a bust. my plan is to start with the 32mm version and then go bigger and bigger keeping the paint scheme the same but improving on details, blends and so on. And hopefully this will result in me getting better even in smaller scales. the priming revealed some flaws like layer marks and support stubs that need to be cleaned up. here is the 32mm: 75mm: and the bust: I have not decided on all the colors jet, but she will have a Caucasian skin tone, dark hair and green eyes. that’s it for now cheers Konrad
-
Thanks! No, I haven‘t (yet)... I already have 2 pretty big Armies, Ultramarines and Deathguard/Nurgle Deamons. And as the new Indomitus Box Set was too good to not get it I now also have 1000 Points of Necrons... Way too many Models to paint and far too little time... I guess I should post an update sometime soon...
-
Is that the trace of a launched torpedo we see there? Looks brilliant!
-
Damn... being a ships engineer this mistake is a no no for me😱 will correct it immediately
-
I‘m missing the 1/144th one in this most impressive list!
-
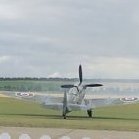
Hi Folks, I'm back! after the above mentioned half mental breakdown I stayed away from the hobby room for a couple of days. With all this social distancing and travel restrictions I was able to enjoy my hometown for the first time without tourists... I could get used to that! But on to modelling: I just did not feel like going on with the girders after I managed to crush one section AGAIN (no pictures of that this time) but I swear I will get this to a pleasant result, eventually... I thought I might start with the part of an CV thats most important: the airplanes! It took me hours to get to this point, PE landing gear is just not my friend but I'm quite pleased with that. Next will be the struts that hold the upper wing. And just as it happens to be "a thing" at the moment here'S a picture of my wonderful pixnor tweezers that made all of the above possible I have them since 2017 and I can tell you they are worth every penny! couldn't imagine modelling without them anymore. on to plastic parts: Rudder, propshafts and propellers are glued on, aft superstructure is just mocked up but getting slowly to the point where I can introduce some color to it. Does anyone have a good recommendation as to colors for both vertical and horizontal surfaces on US ships of that era? Cheers Konrad
-

1/350 Mirage Hobby HMS Anchusa
USS_ESSESS replied to robgizlu's topic in Work in Progress - Maritime
Is it all fixed in place yet? just asking as I’m imagining the horrors of masking all this intricate detail... -
That’s exactly what came out of my mouth! Just WOW!
-
Yesterday was not a good day! It all started off quite innocent. filling some ejector pins, glueing some plastic.... but then I decided it was time to fix the girders... My idea: fix it with some CA to the flight deck and just tweak it a little... so far so good, right? Hell no! I died a little on the the inside!😭 so after some considerable time and the appropriate amount of strong language🤬 it was time to disassemble everything wich is pretty easy as you just need to heat it up and everything pops right off. I tried to straighten the damaged part as good as possible: and was then left with this lot: now I came up with the idea to build the whole structure fixed to the deck below. So some small drops of CA and the first girder was in place it looked promising so I went on You see that? Yeah, I f***ed up big time! I came too close with the soldering iron and melted one of the beautiful fairleads I just glued on earlier... and of corse it's not one of those parts where trumpeter supplied spares... That was the time I just had to leave the man cave and do something else... not sure if I'm brave enough to go back today... Cheers Depressed Konrad
-
Thank you everyone for the suggestions! I was hoping to find a solution that does not include undoing the soldering... but I might have to bite the bullet there... The last days where unusual stressfull for me, as my beloved girlfriend is now in home office... so I did not have as much modeling time as I wished... but today I was able to sneek into the hobby room for a few hours! And I went on with the bridge contruction. After sanding the filled ejection marks flush I assembled the plastic parts and added most of the PE for ease of painting I kept it in two pieces Next task will be either trying to fix and continuing the girders or trying to remove all the bridge pillars from the sprues without destroying them... That's it for today! Stay safe everybody Cheers Konrad
-
Well my next move looks really similar to the last one I continued with the next bit of girder: then I had the great idea to check the fitment... looks okay... trumpeter planed the whole kit already with the additional PE set and made slots where the PE sits... time to check the fitment with the deck... hmm... when I align the feet from the third one to the deck the front looks like this... not good! this might be the reason. Does Anyone have a solution how I can straighten it so it fits both top and bottom??? As I'm hoping you can help me I laid the girder aside and started with the ships hull. First problem: Hawser pipes. I will not fill the whole bow to drill real hawser pipes but blocked the view with a simple piece of plastic sheet next I glued shut all decks as I don't need to access the inside anymore. The fit is fabulous!! Next the not so happy work: ejection marks! First time I tried this method on the elevated ejection marks. Tedious but effective! The filled ones are now drying untill tomorrow. Next I testfitted the superstructure just because I wanted to know how it looks 😉 when seen like this it looks like a cargo ship well if anyone doubted... the plastic girder is a no-go! Hope you can help with the fitment problem Thanks in advance for any suggestions Cheers Konrad
-
Your wait is over! regarding the girders, Trumpeters PE is generally very soft and flimsy brass... when it's not bent it wobbles a lot, seen here from above: but when bend and soldered it is really strong I'm not quite sure if it's possible using CA that's why I went with soldering even if it takes longer and is more cleaning work. Now regarding the plating: the plating is quite subtle, no huge craters as scribe lines and the elevation between the higher and lower plates is also plausible... there are some problem areas due to the slide molding: the stern area is worst. almost no plating detail visible. HTH Cheers Konrad


