Leaderboard


Popular Content
Showing content with the highest reputation on 19/09/12 in all areas
-
Full build log: https://picasaweb.go...4268968790/HP422 points
-
I've always wanted a large scale Ark Royal III, so have made a start on building one from scratch myself. I've still to add the 4.5"gun platforms and rear boat decks. I intend to add the hull over the foredeck and quarter deck separately, as both of these areas will be quite tricky. I've also yet to decide whether to skin the frames with 20 thou card or use car body filler and sand back to the frames. Given the pronounced knuckle and complex shape of the hull, I'm inclined towards the latter, but might try thin stips of 20 thou card first. Advice would be welcome here.1 point
-
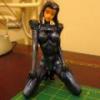
Hello Here is my A4B from Airfix with Pavla models ejection seat1 point
-
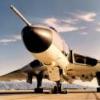
OH NO! Look what I've dug out of the stash! When the Vulcan is finished, I'll give this a go!1 point
-
I built Tamiya's awesome 88 a few years ago. I added Eduard's etch set that includes a shield, ground spikes and load of other refinements. A Jordi turned barrel was also added. The figure are a mixture of Dragon, Tamiya and Verlinden parts. The base is a piece of foam board with model railway grass mat added. The long grass is from an old wall paper paste brush and the stream was made from layers of gloss varnish and Klear floor polish. Verlinden's German uniform badges decals were used and the figures, and gun were painted with Humbrol enamels. Thanks for looking.1 point
-
Hi Gentlemen, I have been using common tap water to dilute my Revell Aqua paints befor spraying without too much drama, however I read somewhere (maybe even on here) that better results can be achieved if I were to use water taken out of the condensing tumble drier collection tank. Has anyone any experience of this method?1 point
-
Here`s my latest two completions; 1st my AMT/ERTL, 1/48 scale A-20G Boston Done as Hilda-Shane, of 22sqn, RAAF, New Guinea From the box but replaced gun barrels with brass tube and decals from AVI-Print Please ignore references to the Spitfire as I`ve replaced PB Photo`s with ones on Imgur and my old effort is soon to be replaced with a Special Hobby `proper` Vc and the old one no longer exists Hope you enjoy... Cheers Russ PS: Sydhuey later PM`d me and retracted his opinion that the markings are incorrect, turns out they`re correct after all1 point
-
Hi All! I just finished with this small bird in scale 1/144... I rejected to build my soviet line ( http://www.britmodel...topic=234925327 or http://www.britmodel...topic=234921520 ) for few moments and built this Scandinavian DC-9/21 airliner. This is the shortest version of the DC-9s family from years 70s... That's why I have had to cut the fuselage at the forward and rear section too on the kit. The kit is the Czech made FLY MODEL 's DC-9/31 and the decals is the professional qualitied Norwegian published Lima Nowember Decals . Now I want to thank you to "rhusberg" (Mr. Ruben) for the perfect decal sheet.... Cheers Daniel...1 point
-
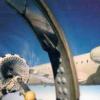
freigth dog sr 53 72nd scale ...... a few weeks back i had a good sunday out at the bristol model show .While gaining inspiration from the great stuff on exhibition i stumbled on freight dog models and there on display was the sr 53 so i snapped it up and shushed it home cleared the model table and set to work this is the first all resin kit i have built and it went together a dream . hope you like it ..... regards Glenn.....1 point
-
This is a quick and nasty OOB build of the very very nice indeed Sword Harrier. I'm no Harrier know it all so please excuse any errors. Thanks for following the build..I'll find the link shortly. I'm not happy with the pics so theres only 3. Cheers all and thanks Sword. It's a great kit! Tim1 point
-
Uh, no. The 787 is elegant and perfectly proportioned. The A380 is a bloated dead putrid whale1 point
-
IIRC a lot were 1:48 - I acquired a couple of sets of vac mouldings in the '80s for 1:48 Concorde models that were left over from a run of Travel Agents models... A fair size! Iain1 point
-
Whatever I'm not going to argue with you, you are right and I am clearly wrong. You are guilty of what you accuse me of - you just can't believe that I would have seen such things. I know what I saw mate, and your protests sound increasingly like you are supportive of such questionable activities, even though I witnessed them several years ago. I would never judge you personally, I don't know you, never flown with you, I'm happy to take all your information on face value, but just because what you think you know doesn't add up with what I have personally witnessed, don't just disregard what I've said. And I'm glad you think I must be unfairly judgemental, because that suggests that things have been getting better. The fact that it doesn't happen in your experience can only be good news for all of us. Al1 point
-
Not to mention the incredible amount of ugliness such a monster would inflict on the general public1 point
-
£13.99 is not a bad price for a high quality kit of a similar subjet. The Deuce is not a small aircraft, it's larger than a Tornado and hopefully the kit will have a good number of parts (if only to reproduce all the details they claim, particularly the weapon bay). The problem is what price the kit will have once it arrives in Europe ! Checking Hannant's prices for other Meng Models kits, they seem to cost around 30% more than the Hobby Easy price, so I'd expect this to be in the £19.99 range. It's not pocket money, but it's the kind of money Xtrakit and other short run manufacturers ask for many of their kits, acceptable IMHO1 point
-
Hi Mike, its at Cosford now. The rocket motor has been removed but is displayed separately. When we photographed it for the kit project the museum could not have been more helpful, gave us a ladder and said help yourself, but don't stick your head too far up the tailpipe because of asbestos risk! When originally flown the airbrakes were not perforated, and the Firestreak missiles were dummies. The kit includes data pods for the wing tips (of which there are few photo's showing them fitted, but they are displayed along side the airframe now). The Firestreaks on it now are not original dummies carried. Colin1 point
-
Fantastic Build! Well done! My Dad flew that airframe on 153 Sqn at West Malling before they went to Waterbeach to be renumbered 25 Sqn. I've got an Aeroclub Mk14 that has been languishing for years due to house moves and no space: determined to dig it out and finish it now.1 point
-
Just a quick update me hearties,building was stalled due to moi losing a part to the carpet monster,but after a diligent search,I found the bugger Well,the hulls together,and am as high as a kite due to the amount of cement used/needed.Pics will follow,when me cameras charged up.1 point
-
This pic is for Bradley, this was done yesterday before work, PLEASE NOTE THE DAY AND TIME LOL, I got a bit carried away yesterday with the filler, and I've corrected the nose on the 744 and above the cockpit.1 point
-
My memory may be fading but..... Rocking the throttles outboard controlled the lift dump (wing spoilers) & thrust reverse. Normally this was done after you were down, definitely staying down (ie not doing a roller/ touch & go) & all 3 wheels were in contact with terra firma. BUT it was possible to pre-arm LD & TR on final approach which activated on mainwheel touchdown, hence you could model a Tornado with the nosewheel still off the ground & the buckets/ spoliers deploying/ deployed. The reason you don't often see that for real is due to the potential for high rates of de-rotation if you cocked it up (ie the nose would slam down very hard during the deceleration) - this was partly the cause of the first RAF F3 crash (during landing at Akrotiri, Cyprus). For that reason, Pre-Armed Thrust Reverse Landings (PATRLs) were seldom practised, usually only once a year during a pilot's QFI "dual check" & you had to be within a strict set of parameters on short finals, eg rate of descent, crosswind, etc otherwise you deselected pre-arm & did it manually when you had all 3 wheels down. From what I remember there were one or two anomalies..... If you managed to bounce spectacularly badly on landing, it was possible to get airborne again with Lift Dump (spoilers) but not Thrust Reverse deployed (can't remember how). Since the jet then had all the flying qualities of a block of flats, this was generally viewed as a Bad Thing..... One of the downwind checks was to make sure the airbrakes were "in & locked" - there was an interlock between the airbrakes & thrust reverse buckets which was supposed to stow the brakes before the buckets deployed but the buckets (pneumatic) deployed very quickly (0.2 sec I think) & the airbrakes (hydraulic) took longer to than that to stow, so if you landed with them out (or even slightly unlocked) there was a real risk of blowing them off with Rev/ Rev. Cue a one way chat, with hat, no coffee..... Hope that helps.1 point
-
Its so nice to know you are "On the Air", thank you very much for your kindness!!! All the best,1 point
-
A couple of hours today on the bow machine gun platform supports.The sides of the platform folded downwards and when horizontal, the sides were supported by the structures under the platform. These protrude when the sides are in the up position, as this photo shows. I'm tryimg now to figure out the white structure under the platform supporting the deck-edge wind breaks. Any ideas? I've also begun to detail the port pom-pom platforms. I thought the supports for these were solid, but this photo shows that what looks like a solid structure was actually shadow as there were separate supports for the platforms,1 point
-
It's been a while since my last confession....... Anyway, some progress. I've now started to detail the various gun and search-light platforms. I've picked up a couple of very useful photos that show detail on the port-side of the hull, so shall continue detailing the hull before thinking about scratching the gun houses. Rather annoyingly, I keep finding small(ish) inaccuracies in the flight-deck plan, but I've decided to live with them.1 point
-
Had a few hours to try to finish. Close but no cigar... Just the canopy and it should be r.f.I. I replaced the gun barrels with brass tube. Had a night mare with the very Fiddely undercarriage. Lost the seat belts about five times, but i am happy for what is my tenth kit to date. Learnt loads along the way. Hopefully just time to finish off properly before baby comes. Thanks for looking. End in sight?? Kevin1 point
-
Very nice!!1 point
-
# You know you want to Julien1 point
-
One more question. When are we going to have some British stuff made? You know, kit that was actually used rather than experimental German kit.1 point
-
Falcon that is an impressive pile of plastic. Its more than my local model shop has!!!!! And you have a propper man room!! I'm relegated to the shed!!1 point
-
More progress on the island: Still a fair bit to do, but it is gradually taking shape. I'm struggling with the arrangement of D deck (top deck of island). I still have the searchlight platform to add behind the direct and mast, but do not have a clear photo of this area. Has anyone got a photograph they could share? Many thanks, IG1 point
-
I've finally managed to find the inspiraton to work on this again..... The island this time - I struggled to get the shape of the island right, as it is not symmetrical. For the base of the island I made 60 thou plastic card sections from the 'as fitted' plans and filled between the sections with P38 auto filler. The funnel was made by using plastic card cross-sections and plastic tube, filled with P38 and sanded back to shape. The base and funnel match the plans very well now, though the funnel still needs a funnel cap, which will increase its height a little. I'm making the decks in various sections, as this is easier to match to the plans and will allow for painting. This is my third attempt at the curved bridge structure with recesses for windows (between C and D decks). I found that using blocks of resin for the curved wings worked best as resin is easier to sand back to the correct shape. I still need to shorten C-D decks before attaching to the island base and build the screens around the front of B deck With the base of the island and funnel on the flight-deck, it actually beginning to look like Ark Royal...1 point
-
A small update. I've been busy correcting the obvious faults on the hull. These are the angle of the round-down and the forward 4.5" opening (of which more later). Compared with plans and photographs, the round-down fell away too sharpely. The old Airfix kit has the angle right, so I decided to razor saw through the hull under the round-down and insert a wedge. You can see the cut in the photo. With the wedge inserted, there was a slight buckle in the flight-deck, which I've corrected. Now that I'm happy with the shape, I've started to detail the stern. The first job was to cut openings in the hull above the quarter-deck. These still need to be sub-divided with plastic card. I also detailed the search-light position, fitted a deck to the opening in front of the round-down and added splinter shields to the 0.5" gun positions and the main 4.5" sponsons from brass sheet. The search light and 0.5" sponsons are braced to the hull of the ship, but I'll add all these more delicate structures later. Finally, I've started to add the re-inforcements to the hull under the round-down from micro-strip. .1 point
-
It's been a while since my last confession. Having finished the basic construction on the hull, it was clear that there were a number of problems to sort out. The cable deck needed redoing, the port midship pom-pom sponsons were mounted too high, the flight-deck overhang over the quarter deck was not even on both sides of the hull and the forward knuckle was too pronounced. It had got to the stage where I was heartily sick of the project, so ignored it for a few months, before picking it up again over the Easter holiday period. The cable deck now looks like this: It is probably good enough since it will only be seen through the hull openings. I removed the poor attempt at a steam pipe on the roof of the cable-deck before fitting. I cut out the midships pom-pom sponsons and made a new set and which are now back in the hull at the correct depth: I also used milliput to finish the 4.5" sponsons, which still need a bit of attention to make even: The flight-deck above the cable deck is now glued to the hull with the cable deck masked with foam peanuts and tape. The water-line shows a repair to the bow where I manage to drop the model onto a brick floor: I haven't finished sorting out the area above the quarter deck, but the hull now looks like this: The next task is the quarter deck and flight-deck over-hang. After that, all of the light AA and searchlight platforms need bracing supports and the hull openings and crane deck need detailing and boxing in. I'm still undecided about whether to bother to reduce the forward knuckle. Here's a slightly older view with the 1/600th kit for comparison. Hopefully the interval until next update won't be as long1 point
-
A quick update. The sponsons for the 4.5" mounts were made using resin and a platicine mould from a master fashioned from the end of a 1/48 drop tank that I found in the spares box. Crude, but provided me with eight sponsons roughly the same shape. These have been added, and 4.5" decks fitted, but the decks still need to be given a supporting structure made from Milliput. Crane-deck and support, searchlight, pom-pom and quad machine gun platforms also attached, along with the armour belt. I've also built a cable deck (pretty crudely as it won't be seen except through the bow openings), but haven't added the anchor chain yet. I'm quite keen to get this painted so that I can zip it up and add the forward 4.5" platforms, but and now need to wait a few days for the WEM paint to dry before painting the bulkheads, chafing plates and chain pipes etc. I think I've also got the chain pipes set marginally too far aft and am considering modifying...1 point
-
Spent the evening filling and sanding (front flight deck not yet stuck down). After a quick coat of grey primer....1 point
-
A few pictures of the bow, which proved quite tricky. I've made the front section above the cable deck as far back as the fist 4.5" position detachable so that I can detail the cable deck later (hence the tape holding it together). The whole hull now needs a careful going over to fill and check for problems. Several of the hull openings need tweaking too, including the height of both the cable and quarter deck, but at least I've now got a rough-cut in plastic to work with before adding all the sponsons, armour belt, lifts, and deck edge furniture. The knuckle came out OK in the end. I used 30 thou card for the top part of the hull, butted onto 20 thou at the bottom, with the ridge filled with fine grain Milliput. The last photo shows the 1/350 hull in comparison with the 1/600 Airfix hull.1 point
-
The hull is now skinned both sides, with flight-deck on, except for the difficult bow area. The stern and fligh-deck over-hang caused a few problems, but the most difficult part so far was the knuckle at the stern. I found that reinforcing the joint flattened out the knuckle. after 3 or 4 attempts I reinforce the lower panel with about 1mm protruding for the upper panel to rest on. It's not too obvious in the photos, but quite apparent up close. The green stuff was applied to correct the over zealous use of plastic weld, which distorted the 20 thou card in a few places. Here's a closer shot of the stern area .1 point
-
I've had little time this week, but I've managed to sort out the quarter-deck and the 4.5" platforms (these will eventually have new decks overlaid, supported by sponsons). I decided to try and skin the hull with 20 thou plastic card and clearly the knuckle will require very thin strips. I was hoping to get one side finished this weekend, but despite not managing this, it's beginning to resemble the ship.1 point
-
Mike, Phil, Plans This project started a few years ago when I then found a set of (basic) plans to about 1/375 and a card model of Ark Royal at 1/300. I reduced the card model to 1/350 and used it to create a set of templates that I used to make 60 thou frames in plastic. It was then obvious from photos and the plans that the card model was fairly inaccurate with respect to the crane and boat deck location/size. I couldn't find any detailed plans so I took the frames apart and forgot about it. The 1/350 plans I'm currently using are the National Maritime Museum's original 'As Fitted' plans as reproduced in John Roberts British Warships of the Second World War (Chatham, 2000). These are reproduced in the book as double page 1/600 plans and include the starboard profile, flight-deck, upper galley deck hull sections at frames 152, 138, 125, 118, 109, 96, 83, 77, 63, 52, 35 and 16, as well as island superstructure at A, B, C, and D deck levels. I scanned these and enlarged them by 172 percent to generate a fairly complete set of 1/350 plans. Using these I was able to modify the plastic frames that I had made from the card model and re-assemble, making new boat and crane deck openings. As an aside, the Roberts book also includes a comprehensive set of 'As Fitted' plans for HMS Indefatigable and Attacker. I thought seriously about Indefatigable, as I'd like a model of this more than any other ship, but reckoned that it would be easier to modify an Illustrious/Victorious than to scratch build and I have 6 Heller Illustrious' models for this purpose (3 in various states of completion as Indomitable, Illustrious and Formidable). The 1/600 Airfix Ark Royal gives a good size comparison. I've also got prints of all the IWM Ark Royal photos that I consider useful and, more importantly, an unpublished set of really detailed photos of Ark Royal taken by Cdr R.N.Everett. He was a pilot with 820 Squadron on Ark Royal 1939-41 and I believe the Ships' photographer. His albums are at the FAAM (with many of the original negatives) and include some really fantastic photos. These include, for example, a photo of the cable-deck, which I've never seen before. Nige, The method you have used on your Lancaster looks very effective. I will definitely try your method on this model (many thanks for the link). My only doubt is whether I've enough frames? Your Lancaster has frames much closer together. Busdriver, Yes, it is bound to happen. I think of this build as a public service to all those who want a 1/350 injected kit. Moreover, I build at a glacial speed, so the chances of being overtaken by injection molded kit are very high.1 point


.thumb.jpg.d17ff607fc7e89ed057e63fcb6f2a888.jpg)


This leaderboard is set to London/GMT+01:00