
Search the Community
Showing results for tags 'Tamiya'.
-
And yes, it is another delta, but as I said in my intro to the Mig-21 they were popular at the time, particularly for aircraft intended to have supersonic performance, but more on that later. In 1976 Aifix released their version and I still have it gathering dust somewhere, but for this built I will be using the Tamiya one. This was first released in 1998 and according to Scalemates the boxing has never been changed. When I said "nearly but not quite" I was referring to the problems that this and many other US designs of the period had with engines. This meant that the plane never quite achieved its full potential and had a pretty short service life. Heinemann & Co designed an improved version with somewhat better performance but that lost out to the LTV F-8 Crusader - some say wrongly, but I will cover that in my usual background story. More as and when. Cheers Pete
-
Been a while since I posted here, hah. Completed this a little while ago (and it unfortunately accumulated a little bit of dust). Built OOB with a bit of additional wiring detail on the exhaust, some reflective film from an AFVClub tank periscope set, and some aftermarket decals and masking. Base used some Brengun tie down PE. Thanks for looking, Gaz
-
Hi everyone This is Tamiya's 1/35 Panther G Late that I built for the Panther Mk.V STGB group build. It was built OOB with the exception of the barrel (Aber) and grills. I used sea foam for the branches. The kit went together ok - the tracks weren't that great, but I think they turned out ok. Thanks for looking and Happy New Year Cheers, Greg With shelf mate...
- 11 replies
-
- 22
-

-
 Hi all. After a series of frustrating days at work, I decided to do some retail therapy and purchased Tamiya's excellent P-38F. I also ordered some decals to build Capt. James Hagenback's plane he flew in late 1943 while commanding the 94th FS in Sardinia. This is probably as colorful as the P-38F gets, with the yellow wings and all. I'm not going to waste anybody's time (including my own with sprue shots and will just launch right into the build, shortly. But needles to say, the kit looks excellent!
 -
My first showing of a completed build!!! (Be gentle with me out there!). I've only returned to the hobby after a break of 40+ years so am learning all new techniques as I go along.......my figure painting certainly needs improvement!!! So here is my examples of a OOB build of the Tamiya 1/35 Sd.Kfz.222 and Horch 4x41a. Both were sprayed using a Tamiya TS-3 rattle can. I've now invested in a spray gun (Amazon Black Friday deal!), so my next build will be finished using that, but need to practice first before letting myself loose on a build. Made into a vignette I need to correct the poor fellows left arm with a touch of filler really....
- 4 replies
-
- 15
-
-
- Tamiya
- Sd.Kfz.222
- (and 1 more)
-
Let me present my first 1:35 scale armoured vehicle - the Centaur Mk IV by Tamiya. Brush painted with a “home brew” Tamiya acrylic mix of SCC 2 to represent “Hunter” from H Troop, 2nd Battery, 1st Armoured Support Regiment, Royal Marines Armoured Support Group, Normandy, June 1944. Weathered with various oil and acrylic washes. Thanks for looking.
- 7 replies
-
- 20
-
-
- Tamiya
- Centaur Mk IV
- (and 1 more)
-
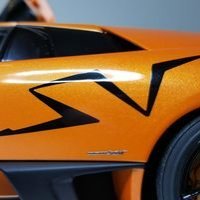
I'm new to the forum and wanted to display my first post and first build in 13 years. I built lots of cars up to getting married and the time taken with starting a business etc. meant my attention moved to collecting high end diecasts. But lock down has given me the time to build again and I've loved it, it's kept me from frustration. This is the wonderful recent Tamiya kit with upgrades from Top Studio and Hobby Design Detail kits, as well as various Top Studio additions such as brake banjos and bleed nipples. Paint is mostly Alclad with the fairings in Tamiya LP-21 Italian Red, which did give me some problems. I had to redo a few panels as the 2k clear reacted with paint that hadn't hardened yet, even after a week of waiting! Hence it's missing its front DUCATI logo until I can find another.
-
Well I think its about time I got my thread up and running at least, if not the actual build started. I am going to be building Tamiya's 1/48 Panther G and hopefully finishing it in a Winter camo scheme, I have a soft spot for these on both aircraft and targets, sorry tanks. Now I am far from an expert on Panthers (or quite a lot of things actually) so don't go expecting any deep knowledge on the subject in my build. I do like armour and used to build no end of it in my youth but have concentrated on wingy things for a very long time and I have been trying to fit some armour into GB's for a little while. A lot of the armour I used to build was German, they made some pretty cool stuff din't they, so I thought I would revisit some of my old subject matter and have signed up for this GB and the upcoming Panzer III one. The kit I will be building is the excellent looking Tamiya 1/48 G, which seems to be able to be built as either early or late versions of the G, so lets start with the ubiquitous box and contents shots; As you can see all is present and correct and eagerly awaiting some glue, which I hope to start using on it tomorrow. I like the ambush camouflage of the Panther featured in the box art but as I said I am drawn to winter schemes and in my searching I have found this one; https://www.worldwarphotos.info/gallery/germany/tanks-2-3/panther-panzer/panther-ausf-g-winter-camouflage/ To my very untrained eye it looks like a late model G (it looks like it has the shot trap deflector on the lower mantlet) and it also seems to be splendidly Zimmerit free! I would appreciate any info that you experten out there can shed on this. Feel free to offer any advice and just generally poke fun at my build along the way. Craig.
-
I don't like that plane - too big and bulky for my taste, but I've noticed that huge white-red checkerboard painted on engine cover and did a little bit of research. Looks like pilot might be my very distant family. I'm not sure about that, but it's great reason to buy a new model, right? :). Even my wife approved that ;). It's my first Tamiya kit after many, many years and I immediately fall in love with that company again. Finishing Bf109G-6 atm and will buy A6M3 soon. It's my second attempt with big, serious aircraft models (but I've painted a lot of smaller things last few years, so it's not my 2nd model at all). I'm happy with painting (painted with Tamiya, Vallejo and a little bit of Kimera), not so happy with construction (need to be a little bit more patient sometimes). And proud mother with her children (P-47s in 1/144 from Platz - models I'm using for wargaming):
-
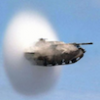
 This is HB981, a Republic P-47D-22-RE Thunderbolt attached to 135 Sq. RAF in Burma during 1945. At 04:45 on 2nd May 1945 it was taking off from Akyab Main to provide "cab rank" support for the Operation Dracula landings at Rangoon, when it lost power and ground-looped off the end of the runway, tearing off both wings in the process. Its relevance to me is that the aircraft contained my father at the time it performed this unplanned evolution. After the aircraft had come to rest, he popped out of the cockpit unharmed, then popped back in again to retrieve his parachute, since it was a chargeable offence to lose a parachute. Then he jogged back to the end of the runway, sat on the parachute, and waited for a vehicle to come and get him. At which point he cadged a cigarette off the driver. Shortly after that, he had his photograph taken, posing on the wreckage. (The photograph, you'll see, also had a fairly hectic later life.) The story is retold amusingly in Roger Freeman's Thunderbolt: A Documentary History Of The Republic P-47. (The squadron number is wrong - 135 Sq. didn't renumber to 615 until slightly later in the war.) Paints are Tamiya, LifeColor and Alclad. The 150-gallon (US) drop tanks are filched from a Tamiya P-47M kit, but the Hamilton prop (and its decals) came with the Razorback kit, although it's not required for either of the aircraft detailed in that kit. SEAC roundels, flashes and the tail number come from an Xtradecal "Yanks with Roundels" sheet. Eduard photoetch detail and placards, Squadron wheels, and an HGW Sutton harness which I found almost unusable. Finally, a comparison of the Thunderbolt and Hurricane, showing what a brute the Jug was in comparison. (My father used to take great delight in relaying the old RAF joke about how the easiest way to avoid enemy fire in a Thunderbolt was to release your harness and run around in the cockpit.) Possibly the drabbest Jug ever modelled. Sorry about that.
- 33 replies
-
- 52
-
-
- Tamiya
- P-47D Thunderbolt
- (and 1 more)
-
Hi there To make a long story short, there's a chance that I produce something in 2020! And please don't ask about 2014 to 2019! It started three weeks ago. Here's the doctor's prescription. A little more than three sprues This one doesn't count! I'll use the stencils only The usual piece of art by Tamiya Colours options... needless to say they didn't suit me!! :
-
Hi there!, I mostly do aircraft and ships and It's been 10 years since I build a tank. Since then a lot has happened in the armour world with many new publications on weathering techniques. Probably the most difficult part is not to overdo and to get all the effects in scale, which is quite difficult in this smaller 1/48th, but been my first in such a long time I'm quite happy with the result, it is far from perfect but it is a start and the most important thing is that I had a lot of fun! cheers
-
Hi all, I'm only subjecting you to this because it's my first ever attempt at something which keeps its wheels on the ground, and a bit of an experiment in the kind of weathering you folk are so good at. It's the Tamiya kit, gifted to me years ago by an extremely talented modeller who thought I should have a crack at armour. Covid-19 was what got the motivation up enough! After Halfords primer, it's almost all Humbrol enamels through a cheap art-shop airbrush or my Hansa 381 for the camo pattern. Pinwashed with oil; tried a dot-wash with mixed results; more success with sponge-applied rust and paint wear using a red shade and a dark purple-grey, and enamel rust-stains. I tried not to go overboard as I had a feeling most Tigers didn't last long in the field before breaking down, getting stuck or getting blown up... Mud was artists' gel mixed with pigments and actual mud, and liberal amounts of pigments to 'dust' the lower parts of the hull. Decals were a b@*#%*d and a coat of Humbrol Clear reacted with water or the Solvaset to make white stains everywhere, which I have now incorporated as pants weathering effects Luckily the large numbers were the least affected but still haven't come out perfect even after 6-7 applications of Solvaset. My top moment was sweating over how the hell to paint the centres of so many wheels accurately, as they would look terrible with even the slightest smudge over the rubber tyres. In the end, attaching them to a cordless drill via a sanded pointy bit of sprue and holding a brush up to the spinning wheel produced perfect circles every time with no masking! Win! How do others achieve this? Hope the whole lot is acceptable anyway, it's been 6 years away from modelling, but it's just like riding a bike, no? Chris (Sorry for all the white-balance issues, I found it really hard to get the dunkelgelb a consistent shade through all the pictures so to get as close as possible I had to adjust it afterwards which made the background go crazy colours)!
- 15 replies
-
- 23
-
-
- Tiger 1 Early
- Tiger I
- (and 1 more)
-
Completed. Straight out-of-the-box build. Don't like the transfers. The Divisional Insignia look too big and were a pig to work with even given a decent application of Micro Sol. One has a crease in it and I lost the black 2 to go on the yellow disk when the transfer disintegrated when trying to get it off the backing paper. All paint has been applied with traditional hairy stick techniques including dry brushing, damp brushing, wet blending and washes. A final coat of Windsor and Newton Acrylic Matt Varnish to seal. As ever, when I look at the pictures I see some faults that I should have rectified. I haven't painted the windscreen wipers and there is a bash that has taken the paint off the rear hubcap in the photo above. Ah well it wasn't supposed to be one for the display cabinet and it is a wonderful little kit, the fit on the parts and the design of the construction is just exemplary. Some pictures of the build here
-
Hey all, Here's my latest on my Soviet armour spree. This is Tamiya's T-55A, which has for once more options in the box than a Dragon kit... The kit can be produced in either Czech, Polish, or Soviet markings with the neccessary parts to represent the relevant country's own production variations to a relatively accurate level. Now whilst this has nothing over the latest Miniart offerings, it is still an awesome kit! My example follows a generic Czech scheme painted using Mr. Hobby 012 Olive Drab (1). Though meant to represent USAAF Olive drab I feel it gives a reasonably accurate representation of Russian Green. The kit was built out of the box and weathered using pigments, graphite, and oil paints in various capacities. I'll admit now that the hatches are a bit bare at the mo, but I'm currently looking to fill them with some crew members to fill those gaps. Thanks for looking! Sam
-
Here we are then, this old beastie. M48 1 by phil da greek, on Flickr There is a WIP on here if you care, but for those pressed for time this is going to be part of a larger project inspired by Kyochi Sawada's photograph of Lt. R Horner USMC and his platoon sheltering behind a Patton on Tran Cao Van Street in Hue on 1st February 1968. A little artistic licence here and there but trawling through the interweb of Patton photos I think this is fairly typical. As always it's brush painted in Humbrol enamels (a 50/50 mix of 155 & 030) and weathered in Humbrol 070 with a touch of white for variation and finished with Winsor & Newton Galleria acrylic varnishes. There's a little bit of aftermarket bits and some odds and ends from the spares box. M48 - 34 by phil da greek, on Flickr M48 - 41 by phil da greek, on Flickr M48 - 31 by phil da greek, on Flickr M48 - 36 by phil da greek, on Flickr M48 - 28 by phil da greek, on Flickr M48 - 30 by phil da greek, on Flickr M48 - 39 by phil da greek, on Flickr M48 - 40 by phil da greek, on Flickr M48 - 35 by phil da greek, on Flickr M48 - 38 by phil da greek, on Flickr M48 - 32 by phil da greek, on Flickr M48 - 29 by phil da greek, on Flickr Thanks for looking in.
- 24 replies
-
- 37
-
-

-
I've been looking at Tamiya's airbrushes but I have an Iwata studio series sprint jet compressor. Would any tamiya airbrushes be compatible with this compressor?
-
This is the Tamiya 1/35 M551 Sheridan. I used the Echelon Decals COLD WAR M551 & M551A1 SHERIDANS sheet depicting a Sheridan fielded by 2 ACR featuring the MASSTER camouflage scheme used in Germany during the early 1970s. It is a short-lived scheme I have always wanted to model. I fully admit I am not much of a figure painter. I did alter the figure by giving him long sleeves (fashioned from Apoxy Sculpt) as would been seen in Germany as opposed to the short sleeves depicted in the kit for Vietnam. Stowage is from the Legend M113 Vietnam Stowage set which I figured would have been appropriate for early 1970s Germany.
- 16 replies
-
- 41
-
-
-
Hello ! It’s been a litle while since I posted anything here , so there is my latest plastic achievement with an “exercice de style “ from an historical photo. I wanted to mount the new Tamiya’s Marder 1 and reproduce this well-known pic was a kind challenge. It required to open the front driver’s post and scratching the interior and somme spécial stuffs as the 5cm mortar ammunition box while thinning a lot of pieces Hope you’ll like it and that the work done was worth it full build here : https://warpaints.net/viewtopic.php?f=60&t=15112&sid=7666074b72b5a1459cb4fc404e17f030 See you Fabrice
- 12 replies
-
- 33
-
-
-
- Jagdpanzer Marder I
- Tamiya
- (and 1 more)
-
 Last time I built an AFV I was 14 years old - I remember making a full blown diorama - 2 Shermans (1 knocked out) and US infantry approaching a building ,the base contained 2 tonnes of plaster of paris with not very convincing foliage 🤣 Back to the present .. I bought the rebox of the same kit a couple of years ago - for the D-Day 75 GB, but never got the time! The plan - build 'Hurricane' one of the decal options in the kit , she came ashore on Omaha beach on D-Day+3 , even though the LST delivered her directly onto the beach she was fitted with Deep Wading Gear ... therefore I am going to try replicate her arrival in Normandy by scratch building the deep wading gear 😬 (plasti-card and 3D printer at the ready) ,all advice will be gratefully received. From the other picture of her having an engine change it can be seen that she has the cast front and spoked wheels - making building choices easier all the time. The kit and a start on the bogies
 -
 Hi all, finished as part of the ongoing and excellent Panther STGB here are some pics of my recently finished Tamiya 1/48 Panther G. She is finished in a temporary winter camouflage scheme copied from a picture, unfortunately the unit and whereabouts are unknown but it was taken in January 1945. The kit is typical Tamiya and goes together with no trouble at all, the paints I used are Revell Aquacolour acrylic ones and they performed very nicely. The temporary white is my Mig products, the mud is homemade and the snow is Citadel Valhallan Blizzard. Now be gentle with me because I am not normally an armour builder, but all comments and criticisms are gratefully received. Thanks for looking, and for those of you who haven't had enough of it here is a link to the build; Craig.
- 11 replies
-
- 22
-
-
-
 I've been somewhat remiss with my group builds this year, with none competed. Hope this will break my duck "This" is a Somua S35, captured and taken into German service. The example I plan to build here will be one used for anti-partisan operations in Yugoslavia. My base kit will be the Tamiya example (is there another?) supplemented by DEF Model resin & PE components to try and improve on Tamiya's offering and add German specific modifications. (Actually it is three DEF model sets in one boxing) The box tops... The sprue shots And the after market stuff ... The DEF AM stuff MTO / Yugoslav theatre decal options: And, my reference source
- 9 replies
-
- 9
-
-
- Yugoslavia
- Tamiya
- (and 1 more)
-
Tamiya 1/35 Opel Blitz, saved from the shelf of doom
Ned posted a topic in Work in Progress - Armour
I started this a good few months ago, and boldly/foolishly decided to include a driver figure to spice it up a bit. The truck sat with just the passenger door fitted while I tried to paint my first figure since the Airfix multipose ones about 40 years ago (and how good they were!) I just couldn't get the fleshtones right at all, so Jurgen ended up with a face only his mother could love and hair like custard. Off to the shelf of Doom! I had a JFDI moment on Saturday, so I got back to work and finished him off. The pictures don't do him justice, but at least he'll be stuck behind glass once the windscreen is on. I'm sure that Francois Verlinden started off in the same way. I have told myself that I will not have a Shelf of Doom. Only been back a few months and there's this Opel Blitz, an Sd.KFz. 222, and a Takom Hanomag SS100 that have been "put to one side". I'm taking myself in hand and sorting them out -
I purchased the 1/48 Betty to compliment my RAAF and RAF bombers a few years ago and thanks to being in a job that gets me to move every few years I have not wanted to build a big kit like this. I am now in the same spot for the next few years and (hopefully) not that far from retiring so I decided to finally make it, the 1/48 Lancasters, Lincolns, C-47, Wellington and 1/32 Swordfish and Avenger will hopefully be getting started in the not to distant future as well. As I am not overly concerned about the interior due to very little being visible when closed up I decided to not get too excited about it. The interior colours are the Mr Colour Mitsubishi interior green and Aotaki. Prior to closing up the interior I weathered the Mitsubishi interior green with some Humbrol Reed Green then a little drybrushing of silver on the highlights or high traffic areas. The cockpit is missing so much detail, and not just little stuff. Behind the second seat, on the desk, should be a radio and coming down from the roof should be the antenna pole but they are all absent. You then have lots of smaller detail such as the lamp on the plotters table and so on. I understand the smaller stuff being missing but big basic things like radios and antenna masts are a bit of a silly one to miss, especially given how much space it would take in the cockpit and how busy it would look. I painted the engines with Aotaki first then using various Humbrol paints I did the cylinders etc with a little silver drybrushing to bring out the detail. I have painted the whole aircraft with Hu27002 with the intention to use acrylics over the top and start using tape to strip of chunks to represent the weathered Japanese aircraft. I figured this will work as I somehow manage to do similar without even trying on other kits so I thought I would give it a go. If it doesn't work it is still ok as the IJN acft were either silver or gray underneath depending on which book or Forum post you read. It is going to be the two tone camouflage version at this stage.
-
Hello Gentlemen, Here's my recently completed Beaufighter Mk.X, from RAF 22 Sq. in Burma, circa 1944. This kit was first build in 1999, as a coastal command TF X, but with the years, skills ameliorations and techniques enahnced and it cried for a restauration! Paints are AK real Colors for the dark earth and dark green, Tamiya for the underside Ocean Grey. Decals from the Extradecals range. The gunner cupola didn't took benefit of paint removal and masking, so the result is a bit down level, and the radar cooler additional scoop on the upper fuselage is standing a bit proud and should be smaller. As usual, comments and critics most welcome. I hope you'll like her. Best Stef (#6)
- 19 replies
-
- 43
-


.thumb.jpg.0bc57cb4bb3dec8e063e1951db6690c2.jpg)

