Search the Community
Showing results for tags 'Panther'.
-
 This project was made as part of the D-Day Group Build. This is my first ever diorama and it's made up with a lot of other firsts. First Typhoon, Panther and Tiger kits, first tank(s) for many, many years, first plane kit in flight, first use of a Prop Blur, first use of aftermarket decals (for the Typhoon) and first 1/72 figures. Nearly everyone who contributed to the WIP thread helped with ideas for the building of various elements of the project so a big thank you to them all - it wouldn't have been possible without the help of the BM team. Also it was seeing Kallisti's Typhoon base that got me thinking about doing a diorama - so thank you to Kallisti for the idea. Typhoon: Airfix 1/72 Mk.IB Typhoon (new tool version) - MN526/TP-V - No.198 Sqn., 123 Wing, 84 Group, 2 TAF B10/Plumetot, France - July 1944. Panther: Dragon 1/72 Ausf G with Zimmerit, no. 135 of 12 SS Pz, Tiger I: Dragon 1/72 Ausf E with Zimmerit, no. 131 of sSSPzAbt 101 German and British troops from Ceasar Miniatures Baseboard: Softwood, Sundela, MDF, filler and various leftover scenic materials from model railway projects made a long time ago. The WIP can be found here The RFI for the Typhoon can be found here The RFI for the two tanks can be found here Time: early evening, July 1944 - Location: somewhere northwest of Normandy This last photo shows the actual diorama and the background I used to give it depth. The background is actually the display shelf I made for my Spitfire builds but it seemed to work well as a backdrop - I thought it would look better than just a plain wall. Although this project is finished as far as the D-Day Group Build is concerned I've still got some ideas for developing this diorama further but I'm going to make a couple of Spitfires first! Thank you for looking. Comments and suggestions welcome. Kind regards, Stix
- 50 replies
-
- 32
-

-
- D-Day Group Build
- Diorama
- (and 3 more)
-
 My diorama..... a Flak Bergepanther making a final stand in the ruined streets of Berlin. Slapped together with parts scrouged from deserted vehicles and leftover factory parts. Thanks for watching! 👍👍👍 On to the next one.
- 16 replies
-
- 32
-
-

-
Here's my build of the RFM Panther Ausf. G. Painted with Tamiya lacquer paints, weathered with Tamiya pigments, acrylic and oil paint. As for my impressions on Rye Field Models, like many have noted before, I found the build overcomplicated at times, and the plastic was softer than I'm used to - that said, I'm very happy with the results.
- 13 replies
-
- 26
-
-
-
-1-1MINIATURA.thumb.jpg.bd7a7e672869500d45ee6e80478f6f25.jpg) Hi Pals, Now the turn for another old acquaintance, the Panther Ausf D, from the Zvezda brand. I bought it a long time ago on balance, and although there are now better alternatives (and more expensive ... lol), it is a fairly complete kit. It includes parts of the barrel, turret basket, accessories on the roof and internal sides of the turret, but really basic, so in the end it did not convince me, because it would have to be completed, and for what in the end it would look ... I gave up, and focused on the outside. It has transparent parts for the periscopes, although the motor grilles are "mosquito net", and the tow cable is not metallic. The tracks were somewhat complicated, since the internal "teeth" had to be included, and the resulting structure was really fragile and flimsy, so after early breaks, I decided to use vinyl ones from an old Tamiya kit ... I saw the camos schemes they suggested, but I didn't like any of them, so I assigned a tritone to it, as I had already done another (Kingtiger Zvezda). The intended appearance is that of a used but not "defeated" vehicle, with scratches and chips, dry vegetation on the underside and dry mud on the belly ... I added some spare parts helmets and an ABER metal antenna. I hope you like it, and thanks as always for watch and comment. Cheers and TC Francis.👍 UPDATE: Pals, here I include a suggested painting scheme on a Dragon kit of a Panther D, from a historical unit. When I painted mine, I admit that I cared less about historical accuracy than about the final result. Reading the comments about the model, the main criticism (constructive, I hope ... lol), was not the final result, it is that this scheme does not correspond to an Ausf.D, and based on that, I considered changing its painting on the other hand, if it respected the historical period, although I don't know when, with so much material in the stash ... lol. Now, coincidentally, looking for new kits, I have seen this camo, and based on that, I will no longer change the model in the future, as it is perfectly plausible with reality. Thank everyone who has commented on that point, because "it itched me", until I found "the scraper" ... lol.
Hi Pals, Now the turn for another old acquaintance, the Panther Ausf D, from the Zvezda brand. I bought it a long time ago on balance, and although there are now better alternatives (and more expensive ... lol), it is a fairly complete kit. It includes parts of the barrel, turret basket, accessories on the roof and internal sides of the turret, but really basic, so in the end it did not convince me, because it would have to be completed, and for what in the end it would look ... I gave up, and focused on the outside. It has transparent parts for the periscopes, although the motor grilles are "mosquito net", and the tow cable is not metallic. The tracks were somewhat complicated, since the internal "teeth" had to be included, and the resulting structure was really fragile and flimsy, so after early breaks, I decided to use vinyl ones from an old Tamiya kit ... I saw the camos schemes they suggested, but I didn't like any of them, so I assigned a tritone to it, as I had already done another (Kingtiger Zvezda). The intended appearance is that of a used but not "defeated" vehicle, with scratches and chips, dry vegetation on the underside and dry mud on the belly ... I added some spare parts helmets and an ABER metal antenna. I hope you like it, and thanks as always for watch and comment. Cheers and TC Francis.👍 UPDATE: Pals, here I include a suggested painting scheme on a Dragon kit of a Panther D, from a historical unit. When I painted mine, I admit that I cared less about historical accuracy than about the final result. Reading the comments about the model, the main criticism (constructive, I hope ... lol), was not the final result, it is that this scheme does not correspond to an Ausf.D, and based on that, I considered changing its painting on the other hand, if it respected the historical period, although I don't know when, with so much material in the stash ... lol. Now, coincidentally, looking for new kits, I have seen this camo, and based on that, I will no longer change the model in the future, as it is perfectly plausible with reality. Thank everyone who has commented on that point, because "it itched me", until I found "the scraper" ... lol.- 39 replies
-
- 37
-
-
-

-
”Hold the Rope Willi!” (DS3516) 1:35 ICM via H G Hannants Ltd The Panther was Germany's answer to the surprise appearance of the Russian T-34 after they finally reacted to the invasion that was Operation Barbarosa. Although the project had been in gestation for some time before, they took some design cues from the T-34 in the shape of the sloped armour, resulting in the Panther that was intended to fill the gap between the Panzer.IV and the (then) new Panzer VI Tiger. It was eventually supposed to replace both the Pz.IV and the earlier Pz.III that was really showing its age, but in reality it often fought alongside the Panzer IV due to lack of production numbers. It was planned as a lighter, more manoeuvrable tank than the Tiger, and was fitted with a high velocity gun from the outset, which gave it enormous penetrating power that was only equalled by the British 17-pounder fitted to the Sherman that turned it into the Firefly. The sloped frontal armour gave it an increased effective armour thickness, but this was not so true of the side armour, which was weaker and more steeply sloped, becoming the preferred target area of allied tanks, especially in urban combat where this was a telling issue. Like most German tanks of WWII, it was complex to produce, so suffered in terms of volume, which led to it being rushed into service with quite a list of problems still to resolve. Later production solved most of these initial gremlins, but loses in the interim were high with many being abandoned after breaking down during combat. Curiously, the Ausf.D was the first to enter production, with the Ausf.A following later in 1943, replacing attrition of the less reliable Ausf.Ds until they themselves were superseded by the Ausf.G, which became the final major variant with increased ammo storage, simplified design to ease production, and further improvements to reliability, although this was never fully cured with a high rate of attrition due to mechanical issues, some of which resulted in catastrophic fires. The Kit This box set contains quite a bundle of kits, including two Panther kits, one Ausf.D, the other an early Bergepanther, a catchily titled le.gl.Einheitz-Pkw Kfz.4 with a Zwilling Anti-Aircraft (AA) mount, and three sets of figures, one of drivers, one of tankers and another of tank riders. It arrives in a compact top-opening box with their usual captive inner flap on the lower tray, and inside are several bags that contain a total of seventeen sprues in grey styrene, either in black, one clear sprue and three small sheets of decals. The instructions are contained in a glossy white folder, and there are seven of them in total, as the figure sets and the AA mount is also available as a separate kit. The two panthers are ostensibly the same except for their turret sprues, or lack of in the case of the Bergepanther, which has its turret removed and replaced by a wooden top cover, a winch and some additional parts that aren’t included in the other kit. We’ll cover the Panther with the turret first, then differentiate between the two kits, then the little AA truck, and finally the figure sets at the end. Px.Kpfw.V Panther Ausf.D This kit is the subject of the Bergepanther’s ministrations, and is a standard Ausf.D that’s combat-focused, and has the following sprues: Construction begins with the lower hull, which is completed by adding the T-shaped rear bulkhead and the armoured surrounds around the final drive housings at the front of the hull. The many stub axles are inserted into the hull with a peg holding them at the correct angle, and these are accompanied by a number of additional suspension parts, bumpers, the housings themselves and of course the interleaved main wheels, plus the four-part idler wheels and two-part drive sprockets. The rear bulkhead is detailed with twin exhausts that hold the detailed jack, and on each side a pair of angular stowage boxes with separate lids are included. The upper hull has the inside of the glacis plate detailed with driver’s hatch and vision blocks, plus two hatches on pegs that insert into the lift-out front section of the forward deck. The rear deck also has a large inspection hatch in the centre that is decked out with mushroom vents and grab-handles, then has the various rectangular and circular vents from the engine compartment added either side, plus a couple more circular vents and lifting lugs. The stowage for the sides of the hull are made up on frames, a couple for each side, plus a tube for the barrel-cleaning rods and two racks of spare track links at the rear. The front mudguards have width indicators added that I’ve not seen before, then it’s time to make up the tracks. The track links are made up from individual parts that are joined together to create the complete run, although you aren’t given a guide figure of how many to use, but from memory I suspect around 90 would be appropriate. They clip together, but need some glue to retain their integrity, so wrapping them around the road wheels while the glue is still flexible, then hold them in place with tape, foam wads and other tools to obtain the correct sag on the return run. The good news is that there are only two sprue gates to deal with per link, but they are on a concave surface, so if you have a circular sanding stick, file or burr for your motor tool, they won’t hold you back for long. There are however two small circular ejector-pin marks in the outriggers of each link’s outer face. Sanding those could be done with a small, flat-tipped burr, or you could make your own and glue some wet’n’dry to it, as I have done in the past. The alternative is to slap some weathering and mud on the tracks to hide any issues you didn’t fix. The turret is moulded as one part with an open back to which the rear bulkhead with its circular hinged hatch is fitted, and at the front the basic breech is mounted on a pair of trunnions that project through the front of the turret and receive the two-layer mantlet. The barrel is made from two halves with the muzzle brake moulded-in, and once the seams are dealt with, it is inserted into the mantlet, locating its notch on a pin within the aperture. The rest of the turret details involve the hinged shell-ejection port, the multi-layer commander’s cupola with pivoting hatch, lifting eyes and grab-handles, the corner-mounted smoke grenade dischargers, and finally the bottom plate, which has the bayonet lugs that secure it in the turret ring with a twist. The model is completed by adding the spaced schurzen side skirts under the sponsons, the twin tow ropes, one on each side, and the gun’s travel lock, which glues on the front between the two hatches, and is made from four parts that should allow it to hinge if you are sparing with the glue. Markings There are two schemes you can depict from the sheet, both based on a dark yellow (dunkelgelb) base and wearing different types of green camouflage. From the sheet you can build one of the following: 52nd Battalion, 39th Armoured Regiment, The Kursk Salient, July 1943 Armoured Regiment of Division “GrossDeutschland”, August 1943 All the decals are by ICM’s usual partner, and are in good registration, sharpness and colour density, with a thin gloss carrier film cut close to the printed areas. Bergepanther Early (35342) This kit builds up the same as the one above until the turret, which is missing for obvious reasons, as is the sprue. Instead, there is a different sprue that includes the wooden two-part hatch that fits over the turret ring, a self-defence machine gun on a short mount on the front right corner and an optional upstand on the other side to move it to if the need arises. Additionally, there is a crane with two supports that fix on brackets at the rear, and hangs over to the side with a twin-sheave block and a pair of hooks to attach the loads on. At the rear is a large two-plate towing bracket with drop-in pin for heavy-duty towing duty. Markings There are two options on the sheet, one in plain dunkelgelb, the other with lengths of diagonal green camouflage sprayed over the yellow, both wearing just a trio of crosses. From the sheet you can build one of the following: S.Pz. Jäger Abt. 653, Kursk, Summer 1943 Panzer Regiment Herman Göring, East Prussia, Autumn 1944 le.gl.Einheitz-Pkw Kfz.4 This bag contains seven sprues in grey styrene plus a single clear sprue and decal sheet, with two sets of instructions with integral painting guide at the rear of the larger one. This is a re-box and amalgamation of the staff car with their Zwillingssockel 36 that is available separately, plus a few extra parts on new sprues that helps merge the two together into the completed vehicle. The chassis is first to be built up with dual springs supporting independent suspension and a driveshaft linking the two transfer boxes, plus the steering linkage front and rear. Fuel tank and stowage are placed to either side of the chassis rails and an exhaust pipe is threaded through to the engine compartment, which is filled with a full rendering of its 4-cylinder 2 litre Stoewer power plant over the front axle. The floor of the cab is built up and added to the chassis, then the three-part styrene wheels with moulded-in tread are fitted to each corner along with the radiator at the front. The firewall and a rear passenger bulkhead are installed next with the former having instruments and transmission tunnel moulded in and pedals attached to the floor. The cab sides, boot/trunk cover, engine cowling and gear shifter are all put in place before the seats are built up from base, cushion and curved back in the front, with a large tread-plated area for the gunners that has just enough room down the sides for spare ammo cans in racks lining the lip. Two rifle stowage points are attached to the front bulkhead, bumpers/fenders and doors are all added with steering wheel, and windscreen also made up between the front and rear compartments with tripods racked on the rear deck of the vehicle. The rear light cluster is fitted to the rear quarters with a spare wheel in between them, and the folded canvas roof above the divide between compartments. Front lights and pioneer tools are attached to the fenders, and windscreen wipers are fitted into the depressions on the frame, with wiper-motor boxes moulded into the frame for completeness. The lights and windscreen all have clear parts so the passengers don't get bugs in their teeth. The guns are built on a separate instruction sheet, and the completed assembly is shown in the main instructions being dropped into place in the rear fighting compartment. To make up the gun, the ammo cans are made up first, joined to the twin frame, which then has the gun mounts fitted on top. The guns are still fitted with their bipods, which along with the breech cover are moulded separately to the rest of the guns. If you’re a detailer, you may want to drill out the muzzles very carefully with a tiny bit in a pin vice. With the guns on their frame, the outer frame is fitted around it in two halves, slotting into the pivot points moulded into the frame, and supported by a cross-brace lower in the frame. Another bracing strut fits across the front and has a canvas brass catcher curtain suspended beneath it that is attached to the tube by a series of rings moulded into the part. The conical base is built from two parts and inserts into a socket in the underside of the outer frame, then it’s a case of making up the seat that fits at the very rear of the outer frame, and choosing the correct sighting part for your chosen pose, pivoting the guns to an appropriate elevation during the process. A pair of scrap diagrams shows the two finished poses, and overleaf is a painting guide in greyscale that could be a tad confusing as it has no paint call-outs on the two greyscale profiles. Markings There are three theatre specific options included in the box with early war Panzer Grey the colour of choice. From the box you can build one of the following: Luftwaffe Ground Units, Greece, 1940 1st Panzer Division, Greece, 1941 11th Panzer Division, Eastern Front The decal sheet is small and printed on a bright blue paper, with good register, sharpness and colour density. German Drivers 1939-45 This small set from ICM gives you four figures to fill those empty seats. It is single sprue with four figures and It's safe to say that all of them are posed in the seated position, while two are dressed in standard Wehrmacht uniforms with a forage and patrol cap on their heads. One other figure has a smock coat over his uniform with a lace-up neck, and the final one is an officer with a rather relaxed hand draped over the top of his steering wheel. Two of the drivers forage cap and smock guy are looking to their left, while patrol cap guy seems to be looking at his steering wheel, perhaps at a map? Each figure comes broken down as torso, individual legs and arms, head and hat, with a couple of ammo pouches for the belt around the smock bedecked gentleman. The instructions are on a single sheet of glossy paper, with part numbers and colour call outs that reference a chart on the rear that shows Revell and Tamiya colour codes, plus the name of the colour in English and Ukrainian (that's a guess). Sculpting and moulding is excellent as we have come to expect from ICM, and the figures will doubtless fit a lot of applications without any adjustment. German Tank Riders (1942-45) Riding is better than walking, and tanks are generally a better way to hitch a ride to or from the battlefield, and also make for a great hiding place if the front isn’t where it was supposed to be. This set arrives on a single sprue in grey styrene that contains parts for four figures, three of which are seated, the standing with a forage cap and MP40 in a semi-ready stance. Two of the seated characters are wearing camouflaged smocks and stahlhelms, one nursing an MG42, the other crouching with a rifle in one hand. The uniformed seated figure has an MP40 over his shoulder and helmet on his head. Parts breakdown is as you’d expect with separate heads, torso, arms and legs, plus helmets that fit over their bald heads with moulded-in chin-straps, except for the cap-wearer, who has his hat moulded onto his head. The additional parts on the sprues include gas mask cylinders, water bottles, pouches, bags, grenades and an ammo box for the MG42. German Tank Crew (1943-45) Another four figure sprue in grey styrene, which includes a standing commander in flat peaked cap checking his watch, an officer in a peaked cap bending over to look at the work being done with a choice of two optional left arms, a spanner twirler on his knees in shirt and trousers, wiping the sweat from his brow with the back of his spanner equipped hand, and another crewman in overalls leaning on one hand on his hands and knees. Parts breakdown is standard ICM with separate heads, torsos, arms and legs, with the spanner twirler sporting a nice centre-part while his compatriot has a moulded-on cap. The Officers have flat tops to their heads and separate caps. They also have pistol holsters to fix to their sides. Conclusion How they managed to pack two Panthers minus one turret, a 4x4 Anti-Aircraft truck and three figure sets into this relatively compact box and keep the price so attractive is amazing. The Panthers aren’t the latest toolings, but they should suffice for everyone but the most detail hungry, with tons of detail in the Einheitz, and excellent sculpting on the figures. Very highly recommended. Available in the UK from importers H G Hannants Ltd. Review sample courtesy of
-
Dear Colleagues Here is the Das Werk Panther Ausf. A Early which I believe originates from the Takom kit. Das Werk also offer separately an excellent zimmerit set. I used some rather old and crumbly markings from Echelon to show the vehicle as one belonging to I/Pz Regt 4 in Italy. They were persuaded to settle only by Mr Mark Setter and Softer. The battalion seem to often have trays above their engine decks, so that had to be scratch built. I used a Gunze set of sandgelb paints And of course it has to go into the garage too! Hope you like it? Regards Andrew
-
Hi guys, here is Panther Ausf. D from Academy I've finished recently. It's the first element of the Eastern Front diorama I'm working on. I've made some alterations to the original moulded model like open hatches replicated in resin or the side skirts made of thin sheet of brass. No crew for now, they will come later. Thanks for viewing
- 13 replies
-
- 32
-
-
Hi all May I present the latest off the hobby desk (as we call it). Knocked out in Argentan is my first attempt at building an urban scene. I saw the original picture and knew straight away i wanted to have a go at doing that. I found it odd that the placement office was left virtually untouched by the bombing while the rest of the street was knocked to bits- shows the contrasts you can find in war. I made a brief WiP which you can find here if you'd like to know a bit more about the techniques involved: https://www.britmodeller.com/forums/index.php?/topic/235098840-knocked-out-in-argentan-wip/ And with a bit of photoshop: And the original inspiration (for info only): Hope you like it and thanks for looking. Any comments and critique welcome. Thanks Graeme
- 11 replies
-
- 30
-
-
-
- Normandy 1944
- Panther
- (and 1 more)
-
Panther - World Of Tanks (03509) 1/72 Carrera Revell The Panther was Germany's answer to the surprise appearance of the Russian T-34 after they finally reacted to the invasion that was Operation Barbarosa. Although the project had been in gestation some time before, they took some design cues from the T-34 in the shape of the sloped armour, resulting in the Panther that was intended to fill the gap between the Panzer.IV and the (then) new Panzer VI Tiger. It was eventually supposed to replace both the Pz.IV and the earlier Pz.III that was really showing its age, but in reality it often fought alongside the Panzer IV. It was planned as a lighter, more manoeuvrable tank than the Tiger, and was fitted with a high velocity gun from the outset, which gave it enormous penetrating power that was only equalled by the British 17-pounder fitted to the Sherman to make the Firefly. The sloped frontal armour gave it an increased effective armour thickness, but this was not so true of the side armour, which was weaker, and this area became the preferred target area of allied tanks, especially in urban combat where this was a telling issue. Like most German WWII tanks it was complex to produce, so suffered in terms of volume produced, this led to it being rushed into service with quite a list of problems still to sort out. Later production solved most of these initial gremlins, but loses in the interim were high with many being abandoned after failing during combat. Curiously, the Ausf.D was the first to enter production, with the Ausf.A following later in 1943, replacing attrition of the less reliable Ausf.Ds until they themselves were superseded by the Ausf.G, which became the final major variant with increased ammo storage, simplified design to ease production, and further improvements to reliability, although this was never fully cured with a high rate of attrition due to mechanical issues, some of which resulted in catastrophic fires. World Of Tanks is a popular online Game developed by Belarusian company Wargaming, featuring 20th century era combat vehicles. It is built upon a freemium business model where the game is free-to-play, but participants also have the option of paying a fee for use of "premium" features. The focus is on player vs. player gameplay with each player controlling an armored vehicle, from the time of Pre-World War 2, to the Cold War-era. This is mainly online with PCs, but is now available on other platforms as well. The Kit Here Revell have re-boxed the Zvesda kit from 2012. The tank is a panther D but this is not mentioned in the instructions, or on the box. This is a "war gaming" kit and as such there is not a massive parts count, but there is a fair amount of parts and detail for the scale. There is a lower hull part, two sprues of parts and a set of tracks. The tracks are not rubber, but seem to be a more flexible plastic. Revell have obviously released this kit in conjunction with World Of Tanks. Inside each kit there is also a set of Special Bonus & Starter Pack codes for the game. Starting off the end of the suspension arms are attached to the lower hull along with the front gearbox parts. The driver sprockets and idler wheels are then built up. The inner and middle layer of road wheels are provided as single parts fitting to each side, the outer layer of wheels are single wheels which then go on. Adding the tracks the completes the lower hull. To the upper hull next are added pioneer tools, additional track links, tow cables, and a starting handle. A mid level plate which fits between the two hull parts is now made up, this mounts the track guards. Exhausts are added to the rear bulkhead and this can then be fitted. The turret is then built up with the gun and mantlet being added. The turret fits to the upper hull and this then to the rest of the tank. Decals/Stickers There is both a sheet of decals and one of stickers. As well as national markings for the tank there are a wide range of markings which I suspect are available in the Game to mark your tank. Conclusion This seems to be a good looking small kit, and although a "snap together" kit it should build up into a good looking model. Revell model kits are available from all good toy and model retailers. For further information visit or
-
Panther Ausf. D Gift Set (03273) 1/35 Revell The Panther was Germany's answer to the surprise appearance of the Russian T-34 after they finally reacted to the invasion that was Operation Barbarosa. Although the project had been in gestation some time before, they took some design cues from the T-34 in the shape of the sloped armour, resulting in the Panther that was intended to fill the gap between the Panzer.IV and the (then) new Panzer VI Tiger. It was eventually supposed to replace both the Pz.IV and the earlier Pz.III that was really showing its age, but in reality it often fought alongside the Panzer IV. It was planned as a lighter, more manoeuvrable tank than the Tiger, and was fitted with a high velocity gun from the outset, which gave it enormous penetrating power that was only equalled by the British 17-pounder fitted to the Sherman to make the Firefly. The sloped frontal armour gave it an increased effective armour thickness, but this was not so true of the side armour, which was weaker, and this area became the preferred target area of allied tanks, especially in urban combat where this was a telling issue. Like most German WWII tanks it was complex to produce, so suffered in terms of volume produced, this led to it being rushed into service with quite a list of problems still to sort out. Later production solved most of these initial gremlins, but loses in the interim were high with many being abandoned after failing during combat. Curiously, the Ausf.D was the first to enter production, with the Ausf.A following later in 1943, replacing attrition of the less reliable Ausf.Ds until they themselves were superseded by the Ausf.G, which became the final major variant with increased ammo storage, simplified design to ease production, and further improvements to reliability, although this was never fully cured with a high rate of attrition due to mechanical issues, some of which resulted in catastrophic fires. The Kit Here Revell have re-boxed the ICM kit from 2005. Here this is boxed with Paints, glue and a poster which is the same as the box top? This is said to be a nice rendition of an Early/Mid Ausf D with a good level of detail. Its worth noting that full link & Length tracks are provided in the box for this kit. Surface detail of the kit is good with areas such as weld seems visible. As well as the 4 sprues for the track there are two sprues for the running gear, two for the tank parts as well as the upper and lower hull mouldings. First up all the suspension and drive train parts are fitted to the lower hull. Eight pairs of road wheels are fitted to each side along with drive sprockets, and idler wheels. The rear hull plate then goes on with the exhausts and rear tanks. Next up the tracks are built up. The instructions say 27 links per track but this is clearly wrong. Periscopes are added to the inside of the upper hull then it can be joined to the lower hull. On the engine deck grills and fans are added along with the engine hatch. At the front of the tank the front hatches are also added and the gun travel lock placed between the hatches. Tools and spare track links are placed on the hull sides. With the hull finished the turret is constructed and a basic gun mantle added to the front. Smoke dischargers can be added to the turret though I have read these were only fitted to early tanks? The two part gun barrel can then be added to the turret and it then attached to the tank. The last items to be added are the side skirts, tow cable and aerials. Decals A small sheet provides markings for two tanks. Div Grossdeutschland "501" Pz.Bat 51, Kursk 1943 (Overall Dark Yellow) Div Grossdeutschland "824" Pz.Bat 51, Kursk 1943 (Dark Yellow, Brown, Green Camo) Conclusion This seems to be a good looking Panther kit and should build up into a good looking model. Revell model kits are available from all good toy and model retailers. For further information visit or
-
Hi all I picked up Tamiya's 1/48 Panther D a while back and was looking around for inspiration for a scene to put it in. I was originally looking at Kursk but I wanted to try doing a street scene which brought me to Normandy and this picture of a knocked out Panther A or G in Argentan (picture for info only!): I thought this will certainly be a test so why not share the progress along the way and hopefully pick up a few tips and suggestions from the helpful bunch here!? So i've completed the Panther build but kept the D version and i've also moved the position of the spare tracks and the side skirts in a bit of artistic licence- (mainly so i could see more of the metal tracks that i forked out so much for!) So i haven't quite decided how to tackle the building yet so i started with the fallen telegraph post. All scratch build using evergreen as the main pole, turned sprue for the insulator thingies and a mix of shaped, melted sprue, aluminium from a beer can and copper for the lamp. Here it is all based in Tamiya dark iron: Onto the weathering by a layer of hairspray and a coat of Tamiya German Grey and washes and speckled lifecolour rust (shadow and light): Here it is with the insulators painted and a sponged on layer of dust wash, plus some speckled lichen or maybe just ash flecks: Finally the block of stone it attached to (i assume it was mounted half way up the building as the lamp would only be about head height from looking at the original picture). Block is chipped plaster with a thin wash of dark sand with some copper wire added as re-bars. Phew 4 pictures and all just for a pole! So now i need to decide how i'm going to make the building-can't decide whether to buy some dense foam and carve out the bricks or cut out individual bricks from cork and stick them on...
-
I thought that I was being clever buying this for its size/cost ratio as something to practise on, but I see that I'm not the first to have this idea! I'm just going for a quick build so that I have something to try things like hairspray chipping on, and it certainly goes together quickly. Two empty sprues on day 1 must be a record for me. I have at least closed up the underside of the hull to stop daylight showing through the engine deck grilles. I've seen someone else on here stick a picture of the radiators and engine under the grilles, so I might try something similar. Up until now my son has only seen my Panzer I/II/III builds, so he was immediately impressed and declared it 'the best one', it certainly is imposing compared to them (but I still prefer the silly little ones). I built one of these 40 years ago and remember it being the first kit that I was really pleased with afterwards, so we'll see how this goes. I'll give it to him when it's finished because it doesn't fit in with anything else - the gun barrel alone is the same length as a Panzer I. Wasn't going to do a WIP, but I might have some questions for you all when I get my hairspray out
-

Guideline Publications Grumman F9F Panther Warpaint No.119
Julien posted a topic in Reference material
Grumman F9F Panther Warpaint No.119 Guideline Publications The Panther was one of the US Navy's first successful Jet powered carrier fighters, it was also Grumman's first foray into jet aircraft. Development for the aircraft began during WWII and so was not able to benefit from the swept wing technology. As such it was a conventional straight winged aircraft. Grumman had been working on a jet fighter the G-75 which lost out to the Douglas Skyknight, however they had been working on the G-79 as well and through some bureaucratic manoeuvring the wording of the G-75 contract was changed to include the three G-79 prototypes as well. The first prototype flew in 1947. The Navy had decided the aircraft would be armed with the heavier 20mm cannon and 4 were installed. The Panther would become the USN & USMCs primary fighter and ground attack aircraft for the Korean War flying over 78000 sorties. A notable pilot of the Panther in Korea was Neil Armstrong, as well as John Glenn. Despite the slower speed and straight wing the Panther did manage some air-2-air victories even over the MiG-15 with Lt R Williams of VF-781 downing 4 in a single engagement, however its limitations were obvious by this time. Panthers would be withdrawn by 1959 with only the US Navy Blue Angels flying them by this point. The design would though live on with the F9F Cougar which was basically a swept wing version of the same air frame. The only overseas user of the Panther was the Argentinian Navy which purchased 28 ex USN Aircraft in 1957. They would serve until 1969. Conclusion The Warpaint series always gets a thumbs-up due to their inability to produce a dud! They are always well written and informative with a wealth of pictures and profiles, this edition also having 1/72 scale plans at the centre and a small section of detailed photos at the end. Very highly recommended. Review sample courtesy of -
Hi y'all hope all ok I need the advice of modelers far better than myself to help with the camo on my below panther and Jagdpanther. Question is do you think the camo on Jagdpanther is too light or too much. Have seen pictures of the late war diagonal pattern but the red brown bands seem to look much darker than mine. Dark yellow ran out as well. No weathering done yet Thanks for looking
- 20 replies
-
- 1
-
-
- Panther
- Jagdpanther
- (and 1 more)
-
The WIP for this build is at: This is my penultimate Hasegawa kit. They're relatively cheap and it shows, taking a lot of extra work to add detail to achieve some semblance of accuracy. Before I bought the Panther I'd also got a Jagdpanzer IV L/48 which I will make my final Hasegawa kit. My Panther is not the 100% accurate depiction as produced by the Britmodeller experts; but I'm not claiming to be any sort of expert, although I find many of them exceedingly helpful with very useful tips and pointers. I just enjoy building kits and that's what counts for me and, maybe I'll work up to being really accurate one day. Nevertheless my Panther Ausf G with steel wheels is here presented for your delectation and delight. All sorts of grief with this but I've enjoyed getting it this far. Huge thanks for all the fellow Britmodeller tips and encouragement. Thank you for looking
- 5 replies
-
- 14
-
-
- Steel Wheels
- Panther
- (and 1 more)
-
I hope this is allowed, i have been researching Panthers all week and felt i was taking the easy route with the Sotnikov Panther as my goal for this GB was always to depict a knocked out Panther. I changed my mind initially because the vehicle i was planning on had it's turret blown off and given the time limit i didn't think i had time to do such a complicated build the justice it deserved, i simply can't afford 60-70 pounds for a kit with full interior and so a lot of scratch building would have been necessary. So a compromise....i really want to do a knocked out Panther, i want the challenge of a cooked of vehicle and the paint and weathering that a project like that will involve. Now having taken the time to dig through all my photos books and online searches i have found the perfect subject....as many of you will know there are many many pictures of destroyed Panthers but few were cataloged and pictured from multiple angles leaving a lot of the vehicle subject to pure guesswork i don't mind that for the most part but for whatever reason i really wanted a subject i could get my teeth into and make as accurate as possible. And so i give you Ursula Ursula had a grim end (is there any other sort) but for Ursula it was more grim than most........ belonging to stab l/Pz.Rgt 6 and assigned to the Pz- Lehr Division in Normandy she and most of her company were knocked out Just north of Le Dezert on July 11th 1944 Ambushed by an M10 of the U.S 899th Tank Destroyer Battalion she took a shot through the left side sponson almost dead centre of the vehicle, this shot set of the magazine and would have killed the crew almost instantly, pretty standard end for a fighting vehicle your thinking. Well what make Ursula's end a little more disturbing was the fact she had tank riders on board as she was ambushed. I won't go into to much detail here but what the U.S engineers found when they came to retrieve the wreck was testament to the violence of her demise. I won't be modeling the dead on board Ursula (even i have limits) but as she was photographed from every conceivable angle and as grizzley as it is....... it is a history and not all history is happy it is also a very interesting subject as a vehicle. This is the only photo of Ursula i'm willing to post as the close up shots are a little much for a family friendly forum And i hope you enjoy my build.
- 715 replies
-
- 10
-
-
Hello everyone ... To prove to myself that I am certifiable. I still have the Proposed British AFV group build going. I also have the Patton Single type build in 2019, the F4U Corsair STGB in 2020, & This build the dates are 10 Oct. 2020 - 10 Jan. 2021. I really must be a glutton for punishment. We have ourselves a Single type group build covering the Mk.V Panther and all of its progeny. If anyone is interested please give a shout out or raise your hand so to speak. The general idea being actual vehicles. If a physical prototype was built and tested then it counts👍. As always all scales are welcome. Simply put I dont know everything about Panthers so please ask me or the co-host and we can research and determine if a particular version counts. 🔹= Standard build rules will apply including the 25% rule. 🔷 = Ok I have had a change of heart on this build. I will allow Paper-Panzers. INTERESTED MEMBERS 🔺1. Corsairfoxfouruncle - Skorzenys M10 clone 🔺2. @Sgt.Squarehead= co-host 3. @SimonT 4. @PlaStix 5. @vppelt68 6. @German Armour 7. @SleeperService 8. @Arniec 9. @Ozzy 10. @Mike 11. @trickyrich 12. @Joss 12a. @Knight_Flyer 14. @Robert Stuart 15. @Julien 16. @Mark Hoffmanly 17. @GREG DESTEC 18. @Badder 19. @bigfoot 20. @Romeo Alpha Yankee 21. @wimbledon99 22. @sampanzer 23. @modelling minion 24. @Rodders154 🏁25. @Dave_R 26. @Yetifan 27. @badger 28. @diases 29. @Foxbat 30. @Mig Eater 31. @BIG X 32. @theplasticsurgeon 33. @daront 34. @srkirad 35. @jean 36. @JOCKNEY 37. @klr 38. @Will9962 39. @Bonhoff 40. @Redcoat2966 41. @Tim R-T-C 42. @Soeren 43. @Jasper dog 44. @M3talpig 45. @Longbow 46. 47. 48. 49. 50. 🔷🔷🔷 Simple Reminder that we’re just shy of one mont until the start date. 🔷🔷🔷
-
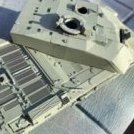
 During WW2, the Wehrmacht used only 7 types of tanks - three light (6-10 tons Panzer I, Pz II and Pz 38t), two medium (15-25t Pz III and Pz IV) and one heavy (57-69t) Pz VI Tiger. In such a "company", calling the 45-ton Pz V a medium tank (as the Germans did) looks at least bizarre. For me (and perhaps most of you) the Panther is by no means a medium tank - it's exactly in the same league as the Soviet KV (44t) and IS (46t) or the Allied Churchill (40t) and Pershing (42t) all of which are considered "real" heavy tanks. Alternatively, you can call the Panther the first true Main Battle Tank, combining the features of both a medium and heavy tank, such as the post-war British Centurion (52t), the Soviet T-54 (36t) and the American M46/M47 Patton (44t) MBTs. But a medium tank? No way… It is well known that for most Allied and Soviet soldiers, every German tank in 1943-45 was either a Panther or a Tiger. But the truth is different: compared to 8,700 Pz IV and 5,800 Pz III, only 1,800 Tigers and 6,000 Panthers were built. All Pz V variants, crewed by five and armed with a long barrel 75 mm cannon, were equipped with an extremely powerful (700 hp) Maybach V12 petrol engine. Although Dragon Panther A/D kits have been with us since 2012, there is still no better Braille scale Pz V on the market. The #7505 boxing (recently reissued as #7546) contains 118 styrene parts on 5 sprues and two continuous tracks. The parts are crisply moulded and no sealing/sanding is required. The decals are provided for two D-Day 1944 tanks (painted RAL7028 Dunkelgelb with RAL6030 Olivgruen and RAL8017 Rotbraun stripes). The same base was used for my specimen, although the 511 from the 5. Kompanie (2. Bataillon), Panzerregiment 5, 5. SS-Panzer-Division "Wiking" has a temporary winter white distemper camouflage applied over it. According to the photos taken in March 1944 at the Kovel railway station (Poland at that time, 200 km west of the Soviet border - today Ukraine, 50 km east of the Polish border), there were no visible German crosses or the Wiking Division emblems - only tactical numbers on three sides of the tower have been preserved. The paints are (as always) Humbrol enamels: 93 for RAL7028 Dunkelgelb, 117 for RAL6030 Olivgruen, 186 for RAL8017 Rotbraun and 34 for RAL9002 Weiss - painted with Italeri brushes. Then the Vallejo matt acrylic varnish was brush-applied overall. The model was made OOB with the exception of enabling turret rotation (two notches cut in the hull upper deck and a rod glued under the turret), drilling the exhaust (rusty) and manifold cooling (white) pipes, and making the antenna of 0.3mm Aber steel wire. The numbers are from the Zvezda IS-2 kit as the Star Decals set covering this vehicle is only available in 1/35 (# 35C-1134). However, the serious problem appeared a few weeks after the flexible "bandage" tracks were painted. It seems that the material Dragon uses for their tracks cannot be enameled as some chemical component of the paint damages the internal structure of the track material, which loses its elasticity and - now being extremely brittle - breaks into several pieces. Parts cannot be glued back together because they simply fall apart when touched with your fingers. So - instead of looking for the aftermarket PE sets - I just cannibalized the old ESCI-ERTL #8363 Panther kit I had bought before the Dragon kits hit the market. BTW - the kit (otherwise complete and very crisply moulded) is available for sale or trade at a bargain price 😉 The pictures are taken with an LG smartphone. Comments welcome Cheers Michael
 -
This is the first Panther kit I've built since, oh, 1983 or so. As the box says, this is a snap-fit kit, but it is certainly not simplified: Almost 100 parts, despite each track being molded as a single piece of hard plastic, and the inner banks of road wheels molded as single parts, as some manufacturers are wont to do in this scale. This subject has the very early style of bow MG housing, correct (I assume) for an Ausf.D model at Kursk, which is what the kit represents. I've already start on this. The real detail is in the suspension. Like the Panzer III, Tiger and Tiger II (but not Panzer IV), the Panther had a complex torsion-bar suspension, with the road wheels being staggered, those on the right side being ahead of those on the left*. The Zvezda reproduction of this is way ahead of the Revell kit, IMHO, with each road wheel arm being a separate part. *Not the other way around, which I had assumed, as that is the norm. The next step is to paint all the wheels, lower hull and tracks. The tracks are designed to attach in such as way as to reproduce the "sag".
-
Very much a place holder for the moment as I'm co hosting the MTO build, it will be built out of the box ( apart from some Tamyia tracks) as I don't think I can add anything else. I have a set of Masterbox crew and a set of paints for the interior.
-
 Hi all, finished as part of the ongoing and excellent Panther STGB here are some pics of my recently finished Tamiya 1/48 Panther G. She is finished in a temporary winter camouflage scheme copied from a picture, unfortunately the unit and whereabouts are unknown but it was taken in January 1945. The kit is typical Tamiya and goes together with no trouble at all, the paints I used are Revell Aquacolour acrylic ones and they performed very nicely. The temporary white is my Mig products, the mud is homemade and the snow is Citadel Valhallan Blizzard. Now be gentle with me because I am not normally an armour builder, but all comments and criticisms are gratefully received. Thanks for looking, and for those of you who haven't had enough of it here is a link to the build; Craig.
- 11 replies
-
- 22
-
-
-
Sd.Kfz.171 Panther Ausf.G (A1352) 1:35 Airfix The Panther was Nazi Germany's answer to the surprise appearance of the Russian T-34 after they finally reacted to the invasion that was Operation Barbarosa. Although the project had been in gestation some time before, they took some design cues from the T-34 in the shape of the sloped armour, resulting in the Panther that was intended to fill the gap between the Panzer.IV and the (then) new Panzer VI Tiger. It was eventually supposed to replace both the Pz.IV and the earlier Pz.III that was really showing its age, but in reality it often fought alongside the Panzer IV. It was planned as a lighter, more manoeuvrable tank than the Tiger, and was fitted with a high velocity gun from the outset, which gave it enormous penetrating power that was only equalled by the British 17-pounder fitted to the Sherman to make the Firefly. The sloped frontal armour gave it an increased effective armour thickness, but this was not so true of the side armour, which was comparatively weak, and this area became the preferred target of engaging allied tanks, especially in urban combat where this was a telling issue. Like most German WWII tanks it was complex to produce, so suffered in terms of volume produced, and this led to it being rushed into service with quite a tick-list of things still to sort out. Later production solved most of these initial gremlins, but loses in the interim were high with many being abandoned after failing during combat. Curiously, the Ausf.D was the first to enter production, with the Ausf.A following later in 1943, replacing attrition of the less reliable Ausf.Ds until they themselves were superseded by the Ausf.G, which became the final major variant with increased ammo storage, simplified design to ease production, and further improvements to reliability, although this was never fully cured with a high rate of attrition due to mechanical issues, some of which resulted in catastrophic fires. The Kit This is another kit from Airfix in collaboration with Academy. This kit being an Academy new tool kit from 2018. The quality of the parts is good as its a new tool, the single part main barrel with a hollow cast muzzle brake is a nice touch. Track are of the link and length type. The main parts are on 8 spures, with another 4 for the tracks, also included is a photo etch fret mainly for the grills. Construction starts with the lower hull. The sides are added to the base with two internal stiffening plates being added to give the whole thing some rigidity. The suspension arms and transmission case ends then go onto the sides quickly followed by the sets of road wheels, driver sprockets and idler wheels. Once all the wheels are on the tracks can be assembled and placed on the wheels, given the nature of construction a medium to slow setting glue will be needed. Next up the rear bulkhead needs to be assembled. The exhausts and other components are added. Once complete it can be added to the lower hull. This is now essentially finished and we can move on to the upper hull. Tools and spare track links are added to the sides along with the attachment plates for the side armour. On top hatches are added to the front and rear along with the engine vents and grills. The bow machine gun goes on and at the rear the travel lock for the main gun. Thread is provided for a tow cable if the modeller wishes to use it. The upper hull can now be added to the rear, and the single part side armour plates added along with the front mud guards. Next up we come to the turret. For the front a basic breach is added behind the gun mantlet mount before this is fitted, the rear hatch is fitted to the rear turret plate and this can also then be added. The turret base is then fitted. The mantlet is then added along with the turret hatches. The muzzle brake is attached to the barrel before this is also added. A few PE parts then finish the turret and it can join the hull. Markings There are markings for two tanks Red Brown/Yellow/Green camo White 301 - 2nd Panzer Division, Cleryaux, Luxembourg, Feb 1945 Yellow/Green camo White 104 - Likely attached to Panzer Regiment 16, 116th Panzer Division, Germany 19456 Conclusion A good kit of the Panther G available from Airfix in their continued move into 1.35 scale. Recommended. Review sample courtesy of
-
 Panzerwaffe on the Battlefield #2 World War Two Photobook Series (9786155583323) Peko Publishing Panzerwaffe is German for tank or armoured weapon, which is a broad term that encompassed many, many homegrown and captured types in WWII, which may well have had a hand in their downfall, requiring specialist equipment and knowledge to maintain and repair their many types, which even included British and French types where they were captured in sufficient numbers to warrant pressing into service after modification to their requirements. This series covers many of those types, from the early Panzer Is through to the ubiquitous Panzer IV and the prestigious Tigers and King Tigers, with many more oddities in between such as the top-heavy Bison SPG, various foreign types with guns slapped on top, and other tank killers such as the Wespe, Marder and Hetzer, plus the awesome Jagdtiger. This is a new volume from Peko's World War Two Photobook Series, and as the name suggests it is primarily a book of photos, which isn't too difficult to divine. Although this is Volume 2 of the set it still covers the earlier vehicles with their relatively light armour and armament, detailing all the variations in fit and finish between the main factories that were engaged in construction of WWII German armour. It is hardback bound with 112 pages plus two blank inner leaves, finished in an overall white cover, and arriving protected by a layer of shrink-wrap that also helps prevent scuffs and keep out dirt during shipping and storage. The photos are almost without exception full page, with space left only for the captions, which are in Hungarian and English, each one adding valuable insight to the photo, which may not be immediately apparent without it, especially if your eyesight isn’t too good. For the modeller there are plenty of diorama possibilities, as well as opportunities to see how the crews actually stowed their gear on their vehicles (or otherwise) in real-world circumstances. Seeing how they come apart when blown up is also useful for diorama purposes, but thankfully there are no grisly scenes accompanying the destroyed vehicles. Where the photos are from private collections there are attributions in the top corner as appropriate, with a number showing soldiers standing in front of damaged or abandoned vehicles after the fighting is over, plus a number of groups investigating the wreckage after a cataclysmic explosion of the tank's magazine, or demolition by the escaping crew. There are also a number of maintenance scenarios with the hatches open for even more inspiration. While the contemporary photos are in black and white, the detail in which they are depicted would be an absolute boon to any AFV enthusiast or modeller, especially those wishing to go down the route of realism and authentic settings. Conclusion Whether you have models that you intend to use this book for reference, or have an interest in the subject, this book will give you all the reference pictures and some besides, as well as some realistic settings ideas for dioramas. Highly recommended. Review sample courtesy of
 -
Morning all, Its the bank holiday weekend (as much as that means anything nowerdays!) but just in time my next kit has arrived; the Takom Flakpanzer Panther. In addition this will be my first build on Britmodeller so let me know if I've goofed the photos or get anything wrong on the way. As with all of my builds this will be an OOB build, as I make kits for the joy of the hobby, and to help fuel my passion for military history. That said I try to get things accurate where I can... Here we go with first attempt at photos:
-
Resin Turrets for Panzer V Panther 1:72 OKB Grigorov Last time I reviewed the output of OKB Grigorov, a producer of resin kits and accessories from Bulgaria, their product line up had a distinctly nautical theme. Fast forward a few years and they are still happily churning out the resin, but have now expanded into the world of AFV kits and accessories. In this review we'll take a look at a couple of their replacement Panther turrets. Neither turret appears to be designed for a particular base kit, so it's up to you to pick the appropriate model and run with it. Turret for Pz.V Panther Panzerbeobachtungswagen First up is the Panzerbeobachtungswagen (artillery observation) turret conversion. From what I can find on the interweb, a single prototype was constructed in 1943, based on the Panzer V Ausf.G. A short series production apparently followed. The main gun was replaced with a dummy, while an optical rangefinder was added to the turret. OKB Grigorov's conversion is made from their usual grey resin. Everything is nicely cast and the details ar exceptionally crisp and sharp. Also included in the tiny box is a clear part for the cupola and a small fret of brass details. Turret for Pz.V Panther Ausf. F, Rheinmetall Proposal The second set enables the modeller to build the Panther Ausf.F 'Schmalturm'. The Schmalturn design was narrower than the standard turret, which increased protection while saving weight. It was also easier to manufacture. In order to accommodate the necessary stereoscopic rangefinder, it featured a small bulge on either side of the turret. The proposal never entered series production. Once again, OKB Grigorov's turret is really nicely made, with sharp, crisp details. The 75mm main gun is made from turned brass, which is a really useful and will avoid the need to purchase an additional part. Again, a clear part is provided for the cupola vision slits. Conclusion I can't really fault either of these items from OKB Grigorov. The quality of production is very high indeed and they will enable us modellers to represent a couple of interesting Panther variants. Recommended. Review sample courtesy of