Search the Community
Showing results for tags 'tamiya'.
-
I really do love the shape of this car and they are a pretty rare sight these days. I visit a lot of classic car shows during the season and have only seen a handful of these cars in the last 20+ years. Although I have built one of these a few years ago, I still struggled with it. In typical car kit style, the chassis and interior is built up and then inserted into the body shell. With the Alpine it's more like trying to get a quart into a pint pot! Whilst looking for some pics online, I came across a red example and immediately settled on that. The side windows were replaced with clear sheet as the kit items are really thick. A distributor and plug wires were also scratched up as these are missing from the kit. Brightwork is bare metal foil and the wheels and bumpers are Alclad polished Aluminium over Humbrol 21Black. Thanks for looking. Steve.
-
I'm in with this one please Original decals are a bit off-white so have ordered some replacements, may also get the Tamiya detail set
-
 This is the cure for modellers block. This is the first model i have totally finished in a long time. There was some firsts for me on this build. The use of MDC lead wire which was fantastic. It was used in the cockpit and alot on the engine. It was also the very first time i have used blu tac for masking the camo. I wish i had tried this sooner , as it works a treat. No more freehand airbrushing for me! Another first on this was the use of windsor and newton matt varnish and flow improver. Everything came together on this model , and without blowing my own trumpet i think its the best i have done so far. Weathering was kept to a minimum on this. I love the look of a clean Spitfire.
 -
This kit is a down-scaled version of their fine 1/48th scale kit of the arrow, and like that kit it is an excellent kit, with little to no flash, superb moulding, and engraved panel lines (and the correct wooden rear fuselage). A test fit shows that the parts fit well, although as seemingly with all Shturmovik kits, you’ll need to be careful with the wing-fuselage joint to get a proper fit. As with the 1/48th scale Tamiya arrow, the link ejector opening on the port wing will need to be redone. These ejector openings are in front of the long, narrow shell casing openings, on the undersides of the wings. Instead of being mirror images of each other, they should both be pointing towards the port wingtip (see illustration below). My real disappointment with this kit is the lack of sidewall detail for the pilot’s cockpit (the Dakoplast [and its rebrandings] and Eduard arrow kits feature more detail, as do the 1/72nd scale Academy kits). Admittedly, the port side has the nicely-done console to cover up much of the sidewall, but on the starboard side you only have the ordnance-release boxes, and none of the levers that characterised this part of the cockpit. No doubt someone like Eduard are busy correcting this lack. By comparison, the gunner’s cockpit features separate sidewalls that have some very nice detail, including a moulded-on oxygen(?) tank. Like the 1/48th scale kit, it features a choice of cannon fairings (rectangular or streamlined – which means you can “borrow” one set to put on the Hobby Boss kit), but only the streamlined rocket rails (unlike the larger kit, which features a choice of the early-style rocket rails and the later streamlined rails). The bombs are well-done (two FAB-50’s, and two FAB-250’s), as are the rockets (four RS-132’s). The decals look well-done, and the painting instructions actually appear to be accurate, a rarity for any Shturmovik kit. This is clearly the best Shturmovik kit in 1/72nd scale to date, and is highly recommended. Best Regards, Jason
-
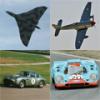
The 935 was on the 'not quite finished' pile and I could not resist buying the recent release of the Jagermeister 934 RSR, so I decided to build them side by side. The RSR is completely oob even down to the seatbelt decals and a very enjoyable build. The only addition was the black line decals on the wheel arch extensions. The digicam has picked up the little wobbles in the black areas of the bumpers but this doesn't really stand out to the naked eye. I did find the masking of the black areas a bit of a challenge. A very nice model to build though and it looks great in my cabinet. Paint is Zero 'Jagermeister' Orange with 2K clearcoat. Some of the black plastic parts in the kit had an almost perfect satin sheen and I chose not to paint them. An example is the rear over-riders and the mirrors. If Tamiya did this on purpose, can we have more of the same in future kits please. The only complaint would be, moulding the headlamp lenses with the surrounds. This makes for tricky masking and could easily have been avoided by Tamiya. I may just add some rivets to the wheel arches and do a bit of touching up on the black areas, now that I have seen these pics! I added some mesh to the old 935 kit to try and hide the see through effect of those big cooling ducts in the rear wings. This kit was one of the more recent reissues so carried decent decals. Paint is Halfords appliance white finished with 2K clear.
- 10 replies
-
- 1
-

-
- Porsche 935
- Tamiya
- (and 1 more)
-
Returning to the hobby after some 20years, first stop a Spitfire. Lots of catching-up to do, lots of new tools to use and new techniques to adapt to, The depicted model X4474 is one of the latest MK.I to be in BoB, with most obvious feature is the lack of the triangular prong on the antenna I also assumed it had the latest 'plastic' seat. Right of the bench... There are a few mistakes I made that I am aware of, but that is the way to gain experience, got to live with it
-
This is most probably my best 1/35 model, as I haven't build many, painted less and nearly everything a long time ago. I am basically a 1/72 guy. But sometimes for a change I make something, and I was quite inspired (if I may say so myself) when I built this one, in just two intensive days with the help of my brother. Usually I am not either a fan of making very worned out vehicles (I normally like vehicles just arrived from the factory), but this clearly cried for all the weatherings one can think of and then more. Here is the result (more pics here; http://toysoldierchest.blogspot.com/2013/05/tamiya-british-special-air-service-sas.html);
-

Tamiya Beaufighter Updates - 1:48 Red Roo Models
Mike posted a topic in Aftermarket (updates/conversions)
Beaufighter Updates (for Tamiya) 1:48 Red Roo Models The Tamiya kit range of this delightful aircraft has been available for some years, and is still relatively widely available, such is the appeal. Red Roo have come up with some new sets for the kit, which should allow you to add some personalisation. There are three sets soon to be available, but we have the first two in our mitts now, as detailed below: Open Cowling Flaps A common feature of radial engines are the flaps around the rear edge of the cowling that are hinged and can be opened or closed by the pilot to allow additional cooling to a hot engine, or to speed up the warm-up period of a cold one. The Tamiya kit cowling flaps, although separate from the cowling itself, are moulded in the closed position, but for those that want a little more visual interest, this set does the trick. Simply substitute the cowling parts behind the engine with these resin replacements and you're done. No cutting, and no messing about. The only thing you have to be careful of is handling them, as they are necessarily delicate and thin, to give an accurate representation of the real thing. Observer's Blister Early/Late This is a simple clear vacform replacement for the kit part, and comes complete with both versions of the canopy. The early version appears more pointed at the top, and has a gun-port where it joins with the fuselage at the rear, while the later version has a larger dome for more freedom of movement for the observer's head, and a flat panel at the rear to join up with the fuselage. Which one you use is down to you checking your references, but why not build two and use them both? The vacform is incredibly clear, and very sturdy, having been made from 0.5mm stock, so should be easy to cut out and sand to shape. The canopy frames around the part are also nice and crisp, so masking before painting shouldn't be a problem. Conclusion Good quality resin and excellent clear vacform parts from this small but prolific company, giving the Beaufighter builder some nice options for the Tamiya kit. Highly recommended. Review sample courtesy of -
Well, spring has sprung, the grass has ris enough to be mowed, so must be time for a very silly modelling project. So check this puppy out, the venerable Tamiya 1/32nd Zero! Impressive eh? no? OK then.. There's another box INSIDE the box! wow. Still not impressed? OK.. There's some resin and tin bits as well! OK, I'm not impressed either. That's because this is the impressive bit. This is the other Zero. Now you're impressed aren't you? No you're not because you don't know what's inside the box. It's this. Basically it's all the pieces of metal you need to make a very small real aeroplane. Why two kits you say? Watch. Nick
-
I've mentioned elsewhere, that my airbrush is 'offline' at the moment until a replacement nozzle arrives fron 'Blighty'. In the meantime, I re-ordered my stash and dug this out: and some bits and pieces I bought over a period of 18months: Got a few references too !! And this morning I made a start: The running gear/suspension just dropped into place exactly as it should, then came the Eduard etched Zimmerit. Something entirely new for me, and so far it seems to be working-out very well. It's measured precisely for the Tamiya kit and Eduard do need to be congratulated on getting that 'spot-on'. All looks very good so far, but I'm fully aware that can change as fast as a very fast thing !! Thanks for taking the time to look. As ever I'll try to answer any questions and comments. AFN Ian
-
I'm going to join the party with this: It's going to be pretty much 'out of the box' but I am going to add the following: As it's an original issue the decals are looking a little old and suspect so will be getting an aftermarket set. I'm going to be building this as an all over gloss gull grey 'Jolly Roger' from the early eighties. I've been looking forward to this - I can't wait to see what are sure to be some fantastic builds coming together. Let the good times roll! Tom
-
Hi a recent spitfire mk vb by tamiya i completed i built this as a group build on facebook and it has a quickboost resin seat with moulded in belts ENJOY The underside i decided not to grime it up although i faded paint A nice view of the side and tail showing the nice preshade affect
-
I've decided that I'm definitely going to finish a GB for once with this one. Hence the ridiculously simple choice of a Tamiya 1/20 Porsche 936. Lashings of Halfords Appliance White all over, when it comes to the paint, so even I can't get bogged down on the masking, which is usually where I start to lose the will to live. Looking forward to this one! If I finish quickly, I might just take a stab at one of my pile of 956 or 962s...
-
 Well this one was ten years in the making. I started it and then went to university, New Zealand etc. and only finished it last month! I must have had a very relaxed approach to sanding and filling back then as the seams are awful but I painted it up anyway. I did attempt a scratchbuilt engine rear/oil header in place of the incorrect 'dimply' wheel wells. Historical accuracy is out of the window - I had some EagleCals decals for a D-11/13 and I really liked the scheme so did it despite the kit being a D-9. Paints are all humbrol/xtracolor enamels and some oil wash, with white for the fabric control surfaces. Radio mast long broken off in storage and haven't bothered to replace it! The decals sheet reckoned top colours of Dunkelgrun and Grauviolett on the wings although I reckon that is rubbish considering the fuselage colours so went with Grauviolett and Lichtgrau. Feel free to correct my wild guesses! Thanks, Chris
 -
Pink Panther Update Set (for Tamiya) 1:35 Legend Productions Tamiya's SAS Pink Panther Land Rover kit has recently been re-released, which should please a lot of folks, and Legend have also re-released their excellent resin update set that improves both the basic kit, and adds the stowage that was typical of these highly personalised and heavily loaded vehicles, which sometimes had to stay out in the desert for extended periods. The set arrives in a small cardboard box, with a picture of the stet installed on the top side. Inside is a large bag of resin, which also contains another bag, to reduce breakages during transport/handling. Additionally, a separate bag containing a Photo-Etched (PE) fret of brass, a length of brass rod, some flexible brass wire, a short length of chain, and a length of braided string/rope. Pouring the contents of the resin bags onto the desk gives a good sense of the sheer quantity of parts included, and you'll be spending plenty of time removing all the casting blocks, which are generally on the mating surfaces, which simplifies the task somewhat. Remember to protect your lungs from the fine dust by wearing a mask, and if using something less than a respirator, do it outside, weather permitting. The instruction sheet is quite small compared to the part count, but it is printed on full-colour glossy paper using photographs to show where everything goes, which should make progress pretty easy. The front end of the Tamiya kit is showing its age, and as such the Legend PE is put to good use here. The radiator grille it removed from the fender part, and is replaced by a more realistic PE part, to which a pair of resin headlights, a Land Rover badge and army style number plate reading 10 FG 67 are added. The front smoke dischargers are mounted on the bumper, and these are replaced by PE mounts and resin tubes with grenades in situ. A new shackle for the front spare wheel is also added, and a short length of the supplied wire is inserted through the shaft to hold everything together. In the cab, two posable searchlights, extinguisher, map holder, compass and a pair of new resin crew seats are added, together with radio gear and stowage between the seats. In the rear, another pair of searchlights are installed on resin mounts, compass, stowage, water/fuel cans, the crew's webbing belts, bedrolls and PE racks in which to keep the cylindrical containers supplied with the set. Smoke dischargers are mounted on the rear of the vehicle, and the tail gate is posed open and festooned with stowage, being held horizontal by the retaining chain that is supplied in the set. The two weapons mounts supplied in the kit are given detailed resin GPMG machine guns atop new resin mounts, with resin ammunition cans attached to the mounts. The rear feed is enclosed in a feed-chute, while the front is exposed, and a trio of lengths of link are included to place between the breech and box. Any spare could be heat deformed to drape over the vehicle, or used to decorate the tops of open boxes if you have access to some PE ammo boxes of the correct type. On the bonnet/hood, the tripod for the range-finder is given realistic PE tie-downs, a mounting plate for another spare wheel (unused), a large tarpaulin, and two dust-proof holsters for weapons stowage, with more equipment lashed to the upper surface. Additional jerry cans are carried outboard of the driver and passenger "doors", which are replaced by resin items in their brackets. Conclusion What a comprehensive set! The sheer volume of parts will give you all the detail you need for the chassis, with perhaps only a set of replacement wheels needed to give the ultimate detail. Resin casting is first rate, the casting blocks are sensibly placed, and there are no bubbles evident on my review samples. A must have for anyone serious about creating a super-detailed model of this iconic Landy. Very highly recommended. Available soon in the UK Review sample courtesy of
-
Hi, some quick shots of a recently built Tamiya Mustang III, one of Horbaczewski´s mounts. The paints are a mix of Tamiya sprays, Humbrol and Citadell acrylics while the decals are a mix of Tamiya´s and AJ Press "Polish Mustang Units". I managed to destroy the correct decals for bombing missions so had to use the ones for Horbaczewski´s other Mustang though....
-
One from last year. Apart from an aerial or two and some more clutter its done. Tamiya 1/35 Bren Gun Carrier Sprayed with Tamiya acrylics & finished chalk wash. IMG_2937 by Snapper_city, on Flickr IMG_2938 by Snapper_city, on Flickr IMG_2939 by Snapper_city, on Flickr IMG_2941 by Snapper_city, on Flickr
- 10 replies
-
- 2
-
-
- Tamiya
- Universal Carrier
- (and 1 more)
-
 Grumman F-14A Tomcat - VF-84 'Jolly Rogers', USS Nimitz, 1981 Tamiya 1/32nd scale kit built for the Swing Wing GB - build thread can be found here: http://www.britmodeller.com/forums/index.php?/topic/234937822-tamiya-132nd-f-14a-tomcat-update-1552013/ Tom
 -
Hi all, Sorry for the dodgy photo's - My digital SLR is about to have a foot to sensor interaction! Had to pick up my old point and press and see what I could come up with! Ok, so the kit... This was the Tamiya 1:48 F117 and Humvee box set. Picked it up at Waddinton airshow for significantly less than what it should be and was not disappointed when I opened the box.. Usually Tamoya quality, made of black plastic (in case your feeling lazy and cant be bothered to paint it, ha ha). If I'd have stuck to the OOB stuff I reckon it would have gone together a dream, then I decided to get the Aires cockpit and it all went horribly wrong. With that cockpit in you have to sand the bottom of the 'pit tub and the top of the front wheel bay. Or in my case sand THROUGH the cockpit floor so the seat falls through, then sand almost through the top of the wheel bay! NIGHTMARE. Anyway, I eventually got the two halves together after much sanding, glueing and lots of swearing, then after that it was plain sailing. Not alot else to talk about with it really from the build point of view, given the simple nature of the exterior of the aircraft it never was going to be difficult. You can build it bomb bay open or close, with or wihout LGB's, and that's about it. Painting was done with a can of black Halfords spray paint and some dry brushing along the panel lines, which I hope has come out in a couple of the photo's. Decals are pretty good (when you don't put them on over a Matt finish, oops) and that's about all there is. The hummer is pretty good, and comes with a couple of different options for painting and decals. Again, it went together pretty easily with good comprehensive instructions. I finally popped my airbrush cherry with the hummer and I think it came out ok for a first timer. A little bit of light weathering and 2 MP's later and the kit was finished. The ground crew and generator came from a Hasegawa set which I bought spare of the moment and the dio' base was made from Tamiya texture paint and some DIY concrete stuff from model zone. Again apologies from the outset for the dodgy pictures but lighting was pants and the camera worse (a good workman always blames his tools, I think). Anyway...
-
 My Hurricane build has come to a bit of a stand still, I was spending too much time messing around with it that I lost interest, its not been relegated to the shelf of doom, just put on the back burner for now. So to get my enthusiasm back I decided to have a go at the Tamiya Mk 1 Spit in the markings of 57 OTU, RAF Hawarden 1941/42. I believe the plane that I'm building was flown by FO Ginger Lacy. I have used elements of the eduard zoom set for the cockpit plus fuse wire, I replaced the seat with an Aires example that I had floating about and I'm using Quickboost exhausts and propeller. So some pictures...(infact they are chronalogical from when I started painting to where I am as of tonight). So there we are, I'm happy with how it's going. Tomorrow I hope to get the serial number sprayed on, the leading edge sprayed yellow and a gloss coat applied. Let me know what you think. Yours aye Iain.
 -
Well i havent done a WIP for ages so i thought i would give it a go again. My Wife bought me this wheil we were on Holiday at my Parents in Devon. Actually we got it for a good price.Ive been wanting to build a Sturmovik for ages and i had been looking at the Hobbyboss 1/32 one. Im glad she bought me the Tamiya 1/48 one. I was blown away when i opened the box. Amazing molding , beautiful surfaces , great decals and even canopy masks! Fantastic! Work starts in the cockpit and as you would expect from Tamiya it litterally falls together. I have painted it RLM Grey and dry brushed with a lighter shade. The decals for the instruments settled down perfectly with some Klear. The front and rear interiors slide in from underneath so the fuselage can be assembled. The front intake and parts all fit perfectly. NO filler anywhere yet Thats it for now. I will post more pics later
-
 Hello everyone. My contribution to this group build will be the Tamiya Seiran that I picked up on evilbay many moons ago. It's a great looking kit. I'll be building it from the box in an attempt to bolster the old mojo, so no fiddly photo-etch or scratch-building in this project. This will also be my first Japanese subject since I was a kid. Cheers Andy
 -
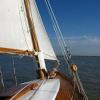
 Hello everyone, I'd like to have a play if that's all right. It's been the thick end of a year since I did any modelling at all, so am going for a relatively straightforward build of the first prototype Mosquito, which I've always loved since first visiting Salisbury Hall as a kid. My work probably won't trouble the judging too much, but it will be a valued addition to the collection so thank you for hosting this GB! I shall be using the Tamiya 1/72 kit of the B.Mk.IV twinned with the Paragon Designs conversion set with the short engine nacelles, early wingtips and different tail surfaces. I shall make my own decals for the serial code, and decide whether to go for the first registration of EO234 or her more enduring identity of W4050 during the build. The roundels and tail flash will be cobbled together from my various 1/72 leftovers - but any recommendations for the correct shade of yellow would be welcome - from a rattlecan if possible as I don't have an airbrush. I'm assuming that the props and spinners provided by Tamiya will be right for the job. I've heard tell that they're actually closer to those found on Lancaster kits, so this would be good to know. Sprue and box shots will follow as soon as Hannants have processed my order, so in the meantime here's a shot of the 1:1 aircraft back in late 1940. And belated New Year greetings to all - nice to be back!
 -
Eventually finished the Tamiya 1/48 Dambuster. After starting this back in November, it's been a lot of work....... Decided to make it AJ-J in the end, using Xtradecal instead to get the right size wing roundels. More pictures to follow, good old Photobucket has just crashed! Again....
-
IJN Heavy Cruiser Tone 1:350 Etch sets The Tamiya 1:350 Tone kit has been out for some time now, but there have been very few, if any, aftermarket detail sets for it. This may mean that Tamiya got it perfect out of the box or that the aftermarket companies have missed it for some reason. Well this has now been rectified with the welcome release of these two sets by Eduard. The first set consists of two sheets of etched brass containing around 132 different parts. The largest sheet provides everything from the ships crane, crane hook, catapults, bollard tops, gratings, turret railings and masts, funnel caps, funnel wind deflector, inclined ladders, to the intake grilles on the funnels and superstructure. There are several wind deflectors for the secondary armament which are made up by folding the large etched segments on each other creating a suitably scale thickness. The kit searchlight towers, their mounts and turntables are completely replaced with new etched items. There are also numerous small details for the rangefinders, masts yards and bridge structure. All the ships boats have additional detail such as rudders, handrails, screens and stern rails. The second, smaller sheet contains many smaller items such as new doors and deck hatches, small deckhouses, inclined ladders, gun shields, boats oars and cable drum supports. The smallest and what look like the most awkward fittings are the hull ladder rungs. Templates are provided to get the holes drilled in-line ready for the rungs themselves. This is going to be an incredibly fiddly job, but worthwhile exercise as the moulded styrene ones are a little bit clunky. The second set, supplied separately, provides all the railings in pre-cut lengths for the whole ship, plus a range of platforms with pierced gratings. Two accommodation ladders are also provided, in addition to their deck edge covered platforms. A pleasant addition is the inclusion of the awning tripods often seen in photographs of Japanese naval vessels. Conclusion It’s good to see these sets being released as, while the 1:350 Tone is a fabulous kit, it still needs something to give it a lift. The quality of the etch is up to the usual standard we’ve come to expect from Eduard. Unfortunately, the instructions are still a little vague in part placement and particularly how parts are folded. If you have the Tamiya kit, then you need these sets. Review sample courtesy of