Search the Community
Showing results for tags 'airfix'.
-
Just finished Airfix's latest, and what a superb little kit it turned out to be. No fit issues, a little filler required here and there, a nice cockpit and a wonderfully thin canopy. It captures the sit-up-and-beg look of the real Vampire T.11 perfectly, and the method for attaching the wings and booms has banished all memories of misaligned tailbooms on other Vampire kits permanently. It will not be the last Airfix Vampire that crosses my bench, that's for sure. Hmm... Norway... Kit built out of the box with addition of masking tape seatbelts. Painted with Vallejo Model Air (first time- very impressed) Aluminium and varnished with Alclad matt clear lacquer. Decals by Bright Spark.
-
I was hoping to get my Vampire finished for the Huddersfield show but didn't manage it as I didn't get enough modelling time and decided I didn't want to rush it in the end. I took some pics on my phone so thought I would do a retrospective work in progress thread showing the stage I'm currently at with my Vampire. The kit is lovely and I've really enjoyed putting it together so far and think I will be buying more. The kit certainly generated a lot of interest when I displayed it at Huddersfield and plenty of kits were being purchased. I'm going to do the No.5 Training school option. First job was to paint the interior black. I painted it in Humbrol 33 matt black and lightened it with some 67 tank grey to give a bit of shading. As you can see from the pic below you get full length intakes and an engine face. I only quickly assembled and painted this as nothing can be seen when the fuselage halves are joined. Here is the cockpit dry fitted in the fuselage. Fit was excellent. I glued the intakes on at this stage. I also decided to break from the instructions and assemble the rest of the aircraft ready for fitting the fuselage once the cockpit was painted to save time. Due to the intakes sticking out and the undercut in the wing to Fuselage join for the flaps it is tricky to get them together but you can do it with a bit of twisting. I wouldn't recommend this method as I had some allignment issues doing it this way and ended up with a gap in the lower wing. Next time I will follow the instructions. Please note the main landing gear must be fitted to the boom before joining the wing due to the actuators and they wont fit once the wing is together. here are a couple of shots of the painted cockpit. I found the detail to be accurate and very little needs adding. I'm unsure about the bulge in the floor for the nose wheel going the full width of the cockpit floor but as it's black in there I don't think it's too distracting. I cut the glass off the gunsights and will replace it with clear sheet later in the build. The instrument panel decal is nicely done and is acceptable in this scale although an eduard panel would look nice in there. The only detail I'll ad will be to the ejection seats. This is the stage I'm currently at. The plane is assembled and the plastic has been polished and the Vampire has received a coat of Alclad grey primer followed by a coat of white primer for the orange areas. I have a couple of imperfections I need to sand out before more paint is applied. I will also then add the very fine balance weights to the tail along with a new pitot tube and the small underside aerial I managed to break off. I also cut off the splitter plates on the intake as they were a little on the thick side and will add some more from thin plastic strip. I'll update the build when I've done a bit more and hope people will find this work in progress useful. Cheers, Mark
-
I bought the new Airfix 1/48th scale Spitfire PR XIX shortly after it was released and started building it right away. I am almost ready for the painting stage now. Here is my question: Is there supposed to be a 1 mm gap between the small inner flap part and the wider outer flap part, or is the gap supposed to be somewhere else (e.g. towards the fuselage centreline)? Jens
-
Regardless of accuracy issues, perceived or real, I have just completed two of Airfix's new 1/48 Spitfire family, the XII and XVII. Both were built OOB, with just the addition of decal seat belts. Both were uncompicated builds, and I enjoyed these enormously. Hope you like!
-
Well started this on Friday afternoon, after picking it up for less than £3 from HobbyCraft. Its the old tool, so I am sure most are aware of the kits shortcomings. I built it OOB as an 87 Sqn bird, the only addition being some Tamiya tape seatbelts, some dials picked out on the IP using cocktail sticks, and a small bit of stretched sprue on top of the tail in order to attach the antenna cable. I will upload better pictures when I can get some taken outside in natural light, but for now, her you all go:
-
Hi mates, I did a few searches here, but didn't find any topics about this. Has anyone received the 2013 Airfix Club kit, and if so what can you tell us about the Hurricane IIb? Is this the recent IIc kit with alterations (I think the wing needs to be different)? Cheers, Bill
-
 The snowfall means that there was no post today, nor is any likely before Monday, so I've dug around the stash to unearth a fine example of the dear old Airfix 1/72 VI/II/XVIII Just like my other favourite, the Airfix 1/48 Hurricane, I've always found that what this kit lacks in modern standards of detail is more than compensated for by the pleasing look of the finished model. Although the decision has, in part, been taken out of my hands I've also decided that I'm just going to build her as she comes... namely with the very basic cockpit. You won't be able to see through the standard canopy anyway! The decal sheet in the kit features an all-black NF.II - DD712 of 23 Squadron, RAF. carrying the code YP-R. The instructions depict her as a standard NF.II with the external 'coathanger' aerial of its AI Mk IV radar. However, while this might have been fitted on delivery in mid-1942, photographs of DD712 depict her after the removal of the radar set in readiness for her later role as a cross-channel Intruder. Effectively, then, DD712 should be a black-painted F.II day fighter. So that's what I'm going to do. If nothing else it's a chance to get my eye in before the bits for my prototype arrive!
 -
Hi all, Long time no post! Just starting to bet back into the fray after an extended break. Thought I'd ease my way back into things with the relatively easy and pain free Airfix 1/48 Bucc with HA's resin intakes. Here's the question, the replacement intakes have come without instructions. So how and where have people attached the compressor face parts. The rear of the part has a very thin continuation of the inner part of the intake (one of mine is damaged) how much of this needs to be removed. Just interested in any fitting tips if there are any. Cheers, Mark.
-
 Hello All, This year, rather than launching back into my current project, I've been drawn into finishing some old stuff that's been hanging around for too long: Airfix 1/72 Old Spitfire IX (started 2010) Loved it. 100% OOB. Humbrol 116/106/64/90. Old decals needed tidying up to deal with out-of-register issues but settled down beautifully. Walkways and lettering done by black pen, with silver pen for chipping. It almost looks like a Spitfire from this angle! Airfix 1/72 new Bf110C (started 2011) The undercarriage, bombs and tanks are beautifully moulded, in sharp contrast to the trenches all over the airframe. I didn't like the RLM70 (Hu117) and then I really struggled with the main decals, which refused to conform and silvered really badly.Yesterday I did the rest of the stencilling with black pen and red paint, so I didn't have to wrestle with about 100 more decals, and then weathered it and called it Done. Now I can get on with my current projects (except I just found that old MPM Defiant I started 2 years ago...) Thanks for looking, Adrian
 -
RIP Gerry Anderson, your marvelous creations were a significant inspiration to me during my youth! This one fought me somewhat - the mould has pretty much had it with poor fit and some distorted details. Still, the new decals are superb and the kit still looks like an Angel to me. Brushed Humbrol enamels, pencil detail marking and Klear to finish. I substituted a smaller pilot to address the scale issue and a cockpit panel shroud to hide the lack of interior! FredT SIG
-
 North American P-51D Mustang 44-14722 'Temptation' 357th FG, 362nd FS Leiston Airfield November 1944 Pilot Lt. Matthew S Martin, 'Waddy' 414722 'Temptation was the mount of Lt. Matthew S Martin 'Waddy' of Kentucky. Sadly Lt Marting was to see out the end of the war from behind the wire of Stalag Luft 1 after he was shot down on 5th March 1944. Kit: Airfix A01004 Scale: 1:72 Paint: Gunze, Tamiya, Alcad. Extras: None Build thread: LINK Built for the Defence of the Reich Group Build
 -
 Well this is my second WIP thread, and will be my fourth model of the year. Many will not count my Revells Micro Wings as they are small simple kits, but as a returnee to modelling, they have helped me get back in the swing of things, and also my Tornado GR1 1/144. So in a bigger scale (and more than likely the scale I will stay with due to space/finance etc) this is my 1/72 Messerschmit BF 109E 4, from Airfix. I hope I am not biting off more than I can chew, as I have read about wing dihedralm issues, problems removing some of the smaller parts from the sprues etc, and also the fact that the Airfix painting instructions are incorrect apparently for the aircraft designation the kit portrays. For these reasons, I am going to be very careful removing any parts (something I thought would make sense all the time anyway), and it is also going to painted in a scheme I decide upon, using the kit decals, so will in effect be fictitious. So, as I am likely to start this tomorrow, for now, there is only the obligatory Box and sprue shot. More to follow tomorrow hopefully.
 -
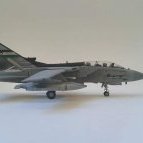
 As I wrote earlier, rather than sulking about the lost decals on the F-4B, I decided to work on a rarely seen version of my favourite plane : the big-bellied twin-stick Lightning. I found out, a bit late, that Aeroclub conversion was designed with the small-bellied Lightning in mind. First fuselage half was a bit so and so: So I cut the conversion part to fit the big belly on my second fuselage half (better late than never, and all that stuff): This is going to look a bit like this: Fuselage halves puttied, sanded, coated with Tamiya TS-30 for test and puttied again because, well, you know how it is: Just before closing the fuselage: Three .36 bullets sure give it something to stay on its three wheels... So, when you glue together the fuselage halves, you get something not quite bad, but rather less than quite good: And when looked at from above, it's bad: Putty and sandpaper, what else? It's starting to look like it: Something a bit annoying about Airfix Lightning: you got to glue a thin card rectangle to the under side of the wing in order to get a good fit to the fuselage: To be continued...
 -
 Hello, does anyone have any experience with the CMK cockpit for this kit? http://www.modelhobbies.co.uk/shop/canberra-interior-4239-p-34237.html This link seems to suggest that it includes the navigator's cockpit, although other photos of the resin parts seem to contradict this (perhaps some confusion between the 1/72 and 1/48 scale sets?). What about fit - How does it compare to the Pavla sets? I saw a build on here a while ago that indicated the Pavla set took some work to get right... Any words of wisdom? Thanks, Andrew
 -
 Hi Here is my Airfix 1/72 Hawk TMk2 bought in the recent Jadlam sale for £7. I built it from the box with the only additions being masking tape seat belts, a cut-down dress-maker's pin for the pitot and the very nice Xtradecal RAF Anniversary Update 2011/2012 I sprayed the model with Tamiya X-1, and following the decal application, I brushed on a coat of Klear (removing some of the minuscule stencil decals in the process!) I didn't use all the Airfix stencils, as I felt that they might ruin the look of the model. I'm sorry about the picture quality, but the winter overcast is not conducive to good photographs.
 -
With the January copy of Airfix Modelworld came a calendar. Looking through its obvious that it uses Airfix artwork. I'd like to get my hands on the Hurricane shown for September 2013, but I cannot identify the kit. Does anyone have any ideas? Thanks
-
 Happy New Year to all on BM! This year i want to bring some fun and nostalgia back into my hobby , so the plan is to build straight from the box with no extras , other than plasticard. First up will be my new Harrier. Im only going to cut the auxillary doors out on the intakes , add a bulkhead to the rear of the canopy and MAYBE add some very basic sidewall detail to the cockpit. Ive made a start this morning. The pilot is probably the best one they have done in 1/24 and he is crying out for a good paintjob. Im figuring that he takes up most of the cockpit so i may add some basic structure detail to the cockpit but it may not be necessary. The canopy will be closed anyway. The engine has been built and now needs painting. Its actually been alot of fun so far , but you do have to battle with your mind telling you to add detail! I will even be keeping the surface detail! I will post more later. Heres the box. Stunning artwork and most inspirational. The engine actually has alot of detail for a kit from the 70s Heres the cockpit. Sidewalls and inst panels are actually quite good.
 -
Slowly been building this one and im glad i took my time as i am over the moon with this one. The underside black and white tested me but i managed to get it done well in the end. Lovely kit i have to say and might have to build some more in the future. Scheme i have chosen is an aircraft of No 85 (F) Sqn, RAF, Advanced Air Striking Force, France, 1940. And a little picture of my Hurricane collection all together, Enjoy,
-
Happy new year to everyone! I felt I needed a bit of modeling therapy, so I started this as a quick, almost OOB build a few weeks ago to try to get my mojo back. It still needs a few fiddly bits like the landing gear and antenna, but I figure it'll be done in another week or so. It's a nice kit; not quite as refined as Tamiya/Hasegawa, but very good nonetheless. It required dry fitting and tweaking to get things just so, but very little filler was needed. Some folks have complained that the panel lines are a touch overdone, something with which I kinda agree. Before starting any assembly, I gave the fuselage and wings a heavy coat of Alclad "Black Primer and Microfiller" and then sanded everything back to the bare plastic, being careful not to obliterate any of the fine raised detail scattered about the model. This had the effect of smoothing the slightly rough surface texture and rendering the panel lines somewhat finer. The other thing I just had to address were the way-too-deep Dzus fasteners around the engine. I drilled them all out, plugged the holes with stretched sprue, sanded them all flush and redid them with a beading tool. This is the first time I've tried AK Interactive "Engine Oil" for the streaking on the belly. I'm quite pleased with how it turned out: The other must-do on this kit is to thin the wing trailing edges which were almost 1mm thick with the flaps raised. Elbow grease plus 400 grit wet & dry sandpaper sorted it out. Gunze Mr. Color 23 Dark Green and Tamiya XF82 Ocean Grey over Tamiya XF83 Med. Sea Grey. I used Montex Masks for the main markings and the kit decals for the stencils. Both products were excellent. Other minor tweaks included, sanding the propeller blades thinner, adding Master brass canon barrels, replacing the radiator outlet flap with 0.010" styrene, drilling out the exhaust stubs and fabricating the little scoop on the top of the engine cowl from sheet aluminum. Cheers, Tony Bell
- 21 replies
-
- 6
-

-
- Airfix
- Spitfire Mk.XII
- (and 2 more)
-
Finished this one today for a group build over on another forum, based around the Lend Lease program. What ive built is the Airfix Hurricane IIc kit but ive used the 3d Kits conversion to convert it in to a IID. Ive also used AML decals to do a nice russain scheme for the model. The kit itself is a lovely kit and just falls together, the only big down side is the small prop. The 3d Kits conversion is nice simple to use and is nicely detailed, i would well recommend it to anyone. The AML decals were lovely to use to. I used humbrol and revell paints through out. Overall it was an easy build and im really happy with the finshed product. Enjoy, Tom
-
This is a Hawker Siddeley Trident 1C, G-ARPR of British European Airways. On 10 June 1965, while operating Flight BE343 from Le Bourget to Heathrow, this aircraft made the first fully automated landing of a commercial airliner carrying paying passengers. However, my model will show the aircraft as it was in May 1968 with a natural metal rear fuselage. Like this! The kit is the venerable Airfix 1/144 kit, suitably modified. Decals are from the Two-Six sheet 44034 Taken from the mould and boxed long before the parts had cooled! No damage to the parts though. Okay, hold on tight, rider! Here we go, two, free, four...
-
My new model Modelarovo.cz
-
Apologies if this topic has already been covered. I want to build a 1/72nd scale RAN Douglas A4G operating from HMAS Melbourne in the early 1970s and have the Modeldecal sheet that includes this scheme. As the new Airfix A4B kit is readily available and reasonably priced what are the main differences between this mark and the A4G? i.e. Is it possible to build the A4G more or less from the box or is there extensive re-modelling/converting to be done and where? I have searched the net but have not been able to find a definitive list of differences. With thanks in advance. Tim.
-
This is the 1/72 Airfix kit built as an exercise in various weathering techniques for me. I made a few changes to the kit in attempt to add a little finesse to the out of box offering: Upper engine nacelles reduced and re-shaped, elevators dropped, ailerons deflected, fuselage antennas added, fuel lines added to drop tanks, braces added to bomb tails, boat release cable added to fuselage side, majority of panel lines filled and then later lightly drawn in with pencil with a few painted highlights. The rear machine gun has been lost to the carpet monster and the wire antennas are missing because I'm out of super glue! I struggled to get the canopy to fit well. The kit decals are wretched! The lower markings were painted on - but not terribly successfully! Painted mostly with Revell Aqua, a little Vallejo Model Color, Tamiya, Citadel, oil paint and pastels. The intention was never to make a wholly accurate model and I accept that it misses the mark in places but as an exercise in developing new ideas and pushing my boundaries slightly it has achieved all I wanted. Most of all, I enjoyed making it! All constructive criticism most welcome! Jon.


.thumb.jpg.85b0bd1b23acb88e6a79720372668e78.jpg)