Search the Community
Showing results for tags 'Trumpeter'.
-
 MiG-31B/BM Photo Etch and Masks for Trumpeter Kit 1:72 Eduard Eduard seem to have tracked the release of Trumpeter's new line up of Russian jets in 1:72 fairly closely. Each time a new kit has been released, we haven't had to wait long for a set of photo etch and masks. There is even a growing range of high-quality resin hardware to hang off the bottom of your chosen kit. This month is the turn of the new MiG-31B/BM kit to receive the Eduard treatment. MiG-31B/BM In the usual Eduard style, this set comprises two frets of parts. The first fret contains pre-painted parts for detailing the cockpit and includes harnesses, cushions, pull handles and other details for the seats, as well as details for the instrument panels and side consoles. Also included are parts for the rudder pedals. The second fret is unpainted and contains a new head-up display unit, parts for detailing the join between the canopy and the cockpit and parts for detailing the mating edges of the canopy itself. Clearly this part of the set will be of use only if you wish to finished your model with the canopy open. MiG-31B/BM Zoom If you don't wish to finish your model with an open canopy then you may be better off plumping for the Zoom set. If you do, the only other part you will really be missing out on is the head-up display unit. MiG-31B/BM Exterior This is a fairly small set which provides some details for the rest of the airframe. There are new tail structures for the R-77 missiles, new fences for the upper wing, details for the inside of the airbrake (which will necessitate removing a small amount of plastic from the kit parts), strakes and static discharge wicks for the tail and a whole host of aerials, antennas and other small surface details for the forward part of the fuselage. The insides of the landing gear doors receive extra details, and there are replacement parts for both ends of the mighty Soloviev turbofans. MiG-31 Pre-Cut Masks This set provides pre-cut paint masks for the canopy and all of the wheels. If you've used Eduard's pre-cut masks before, you'll know that they are a real time saver. Conclusion These sets are a handy upgrade for the new Trumpeter kit. The cockpit seems to be the main beneficiary of the first set, while the exterior set is worth having for the replacement strakes and extra details for the undercarriage. Masks are really just a time saver, but still worth considering if, like me, your modelling time is restricted. Review sample courtesy of
 -
I have been working on the Trumpeter Tiger II for almost half a year now (yes I have pictures of the progress). But I've run into a problem with the Turret basket, on the real Tiger II there is the diamond plating at the bottom of the basket and in the kit the basket is bare. I also noticed that the diamond pattern around the turret basket is also incorrect and they are missing the diamond pattern for the drivers' feet. I am curious as to where one could acquire the correct diamond pattern and size. I have been looking around and couldn't find anything that is correct.
-
 Hello, Once again I'll try to build a model. And how iconic would it be when they first model in years finished would be a Flanker. So off it goes. I cut out some parts from the intakes and started to adjust the engine fronts as it's going to be flying! Photoshopped some turning fans to go in the intakes as well. Photo's soon! Greetings! Typo edit 😉
- 5 replies
-
- 1
-

-
- Trumpeter
- Linden hill
- (and 1 more)
-
 Update: complete Trumpeter catalogue 2017-2018 online here: http://www.moxingfans.com/new/news/2016/1228/3083.html --------------------------------------------------------------------------------------------------------- First pictures from the Trumpeter catalog 2017-2018. Stay tuned. Source: https://www.facebook.com/TrumpeterModel/posts/695807090577887 Remember, thread about Trumpeter's catalog 2016-2017 is here: http://www.britmodeller.com/forums/index.php?/topic/234992484-trumpeter-catalog-2016-2017-programme/ http://www.themodellingnews.com/2015/12/trumpeter-catalogue-2016-2017-lets-see.html Up until now only infos for mud & pebbles movers, flintstones etc. V.P.
 -
Hi all, Here's my latest completion, Trumpeter's 1/700 kit of the Frunze with some of the WEM etch for the type. Paints are WEM Russian Northern Fleet Grey and Deck Red with Humbrol for the rest. Like the Ki-67 "Peggy" I posted in the Aircraft RFI section, I've had this kit in the stash for ages (released in 2003/04) but never made much headway with it. I actually built the kit as a side project to the RNZAF Dauntless I posted back in March, but it's taken this long to get the paint work done! Comments welcome! Mike.
-
Here's my last completion for 2014, Trumpeter's 1/700 scale model of the HMS Barham modified to represent the ship at the time of the Battle of Cape Matapan. Colourcoats used for the AP507B and AP507C camouflage pattern with Teak and AP507A used for the decks and the RN White for the stripe on the mainmast and blast bags. WEM's etch for the kit was also used, although I substituted Quad Pom Poms for the Octuples on the bridge structure using photos as reference. The modifications to change from as sunk to Matapan condition mainly consisted of changing the platform on "B" turret to have an UP projector instead of the quad '50 and leaving off the forward AA platform that was also mounted on "B" turret as well as the one on "Y" turret. The Walrus was painted using Humbrol enamels and actually has the countershading on the lower wing as per the biplane version of the Temperate Sea Scheme. The roundels were sourced from Tamiya's 1/700 Repulse as the kit supplied ones were too big (1/350?) and the wrong style. Before painting: Walrus: After painting: As always, comments and criticism welcome! Mike.
- 20 replies
-
- 25
-
-
Dear Fellow Modellers Here is the Chinese CA-30 truck which is a clone of the Soviet Zil-151. The design owes much to the lend-lease Studebacker trucks from WWII. It was in service in China from 1960s to 1980s and I believe some still serve in the Bangladesh army. In the Vietnam war they chugged down the Ho chi Minh trail and so made a major part in the eventual victory of the Communists. It is dressed up with Miniarm resin wheels and SKP lamps and lenses. Trumpeter provide a canvas tilt but omit the cover on the front so this was added from tissue. Hope you like it? Andrew
-
Dear Fellow Modellers A few photos of my Trumpeter T-64. Whilst we in the UK were fighting to get the opposed piston 2 stroke L60 to work in the Chieftain, ironically the Russians were having awful trouble getting their similar engine to work in the T-64. In the case of the 5TD engine the cylinders are horizontal so helping the ultra-low profile of the tank. These tanks were amongst the main protagonists in the terrible Ukrainian conflict. Hope you like? Andrew
- 12 replies
-
- 20
-
-
 Hi, all. Until I wasn't at home, this cat: has surfed on my table where there were details J-10B for coloring. As a result I haven't got one nose wheel (detail D5) and is HUD (detail G7). Nose wheel not a problem for my, because I can make the copy from remained. Not problem to make HUD most if there is a photo or the drawing. Whether somebody can at whom have unbulit J-10B (Trumpeter 1/72, item no.:01651) to make HUD photo (a detail G7) near a ruler? Three photos the front view, the top view and a side view are necessary!!! To me three photos are necessary because at J-10B rather irregular shape is HUD: (resource photo:http://errymath.blogspot.com/2015/01/jf-17-block-iii-pictures.html?m=0#.WbwmrBmOGBY ) and just I haven't enough photos from the Internet for production of this detail. Of course I will look for these details, but if the cat hasn't eaten them, then he has dumped them from a table on a carpet. But "a big carpet monster" doesn't give fine details! Therefore it is possible they should be done most. For this purpose the photo is necessary. Please help! B.R. Serge
 -
Hello again! Having slightly healed from my previous incursions into the modeling arena, I shall once again throw my body into the breach, too see whether I have yet bitten off more than I can chew! My efforts this time will center upon flailing away at the 1/72 Trumpeter F-100F offering, trying both to make it look a little more accurate, and at the same time, trying to alter it into something resembling an F-100F "Wild Weasel" version of Vietnam War vintage. There are several items involving these two goals; some of which I will treat, and -- as is my custom -- others, which I will ignore. That being said, here goes... To begin, a little comparison is in order; primarily some comparison between the Trumpeter kit and the Esci kit, which has a long and oft' renamed history. Since I had both laying about, these were my only choices. Side-by-side, the Trumpeter kit is a bit long in the cockpit area: In the above photo, the Esci kit behind, the Trumpeter kit in front. Next, a better angle on the problem: Next, comparison to drawings; the Detail and Scale offering is what I had lying about. First, the Esci kit: As you can see, the Esci kit isn't bad, most notably a disagreement about the fuse depth, as well as the tail height. Next, the Trumpeter kit, same drawing: Here, the fuse depth is right on, but the cockpit is way too long. The tail is about the same as Esci's. The red line indicates where the rear edge of the nose intake cone should line up. From above: BTW, the comparison of the two kits' wing can be found on the WIP for my F-100C.HERE Yup, the cockpit length is definitely a problem, so let's get started trying to fix that little puppy! First, let me state that either kit option required a new canopy. The Esci has the bogus center frame at the third forward, vs correct center point of the cockpit. The Trumpeter canopy (and kit) are much too narrow. I have ordered a Rob Taurus, and I sure hope that it's the same length as the ESCI, caused that's what I used to determine the cutting points! After a lot of study and burnt offerings, I finally decided that the best place that would let me remove the excess length, and damage everything else as little as possible, would be along the slanted panel line thoughtfully provided by Trumpeter, and show here enhanced by a marker: I determined that a piece about 21 scale inches or 8mm would need to be removed -- MEASURED ALONG THE HORIZONTAL DATUM LINE, NOT PERPENDICULAR TO THE CUT LINES! Next, showing the left fuse pieces joined, and the amount that needs to be removed (along with the location of same) on the intake trunk: In the pic above, "A" denotes the part to be removed from the intake; "B" shows where the intake mounting lugs need to be shortened on each side, to fit the shortened fuse halves; and "C" shows that the bottom of the nose no longer aligns with the rest of the fuse, and will have to be filed, later. In the above pic, the right fuse side nose end has not yet been cut off to fit the Esci intake copy that I will use, but the right side has been cut and shortened like the left side. HOWEVER, you will note that I screwed up when cutting the left side and had made the cut poorly. This resulted in the left nose half being too short at the top (near the cockpit), which resulted in the whole left nose half being rotated upward, and to be short. The fix was to re-open the left side seam and insert a wedge of kit sprue, to fill the gap as well as align the nose halves properly: When cleaned up later, this will fix the problem. Next is shown the completed right half, with the nose part joined and the resultant shortening of the intake trunk mounting lug holes, marked "A", and the shortened mounting lugs, marked "B". Also not the shortened intake trunk assembly, itself. Next, we move on to the cockpit itself. Let me state here that the single largest problem in trying to depict an accurate F-100F Wild Weasel aircraft is that there seems to be zero, zip, nada available on what the Weasel cockpit looks like. Many searches on other forums, etc has been fruitless. If ANYONE has a copy of an original Weasel manual, or photos of the real deal, please chip in. (Of course, they're very likely still Classified, and for good reason!) In the pic above, "A" denotes where the front of the cockpit assembly sets too low, and "B", where it sets too high. The solution for me was to saw off the upsweep at the rear of the intake trunking, and to sand the bottom of the cockpit, to allow everything to sit flat. Results are shown below: Next, we start installing parts into the fuse halves, starting with some lead in front, atop the intake trunking. Then the tailpipe (painted inside) was installed into the tail. Note also the wedges of plastic card inserted into the edges at the front of the intake trunk, to cause the trunk to better fit the Esci intake front that I'll be using, as per my F-100C build. In the above photo, I take special care to see that the two mating surfaces pointed to by the arrow are flush with each other. Well, at least that's a start, and, as promised, it is a bit "whacked-up"! If you're interested so far, please feel free to tag along. Later, Ed
-
 My next attempt at model building will be the 1/32 Trumpeter TBM-3 Avenger. (Apologies to jean who requested the 1/32 F-105, but there are too many corrections and additions I need to make to the 105 and just want to do something semi-out of the box.) When this kit came out, it was reviewed as one of Trumpeter’s better kits as far as shape and accuracy is concerned. The box art is here. Inside there is some included kit PE and it looks like at some point in time I purchased the Eduard Seat belts. Now the kit PE has seat belts, but the Eduard are so much better. The bulk of the rest of the kit PE is for the bomb bay doors. Now what is missing from this picture? The canopy masks! I hate to mask canopies. It is my least favorite thing about model building. And this puppy has a lot of complicated masking that needs to be done. Must go online and purchase canopy masks! Not to worry though, it will be a bit before I need them. Inside the main box is a little mini-box full of goodies. Inside the mini-box are the vinyl tires; the engine cowl; some pieces for the engine; those funny, but irritating steel pins needed to hinge the flaps, tail and elevator; stuff for the instrument panel; the clear part for the rear machine gun; some stuff for the folding wings; and finally, some string. (Not real sure about the string use yet?) I got me some instructions to follow. (28 pages!) The decals aren’t much to write home about. I have a choice of two color schemes; one for a bird from the USS Shamrock and the other in the markings of former President Bush’s plane. Right now, I am strongly leaning towards President Bush’s mount as I have just reread Flyboys. I also am tempted to do a Tarpon/Avenger II but I think I will do that with the Accurate Miniatures version I have in the stash. Finally, there are a ton of sprues inside. There are 492 parts in total, not counting the Eduard PE. According to the kit instructions, just 2 will not be used. This might keep me busy over the weekend! I also did a size comparison so I can also start thinking about where to put this when it is finished. The kit fuselage is dwarfs the 1/48 Accurate Miniatures fuselage which for a single engine plane is fairly large for 1/48. I’m thinking this is destined for one of the hutches. I also compared the inner fuselage detail. Accurate Miniatures is known for the quality of kit detail and the Trumpeter inner detail is pretty close to match the AM detail. That is a good sign. So, next up, according to the instructions is four steps on just building up the engine. It looks fairly detailed so I will probably figure out a way to display it as the cowling is a one-piece affair. Must do some research on how the engine panels open for servicing and how to plan the surgery to open up the engine. Seems a waste not to show it. As always, all comments are welcome.
- 123 replies
-
- 10
-
-
Hi I have the Profile warship on HMS Cossack , but I can't see any cable reels on the artwork plan and side profile drawings provided in the centrefold Does anyone know if these ships had them fitted to the deck and where they were positioned ? any help would be very appreciated ! regards David
-
 Quick start on a long thread! I have in the stash a number of fw200 condors. The first was from a local shop which I acquired back in 2007ish! I started to hand paint it but gave up on the interior parts! This thing predates my acquiring an airbrush! It's been sitting for a while........ then i "saw" the newer boxing c4 bomber kit, I went home with that.....finally I found a trumpeter c3 on half price. Yeah, I got that too. My plan is to build dönitz personal aircraft, but the info seems confusing/misleading, I have the of decal set for it. I will need some more bits and a load of hacking to complete this build. It needs more windows, more seats, less bomb bay and a couple of turrets, or just one? Depending on where you find the profiles. The trumpeter box will represent the longer range conversion trials aircraft, or one of them. The third kit, well, that's still wrapped up nicely......for now. I will post some pics, but I need to shoot them first. I have the kagero book fw200, winkle browns wings of the Luftwaffe, something from osprey, another periodical and some internet references. I am going to need help, especially with scratch building..... For me this will be an epic conquest.
 -
As tated in the build thread, here are some hastily-taken, and not very good photos of my "Whacked Out Wild Weasel" build. So named because of the plastic mayhem needed to make a good kit out of the Trumpeter F-100 offering. In fact, the fact that it's the Trumpete kit is probably the only thing that sets if off from other builds of the F-100F -- that and the fact that most of the pics have disappeared from most of the other builds on-line! Without further ado, the pics: Anyway, it's the last on of THESE I'll ever build! Hope you find them interesting. Here is the link to the build thread: Linky Ed
-
After a 6 month build on the Revell Corvette, it's time to return to my more familiar habit of AFVs. Although after seeing so much inspiring work here on aircraft I rather think I'll commit to the modelling equivalent of Triathlon and go for an aircraft after this And so, onwards to the kit which has been well reviewed elsewhere and provides a modern alternative to the elderly Dragon/Zvezda offering. I've taken quite a like to these recent Soviet bloc Trumpeter kits. They are relatively cheap and reasonably detailed. This comes with vinyl one piece tracks which I'll replace with MasterClub resin versions I aim to build a rather attractive and colourful machine - decals curtesy of Echelon Fine Details... However, I can find No photographic representation of this on T'internet which is a shame. My single reference remains this adequate Concord offering (and shame and despair that they seem to haves stopped publishing) The hull tub is nicely moulded.. Deck fit is perfect The original idea was to go for a straight build but you know how it is - there is a partial interior so on reflection I'll probably have some hatches open. More soon Thanks for looking Rob
-
It is 12:30 a.m. May 6, 2017 in my time zone and I can’t sleep. So, what should I do? Since I am building the Trumpeter 1/32 Avenger at breathtakingly, almost inhumanely slow speed (been working on the engine for the past month, still isn’t finished!) what does my addled brain think will help the situation? That’s right, let’s participate in a group build and pick out a 1/24 kit to build. That will help the pace on the Avenger. But, at the speed I am building, guess it can’t hurt much. The kit is the 1/24 Trumpeter Bf 109 G-2. I built the G-6 version many years ago in the Eric Hartman’s livery. For a while, I have been thinking about building one of the planes flown by Gunthar Rall. I briefly met General Rall at one of those “greet the speaker” at the end of a lecture he was giving. I am sure, for him, it was just one more painful smile and shake hands with the masses ordeals that comes with speaking engagements, but he was very kind with everyone who wanted to meet him, was always smiling, attempted to make each greeting somewhat personal, and just seemed to be a very likeable gentleman. Throughout his lecture, he underplayed his own skills and the tragedies he endured during WWII. The G-2 by Trumpeter has markings for one of General Rall’s aircraft. At times, Trumpeter’s decals are not quite up to snuff in what they are supposed to represent and the quality of printing. However, a search of the internet gives several different versions of the same aircraft represented by the Trumpeter G-2 kit. Yeah, I know the last one is of a Fw 190, but I also think I have the Trumpeter version of this kit too! Anyway, several sources other than what is inside of Trumpeter’s box seem to agree on the color scheme for General Rall’s G-2. So, with that sorted, what’s in the box? At some point in time, I must have purchased the Eduard placard set for this kit, yea me! Next step, see if I might be able to join this cheery group of 109 fans and their group build? If so, then the next step is actually building this kit. I think I have missed every group build deadline I have started. (At least I’m consistent!) As always, all comments are welcome.
- 83 replies
-
- 12
-
-
Finally got around to starting my first group build here at Brit Modeller. Thought I would have a go at Trumpeter's new MiG-31, using this as a bit of a dummy run before I build the AMK Foxhound. Going to be using Hataka paints for this build and, hopefully, this will be my last hairy stick build too. Really looking forward to getting stuck in. I've made a bit of a start, and I've primed the cockpit and painted the intakes. Anyway, here are some photos to start us off... More photos to follow! Enjoy
-
Hello all! I've been around a few months and love the site, the content, and the great contributors on here! This is my first WIP and my first real journey back into the world of modelling. I decided to build Trumpeter's 1/32 A-6E and represent the bird I had the privilege to take care of as a plane captain in VA-115. We were stationed in Japan at NAF Atsugi and deployed aboard the USS Independence. After qualifying as a Plane Captain, I was assigned to aircraft 503 BuNo 152950. She was the oldest in the squadron yet she had lots to offer. While on deployment in support of Operation Southern Watch, she racked up more sortie hours than any other aircraft in the air group! Just a quick note: I am not a rivet counter and my memory is a bit faded. I do appreciate any and all comments, advice, criticism, etc. PLEASE do not be offended if I choose not to incorporate your particular suggestion. It's nothing personal. And here we go! I chose to start in the office. I used the Eduard PE set (first time using PE) and upgraded to Quickboost seats (I used the GRU 7A seats and modified them to my liking).
-
Here is a start on a new project, Trumpeter's Panzer IV Type H in 1/16 scale. Rather large project with 80 odd sprues and over 2000 parts. That's a Dragon 1/35 Tiger II beside it for scale. Won't be as involved or complete as Gremlin's build of "Buttercup" but what the heck.
-
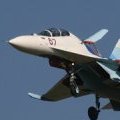
Here's my 1/72 Trumpeter MiG-31 for the From Russia With Love GB. You can find the build thread here. First off, I know, I know, there are a couple of horrific seams! This build was completed as I was in the final months of my PhD, so for me it was something to take my mind of the thesis and help me relax. It was also a chance to test out @HATAKA OFFICIAL paints and some new oil based weathering techniques. Probably not the best way to kick off my first RFI, but I thought I would get the excuses out of the way early Anyway, to the build itself. I was impressed with the fit and how the kit went together with the one exception of the intakes. Struggled to get the seam sorted out, and in the end I decided not to go too far and lose too much detail. Painting went very well, brush painted @HATAKA OFFICIAL Red Line paints and was very pleased with the finish. I tried out some oil paints for the weathering and was satisfied with the outcome. For me, it looks like a MiG-31 and that's what matters! With any luck this will be one of my final brush painted kits! Sorry for the terrible pictures, but hope you enjoy nonetheless!
- 5 replies
-
- 15
-
-
- Trumpeter
- Brush Painted
- (and 1 more)
-
Hello all newer person here at Britmodeler. Ive done mostly aircraft and a little bit of armor since the late 1970's. I haven't done any ships since a horrid attempt at a 1/700 Prinz Eugen in the later 1990's. That was a very bad kit and my skills weren't up to snuff for a ship. Im interested in attempting my first ship since then. And i've decided i want to keep to 1/350th. I have an interest in eventually building a relatives Hunt class Destroyer escort. Now before i outlay $ for a resin kit in the future. I want to get my skills up on a couple of practice kits. Im thinking of Trumpeter's 1/350th HMS Abercrombie Monitor. I find the ship interesting and different and this will also get me some practice at RN Distemper camouflage and colors. My question is this. Has anyone here built that particular kit ? If so anything positive or negative to say about it ? Also if thats not a good choice for a first kit please suggestions are most welcome. As always I will thank you in advance. Dennis
-
This is my T-62 built as a Syrian machine used during the Yom Kippur War with Israel in 1973. The kit is from Trumpeter, and was lots of fun to build. I understand there are problems with the contours of the hatches, and some other things, but whatever. The kit was a lot of fun to build, and detail. I added by own plumbing for the spare tanks and replaced grab handles with wire. Some day I'll add a figure. Paints are Model MAster Acrylics, and all weathering was done with washes. About four or five different shades. I also utilized some pencil graphite on edges and scratches, as well as baking soda for sandy silt textures. Please excuse the weird colors, this was photographed indoors under two junky lamps.
-
I purchased a couple of Caracal 1/72 sheets earlier in the year & like many who most likely have attended RIAT and some overseas shows over the past few years, I have wanted to build at least one. Now that I've finished a couple of long term WW2 builds, it is time to explore a faster, noisier and much more modern subject. These are a few of my pics of Red 56 from RIAT 2015 The only aftermarket i'll be using will be the Caracal decal sheets. The main undercarriage legs look a little iffy and I would have liked to obtain the SAC replacement legs, but that would cost me another £28.00 just for some little bits of metal, so I will drill out and reinforce the existing main legs with brass rod. Title edit alert!!! It seems that this Heroes thing is rather popular and everyone is doing the same thing, especially Red 56. I've decided that my "UB" version will be the twin seat Slovak Tiger as seen at a few air shows since 2008. Coincidentally it can be added to my slowly expanding collection of Tiger Meet aircraft. Was, or is there a Tiger Meet group build, also is there a Tiger Meet S.I.G.? If anyone can tell me which year this scheme originated I would be gratefull! I have ordered a Kopro sheet which represents this airframe. Cheers everybody Martin
- 15 replies
-
- 4
-
-
- Trumpeter
- Kosciuszko
- (and 1 more)
-
Eduard Big Ed set used although a lot of the external replacement bits were unnecessary I thought, so I left them off. Before anyone has a go at me I think the following are wrong: -incorrect fuselage roundel type -live torpedo should have a yellow nose (according to an FAAM info board) -the kit's PE wing bracing wires are wrong - they had a circular cross-section rather than flat Eduard's pre-coloured wing folds are wrong - in real life they appear to be fabric covered and match the colours of the upper and lower camouflage. Only found all this out after I had finished. Must do better research! Hope you like the photos nevertheless. Regards J A
-
I thought it was about time I started posting my completed builds in the Ready for Inspection section; starting with some pictures of my model of HMS Somerset, my third and favourite ship on which I served from December 1994 to October 1998. Somerset is the 11th Type 23 Frigate (although her yard number was T23-12). I joined the ship whist she was in build in Glasgow and had the privilege of being part of the team that brought the ship to life. I modelled HMS Somerset as she appeared in the period 1997 to 1998 and the starting point was the Trumpeter 1:350 HMS Kent kit and White Ensign (now Atlantic Models) Etched brass. I made some minor adjustments to both the kit and PE to correct some small mistakes and I designed my own PE for the first time with this model and I would like to thank Mike McCabe who helped me getting it made. All the details of this build can be found on the forum here: http://www.britmodeller.com/forums/index.php?/topic/234979406-hms-somerset-f82/ Thank you and enjoy.
- 19 replies
-
- 37
-
-
- Type 23 Frigate
- Trumpeter
- (and 1 more)


.thumb.jpg.b4a5069fd2c2dd5708ce1694345c5b11.jpg)