Search the Community
Showing results for tags 'resin'.
-
Products of Metallic Details is in stock: 1/144 Detailing set for Airbus A319 Set contains photoetch parts for detailing the engines, fold chassis, sensors, winglets, wipers of the aircraft. Recommended for Revell kit. Detailing set for Tu-144 Set contains photoetch parts for detailing the exterior of the aircraft. Recommended for ICM kit. Detailing set for Boeing 787-8 Dreamliner Set contains photoetch parts for detailing the exterior of the aircraft. Recommended for Zvezda kit. 1/48 Detailing set for I-185 Photo etched parts. Recommended for kit: Ark Models Detailing set for Su-2 Photo etched parts. Recommended for kit: Zvezda Detailing set for Po-2/U2 Photo etched parts. Recommended for kit: ICM Air intake grilles for Su-27 Photo etched parts. Recommended for kit: Academy Detailing set for B-29 Resin & photo etched parts. 4 x Engine, 8 x Compressor exhaust, 2 x Landing gear bays. Recommended for kit: Revell/Monogram Detailing set for He-219 Photo etched parts. Recommended for kit: Tamiya Detailing set for Yak-9 Photo etched parts. Recommended for kit: Modelsvit Detailing set for Folland Gnat T.1 Photo etched parts. Recommended for kit: Airfix Ejection Seat K-36 D/DM Resin & photo etched parts. The set has 2 seats with the possibility to assemble the chairs in variants K-36D and K-36DM. These seats are installed on the aircraft such as the Su-27, MiG-29, Tu-160 etc. Detailing set for Po-2 mod. LNB/VS Resin & photo etched parts. The set contains 2 dashboards for the pilot and navigator for the aircraft Po-2 modifications LNB (light night bomber)and VS (Soviet Air Force plane connection). In addition, the kit contains parts for assembly and device for forming 2 spoked wheels with tires (original size 700x120 mm). Detailing set for Pe-2 Photo etched parts. Recommended for Zvezda kit. Set contains parts for detailing the interior and exterior of the aircraft. Czech hedgehog Kit contains photoetched and resin parts to build 1 Czech hedgehog. The base with the bolts/nuts has a fixture to bend. The thickness of the metal - 0.3 mm. The diameter of the bolt head, nut - 0,86 mm. The bolt is threaded on its end. Detailing set for B-29, flaps Photo etched parts. Recommended for Revell/Monogram kit. Set contains parts for detailing exterior of the aircraft. 2 sheets - 270*126 mm, 1 sheet - 270*70 mm Nose cone for Su-27 The nose cone for model aircraft Su-27 by Academy. Designed for correcting the shape of the nose cone. Nose cone for MiG-23 The nose cone for model aircraft MiG-23 by Trumpeter. Designed for correcting the shape of the nose cone. 1/72 FuG-200 Photo etched parts. Detailing set for Su-27 Photo etched parts. Recommended for kit: Zvezda Detailing set for T-50 PAK-FA Photo etched parts. Recommended for kit: Zvezda Detailing set for B-29 Resin & photo etched parts. 4 x Engine, 8x Compressor exhaust,2 x Landing gear bays. Recommended for kit: Academy Czech hedgehog Kit contains photoetched and resin parts to build 1 Czech hedgehog. 1/48 & 1/72 Machine gun sights Photo etched parts 1/35 Soviet tanks set 1 Photo etched parts. The universal set for Soviet tanks of the II World War (IS-1, IS-2, SU-100, ISU-152, T-34). Czech hedgehog Kit contains photoetched and resin parts to build 1 Czech hedgehog. The base with the bolts/nuts has a fixture to bend. The thickness of the metal - 0.3 mm. The diameter of the bolt head, nut - 0,86 mm. The bolt is threaded on its end. German grenades M39 and M24 Photo etched and resin parts. Kit contains 5 resin Eihandgranate M39, 5 resin Stielhandgranaten 24, 2 boxes to transport both types of grenades Soviet grenades F1 and RGD-5 Photo etched and resin parts. Kit contains 5 resin grenades F1, 5 resin grenades RGD-5, 4 resin capacity with UZRGM fuses, 2 boxes to transport both types of grenades (14*9 mm) Soon 1/48 B-24 Liberator. Engines Resin parts.4 x Engine Pratt & Whitney R-1830 Twin Wasp, 4 x Supercharger. Number of parts - 148. Recommended for Revell/Monogram kit.
-
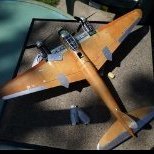
Dear all, Here's a recent completion from me, the Anigrand 1/72nd scale full resin kit of the KC-10 Extender as a USAF tanker. The build was not the most straightforward, with lots of warped parts that needed straightening and quite a bit of filling being needed. It was painted with Xtracolour enamels and the kit decals were used, which were good. It's a big old beast of a kit - it certainly takes up quite a bit of shelf space! Best regards, Rob So just how big is a 1/72nd KC-10? Here's a 1/72 Spitfire TR9 as a comparison! And alongside a 1/72 KC-30 (Titan Models' Airbus A330-200 tanker) which is also quite a lump!
- 12 replies
-
- 66
-

-

-

-

-
Evening All I've had this in the stash for a fair few years but have never been able to pluck up the courage to start it due to some seriously large casting blocks. A new razor saw I had as an Christmas present has proved ideal and I've managed to finally get the hull together. Sadly I didn't take any "before" photos as this wasn't planned to be a WIP build. There's a small amount of damage to the front (looks worse than it is on the photo), but all in all, I'm happy with the result. The kit is stunning and is mostly resin, using just the running gear and a few details from the revell king tiger. It also includes a turned aluminium barrel. I wasn't overly struck on the revell tracks next to the level of detail on the superstructure so treated myself to a set of OKB tracks which are superb. Also adding a set of voyagers very nice etched grilles to add the finishing touch Will try and update when I can but might be a lengthy build as I don't want to rush. All the best Ben
-
Fordson WOT2D Van Body (MV135) 1:72 Planet Models by Special Hobby The War Office Truck, or WOT, was a series of vehicles designed by Ford of Britain during WWII, with about 130,000 units made overall. It started with the WOT1, a rear-wheel-drive truck with a 3.6L V8 engine, and the smaller WOT2, which became the most produced of the range with four wheels instead of six, but otherwise similar in design and layout. The WOT3 was a larger and heavier variant, and the last of the rear wheel driven range, the later versions designated WOT6 and WOT8 having four-wheel-drive to assist with rough terrain handling. As well as seeing service in large numbers with the British Armed forces, it was also sent to Soviet Russia under the Lend/Lease programme where it was used as transport, Katyusha rocket carriers, amongst others. The Kit This is a new boxing of a resin kit from Planet Models that was originally release in 2023, with new parts to depict the van bodied version of the truck, and it arrives in a white cardboard box with a large adhesive label showing the product details on the front and sides. Inside are three Ziploc bags, one containing thirty-two grey resin parts, another a 3D printed grey resin chassis, the final bag holding a Photo-Etch (PE) fret, decal sheet and a 6cm x 4cm sheet of clear acetate (not pictured), plus an A5 instruction booklet printed in colour with profiles for the decal options on the rear pages. The remaining space within the box is taken up with green packing foam chips, ensuring that movement during shipping and storage is minimised. Detail is crisp and of a high standard, the chassis being an extremely finely printed part. The model doesn’t include the engine, but the interior is well-appointed, and the details are augmented by plenty of PE parts inside and out. Construction begins with the bonnet, which has the firewall and instrument panel moulded-in, adding a detailed radiator to the front, the steering column inserted into the firewall, and the foot pedals as PE parts. The chassis is of course the base for the model, arranging the bonnet assembly, cab floor and load area floor sequentially front to rear, and further detailing the cab with PE steering wheel, handbrake and gear shifter, which you could ‘flesh out’ by adding a blob of super-glue to the top. The crew seats are applied to their bases either side of a stowage box in the cab, with fuel tanks under the floor, and stowage boxes just behind them, lowering the van body over the rear after making up the windows from acetate sheet, although they aren’t mentioned in the instructions. A fuel can and box are secured under the rear of the body with the rear bumper bar at the very back, mounting the four well-detailed wheels with moulded-in tread, hubs and sidewall texture onto the axles. A wire from your own supplies is used to link the two steering arms on the wheel hubs, and a fine exhaust system is fitted under the forward chassis, exiting just behind the fuel tank. Detailing the external bodywork is done mostly with PE parts, starting with the front fender that has PE supports, and should be braced with two differing widths of wire to make the cross bars, hanging a manual starter handle underneath in a recess. The back of the cab has the fabric roof glued in place, with an optional metal roof, trapping the acetate windscreen between two PE layers to create the frame, installing it in the space between the roof and scuttle. A pair of PE crew doors have their hinges folded in, and can be glued in place open or closed, leaving the wind to whistle through due to a lack of side windows. PE mudguards, number plate holders, wing mirrors, rear step, ladder, indicator stalks and a circular placard on the front right wing are all fixed to the bodywork to complete the detailing. Markings Both decal options are painted in olive drab with black cloud camouflage over the top in differing patterns. From the box you can build one of the following: Z2286314, RAF, England 1944 Postwar Service The decals are printed using a digital process and have good registration, sharpness, and colour density, with a thin gloss carrier film cut loosely around the printed areas. This means that the carrier film on their decals can be coaxed away from the printed part of the decal after they have been applied, effectively rendering them carrier film free, making the completed decals much thinner and more realistic, and obviating the need to apply successive coats of clear varnish to hide the edges of the carrier film. It’s a great step further in realism from my point of view, and saves a good quantity of precious modelling time into the bargain. Conclusion The WOT2 was almost ubiquitous in British service, so will make a useful diorama accessory, or you can build it as a stand-alone model, safe in the knowledge that this nicely detailed model won’t take up an awful lot of room in the cabinet. Highly recommended. Review sample courtesy of
-
Resin. Why does that word fill me - and I suspect others - with unease? Probably for the same reason the Vacform in "Multimedia kit: vacform, resin and white metal" does. Is it because I think resin is outside my box? Except .... I sometimes use resin aftermarket items, and don't appear to have had many problems with them. Nor, apart from from some wobbly cutting, did I approach the vacform sails in boat kits like HMS Victory or Cutty Sark (the airfix ones) that I built as an early teenager with any trepidation.. Perhaps it's a natural thing when mainly dealing with injection moulded plastic to view the guys who do things in resin and/or vacform as somehow more advanced modellers than you, just a weedy, injection moulded man.. But yes, I have just made a resin kit. My first one. To whit, the Magna Models Polikarpov ITP (M-1). Nope, I'd never heard of it before I bought the kit at the Gloucester IPMS show way back in 2019. Apparently it was a design for a heavily armed fighter, but it never got over a problem with the engine which wasn't able to give it the speed required. But for £6, surely the kit couldn't go wrong? Hmmmm .... Deafening silence. Before I go on to the finished model, here's a couple of photos of the box, and the resin, vacform canopy and white metal parts - the resin parts have been separated from the casting blocks. Now I'm not going to lie, making this kit was a touch problematical. That's because I failed to read the instructions properly. yeas, I know, but in all honesty, how many Britmodellers have done the same? What I would have seen in the instructions was a command not to cut the locating lugs off the wings as well as the casting blocks. Yes, you guessed, I cut the wing locating lugs off. So I got around that problem by using a brass rod pin going through the fuselage to pin the wings to the fuselage. Surprisingly, for me, that worked! Was there a next problem? Cutting the vacform canopy to size, perhaps? was there a reason why 2 vacform canopies were provided? Nope, the first canopy cut and sanded out of the excess quite easily. Anything else? Well, painting wasn't too bad; I gussied up the cockpit, painted some seat belts (not easily seen) and some attempt at an i/p, and used used Mr Masking compound around the wing root air intakes and wheel wells to give a pretty clean paint job there. There was minimal paint bleed under the masking tape on wings and fuselage, easily cleaned up. The canopy masking went fine. My word, this is sounding easy, isn't it? Actually, given there are only 21 parts altogether - 9 resin, 1 vacform and 11 metal, I think I can be excused thinking that I shouldn't have found it difficult. The minimal decals came from an old, long abandoned Mig 15 kit - Magna didn't supply any decals. Paints by Tamiya and Mr Color, varnishes by Windsor & Newton Galleria. Would I do another resin kit? I don't know. I know that there are some resin kits around (I do read reviews) which are more akin to injection moulded kits, but what I'm thinking of are the type of resin/vacform/white metal kits err .... like the whirlybirds Sikorsky S 51 dragonfly that's in my stash. Hmm .. maybe I'll give it a go, after I've retreated into my injection moulding comfort zone for a while!
- 8 replies
-
- 13
-
-

-
- Resin
- magna models
- (and 1 more)
-
Here is my latest kit: the MiG-31 Firefox of the 1982 Clint Eastwood film. It's the Anigrand 1:144 resin kit. Keeping in mind the discrepancies between the full-scale film prop and the "flying models", the kit has some inaccuracies, namely around the undercarriage. The nosewheel should have twin wheels and the bays and doors are wrong but I left well alone and only cut the nose bay door in a way that made it closer to what we see in the film. My only other modifications were replacing the WW2-type seat with one from a Revell/Mark I F-104 kit (chopped down a bit in height to fit) and adding a landing light to the nose u/c leg. One of the major discrepancies is the finish. The full scale prop was a dark grey colour whereas the flying models had a highly glossy or metallic) blue-grey tone. I found a comment of the prop designer in internet that stated that Clint Eastwood wanted the plane to be very shiny and that the plane was a dark blue-grey colour. I tried to get somewhere in between. I made some mixes and the final one was Tamiya Gun Metal with Medium Blue and Gloss Black (+ Vallejo Black when the latter ran out). I got a nice pearly dark blue-grey colour. The kit was fully painted by brush. The kit's painting instructions were fictitious so I tried to follow what I could make out from the film. The leading edge panels were painted Vallejo Natural Steel. The kit's decals were oversized so I used some from a Mark I red stars sheet and I placed them according to what I could make out in the ice floe scene. I applied a slightly gloss satin varnish (mixed from Vallejo varnishes) since a high-gloss sheen would look awful. Thanks for looking and all comments are welcome as usual. Miguel
- 15 replies
-
- 46
-
-
 PV-1 Ventura Cockpit, Nose & Turret Armament (4467 & 4469 for Revell/Academy) 1:48 CMK by Special Hobby It’s hard to believe that the Revell 1:48 Lockheed PV-1 Ventura was released as far back as 2011, but I’ve still got both of mine and haven’t built either, to my shame. It’s a nice kit, even by today’s standards, but as with all injection-moulded models, its level of detail can be improved upon by the application of resin casting, which is what CMK’s artisans have done. The two sets we have for review arrive in the familiar clear vacformed box, with the resin parts safely inside, and yellow-themed instructions sandwiched between the header card at the rear. Decals and Photo-Etch (PE) when included are separated from the resin parts by a clear piece of acetate to prevent scratching and damage during transit. Pilot Cockpit (4467) This set includes eighteen grey resin parts, two 3D printed control yokes, a small sheet of printed acetate instruments, a decal sheet with instrument dials, and a sheet of Photo-Etch (PE) that contains an instrument panel and seatbelts. Construction begins with thinning the cockpit side walls in a thick L-shape that matches the new resin inserts, which are glued into position once they are suitably deep. The rear cockpit bulkhead has the door support cut out, and this is glued to the cockpit floor, adding two instrument clusters in the centre, plus a throttle quadrant on a tall stand, adding eight PE levers into the grooves on top. Two resin control columns are mounted on the floor, and are topped with the 3D control yokes, and the crew seats are built. The pilot’s seat has a high back and arm rests moulded in, adding four-point seatbelts from the PE sheet, then mounting it on the bulkhead behind it on a pair of projecting supports. The co-pilot’s seat is less luxurious, with no arms, and utilising the kit legs to attach it to the floor, adding lap-belts to the completed seat, as we must presume that his head is of lesser value than the pilot’s even though he has full controls to fly the aircraft. The instrument panel is made up from layers, depending on how you prefer to create your panels, starting with the resin back plane, which has the instrument dial recesses moulded-in, and you have the choice of either decaling that, or using the acetate film and painting the rear white, adding the PE layer over the top after painting it. Alternately, you can mount the PE panel over the decal. It’s entirely up to you. The pilot’s rudder pedals are well-detailed resin parts and are suspended from the rear of the panel, as are the co-pilot’s pedals, although they are simplified L-shaped rods that mount on a cross-bar, one end of which fits into a slot in the rear of the instrument panel. The completed panel is glued to the central quadrant box, which is glued to the forward section of the floor. Nose and Turret Armament (4469) This set is well-detailed, but straight forward in use, replacing the kit barrels in the belly gunner and top turret positions. The belly gunner uses the rear portion of the kit part, supplanting the barrels with the twin perforated resin barrels provided in the new set. The upper turret is a replacement for the kit parts, consisting of the two barrels linked together, adding a pair of resin breech parts to the rear. The other barrels are for the two nose guns in the upper portion of the nose, which are straight replacements for the kit parts and add extra detail there. The three barrels under the nose are installed in a resin fairing, adding three angled shrouds to the fairing before inserting the barrels into them, taking care to align them all in the direction of flight and at the same angle. This fairing is then mounted under the fuselage within the lines detailed on the accompanying drawings. Conclusion A great and cost-effective update to the kit, with more sets available to upgrade the flying surfaces on the tail and ailerons. Highly recommended. Review sample courtesy of
 -
Hi all, My entry will be this Vickers Virginia - a hand-made 1/200 resin kit, produced by the late Chris Sayer (who traded as Shed Models). The kit comprises four impeccable resin parts, plus a selection of white metal bits for the engines and u/c. Noticeably absent are any struts or decals. The instruction sheet states that these were available as extras if required - a sheet of roundels was £12 (presumably containing more than just those needed for this kit), whilst an etched brass 'strut pack' could be had for £10. Unfortunately, the original owner of my kit appears to have declined these generous offers . I'll need to get some good drawings to sort out the struts. The Virginia entered RAF service in 1924, as a bomber replacement for the Vimy. It continued in front-line Squadron service until February 1938, when the last Virginias were replaced by Wellingtons, Hampdens and Whitleys. According to Wikipedia, other inter-war bombers, such as the Heyford, merely supplemented the Virginias, rather than replacing them. Over its long life, the Virginia was regularly updated and my kit represents the last (and most numerous), version - the Mk. X (roman numeral). The swept back wings and tail gun position are the give-aways. During the 1930s, Virginias found themselves being used for a number of non-bombing purposes including acting as tankers for the earliest in-flight refuelling trials and also as parachute trainers. For this latter purpose, 'jump platforms' were fitted to the lower wings. Fittingly, the final service role for Virginias was with the Parachute Test Flight at RAF Henlow, where they continued to serve until December 1941. And so Virginias ended their RAF careers in a fairly low-key way - but things could have been very different... Minutes from a committee meeting on 26th June 1940, record that consideration was being given to equipping Virginias with an equally obsolete COW cannon (37mm), for anti-tank work. Now that would have been something to see! Needless to say, it never came to fruition. I'll be finishing my Virginia as this aircraft from 214 Squadron in 1937. Cheers
- 48 replies
-
- 24
-
-
Ever had a "Nemesis" model or Kit? Ive had two,the He177 (Mpm and Airfix) and this huge resin kit I got about 300 years ago(Hyperbole much :),Late 90s),I think its been painted a least twice,and then re-primed and never finished,Well,Sod that for a game of soldiers,Am determined to finish it once and for all. * Wish me luck Im going in....................................................................... * Disclaimer \ may never get finished The protagonists The huge tree Im not sure but I think the sculptor,Simon Laurens may have realised too late he had the wrist blades on the wrong arm,so chucked in spare arms with the correct orientation,but it would decrease the dramatic effect so I stuck to the original plan Perhaps as a nod to the old Aurora kits the base has a snake and a spider on it,but I may cover with some foliage(oh,and a seperate frog Over the years its had a few knocks and bumps,and I will need to disguise the join with some Milliput work and foliage.While a bit rough and ready compared to the resin kits of today,its a true garage kit and not lacking in charm.
-
Border Model WWII Soviet Tank Desant Troops (BR-004) 1:35
Mike posted a topic in Diorama & Accessory
WWII Soviet Tank Desant Troops (BR-004) 1:35 Border Model via Albion Alloys Getting a lift on a tank was a treat for the foot-soldier that occasionally turned sour if their lift came under fire from an enemy tank, especially if the turret started to rotate and the crew began using the main gun. Sometimes they’d ride into battle on the back of a tank, using the turret as temporary cover until it came time to dismount, usually off the rear avoiding the exhausts, other times it was a case of sitting somewhere flat on the hull of the tank for a well-earned rest, and saving some shoe-leather whilst still getting from A to Battle. During winter periods, especially in the freezing cold of the Eastern Front, a seat on the warm engine deck would be prime real-estate, helping to defend against the biting cold that required heavy uniforms and great-coats. In Russian tactical doctrine, Tank Desant is the act of riding into battle on the back of a tank, dismounting at the point of contact with the enemy to act as suppression of infantry, anti-tank artillery, or troops equipped with portable anti-tank weapons such as the Panzerfaust or Panzerschreck. The tactic persisted into early Cold War Soviet tank combat but has long since fallen out of use. The Figure Set This set of five resin figures arrives in a small rectangular box with a rendering of the figures in isolation and in position on a tank from behind. On the rear of the box is a picture of the box art of the T-34/85 kit from Border that this set is designed for, and if you haven’t got one already, you can pick it up by using the code BT-027 as your search term. Inside the box the figures are individually bagged in Ziploc bags, all surrounded by an additional bubble-wrap bag that is stapled closed, fitting snugly inside the box to reduce movement during shipping and storage. Each figure is cast in a dark bluish grey resin, the body of the figures cast separately from the arms, heads, and weapons. There is a number between 10 and 14 scratched on each of the casting blocks, but these will be lost when the parts are removed from their blocks, so bear this in mind during construction and keep the loose parts together with their body until you are ready to glue them together. Each figure has a separate head, arms, and weapon on the extra casting block, with square mounting pegs assisting with location of the parts on the body. Three of the figures are sitting down, one is kneeling, and the fifth is standing, resting one hand on the side of the tank’s turret, presumably peering into the distance to ensure they aren’t yet in range of the enemy. Parts breakdown is sensibly placed along clothing seams or natural breaks to minimise filling once they are built up. The sculpting is excellent, by Jason Studio, who are a common collaborator with Border Model, with natural poses, drape of clothing and textures appropriate to the elements of the figures and weapons. They have been mastered by 3D printing, and some fine layer lines can be seen on the surface, but they should disappear under primer and subsequent layers of paint. Conclusion A great addition to any Soviet tank to give it human scale, especially the T-34 that’s suggested, but the poses are generic enough to allow them to be used with anyone’s kits. Casting is excellent, and does the sculpting justice. Clean-up should be a breeze, making it quick & easy to get quality resin figures on your model or diorama. Highly recommended. Available in the UK in all good model shops. Review sample courtesy of -
 Hi all, as my Curtiss Seahawk nears decaling, I thought I'd take a look at a racer. So here is my next build, a Wedell-Williams Model 44 Racer by Dekno in 1/72, I have never built anything by Dekno, a producer resin kits of racers, Golden Age aircraft and subjects from the Spanish Civil War> I have a couple of resin kits under my belt and thought I'd give this little guy a go. The box. The resin. The decals and instructions. The instructions are one sheet, smaller than A4, one side for the build process and the other for decal placement. I don't think the build will give me any grief (that's done it) but I foresee problems with the painting and decals. The problem is the gold in that, I have to paint some parts gold and they've got to match the decal gold . Hopefully start this soon. Stuart
- 58 replies
-
- 16
-
-
This new model looks great. Anyone have any other details on it? https://www.monstersinmotion.com/cart/item-list-fj-c-13_192/fireball-xl5-16-inch-model-kit-with-launch-ramp-p-16524.html
- 1 reply
-
- 2
-
-
- Fireball XL-5
- New Model
- (and 1 more)
-
Well this will be something very different and an extended WIP... The kit is the latest creation from Flying Start Models, AKA Tim Perry. It truly is a work of art as is reflected in the price😬, but where else are you going to find a 1:32 Mk3?😉 I'm sure this kit will be of interest to anyone who came through the ATC(Air Cadet) system in the 50s-80s and will bring back many memories! I first bumped into Tim at 621 VGS based at Hullavington at the time. I'm a member of the Historic Flight and we have a fleet of ex ATC gliders ranging from a Grasshopper through the Mk3, Sedbergh, Prefect, Swallow and a Clockwork Mouse, the Venture! Tim arrived for a flight on his motorbike and as I was there with mine too we immediately got into conversation. I took some pics of his flight in the Mk3(AKA Slingsby T.31) and things progressed from there via Facebook. Fast forward a few years and he announced he was making a kit of the Mk3, and not just any Mk3, but our aircraft😍. So of course I had to have one... It took until march to come onto the market but it's available now: http://flyingstartmodels.com/Flying-Start-Models-Collection.html Tim is actually improving things all the time and a new tailplane and harness set are now available and the latest version of the instructions/paint schemes are currently being updated as I write. The kit is available with decals to enable you to model ANY of the aircraft that were produced for the ATC, so you can make your very own personalised version😀, with colour charts for the old silver and yellow training scheme and the later red/white/black colours. If you click on the link above you'll find a link in the text to download the instructions including the colour options. The main 'problem' wit this kit is that it's in resin not 'plastic' however Tim has done his absolute best to make everything fit perfectly and look as close to the original as possible. All parts come still attached to the 3D printing webs which resemble the scaffolding for a roller coaster! The amount of work to get all this to work is mind boggling... The instructions include comprehensive hints and tips for those of us who've never built a resin kit before, so don't feel too intimidated. You DO have to be very careful though as the resin is extremely brittle, but Tim assures me that if you break anything he'll replace it. Anyway, enough rambling and to work... The kit comes in a surprisingly small but perfectly packed flip top cardboard box with plenty of bubble wrap. I started with the fuselage which comes as previously described with its own rollercoaster frame which has to be clipped away bit by bit. Very sharp nippers are a must and leaving a little nub on the surface of the model seems to work best rather than cutting right down to the skin so to speak. The frame is 3D unlike a 'normal' sprue which is basically flat so this requires a bit of thinking as to where to start and which bits to cut next, but you'll get the hang of it😉 Actually the first bit of modelling starts with the cockpit. This is basically the same principle as any aircraft model; You start with the cockpit floor and work up. Individual parts for the seat bases, sticks, bulkheads, seat straps, and instrument panels are provided. There are even instrument(such as they are in a Mk3😁) decals and cockpit placards! The decals seem of extremely good quality. I'm still getting the hang of superglue and I suspect I need to invest in some proper modelling stuff rather than the stuff you buy in the DIY shop; It's all a steep learning curve for me! I managed to snap off the joining bar between the front rudder pedals bit got them to stick in the right position anyway🙄
- 6 replies
-
- 2
-
-
- 1:32
- ATC Gliding
- (and 1 more)
-
This started as the RugRatResins Viscount 700 and the fuselage had to be shortened in the wing root area and the wingspan reduced at the wing root. I made a master for the engine nacelles and vacformed the left and right halves. New main undercarriage was scratchbuilt and consists of two legs either side of each jetpipe. Painted with Alclad and dulled down a bit with a clear coat, the decals were drawn in CorelDraw and printed at home. 9 Thanks for looking. Steve
- 21 replies
-
- 60
-
-
-
- RugRatResins
- 1/72
- (and 1 more)
-
Time to start another one - the Alley Cat resin 1/72 Gannet AEW.3. Obviously there's the injection moulded kit from Sword, but this was an irresistible bargain on a local Facebook group so I'm going down the resin route this time. Here's what you get in the box: Nicely cast resin, small parts in white metal and PE, and a decal sheet with four marking options. I've started removing parts from casting blocks and priming a few of them - hopefully I'll have something worth sharing tomorrow. cheers Julian
-
 After the unmitigated disaster that was my first resin kit, I have decided to dip my toe into the water again with another one - hopefully this will go together much more nicely! It's the 1/72 VFR models Grumman AA-5 kit, designed and produced by @Bangseat. This is an aircraft that I used to fly in the late 1990's, when I was working as a flying instructor. I will paint it as "G-OMOG", an aircraft operated by Solent Flight at Southampton airport - here's a photo of the aircraft, copyright Simon Palmer: It also has the benefit of being a simple livery to replicate - solid colours and basic design. Many other AA-5's that I flew during this time had metallic paint and complicated designs - I'm taking the easy option here! So what's in the kit? Let's start with the box, which is very sturdy, top opening and has some good graphics: As you can see, four decal options are supplied, the one for G-ODAM will make a great template for my own decals, which will need producing at some stage: The parts come in several in several bags, with multiple pieces for the different variants: And an instruction sheet, showing the various different variants that can be built: First impressions are very promising - I'm looking forward to this!
 -
Hello everybody don't really know myself what got me into buying this general shape of resin supposedly representing the best!"! availabl 1/48 model of IAI attempt to challenge the F-16s reign over Israel in the late 1980s I already learned quite some things, e.g. that it was not powered by a PW-100, but a smaller version (GE-404 sized), also intended for the IAI Super Phantom, the PW 1120... all in all based on the F-16, but way smaller!! - interesting-!!! so, here it is, not "extremely" detailed or symmetrical (port/ starboard) etc... any good ideas on how to tackle it? decals look good at least! so here is what I have got an d my best attempts to align the fuselage , and also fit the cockpit section into place F-16 style intake, also fits nearly perfectly relatively nice PW-1120 with the characteristic sectioned petals so again, any ideas apart form the bin would be very welcome! Best, Werner
-
As my workbench is getting empty again, I have decided to start a new kit and build another model of an aircraft I have flown. This time it is the turn of the ATR-72, which was the first aircraft I flew when I became an airline pilot for Cityflyer back in 2000. This kit will be my first foray into the world of resin, which is a completely new material for me to work with. All I really know is don't inhale the dust - is there anything else important I should know?! The kit is the 1/144 offering from F-RSIN. Here's the obligatory box shot: The contents inside look a little sparse - decals, fuselage, wings, flap fairings, tailplanes, engine nacelles, propellor sections and undercarriage components: I'm hoping this one will go together quite quickly! At some point in the past I have applied some filler to the fuselage, which is dotted with minor pinholes - apart from that, the kit is untouched. My first job will be removing and cleaning all the components, followed by filling and sanding.
-
Next and probably last build in this GB for me is the Piaggio P.166DL-3 in 1/72, using the Cunarmodel resin kit. I've had a bit of a thing for the P.166 and its turboprop variants (I also have a thing for turboprops. Maybe it's that all the flights I took until the age of 8, and most of them after that, were on turboprops) since I saw this one at Fairford in 2005: How could I not love this aeroplane? Quirky doesn't come close. It's got gull wings, a shark mouth, and not only does it have turboprops but they're pointing the wrong way! Somehow Tamiya, Eduard and so on seem to have overlooked this classic, surely it would have flown off the shelves! The only kit seems to be in resin, from Cunarmodel, and it's almost as rare as rocking horse excrement. I say almost, because I actually managed to buy one, and at a not-exorbitant price as well. Here it is: Quite crisp resin, although not the most finely detailed ever it's good enough for 1/72. Almost complete lack of clear parts, apart from the strange vac formed shape that seems to be intended to be the windscreen. Not pictured here is the small decal sheet for the same aircraft I saw at Fairford 18 years ago, and a very basic instruction sheet. This should be fun! more soon Julian
- 24 replies
-
- 13
-
-
- Cunarmodel
- 1/72
- (and 1 more)
-
a.thumb.jpg.58d92d116b0315dc55d352fd191d65e4.jpg) Here is the first of at least four intended models of the DC-8. It is a DC-8-52 flown by Air New Zealand. It was only used for a little longer than one year, because this aircraft was then destroyed in a training accident. See more here: ZK-NZB Douglas DC-8-52 (aussieairliners.org) The kit is a resin kit by Kurt Lehmann's Authentic Airliners with decals by Nick Webb (classic airlines). The white was painted with Mr. Hobby by Gunze, the metallic surfaces with different shades of MiG Ammo and AK polishing paste and some powders. Hope you like it! Greetings from Germany, Norbert
Here is the first of at least four intended models of the DC-8. It is a DC-8-52 flown by Air New Zealand. It was only used for a little longer than one year, because this aircraft was then destroyed in a training accident. See more here: ZK-NZB Douglas DC-8-52 (aussieairliners.org) The kit is a resin kit by Kurt Lehmann's Authentic Airliners with decals by Nick Webb (classic airlines). The white was painted with Mr. Hobby by Gunze, the metallic surfaces with different shades of MiG Ammo and AK polishing paste and some powders. Hope you like it! Greetings from Germany, Norbert -
I will joining the GB with a 1/35 resin kit of the TNH 57/900 from StahlhelmModels. Designed in 1949 the TNH 57/900 was the last project from CKD-Škoda based on the TNH/38(t) design, they were hoping that it would attract export sales like the original TNH tank had before the war but no one was interested & none were built. The kit comes with metal barrels, plastic link & length tracks taken from some other kit, but most of it is resin & needs a lot of clean up (pic from their website). I'm currently finishing up a build, once I'm done I'll unpack this kit & get some photo of the parts.
-
Hi to all sorry if it’s in the wrong area but the other areas are not available to me and perhaps it has been asked before sorry. Aftermarket resin parts come with blocks of extra resin moulded to parts like ejection seats or clock cluster and I was wondering how do other model builders separate this from the useable part. What knives or saws or procedure is best practice. Thanks in advance.
-
 Hi everybody, Hope this is the right spot where to post this but, surfing through the pages of a Facebook publication the other day, I came across this excellent rendering of the good-old Fokker F-28 Mk1000 kit in 1/72nd scale I thought I'd share here with you. These are some takes of the resin works: So far, I've only learnt that the medium is resin, and that the author offers different versions for decals. Apparently, versions are just for the aircraft in the service of the Argentine Air Force, the Armada and Aerolíneas Argentinas airline. There seems to be an option for deployable flaps as well. Some additional takes on the finished kit in the different services: Last, I dunno what the kit exact dimensions may be in 1/72, but here's a good comparison for those of you who know what the F-28 dimensions are in 1/144th scale Unfortunately, it's not my scale, but if you're interested, and you're a Facebook user, you might ask Juan Carlos Domizio about price and shipping quotes at his page here Wish Juan Carlos would upscale this kit to 1/48. Hope you like it. Cheers, Igna
 -
Hello, First try at aircraft since I was a kid (a long time ago!) I usually do ships, but came across some 1/144 resin British aircraft at Telford last year from https://www.144th.co.uk/ Picked up a Buccaneer and a Lightning. Lovely kits, great quality and very nicely detailed. Only extra bits I added were ejection seat handles, seat belts from odd bits of etch, a piece of acetate sheet to represent the 'hood' over the navigators position s the kit part is necessarily quite heavy, and some bits of etch and wire to replicate the wing folding mechanism. I need to work on my aircraft weathering!! This is the Buccaneer ready for inspection; Ejector seat handles from 0.2mm copper wire; Wing fold mechanism from spare etch and wire; Thanks for looking and any feedback gratefully received. Cheers Nick
- 10 replies
-
- 43
-
-
-
Hi I don't normally do build diaries but I just wanted to see what you guys think. Here is just a little insight into a WIP I'm looking at doing soon, I’ve wanted to build the Defender from the tv series Death in Paradise for some time so I brought the Revell Land Rover to look at doing after my next project. But last week our JRT passed away very suddenly, so I needed something to destroy and something to keep my mind from wondering, so I dug this out and a 1/24 metal version I had (hence the destruction). So heres some photo of what I’ve done over the weekend to try and convert a Land Rover into a Defender, please leave feedback good or bad was to what you think. Kit I'm going to use The donner kit that I took apart.