Search the Community
Showing results for tags 'Warhawk'.
-
 I suppose just in order to annoy the soon to release Special Hobby kits, Legato is to release a serie of 1/72nd - Curtiss P-40E Warhawk / Kittyhawk Mk.Ia kits. These will be repop of the old AZmodel kit with new decals, masks etc.. Source: http://www.modelarovo.cz/velky-doprodej-info-z-kpaz/ V.P.
 -
Special Hobby is to release a family of Allison engined 1/72nd Curtiss P-40 Warhawk kits from P-40E to N. Source: http://www.specialhobby.net/2017/02/info-z-norimberku-no2.html V.P.
- 217 replies
-
- 14
-

-
- Warhawk
- Special Hobby
- (and 1 more)
-

Eduard P-40E SPACE (3DL48208 for Eduard) 1:48
Mike posted a topic in Aftermarket (updates/conversions)
P-40E SPACE (3DL48208 for Eduard) 1:48 Eduard Hot on the heels of Eduard’s newly tooled P-40E Warhawk kit in 1:48, this new SPACE set will give the modeller a premium cockpit upgrade that can be accomplished with minimal effort. The set uses new 3D printing techniques that lays down successive layers of different colour resin, creating highly realistic almost full complete panels that are supplied on a decal sheet. They can depict metallic shades, plus glossy, satin and matt colours too, which really ups the detail on everything they print. In addition, a small sheet of nickel-plated and pre-painted PE is included for the aspects of the set that lend themselves better to this medium, such as seatbelts and rudder pedals. The first decal depicts a dial mounted on the cockpit floor in the pilot’s eyeline, followed by a three-part replacement for the kit's instrument panel, which includes a panel that fits over a blank spot on the main lower panel in the top right. The sidewalls have small areas of styrene removed that are marked in orange, replacing them with new decals that portray dials, switches, and a large document pouch, with a choice of two layouts to the starboard wall, depending on which kit part you are using. The PE sheet includes a full set of four-point harnesses for the pilot with a comfort pad under the lap buckle, using the same parts for either of the seat designs that are provided in the kit. Highly recommended. Review sample courtesy of -
Curtiss Tomahawk Mk.II (A05133A) 1:48 Airfix First flying before the outbreak of WWII, the Warhawk was a development of the P-36 Hawk, and although it was never the fastest fighter in the sky, it was a sturdy aircraft that served during the entire length of WWII in American and Allied hands, with many Lend/Lease airframes used by Soviet pilots in their battles on the Eastern front. The various marks garnered different names such as Tomahawk and Kittyhawk, so it can get a mite confusing if you're not familiar with the type. It couldn’t quite keep pace with the supercharged Bf.109, but was used to great effect in the Far East and Africa, which may have assisted in the feeling that it was a second-string aircraft of inferior design, when this really wasn’t the case – certainly not to the extent inferred. It was robust, cheap to make, and easy to repair, although its high-altitude performance dropped off somewhat with an Allison engine providing power. The early marks were under-armed with just two .50 guns firing through the prop from the top of the engine cowling and a pair of .303s in the wings, but later models benefitted from improved armament and engines. The B model was a revision of the initial airframe with lessons learned from early production, self-sealing fuel tanks and armour in critical parts of the airframe, although this extra weight did have an impact on performance. It wasn't until the –F model that the Allison engine was replaced by a license-built Merlin that gave it better high-altitude performance, and these were followed by the L, which was a stripped-down variant that was lightened to give it extra performance, receiving the nickname Gypsy Rose Lee as a result, although the weight-loss failed to give it the boost to speed that it needed. In British service the 330 Lend/Lease airframes were known as the Tomahawk Mk.IIA up until the final hundred airframes to differentiate. The Kit Originally tooled in 2016, this is a welcome reboxing in British and Turkish service, the latter after finishing service with the RAF. The kit arrives in one of Airfix's standard red-themed boxes, and inside are three sprues of grey styrene, plus a clear sprue, a decal sheet, plus of course the spot colour instruction booklet that also has the painting and decaling guide on the rear in colour. A look over the sprues shows some nice detail, with engraved panel lines that should look good under a couple of coats of paint and primer. You get a nicely detailed cockpit, a pilot figure with separate arms, the option of open or closed cooling flaps under the engine cowling, raised or lowered landing gear that use alternative parts for the legs, tyres and doors, and a choice of open or closed canopy. Construction starts with the cockpit, which is built up on a detailed portion of the centre-section of the wing, showing the front of a fuel tank behind the pilot's seat, a detailed front bulkhead, and a pair of side walls that have a latticework of ribs and stringers on which the various ancillary controls are suspended. The instrument panel is slotted into grooves in the sidewalls, and a decal is included to represent the dials, with no background colour to complicate the painting process. The optional pilot figure is a squat fellow with separate arms, and should fit within the cockpit without any adjustment, but test that hypothesis before you get too far with the build. The fuselage halves have ribbing moulded-in, and these are a few necessary ejector-pin marks that might need work if you think they’ll be seen, which they probably won’t in this boxing. There is an oddity after step 13 in the instructions where you fill the side hatch with a blanking plate, but step 14 shows a camera mount in red, which isn’t used in this boxing, although the parts are still found on the sprues. The cockpit interior is glued into the fuselage whilst upside down after inserting some small clear parts at the lower rear by the wing root, and once the glue has cured, a bulkhead that has the mesh texture moulded-in for the chin scoop are added, terminating with a nose-ring at the front. This then allows the fuselage halves to mate firmly, after which the final part of the chin-scoop ducting is added at the tip of the nose. Two sections of supporting sprue are left in the nose until this point, to give the assembly more rigidity before it is complete, cutting them out when the fuselage is glue is cured to accommodate the gun-trough inserts and fairings. The large wing root fairings are moulded as separate parts, and are added to the fuselage before the wings are built up, slotting into a keyed area on the sides. The lower wing is full span as you would expect, and into this is placed a single part that performs the combined task of providing the fabric-lined wheel bay inserts and a tunnel between them that adds structural rigidity to the wing. Two flashed-over holes are found in the centre of the lower wing to facilitate use of a stand that’s sold separately if you’re so minded, drilling them out at this stage. The assembly then slots into the bottom of the fuselage leading-edge first, engaging a pair of tabs into the corresponding slots, which should make for a good strong joint. The upper wings and the "kneecap" fairings of the landing gear bays are then added, as are the separate elevator fins, their flying surfaces and rudder, which are single parts and posable. The instructions give you maximum deflection angles for each surface, which will help you get them looking right. A choice of open or closed cowling flaps under the nose is next, simply by choosing the appropriate part, each option having a side-profiles to assist with location. Next you need to choose whether to model your Tomahawk with the wheels up or down, which affects your choice of parts for the next few steps. Wheels up includes a closed tail-wheel door, partial depth main wheels and main struts, plus closed bay doors that cover the struts only. The gear down option has single-part struts, and open bay doors that fit into place with good-sized contact areas and a separate V-shaped retraction jack. The wheels are separate from the hubs, and have a slightly exaggerated flat patch at the bottom to simulate the weight of the airframe on the tyres. The prop is supplied as a single part that fits into a four-part spinner and axle with surround at the rear that glues into the larger hole in the front of the fuselage, and requires you to be careful with the glue if you want to leave it rotating. The wing-mounted guns are used for one decal option, and sit in their respective slots, filling the holes for the other option. The exhaust stacks are slotted into grooves in the sides of the cowling, and a cranked pitot probe slots into a hole in the port wingtip. The final task is to fit the pilot's armoured glazing panel before adding the windscreen, and the scalloped rear-view panels that cause so much confusion over the colour of the panels behind it. Then you have a choice of open or closed canopy parts that differ slightly in width, after which you're done. Markings There are two markings options on the sheet, one in RAF and the other in Turkish service, as previously mentioned. From the box you can build one of the following: No.1686 Bomber (Defence) Training Flight, RAF Hixton, Staffordshire, England, 1943 Ex-RAF, allocated to XIV Battalion, 2rd Regiment, Turkish Air Force, 1941 Decals are by Cartograf, which is a guarantee of good registration, sharpness and colour density, with a thin gloss carrier film cut close to the printed areas. Conclusion This is a welcome reboxing of the kit, and it’s good to have both a British and Turkish decal option to choose from. Detail is just as good as the original, and Cartograf decals are always top-quality. Highly recommended. Review sample courtesy of
-
 This is Amtech's 1/48 P-40E Warhawk, built as Colonel John S. Chennault's 'Bengal Tiger' P-40E, Adak, Alaska. Every one of the 11 FS, 343 FG aircraft had a slightly different 'Tiger' head, and the fuselage stripe on some leaned backwards, some forwards! (and, yes, they DID have the blue surround on the star!) Built with a resin cockpit, wheels, seat, photo etch gunsight, a homemade vacuform sliding canopy, and the addition of a winter kit, (the scoops ahead of the exhaust, and the exhaust pipe blanking plates covering the openings). The Superscale decals turned out to be traneslucent, requiring careful masking and repainting of the Bengal Tiger head and spinner. Thanks for looking, Colin
 -
Greetings. The model was assembled several years ago. The old kit from Special Hobby was not easy to assemble, the contents of the cockpit are not true, empty landing gear niches, empty air ducts that are saturated in the P-40, and so on. Some castings are unsuitable in detail. I couldn’t find any third-party add-ons for the set from Special Hobby. Therefore, the modification work was not easy - in addition to significant modifications of my own, I used a lot of etched and resin products for other sets that had to be adapted for Special Hobby. Acrylic painting. Bottom surfaces are Tamiya Neutral Gray. The upper surfaces were first painted with “Olive drab” from Gunze, and on top of it – “Tan” from the same Gunze, after which “shabbyness” was done to the bottom color using “Worn effects” liquid from AK. *Sorry for the automatic translation
- 12 replies
-
- 51
-
-
- p-40
- Special Hobby
- (and 1 more)
-
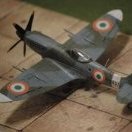
 This is the well-loved Airfix Hawk 81-A-2 of the AVG in China, around 1941. Built mostly OOB with the addition of Infini Model Aero Rigging 0.055 mm for the radio antennas. Only fit issue was a large gap (around 2mm) along one of the wing roots. Otherwise, the kit has nice and delicate recessed details and is sharply molded. Mr Color and Tamiya paints; AK enamel wash, Abteilung 502 and Mig Oilbrushers oils, and Tamiya pigments for weathering. I wanted this thing to look really beat up, so I took the plunge and tried my hand at weathering the decals, coming at them with all manner of sharp implements. Likely overdone, but it was a fun learning experience. Thanks for looking!
 -
Thanks to the two-week extension to the GB, in a moment's insanity I thought I'd break out another of the Matchbox classics I bought in readiness. This time it's the P-40N Warhawk, another one that I built as a nipper. I remember back then being particularly pleased with how I sanded the bomb to better emulate the box-top painting without breaking the percussion detonator It's going to be entirely OOB, unlike my Buffalo which I'm trying to "improve", and hopefully I'll be able to use the original decals, too! I never liked the skull marking, so as a youngster built the RAF version; this one will be the same. So, box and sprue shots: I can't remember the sprue colours of my original kit, but I don't think it was this particularly gopping combination! And a start has been made The wing panels have been assembled: I removed the location pips as it allows the lower panels to sit more snugly. I've also fitted the seat and rear cockpit coaming to the port fuselage half, using the starboard half to ensure alignment, and fitted the "stick" to the seat: I *might* add some semblance of interior detail from strip and bits and bobs. I'll also cobble together an IP, and add a fillet behind the coaming. Debate is raging over wheels up or wheels down. As a youngster, all my 'planes were wheels up as they were suspended from my bedroom ceiling. I never used the stands. However, I'm going to put the Buffalo on its Matchbox stand, and I'm tempted to do the same thing here. Anyways, onward and upward, and thanks for looking in Cheers, Mark
-
My latest build is a 1/72 Academy P-40N built as "Miss Frances III" 10AF 80FG 89FS based out of Nagaghuli, Assam, India - The Burma Banshees. Despite it's performance limitations the P-40N held its own in Africa and Asia. I have always liked the skull head nose art of the Burma Banshees. My previous Hasegawa build fell and broke and I decided to build the Academy kit this time around and hope to make a few more of these. Having now built the Hasegawa P-40N and the Special Hobby P-40F (which was surprisingly lacking), I found the Academy kit far better to build. I am not sure dimensionally which is more accurate but the Academy wins in my book for how well the parts went together. The instructions funnily leave out a part which is on the sprue but I did add it. The carpet monster got the pitot tube and till I can find it a metal pin will hold the fort. Paints are all Tamiya (Olive Drab and Neutral Grey) though I have started getting more partial to Vallejo Air. I gave it a Tamiya wash before sealing with dull coat. The decals have been cobbled together from three different sheets but the differences are too subtle to make out - at least for me. Thank you for stopping by. Comments are always welcome and makes one get better at the hobby 🤠 Thank you for looking!
- 19 replies
-
- 36
-
-

-
- 1/72 Academy
- P-40N
- (and 1 more)
-
 P-40K/M/N Warhawk Late fishtail Exhausts (Q72396 for Special Hobby Kits) 1:72 CMK Quick & Easy by Special Hobby Exhausts are one of the things which look a great deal better in resin than injected plastic. Here the exhaust stubs are in pairs and must be added to their manifolds, a little fiddly in this scale but well worth the effort. The parts are very well cast. This set arrives in CMK’s Quick and Easy green backed envelope. it requires minimal clean up from the small casting blocks. This will add something extra to your Warhawk. Review sample courtesy of
 -
All, This question has probably been asked many times before, however I cannot seem to locate a recent thread that will answer my query (Happy to be re-directed if one is out there). So from all the current 1/72 P-40 Kittyhawk kits out there, which manufactuers produce the most accurate shaped P-40 E/M & N kits? I've collected duplicate copies of both the Academy P-40E & P-40M/N kits over the years, however now that I've purchased the excellent DK decals sheet and getting stuck into the research side of things, it would appear that these nicely moulded kits are perhaps not as accurate (shapewise) as they should be. I'm not too concerned over cockpit detail, so am happy to trade this for something that looks correct. I'm also keen to build more that one of each type, so do not want to really spend GBP15-20 (AUD30-40) for each kit. Perhaps I'll answer my own query and suggest that the good old Hasegawa kits are still the best available, however is there anything else out there on the market (price-wise that can compete with these old kits? Thanks for reading and/or answering my query. Cheers .. Dave
-
Despite the "New tooling" indication Academy is to rebox the Mauve 1/48th Curtiss P-40N Warhawk kit under - ref. 12341 Source: https://academypm.cafe24.com/09_site/2021_academy_catalog.pdf Box art V.P.
-
I fear quarantine has finally caught up to me and left me fit for the madhouse. While I finish tracking down the paints for a 1/72 Texan in Brazilian Markings courtesy of Tim and finish painting a 1/72 Mustang in Guatemalan Markings courtesy of Herb, I've decided to crack into what I expect will be a years-long endeavor. Having recently done more reading on the later marks of the ever-beautiful P-40, I came across a few more photos of the TP-40 models, both K and N, and somehow decided making a TP-40N starting from the Academy kit didn't seem all that difficult. So then, of course, I chose to make it difficult. And expensive. And time consuming. As only a modeler could. I stumbled back across Super Model of Polands fine website and began to take inventory of just how much aftermarket I could work into the build, from flaps and gear doors to engines and radios, and even bomb racks and machine gun bays. With some wheels, stencils, and control surfaces for good measure, I've gotten to work. Now I just need new cockpit parts, exhaust pipes, pilot figures, and resin wheel bays from Aires. Perhaps a new pitot and gun barrels will even find their way to the bench. PART flaps were chosen because they're vastly more detailed (and easier to use) than the ones Verlinden provide. Seeing a Hasegawa P-40N for cheap, I picked it up to make use of some of the leftover parts from the Verlinden set that won't find their way into this build, as a dry run to get more experience with resin and PE. Expect to see that in an Olive / NG Brazilian Scheme eventually. Once the Academy kit arrives, I'll be able to make more visible progress than just cleaning resin parts and opening access panels. For now, the parts: Wish me luck! Stay Healthy, Tweener
- 10 replies
-
- 3
-
-
- Conversion
- P40
- (and 1 more)
-
Curtiss P-40B Warhawk (A01003B) 1:72 Airfix The Curtiss Hawk 81-A-2, known in US Army Air Corps service as the P-40B Warhawk and in RAF service as the Tomahawk Mk. IIA, was a single seat fighter based on the radial engined P-36 Hawk and first flown in 1938. The P-40 series went on to be amongst the most produced US fighters of the war, with more than 13,000 rolling off the production line. A popular aircraft with its pilots, the P-40 earned a reputation as a manoeuvrable yet tough aircraft. The Kit This was a new tool for Airfix back in 2011. The kits 47 parts are split across 2 light grey sprues and one small transparent sprue. The quality of the mouldings looks very nice indeed; as you would expect from a newer tool there is no flash present and there are no sink marks. The panel lines are crisply rendered and, although they are quite deeply engraved, they are certainly not too broad or ‘trench like’ and I imagine the majority of modellers will be very satisfied with them. The surface of the plastic is also smooth and glossy as opposed to the slightly textured finish that has featured on some recent kits from Airfix. From the layout of the sprues it would appear that slide mould technology has been used to create the hollow intake on top of the engine cowling too. Cockpit detail is comprised of a floor, instrument panel, seat and control column. The instrument panel is devoid of raised detail as a decal is provided to represent the instruments instead. The cockpit sidewalls feature convincing detail, the majority of which is embossed into the sides of the fuselage rather than standing proud. The lower wing is moulded in one piece and the main gear wheel wells are moulded with convincing depth and detail. Two different main gear wheels are provided – a pair of nicely weighted wheels for the undercarriage down option and a pair of thinned wheels for the undercarriage up version. The tail wheel is moulded in one piece and the fabric cover for its bay is very nicely represented. Two types of radiator flaps are provided, giving the modeller the choice to pose them open or closed. The tail planes are perhaps the one area of the kit where the panel lines are too pronounced, but by happy coincidence this would be the easiest area to rectify should you so wish. The rudder is moulded separately to the tail and can be posed in a deflected position – a nice touch for a relatively simple series one kit. The exhausts are moulded separately to the fuselage and can be dropped in at the end of the build, which will make painting these parts much easier. The transparent parts are beautifully thin and clear, so much so that it’s a shame that the sliding canopy is moulded in one piece with the windscreen as it can’t be posed open without some surgery. Decals A small decal sheet from Cartograf (so you know the quality is there) provides decals for aircraft only. 284 from the 6th Pursuit Sqn, 18th Pursuit Group Wheeler Field, Hawaii December 7th 1941 Conclusion As with other recent releases from Airfix, this is a great looking kit that features nice details and a host of clever little touches. If the fit and engineering of this kit is up to the same standard as their other recent kits then this will be a very buildable little model indeed. This kit can be firmly recommended. Review sample courtesy of
-
 Hi everyone and hope you and yours are safe and well. Over at IPMS Ireland, we've an 'All Asian' GB running since the lockdown started and this is my entry, Trumpeter's P-40B in Flying Tigers scheme. The build thread is here if you're interested but to recap.. Kit: Trumpeter P-40B Warhawk Build: OOB except for masking tape for the belts Paints: Revell Acrylics with an airbrush, Klear, Flory Models wash, pastels, W&N Matt Varnish Decals: From the kit I've read about some accuracy issues with the kit (cockpit depth, radio hatch) but I just wanted a relatively quick build and this was great - lovely fit and detail and the decals were great too. Trumpeter P-40B_done (2) by Dermot Moriarty, on Flickr Trumpeter P-40B_done (3) by Dermot Moriarty, on Flickr Trumpeter P-40B_done (6) by Dermot Moriarty, on Flickr Trumpeter P-40B_done (8) by Dermot Moriarty, on Flickr Trumpeter P-40B_done (10) by Dermot Moriarty, on Flickr Thanks for looking and stay safe. All the best, Dermot
 -
Hi, Concerning those P-40's defending Pearl Harbour I wonder if the edge between the green and the grey was hard edged or soft edged? https://www.victorymodels.com/products/wolfpack-1-48-decal-p-40-warhawk-part-1-pearl-harbor-defenders-at-dec-7-1941 Cheers / André
-
This is my first entry to a group build but as I had just picked up the kit on eBay and intended to build it straight-away it seemed logical to join the build. The kit is the Hasegawa 1/32 P-40E Warhawk and at this point in time I'm not sure what markings I'm aiming for. The kit provides a Dark Earth/Dark Green P-40E 'Texas Longhorn' in New Guinea in 1942 and a China based aircraft in similar markings. I've got some old Superscale decals on order for Texas Longhorn and I'll have a look at those before choosing the final scheme. Anyway, here's the kit: With it I also got the new Eduard Look set with an instrument panel and seatbelts. I haven't used one of these before but they look great. There'll be some more resin and brass before we start building along with the inevitable mask set.
-
Greetings folks! Here is my entry for the GB Italieri's reboot of the AMT kit with lots of choices of markings. I have still to decide if i will do an M or an N model, which will ultimately depend on what markings i choose. Looking forward to getting going. TFL Greg
-
Hello everyone, finally a GB I was waiting for, with my favorite fighter. I will be working on Hasegawa's P 40 E. To make this kit more interesting I have chosen unique decals made by Kit World company, with nice pin-up girl . The kit was made in late '90s, so isn't top-notch any more. But it is still the best on the market, that is why I have decided to add PE parts from Eduards. Warhawk will be marked as the fighter used by 79th FG.
-
Kagero TopDrawings 68 – Curtiss P-40B/C/D/E (9788366148185)
Mike posted a topic in Reference material
TopDrawings 68 – Curtiss P-40B/C/D/E (9788366148185) Kagero Publishing via Casemate UK The P-40 was designed as a low-cost fighter/ground-attack aircraft, which struggled to keep up with the moving goalposts that were set for it in terms of performance. It was eventually accepted into service in 1941 under the name Warhawk, and Tomahawk in British service with the Kittyhawk moniker being coined for the D onwards. It still wasn't the fastest kid on the block, so tended to be used primarily in theatres away from the top-echelon Bf.109s and Fw.190s. Thus it tends to be associated with the Pacific theatre, where despite suffering heavy losses it was useful as close air support as well as a fighter. We have kits in all scales from almost every manufacturer due to the popularity of the type, despite its shortcomings. The TopDrawings series majors on scale plans, which is the main thrust, but also includes a little background information, some pertinent profiles, and often a bonus of decals or masks targeted at the subject matter in hand. With this edition, you get a handsome A4 print of a P-40B battling the Japanese invaders at Pearl Harbour. The book is written in English on the left of the page, with Czech on the right, which translates to top and bottom for the captions to the various drawings within. The book itself is bound in a card cover and has 28 pages, with the rear cover devoted to additional profiles of a couple of Es. The first half of the plans show the variants from the XP-40, Tomahawk Mk.I, P-40B Tomahawk Mk.IIA & B, P-40C and D, after which the colour profiles are printed on four pages in colour, augmented by the two on the rear cover. After this change of pace there is another set of plans on the P-40E and its trainer variant, plus the E-1. The final six pages show side and top profiles with the changes between the variants discussed picked out in grey, and bullet-pointed lists detailing the changes further. Throughout the book, there are numerous smaller diagrams that shows gun packs, bombs, cross-sections of the fuselage, instrument panels, fuel tanks and weaponry. Conclusion These books are essential for the modeller that enjoys comparing their models against scale plans, and wants them to be as accurate as possible, with the print a nice bonus that has drama and poignancy at the same time. Highly recommended. Review sample courtesy of -
P-40N Warhawk 1:72 Special Hobby The Curtiss P-40N Warhawk was a single seat fighter that could trace its roots back to the radial engined P-36 Hawk first flown in 1938. It ranked amongst the most widely produced US fighters of the war, with more than 13,000 rolling off the production line. A popular aircraft with its pilots, the P-40 earned a reputation as a manoeuvrable yet tough aircraft. The P-40N was the last major production variant. The fuselage behind the cockpit was stretched to counter the torque of the more powerful engine. In an effort to reduce weight, the number of .50 cal machine guns was reduced from six to four, but was later increased to six following feedback from pilots. In Commonwealth service it was known as the Kittyhawk Mk.IV This is an all-new kit from Special Hobby, unrelated to the P-40F released in 2008. Inside the top-opening box are three sprues of grey plastic, a small clear sprue and a sheet of decals (plus a small extra 'addendum' sheet. Gone is the fret of photo etch parts, indicating Special Hobby's continued progress towards the mainstream. The parts are all well detailed and crisply moulded, although the panel lines are a little heavy here and there, particularly on the fuselage sides and lower wing surface. Altogether there are over 70 parts. Cockpit detail is very good indeed. The cockpit sidewalls are moulded separately to the fuselage and feature crisp, clear details. The pilot's seat, armour and bulkhead are all moulded separately, as is the instrument panel and control column. The floor of the cockpit is moulded in place on the part that joins the upper wing halves, but this does not particularly compromise detail, particularly in this scale. Aside from the cockpit, the only other item that has to be assembled before the fuselage halves can be joined is the radiator, which is made up from three different parts. The lower wing, just like the upper wing, is moulded in one piece. The main landing gear bays are made up of a plastic square part which sandwiches between the wing halves to give convincing depth and detail. Two different main gear wheels are provided, so make sure you select the correct version for the particular aircraft you wish to build. The tail wheel is moulded in one piece. Once the wing has been joined to the fuselage, you can add the remaining control surfaces. The horizontal tail planes are solid parts, while the rudder is moulded separately to the vertical tail. The engine exhaust pipes are moulded separately to the fuselage and can be added from the outside of the fuselage, which is a major plus when it comes to the painting stage. Two sets of cooling gills are provided; one open and one closed. The propellor is moulded with all three blades as one part which, once painted, can be sandwiches between the front and rear parts of the spinner. A choice of two different drop tanks are provided, along with a bomb for the centerline pylon. The transparent parts are beautifully thin and clear and the sliding part of the canopy is moulded separately to the windscreen. Two different parts are provided depending on whether you wish to finish the canopy in the open or closed positions. The decal sheet provides for three options: ⦁ Curtis P-40N-5, 49th Fighter Group, 7th Fighter Squadron, Gusap, New Guinea, 1944. This aircraft is finished in Olive Drab over Neutral Grey with a white tail; ⦁ Curtis P-40N-5 "Butter Bean II", 80th Fighter Group, 89th Fighter Squadron, Nagaghuli, Assam, India, 1944. This aircraft is finished in Olive Drab over Neutral Grey; ⦁ Curtis P-40N "Snafu", No. 120 Squadron, ML/KNIL/RNEIAAF, 72nd Air Defence Wing, RAAF, Mokmer Biak, New Guinea, 1945. This aircraft is finished in Olive Drab over Neutral Grey; and ⦁ Curtis P-40N "Snafu", No. 120 Squadron, ML/KNIL/RNEIAAF, 2VB Andir, Dutch East Indies, 1947. This aircraft is finished in Olive Drab over Neutral Grey. The decals themselves are nicely printed and look glossy and opaque. Conclusion Airfix have already provided us with a nice early Warhawk, so it's good to see Special Hobby cover the later Warhawk with this new kit. It is both more detailed and more complex when compared to the Airfix kit, and is all the better for it. It should build up into a pleasing model, particularly if you acquire some of the not-inconsiderable resin sets that CMK have released alongside the kit. Recommended. Review sample courtesy of
-
Hi guys, So this is my first post as a newbie on here, it's my Hasegawa P40e Warhawk that was purchased as a Easter present from my lovely lady. I'll put some photos of bits and bobs that I have done up to now as I'm nearly finished so it's not that detailed a walk through I'm afraid. I would say I think she paid about £20 for it and it's a great little kit to be fair and has been an enjoyable build. The detail is good especially the landing gears. I had a lot of filling and rubbing to do on the fuselage as the tail end is separate, in highnsight I probably should have glued half the tail onto each fuselage half first then put them together but there you go. Hopefully you'll see these pictures: As you can hopefully see I have painted the shark mouth rather than go with the decal and the aux tank and gears are on, just a few more bits and pieces and a little weathering and it should be done. Thanks for viewing. Phil
-
Hi all, So finished this build fairly quickly for my standards and I think its testament for what a nice little kit it is. There were a few minor issues mainly the tail to fuselage join (which in hindsight seems like it could be much more straightforward) but all in all a really enjoyable build. One thing I did do that's worth pointing out is swapping the target crosshair from just in front of the screen to a PE part off an old Eduard German gun sight, this gives for better scale. Some of the lights which I hope you will see on the tips of the wings were just the clear parts and before adding them on i touched them with red and green sharpies. This is the first time I have tried this effect and it works perfectly. Thanks for looking.
- 19 replies
-
- 24
-
-
Hello there, this is my P-40E from Hasegawa OOB, i used mainly Vallejo and Tamiya Paints, the model is brush painted. Also this is my first go at chipping, i used Vallejos chipping medium and it worked pretty well. Well, it got a little bit heavy in the end, but i kinda like it. Also my first go with oils for streaks etc. By the way, i´m still figuring out the photographing part.... Hope you like, Cheers


.thumb.jpg.3d6eff3e2f6cc042679bca864bcb2b1a.jpg)