Search the Community
Showing results for tags '1/72'.
-
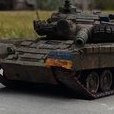
Finish no3 for the year is Academy's Challenger 1 in 1/72 which I finally found in my local Hobbycraft. A bit of a quick build less than 10 days start to finish while finishing off the Finemolds Phantom, I went for the BATUS (British Army Training Unit Suffield) camo rather than the desert tan or plain green that were depicted. This one is straight out of the winter repair program so freshly painted, without call sign or zap numbers painted on ready for the first crew of Med Man 1 to take it out of the hanger. I didn't make any stowage bin covers as these were normally removed along with the CES (Complete Equipment Schedule) and hand back to the stores at the end of each year before the vehicles went through the winter repair program. The kit is basic but looks pretty close to a CR1 but all my experience is with CR2's, the track piece's were a bit fiddly to get lined up but its dead track so some misalignment doesn't look wrong. Painted with a grand total of 4 Tamiya colours, Nato green, Desert tan, rubber black and white with a small amount of exhaust with MIG Ammo powder.
-
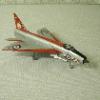
 Got this for €7 in the Dublin model shop and as I’m engaged in stash reduction I decided to start it today. I hadn’t realised it’s a 1990s reboxing of the 1979 Heller release so it fits nicely into the GB and the deadline will keep me on track 😀 I think the previous owner roughly desprued the kit, not sure if that’s a good or a bad think… Going for an Aeronavale scheme, (not this unit although I do like the shark) although the kit only shows one scheme there’s a full set of decals on the sheet and I like the medium grey. The decals which were a Smer addition with the reboxing.
 -
 Hello all, While looking for an interesting OH-6A chopper to build, I came across the AOA "Low level scouts" decal sheet (which is for 1/35 models). This includes one helicopter in a rather unusual (to me at least) camo scheme. Searching a bit further, it appeared that this particular helicopter was used for so-called "Snoopy Operations" over Vietnam, where OH-6A choppers were equipped with chemical sensors (XM-3 airborne personnel detectors) to detect human presence in the jungle. Such aircraft were also referred to as "Sniffers" and flew low-level missions, in conjuction with helicopter gunships, over the Vietnamese jungle. On the ARC forums, at the time when this AOA decal sheet was released, some pictures were shared of this particular airframe (see page 2 of this topic, copyright owner unknown): http://www.arcforums.com/forums/air/index.php?/topic/291968-new-decals-oh-6a-loach-in-the-vietnam-war/page/2/ This seemed an interesting Cayuse to build for this year Vietnam's GB. I used the 1/72 AZ Model kit as a basis, with some modifications: all four doors were removed, as per the reference pics, and the XM-3 detection equipment was scratched. I also used some PE parts from AZ Model's set, a Croco vacform canopy and added a bit of detail here and there. Decals are puzzled together from various decal sheets. Paints are Gunze, weathering was done with oils and a touch of pigment. Not the easiest kit to build, being short run with lots of flash on the parts, quite small and also with such a large canopy part, but I am pleased with how it turned out. For the diorama, I added Trumpeter's M706 Commando Armored Car, which was a nice side project to complete. Credits background picture: Freepik, https://www.freepik.com/free-photo/misty-morning-field-with-mountains-background_11678309.htm#query=desert foggy&position=2&from_view=search&track=ais WIP link: https://www.britmodeller.com/forums/index.php?/topic/235151900-oh-6a-cayuse-vietnam-1970/#comment-5245913 Thanks for looking, comments always welcome! Cheers, Patrick
 -
See content further down.
-
Here's a quick build of the Bell XFL Airabonita from RS Models, in 1/72 scale. The Airabonita was an attempt at making a version of the P-39 for the US Navy, which was not successful. Performance was considered subpar (especially since the Navy was reticent to switch to air-cooled engines at the time), especially compared to its competitors: Grumman's XF5F and the Vought's XF4U. I opted to build this in a "what-if" livery of M-485 blue gray over light gray. The paints were AK Real Colors and Tamiya `acrylics,' and the decals were spares from a couple other kits, I think the Airfix F4F and AZ Model/Admiral TBD-1. All in all, it was a straight-forward build, a couple minor fit issues at the wing root and such.
-
I did promise @Johnson to do another Mosquito and I did promise to treat myself to a new tool kit this time - so I'm in with the Airfix B.XVI. I chose this kit as it has the fuel tanks provided, which you can see from the bomb bay (the newer PR.XVI kit does not!) I like bombers in black so I'm going to do the 109 Squadron option. I'm looking forward to this and everyone else's builds.
-
Even though I mainly make things with propellers, I actually signed-up to this Group Build because I have more Starfighters than I ought to have. Anyway, I'm going to assemble this one: It's the Revell kit and i believe is has an issue with the front canopy shape (which I am going to ignore). I'm going to do it as one of the 435th TFS planes based at Udorn, Thailand from June 1966. As they were used for CAS missions (as well as CAP), I'll dig some M117s out of the 'things that go bang' box and hang them under the wings. I'll probably start this after finishing the F-16B I'm currently making a mess of in that Group Build. In the meantime, here's an interesting piece about the F-104s use in South East Asia: https://www.i-f-s.nl/vietnam/
-
I got this one, dating from 1972, many years ago. The previous owner had kindly removed all the parts from the sprues and put them in a bag. At the same time they lost both the instructions and decals, well you can understand why this kit and i were just made for each other ! Picture from Scalemates I'm planning on building the one in the picture with the blooming great cannon, well it would be just plain rude not to Good luck everyone Cheers Pat
- 55 replies
-
- 25
-

-

-

-
I picked up this bagged Yak-3 a few years ago and thought I'd enter it in this GB. It didn't come with instructions but as @Enzo the Magnificent built one in the last Heller classic GB I'll be using his build thread for reference. The kit is moulded in a rather bright shade of blue. P1070668 by timothy jones, on Flickr Although the kit included the decals they were old so I bought an aftermarket set. I'll be building it as the red nosed example. P1070669 by timothy jones, on Flickr Hopefully this will be a quick build as I've also got a 1/24 scale car lined up for later.
- 10 replies
-
- 12
-
-
-
I've had this kit for some time (the all-knowing .xls says "before 2000") and must have started it at some point... probably couldn't decide what version to build, so I put it aside, you know the drill.😊 There are certainly better kits out there, nonetheless: when I look at the box top painting, something in me smiles and says "No way this is not going to be built." Looking forward to getting it finished in this GB - the Falklands War was geographically far away, but nonetheless the subject of strong opinions among the people I spent my time with in the early 80s. I put this aside undecided, so I must pick it up undecided... on the one hand, this build only makes sense to me when I build an aircraft involved in the war - on the other hand, I love the box top painting (have I mentioned the box top painting?), so I might try to find an excuse involving images of HMS Hermes leaving for the Falklands in early 1982, with Sea Harriers still in their old livery. We will see. Sadly, the sexy Sea Eagle will have to remain for the spares box, only tanks and Sidewinders for this one. But there's a Buccaneer in the stash.😁 Very nice aftermarket nozzles are out there now, I might be tempted to add some. Still a lot of time for that!
- 11 replies
-
- 7
-
-
- Sea Harrier
- 1/72
- (and 1 more)
-
1/72 Hasegawa Raiden - J2M3 (Jack) Oh, and it was all going so well. I recently finished off the Hasegawa Mitsubishi Raiden ( Jack) and discovered such a doozy of a fault ..... in my work. No, you'll have to find it! Firstly, those of you who have made this kit before will know that it is typical of Hasegawa's single engine Japanese Army and Navy fighters; a little basic perhaps, but an excellent model and very good value for money. No fit dramas, no instruction dramas, just a well engineered kit that goes together well. In fact, if there are problems, I'd be inclined folks to blame the modeller. I finished the kit as from the 352 Naval Kokutai, in a standard Hasegawa instructions green upper- and grey under fuselage. Gun barrels, pitot and radio aerial courtesy of albion alloys brass tube. Paints by Tamiya and Mr Color, varnishes by Windsor & Newton Galleria. I did have some very minor puttying to do, and I did have a serious carpet monster moment - the propellor and spinner went awol! This was a disaster, as there is only one spinner, and I was faced with a spinnerless kit. You'll notice I solved it - you'll not be surprised to know the spares box came to the rescue. The spinner is the front end of a bomb from an F-5e kit I made a while ago! It looks just like the spinner in the box art, and size and shape wise I think it is almost perfect. I just had to cut the blade cut outs out, fill the somewhat oversize gaps and there you are; a new spinner. The propellor is a second propellor from the kit. So you're wondering - what is the flaw in this kit? Hmmm, it won't take you long to see it .... Starting with the box art here are some photos of my 3rd build this year, thanks for looking.
-
 ... Did I do something wrong here? I'm building the 1:72 FW 190 kit from Revell, everything's going together more or less fine, then the rear canopy goes on like this: I'm totally thrown for a loop here, I can't get it to fit with either the frame or the front canopy, and trying to split the difference makes it look even worse. Did anyone else have this problem or did I miss something totally obvious?
 -
.....well i hope not. The whole point of this hobby is to have fun. However, I’ve always wanted to do a PRU coloured aircraft since I returned to this hobby a couple of years ago. I’d always expected it to be a Spitfire. But this GB and the Airfix Mosquito PR XVI means the Mossie gets first crack. I’ll be trying to keep this OOB as much as possible – that scheme with the yellow spinners, red/white stripey fin and big b&w stripes is both a challenge and very eye-catching. I know these have been done before, but I want one of my own. 😁 In preparation, I have been looking up the history of this aicraft. Fascinating. If it's not too boring, I may share some of the findings with you as we go Cheers for now Rob
- 57 replies
-
- 22
-
-
I'll be joining with this kit, to build as a two-seat F1B. This is the first release of the kit by Heller, in 1978. The kit isn't very specific about two seaters, so I'll have to do some research.
-
Hi All, I thought to join this GB with some NZ aircraft - among them Robinson helicopter, A-4 Skyhawk (Air-Graphics just released a decal sheet!!!), DH Devon that I have with optional NZ decals, Jet Stream with ZK-LFW registration in Life Flight livery, possibly DH Beaver with NZ Antarctic markings - but Dora kit is not yet released. Given there is too many ongoing projects - I'll be joining this GB with just that kit: The kit does not have New Zealand decals so a decal sheet from Avalon will help. It has not one but two NZ versions: Of which I think I'm choosing the black one. Couple more posts to follow. Stay tuned!
-
 On 16th June 1945, Squadron Leader Clifford Grainger Andrews DFC with 684 Sqn. made the first of two flights over Mt. Everest to help survey a second route to the summit. There’s an excellent article on the website of the New Zealand Airforce Museum. From his logbook, it’s evident that he flew a Mosquito XVI coded ‘O’ for the mission- although the serial is too small to read in photos. The June ORBs aren’t in the archive, but thankfully the May records are, and Mosquito ‘O’ appears as NS704. NS704 is a PR.XVI from the same contract and delivery dates (Between 24-3-1944 and 31-12-1944) as NS787, the aircraft illustrated in the photo below. Source: IWM Source: IWM This means an overall High Speed Silver finish, with SEAC roundels and ID bands in the same dark blue. The PRU Blue slipper tanks are noteworthy too. I plan to cut masks for all markings, although may use some of the kit stencils where necessary. As always, a little inventory to start with.
- 41 replies
-
- 10
-
-
-
Hi all, A Vietnam GB should really contain at least one chopper, so this will be my attempt at building one of these: I have the AZ Model kit, as well as a small PE fret from the same source, and a spare clear vacform set from Croco (to be seen if I need to use that). As I am working on a few other builds now, it may take a while before I can actually start - but at least I have a seat reserved! Cheers for now, Patrick
-
Hello all, Although I mostly build aircraft and helicopters, I also visit this Armour RFI section from time to time. As I recently completed Trumpeter's M706 Commando Armored Car, I thought I post a few pictures here. For my project in the "Vietnam War" Group Build, I wanted an armour vehicle to accompany my OH-6A chopper for a typical Vietnam scene. The Trumpeter M706 kit is a really nice kit: simple to construct and with good level of detail. I opened up the top hatch and one of the side doors, while adding a bit of detail on these. Also added some communication equipment and a second fire extinguisher in the interior. Externally, PE grills were added to the front light protectors and an antenna made of stretched sprue. Interestingly, the kit tires are made of some sort of rubber, looking very toyish and shiny out of the box. I simply sprayed these Tamiya Rubber Black, making them look much better. Paints are Tamiya/Gunze, weathering was done with oils and some pigments. Credits background: Freepik https://www.freepik.com/free-photo/misty-morning-field-with-mountains-background_11678309.htm#query=desert foggy&position=2&from_view=search&track=ais More pictures of the helicopter can be found here: https://www.britmodeller.com/forums/index.php?/topic/235155352-oh-6a-cayuse-“operation-snoopy”-10th-cavalry-regiment-an-son-vietnam-1970/ Thanks for looking, comments always welcome! Cheers, Patrick
-
 Made a start on one of my Famos. Not sure if I'll build the Revell 21cm Morser to go with it or to build the tank transporter trailer that came with my other Famo. My early efforts at putting the tracks together are posted here. The large number of parts. Some parts have a little flash and others do not quite match the destructions which can be found on the Henk of Holland site. I started work on the engine. The block is in two halves, each moulded with a head and rocker covers. The front of the engine is moulded in one piece with the dynamo and cooling fan. Part of the destructions show this part and elsewhere a separate fan which looks much better So I resorted to a mini disc cutter and, after initial tidying - Methinks it looks a tad better. Then, after some carving of the front section to ensure level engine mounts the engine is dry-fitted in the chassis.
 -
I know, I know - I said I wouldn't start any more until I'd finished the ones I'd part completed. But I've started my IBG Cromwell and my Revell example of the same vehicle. IBG box art, destructions and parts are on the Henk website here as are the Revell box art, destructions and parts found here. so I won't repeat them on this site. This is the IBG Lower hull. The road wheels hang in space - held on only by the tracks. It makes the wheels and tracks very easy to fit but is a bit light on realism. The tracks have no inside detail.................. The lower hull fits well and there is some PE for the exhaust guards, the headlight guards and a fender support each side at the front. The upper hull has crisp detail and fits well too. (Although I read somewhere the rear deck is not very accurate.) The turret goes together OK but the mantlet needed some additions to keep it in place. Dry fitted and white-tacked it looks like a Cromwell The Revell version also looks like a Cromwell but a bit more so, methinks. There's no PE but a bit more detail. There are the Cromwell spaced armour panels to be added to the lower hull, for example. Last but not least - the Revell rear view. I have not scaled these yet so it'll be interesting to see which comes out closest to 1/72. Enjoy!
- 98 replies
-
- 10
-
-
- 1/72
- Brush Painted
- (and 1 more)
-
Good day, This subject was suggested to me from a good friend. The highlights of this particular project are as follows…………….. 1. Exhaust section A. Open / end side of nozzle : Gunze Burnt Iron ( base color ), Gunze Silver dry brush on ends. Tamiya Copper XF-6 dry brush. Tamiya black wash B. Inner section : Tamiya Metallic Grey XF-56 ( base color ), Tamiya Gold X-31, Tamiya Purple X-16 dry brush, Tamiya black wash C. Heat shield : AK Extreme Steel, Tamiya black wash 2. Airframe : AK Air ADC Grey ( #AK11867 / FS16473 ), Ammo Light Grey Wash ( #A.Mig-1600 ), Tamiya NATO Black XF-69 Anti Glare panel, Tamiya Flat Black XF-1 Nose radome cover, Tamiya Black X-1 Flir end 3. Cockpit A. Ejection Seats : AK English Grey #AK11020, Tamiya Black wash, Gunze Silver dry brush, Tamiya Olive Drab XF-62 seat cushions, Tamiya Khaki Drab XF-51 seat belts. B. Interior : AK Air Dark Gull Grey ( #AK11884 / FS36231 ), Tamiya black wash, Tamiya Titanium Silver X-32 dry brush 4. Landing gear struts, bays & intake : Tamiya Flat White XF-2, Tamiya Chrome Silver X-11, Tamiya black wash 5. Decals : Caracal F-101B Voodoo Air National Guard #CD72011 6. Misc : True Details resin ejection seats, Master metal nose pitot tube, plumbers putty & fishing sinkers for nose ballast Despite the age of this kit, I found it to be still up to modern standards of very good fit between parts, fine recessed panel lines, and excellent detail. The instruction sheet was a bit vague but workable and pretty much straightforward. I added True Details resin ejection seats as the ones provided with the kit were very basic in detail. I chose not to weather this one too much as ANG aircraft were kept somewhat clean for the most part. Oddly, the nose landing gear was too “short” and fabricated some scrap sprue into an extension in order to have the airframe sit properly. Unfortunately there are no alignment pins for any of the three landing gear struts but they hold well after overnight setting. I tried no less than four different color combinations to find the appearance that I was seeking with the exhaust sections. What I listed in the highlights is what I felt looked best. Apart from the landing gear assemblies, this is a very nice kit. It`s too bad that it has been out of production for so long as the F-101 is a subject lacking in 72nd scale. I recommend it to those with a bit more experience. Thank you in advance, Mike
- 26 replies
-
- 69
-
-

-
-
Good evening fellas. I did this great little kit as a fast build while working on a bigger project (a 1/72 AC-47 at the moment). I like these smaller builds to keep my interest in check. It’s a really nice kit with some 3d printed parts for the mk.iid version. Painted with Hataka acrylics and weathered with flory wash, oils and pastels. I also added a little riveting to the wings and engine cover. Thanks for stopping by.
-
With the Jet provost done and the other activities out of the way, it’s time to get back in the saddle and do some more modelling. For a bit of a mojo boost, I watched Top Gun, Top Gun Maverick and The Final Countdown on DVD’s. So tonight, out came the Airfix F-14A Tomcat (blueprint box) and the Revell F-14D Super Tomcat from the stash - both 1/72. I’m going to try to build them both together stage by stage (rather than build one and then the other). The Revell is better in detail as it’s a much later kit, but the Airfix one still has a certain charm to it - even with the raised panel lines which I’ve decided to leave to see how it turns out. So, the first stage was to build the two cockpit tubs. The Airfix one is much longer then the Revell and both have raised detailing in the some consoles in roughly the same depth. The ejection seats are worlds apart in detail, so I might see if I can 3D print something a little more interesting for the Airfix kit. Otherwise the offices are fairly well detailed considering….. Both tubs were painted with Tamiya XF-19 Light Grey (as it’s what I had to hand) and are drying off. They will both receive other colours to highlight the consoles and IP’s. I’ve also bought an extra set of Airfix F-14A decals which offers two options - TopHatters and the Black Aces - to go with the Bounty Hunter and Grim Reaper options for the kits.
- 82 replies
-
- 14
-
-
Jets of 800 Naval Air Squadron OK, the first one isn't a jet but it's the last piston! Also I have an 800B Scimitar with refuelling pod somewhere but couldn't find it! Still to do - Harrier GR.9, Harrier T.10, Buccaneer S.2 with plain 'E' fin code before the red flash. On yes - and two more Sea Harrier FRS1s - one in overall Falklands period EDSG and one in post Falklands overall Dark Sea Grey (and yes I know the Falklands period jet shown here was ex-899 but was probably flown by 800 at some time!!)
- 19 replies
-
- 84
-
-
-
-
Joining you with this kit, purchased in 2022. Earning the description Australia's Panic Fighter, produced in just 16 weeks. Let's see if I can beat that deadline! And I've acquired these Esci decals.
- 15 replies
-
- 19
-
-