Search the Community
Showing results for tags 'resin'.
-
Dear all, Here's a recent completion from me, the Anigrand 1/72nd scale full resin kit of the KC-10 Extender as a USAF tanker. The build was not the most straightforward, with lots of warped parts that needed straightening and quite a bit of filling being needed. It was painted with Xtracolour enamels and the kit decals were used, which were good. It's a big old beast of a kit - it certainly takes up quite a bit of shelf space! Best regards, Rob So just how big is a 1/72nd KC-10? Here's a 1/72 Spitfire TR9 as a comparison! And alongside a 1/72 KC-30 (Titan Models' Airbus A330-200 tanker) which is also quite a lump!
- 12 replies
-
- 64
-

-

-

-

-
Fordson WOT2D Van Body (MV135) 1:72 Planet Models by Special Hobby The War Office Truck, or WOT, was a series of vehicles designed by Ford of Britain during WWII, with about 130,000 units made overall. It started with the WOT1, a rear-wheel-drive truck with a 3.6L V8 engine, and the smaller WOT2, which became the most produced of the range with four wheels instead of six, but otherwise similar in design and layout. The WOT3 was a larger and heavier variant, and the last of the rear wheel driven range, the later versions designated WOT6 and WOT8 having four-wheel-drive to assist with rough terrain handling. As well as seeing service in large numbers with the British Armed forces, it was also sent to Soviet Russia under the Lend/Lease programme where it was used as transport, Katyusha rocket carriers, amongst others. The Kit This is a new boxing of a resin kit from Planet Models that was originally release in 2023, with new parts to depict the van bodied version of the truck, and it arrives in a white cardboard box with a large adhesive label showing the product details on the front and sides. Inside are three Ziploc bags, one containing thirty-two grey resin parts, another a 3D printed grey resin chassis, the final bag holding a Photo-Etch (PE) fret, decal sheet and a 6cm x 4cm sheet of clear acetate (not pictured), plus an A5 instruction booklet printed in colour with profiles for the decal options on the rear pages. The remaining space within the box is taken up with green packing foam chips, ensuring that movement during shipping and storage is minimised. Detail is crisp and of a high standard, the chassis being an extremely finely printed part. The model doesn’t include the engine, but the interior is well-appointed, and the details are augmented by plenty of PE parts inside and out. Construction begins with the bonnet, which has the firewall and instrument panel moulded-in, adding a detailed radiator to the front, the steering column inserted into the firewall, and the foot pedals as PE parts. The chassis is of course the base for the model, arranging the bonnet assembly, cab floor and load area floor sequentially front to rear, and further detailing the cab with PE steering wheel, handbrake and gear shifter, which you could ‘flesh out’ by adding a blob of super-glue to the top. The crew seats are applied to their bases either side of a stowage box in the cab, with fuel tanks under the floor, and stowage boxes just behind them, lowering the van body over the rear after making up the windows from acetate sheet, although they aren’t mentioned in the instructions. A fuel can and box are secured under the rear of the body with the rear bumper bar at the very back, mounting the four well-detailed wheels with moulded-in tread, hubs and sidewall texture onto the axles. A wire from your own supplies is used to link the two steering arms on the wheel hubs, and a fine exhaust system is fitted under the forward chassis, exiting just behind the fuel tank. Detailing the external bodywork is done mostly with PE parts, starting with the front fender that has PE supports, and should be braced with two differing widths of wire to make the cross bars, hanging a manual starter handle underneath in a recess. The back of the cab has the fabric roof glued in place, with an optional metal roof, trapping the acetate windscreen between two PE layers to create the frame, installing it in the space between the roof and scuttle. A pair of PE crew doors have their hinges folded in, and can be glued in place open or closed, leaving the wind to whistle through due to a lack of side windows. PE mudguards, number plate holders, wing mirrors, rear step, ladder, indicator stalks and a circular placard on the front right wing are all fixed to the bodywork to complete the detailing. Markings Both decal options are painted in olive drab with black cloud camouflage over the top in differing patterns. From the box you can build one of the following: Z2286314, RAF, England 1944 Postwar Service The decals are printed using a digital process and have good registration, sharpness, and colour density, with a thin gloss carrier film cut loosely around the printed areas. This means that the carrier film on their decals can be coaxed away from the printed part of the decal after they have been applied, effectively rendering them carrier film free, making the completed decals much thinner and more realistic, and obviating the need to apply successive coats of clear varnish to hide the edges of the carrier film. It’s a great step further in realism from my point of view, and saves a good quantity of precious modelling time into the bargain. Conclusion The WOT2 was almost ubiquitous in British service, so will make a useful diorama accessory, or you can build it as a stand-alone model, safe in the knowledge that this nicely detailed model won’t take up an awful lot of room in the cabinet. Highly recommended. Review sample courtesy of
-
Resin. Why does that word fill me - and I suspect others - with unease? Probably for the same reason the Vacform in "Multimedia kit: vacform, resin and white metal" does. Is it because I think resin is outside my box? Except .... I sometimes use resin aftermarket items, and don't appear to have had many problems with them. Nor, apart from from some wobbly cutting, did I approach the vacform sails in boat kits like HMS Victory or Cutty Sark (the airfix ones) that I built as an early teenager with any trepidation.. Perhaps it's a natural thing when mainly dealing with injection moulded plastic to view the guys who do things in resin and/or vacform as somehow more advanced modellers than you, just a weedy, injection moulded man.. But yes, I have just made a resin kit. My first one. To whit, the Magna Models Polikarpov ITP (M-1). Nope, I'd never heard of it before I bought the kit at the Gloucester IPMS show way back in 2019. Apparently it was a design for a heavily armed fighter, but it never got over a problem with the engine which wasn't able to give it the speed required. But for £6, surely the kit couldn't go wrong? Hmmmm .... Deafening silence. Before I go on to the finished model, here's a couple of photos of the box, and the resin, vacform canopy and white metal parts - the resin parts have been separated from the casting blocks. Now I'm not going to lie, making this kit was a touch problematical. That's because I failed to read the instructions properly. yeas, I know, but in all honesty, how many Britmodellers have done the same? What I would have seen in the instructions was a command not to cut the locating lugs off the wings as well as the casting blocks. Yes, you guessed, I cut the wing locating lugs off. So I got around that problem by using a brass rod pin going through the fuselage to pin the wings to the fuselage. Surprisingly, for me, that worked! Was there a next problem? Cutting the vacform canopy to size, perhaps? was there a reason why 2 vacform canopies were provided? Nope, the first canopy cut and sanded out of the excess quite easily. Anything else? Well, painting wasn't too bad; I gussied up the cockpit, painted some seat belts (not easily seen) and some attempt at an i/p, and used used Mr Masking compound around the wing root air intakes and wheel wells to give a pretty clean paint job there. There was minimal paint bleed under the masking tape on wings and fuselage, easily cleaned up. The canopy masking went fine. My word, this is sounding easy, isn't it? Actually, given there are only 21 parts altogether - 9 resin, 1 vacform and 11 metal, I think I can be excused thinking that I shouldn't have found it difficult. The minimal decals came from an old, long abandoned Mig 15 kit - Magna didn't supply any decals. Paints by Tamiya and Mr Color, varnishes by Windsor & Newton Galleria. Would I do another resin kit? I don't know. I know that there are some resin kits around (I do read reviews) which are more akin to injection moulded kits, but what I'm thinking of are the type of resin/vacform/white metal kits err .... like the whirlybirds Sikorsky S 51 dragonfly that's in my stash. Hmm .. maybe I'll give it a go, after I've retreated into my injection moulding comfort zone for a while!
- 8 replies
-
- 13
-
-

-
- Resin
- magna models
- (and 1 more)
-
 PV-1 Ventura Cockpit, Nose & Turret Armament (4467 & 4469 for Revell/Academy) 1:48 CMK by Special Hobby It’s hard to believe that the Revell 1:48 Lockheed PV-1 Ventura was released as far back as 2011, but I’ve still got both of mine and haven’t built either, to my shame. It’s a nice kit, even by today’s standards, but as with all injection-moulded models, its level of detail can be improved upon by the application of resin casting, which is what CMK’s artisans have done. The two sets we have for review arrive in the familiar clear vacformed box, with the resin parts safely inside, and yellow-themed instructions sandwiched between the header card at the rear. Decals and Photo-Etch (PE) when included are separated from the resin parts by a clear piece of acetate to prevent scratching and damage during transit. Pilot Cockpit (4467) This set includes eighteen grey resin parts, two 3D printed control yokes, a small sheet of printed acetate instruments, a decal sheet with instrument dials, and a sheet of Photo-Etch (PE) that contains an instrument panel and seatbelts. Construction begins with thinning the cockpit side walls in a thick L-shape that matches the new resin inserts, which are glued into position once they are suitably deep. The rear cockpit bulkhead has the door support cut out, and this is glued to the cockpit floor, adding two instrument clusters in the centre, plus a throttle quadrant on a tall stand, adding eight PE levers into the grooves on top. Two resin control columns are mounted on the floor, and are topped with the 3D control yokes, and the crew seats are built. The pilot’s seat has a high back and arm rests moulded in, adding four-point seatbelts from the PE sheet, then mounting it on the bulkhead behind it on a pair of projecting supports. The co-pilot’s seat is less luxurious, with no arms, and utilising the kit legs to attach it to the floor, adding lap-belts to the completed seat, as we must presume that his head is of lesser value than the pilot’s even though he has full controls to fly the aircraft. The instrument panel is made up from layers, depending on how you prefer to create your panels, starting with the resin back plane, which has the instrument dial recesses moulded-in, and you have the choice of either decaling that, or using the acetate film and painting the rear white, adding the PE layer over the top after painting it. Alternately, you can mount the PE panel over the decal. It’s entirely up to you. The pilot’s rudder pedals are well-detailed resin parts and are suspended from the rear of the panel, as are the co-pilot’s pedals, although they are simplified L-shaped rods that mount on a cross-bar, one end of which fits into a slot in the rear of the instrument panel. The completed panel is glued to the central quadrant box, which is glued to the forward section of the floor. Nose and Turret Armament (4469) This set is well-detailed, but straight forward in use, replacing the kit barrels in the belly gunner and top turret positions. The belly gunner uses the rear portion of the kit part, supplanting the barrels with the twin perforated resin barrels provided in the new set. The upper turret is a replacement for the kit parts, consisting of the two barrels linked together, adding a pair of resin breech parts to the rear. The other barrels are for the two nose guns in the upper portion of the nose, which are straight replacements for the kit parts and add extra detail there. The three barrels under the nose are installed in a resin fairing, adding three angled shrouds to the fairing before inserting the barrels into them, taking care to align them all in the direction of flight and at the same angle. This fairing is then mounted under the fuselage within the lines detailed on the accompanying drawings. Conclusion A great and cost-effective update to the kit, with more sets available to upgrade the flying surfaces on the tail and ailerons. Highly recommended. Review sample courtesy of
 -
Border Model WWII Soviet Tank Desant Troops (BR-004) 1:35
Mike posted a topic in Diorama & Accessory
WWII Soviet Tank Desant Troops (BR-004) 1:35 Border Model via Albion Alloys Getting a lift on a tank was a treat for the foot-soldier that occasionally turned sour if their lift came under fire from an enemy tank, especially if the turret started to rotate and the crew began using the main gun. Sometimes they’d ride into battle on the back of a tank, using the turret as temporary cover until it came time to dismount, usually off the rear avoiding the exhausts, other times it was a case of sitting somewhere flat on the hull of the tank for a well-earned rest, and saving some shoe-leather whilst still getting from A to Battle. During winter periods, especially in the freezing cold of the Eastern Front, a seat on the warm engine deck would be prime real-estate, helping to defend against the biting cold that required heavy uniforms and great-coats. In Russian tactical doctrine, Tank Desant is the act of riding into battle on the back of a tank, dismounting at the point of contact with the enemy to act as suppression of infantry, anti-tank artillery, or troops equipped with portable anti-tank weapons such as the Panzerfaust or Panzerschreck. The tactic persisted into early Cold War Soviet tank combat but has long since fallen out of use. The Figure Set This set of five resin figures arrives in a small rectangular box with a rendering of the figures in isolation and in position on a tank from behind. On the rear of the box is a picture of the box art of the T-34/85 kit from Border that this set is designed for, and if you haven’t got one already, you can pick it up by using the code BT-027 as your search term. Inside the box the figures are individually bagged in Ziploc bags, all surrounded by an additional bubble-wrap bag that is stapled closed, fitting snugly inside the box to reduce movement during shipping and storage. Each figure is cast in a dark bluish grey resin, the body of the figures cast separately from the arms, heads, and weapons. There is a number between 10 and 14 scratched on each of the casting blocks, but these will be lost when the parts are removed from their blocks, so bear this in mind during construction and keep the loose parts together with their body until you are ready to glue them together. Each figure has a separate head, arms, and weapon on the extra casting block, with square mounting pegs assisting with location of the parts on the body. Three of the figures are sitting down, one is kneeling, and the fifth is standing, resting one hand on the side of the tank’s turret, presumably peering into the distance to ensure they aren’t yet in range of the enemy. Parts breakdown is sensibly placed along clothing seams or natural breaks to minimise filling once they are built up. The sculpting is excellent, by Jason Studio, who are a common collaborator with Border Model, with natural poses, drape of clothing and textures appropriate to the elements of the figures and weapons. They have been mastered by 3D printing, and some fine layer lines can be seen on the surface, but they should disappear under primer and subsequent layers of paint. Conclusion A great addition to any Soviet tank to give it human scale, especially the T-34 that’s suggested, but the poses are generic enough to allow them to be used with anyone’s kits. Casting is excellent, and does the sculpting justice. Clean-up should be a breeze, making it quick & easy to get quality resin figures on your model or diorama. Highly recommended. Available in the UK in all good model shops. Review sample courtesy of -
Hi all, My entry will be this Vickers Virginia - a hand-made 1/200 resin kit, produced by the late Chris Sayer (who traded as Shed Models). The kit comprises four impeccable resin parts, plus a selection of white metal bits for the engines and u/c. Noticeably absent are any struts or decals. The instruction sheet states that these were available as extras if required - a sheet of roundels was £12 (presumably containing more than just those needed for this kit), whilst an etched brass 'strut pack' could be had for £10. Unfortunately, the original owner of my kit appears to have declined these generous offers . I'll need to get some good drawings to sort out the struts. The Virginia entered RAF service in 1924, as a bomber replacement for the Vimy. It continued in front-line Squadron service until February 1938, when the last Virginias were replaced by Wellingtons, Hampdens and Whitleys. According to Wikipedia, other inter-war bombers, such as the Heyford, merely supplemented the Virginias, rather than replacing them. Over its long life, the Virginia was regularly updated and my kit represents the last (and most numerous), version - the Mk. X (roman numeral). The swept back wings and tail gun position are the give-aways. During the 1930s, Virginias found themselves being used for a number of non-bombing purposes including acting as tankers for the earliest in-flight refuelling trials and also as parachute trainers. For this latter purpose, 'jump platforms' were fitted to the lower wings. Fittingly, the final service role for Virginias was with the Parachute Test Flight at RAF Henlow, where they continued to serve until December 1941. And so Virginias ended their RAF careers in a fairly low-key way - but things could have been very different... Minutes from a committee meeting on 26th June 1940, record that consideration was being given to equipping Virginias with an equally obsolete COW cannon (37mm), for anti-tank work. Now that would have been something to see! Needless to say, it never came to fruition. I'll be finishing my Virginia as this aircraft from 214 Squadron in 1937. Cheers
- 48 replies
-
- 24
-
-
 Hi all, as my Curtiss Seahawk nears decaling, I thought I'd take a look at a racer. So here is my next build, a Wedell-Williams Model 44 Racer by Dekno in 1/72, I have never built anything by Dekno, a producer resin kits of racers, Golden Age aircraft and subjects from the Spanish Civil War> I have a couple of resin kits under my belt and thought I'd give this little guy a go. The box. The resin. The decals and instructions. The instructions are one sheet, smaller than A4, one side for the build process and the other for decal placement. I don't think the build will give me any grief (that's done it) but I foresee problems with the painting and decals. The problem is the gold in that, I have to paint some parts gold and they've got to match the decal gold . Hopefully start this soon. Stuart
- 58 replies
-
- 16
-
-
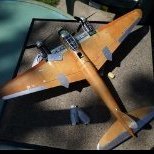
a.thumb.jpg.58d92d116b0315dc55d352fd191d65e4.jpg) Here is the first of at least four intended models of the DC-8. It is a DC-8-52 flown by Air New Zealand. It was only used for a little longer than one year, because this aircraft was then destroyed in a training accident. See more here: ZK-NZB Douglas DC-8-52 (aussieairliners.org) The kit is a resin kit by Kurt Lehmann's Authentic Airliners with decals by Nick Webb (classic airlines). The white was painted with Mr. Hobby by Gunze, the metallic surfaces with different shades of MiG Ammo and AK polishing paste and some powders. Hope you like it! Greetings from Germany, Norbert
Here is the first of at least four intended models of the DC-8. It is a DC-8-52 flown by Air New Zealand. It was only used for a little longer than one year, because this aircraft was then destroyed in a training accident. See more here: ZK-NZB Douglas DC-8-52 (aussieairliners.org) The kit is a resin kit by Kurt Lehmann's Authentic Airliners with decals by Nick Webb (classic airlines). The white was painted with Mr. Hobby by Gunze, the metallic surfaces with different shades of MiG Ammo and AK polishing paste and some powders. Hope you like it! Greetings from Germany, Norbert -
Time to start another one - the Alley Cat resin 1/72 Gannet AEW.3. Obviously there's the injection moulded kit from Sword, but this was an irresistible bargain on a local Facebook group so I'm going down the resin route this time. Here's what you get in the box: Nicely cast resin, small parts in white metal and PE, and a decal sheet with four marking options. I've started removing parts from casting blocks and priming a few of them - hopefully I'll have something worth sharing tomorrow. cheers Julian
-
Next and probably last build in this GB for me is the Piaggio P.166DL-3 in 1/72, using the Cunarmodel resin kit. I've had a bit of a thing for the P.166 and its turboprop variants (I also have a thing for turboprops. Maybe it's that all the flights I took until the age of 8, and most of them after that, were on turboprops) since I saw this one at Fairford in 2005: How could I not love this aeroplane? Quirky doesn't come close. It's got gull wings, a shark mouth, and not only does it have turboprops but they're pointing the wrong way! Somehow Tamiya, Eduard and so on seem to have overlooked this classic, surely it would have flown off the shelves! The only kit seems to be in resin, from Cunarmodel, and it's almost as rare as rocking horse excrement. I say almost, because I actually managed to buy one, and at a not-exorbitant price as well. Here it is: Quite crisp resin, although not the most finely detailed ever it's good enough for 1/72. Almost complete lack of clear parts, apart from the strange vac formed shape that seems to be intended to be the windscreen. Not pictured here is the small decal sheet for the same aircraft I saw at Fairford 18 years ago, and a very basic instruction sheet. This should be fun! more soon Julian
- 24 replies
-
- 13
-
-
- Cunarmodel
- 1/72
- (and 1 more)
-
Hi to all sorry if it’s in the wrong area but the other areas are not available to me and perhaps it has been asked before sorry. Aftermarket resin parts come with blocks of extra resin moulded to parts like ejection seats or clock cluster and I was wondering how do other model builders separate this from the useable part. What knives or saws or procedure is best practice. Thanks in advance.
-
I will joining the GB with a 1/35 resin kit of the TNH 57/900 from StahlhelmModels. Designed in 1949 the TNH 57/900 was the last project from CKD-Škoda based on the TNH/38(t) design, they were hoping that it would attract export sales like the original TNH tank had before the war but no one was interested & none were built. The kit comes with metal barrels, plastic link & length tracks taken from some other kit, but most of it is resin & needs a lot of clean up (pic from their website). I'm currently finishing up a build, once I'm done I'll unpack this kit & get some photo of the parts.
-
Hello, First try at aircraft since I was a kid (a long time ago!) I usually do ships, but came across some 1/144 resin British aircraft at Telford last year from https://www.144th.co.uk/ Picked up a Buccaneer and a Lightning. Lovely kits, great quality and very nicely detailed. Only extra bits I added were ejection seat handles, seat belts from odd bits of etch, a piece of acetate sheet to represent the 'hood' over the navigators position s the kit part is necessarily quite heavy, and some bits of etch and wire to replicate the wing folding mechanism. I need to work on my aircraft weathering!! This is the Buccaneer ready for inspection; Ejector seat handles from 0.2mm copper wire; Wing fold mechanism from spare etch and wire; Thanks for looking and any feedback gratefully received. Cheers Nick
- 10 replies
-
- 43
-
-
-
Hi I don't normally do build diaries but I just wanted to see what you guys think. Here is just a little insight into a WIP I'm looking at doing soon, I’ve wanted to build the Defender from the tv series Death in Paradise for some time so I brought the Revell Land Rover to look at doing after my next project. But last week our JRT passed away very suddenly, so I needed something to destroy and something to keep my mind from wondering, so I dug this out and a 1/24 metal version I had (hence the destruction). So heres some photo of what I’ve done over the weekend to try and convert a Land Rover into a Defender, please leave feedback good or bad was to what you think. Kit I'm going to use The donner kit that I took apart.
-
This new model looks great. Anyone have any other details on it? https://www.monstersinmotion.com/cart/item-list-fj-c-13_192/fireball-xl5-16-inch-model-kit-with-launch-ramp-p-16524.html
- 1 reply
-
- 2
-
-
- Fireball XL-5
- New Model
- (and 1 more)
-
 Hi everybody, Hope this is the right spot where to post this but, surfing through the pages of a Facebook publication the other day, I came across this excellent rendering of the good-old Fokker F-28 Mk1000 kit in 1/72nd scale I thought I'd share here with you. These are some takes of the resin works: So far, I've only learnt that the medium is resin, and that the author offers different versions for decals. Apparently, versions are just for the aircraft in the service of the Argentine Air Force, the Armada and Aerolíneas Argentinas airline. There seems to be an option for deployable flaps as well. Some additional takes on the finished kit in the different services: Last, I dunno what the kit exact dimensions may be in 1/72, but here's a good comparison for those of you who know what the F-28 dimensions are in 1/144th scale Unfortunately, it's not my scale, but if you're interested, and you're a Facebook user, you might ask Juan Carlos Domizio about price and shipping quotes at his page here Wish Juan Carlos would upscale this kit to 1/48. Hope you like it. Cheers, Igna
 -
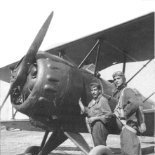
RWD-23 was to be the successor of the RWD-8 training aircraft and was intended as a training aircraft for flying clubs. With a one-man crew, he could perform acrobatics. A sports variant powered by a 66 kW (90 hp) engine was envisaged. In 1939, LOPP (Air and Gas Defense League) placed an order for 10 RWD-23 aircraft. The prototype was destroyed in the factory during the war in the first days of September 1939
-
Good day, colleagues and sympathizers. Today I want to present to you for inspection a fresh model from SPM - truck AMO F-15. The second in the epoxy recently. At one time, I missed a model from the company OtVinta and this time I decided to buy it. A lot has been said about the prototype, if you search. In short, a one-and-a-half-ton truck, the first serial in the Soviet Union. As with many cars in the USSR - in the girlhood it was a Fiat 15 ter, somewhat redesigned as a result by our engineers to match the "beautiful" roads) An overview of the details of the model I posted here not so long ago -; https://karopka.ru/community/user/24492 /?MODEL=631069 The box gives a choice of 3 assembly options, all for the early production period. Assembly - everything is easy to assemble, the parts practically do not require fitting. Olives are thin, neat, I got them without defects. There are several nuances in the correspondence of the model to the prototype. The absence of a window in the tent, the absence of a second handle on the right (the handbrake and gearshift were still both outside). I didn't dig deeper into the match, but judging by the photos, people who are "sick" with this will have questions) As I wrote above, there are 3 model assembly options in the set: 1. The earliest "First AMO" 2. The next issue, 1925 (if I found the info correctly) 3. Differs from the second variant by the stamp of the hood sidewalls. It's generally difficult here, but there are photos of such cars. I chose the second option. A car that participated in the 1925 Leningrad-Moscow-Kursk motor rally (for trucks). It is noteworthy that both AMOS from the participants of the run came taking 1st and 2nd place. I don't want to make a very clean or very dirty car, so it turned out something in between. We will assume that they have recently left) Coloring - traditionally AKAN, a little Gunze (supermetallics top). AK oil, pigments - strategic reserves of masterpigment) Enjoy watching, thank you for your attention) Good day, colleagues and sympathizers. Today I want to present to you for inspection a fresh model from SPM - truck AMO F-15. The second in the epoxy recently. At one time, I missed a model from the company OTVINT and this time I decided to buy it. A lot has been said about the prototype, if you search. In short, a one-and-a-half-ton truck, the first serial in the Soviet Union. As with many cars in the USSR - in the girlhood it was a Fiat 15 ter, somewhat redesigned as a result by our engineers to match the "beautiful" roads) An overview of the details of the model I posted here not so long ago -> https://karopka.ru/community/user/24492 /?MODEL=631069 The box gives a choice of 3 assembly options, all for the early production period. Assembly - everything is easy to assemble, the parts practically do not require fitting. Olives are thin, neat, I got them without defects. There are several nuances in the correspondence of the model to the prototype. The absence of a window in the tent, the absence of a second handle on the right (the handbrake and gearshift were still both outside). I didn't dig deeper into the match, but judging by the photos, people who are "sick" with this will have questions) As I wrote above, there are 3 model assembly options in the set: 1. The earliest "First AMO" 2. The next issue, 1925 (if I found the info correctly) 3. Differs from the second variant by the stamp of the hood sidewalls. It's generally difficult here, but there are photos of such cars. I chose the second option. A car that participated in the 1925 Leningrad-Moscow-Kursk motor rally (for trucks). It is noteworthy that both AMOS from the participants of the run came taking 1st and 2nd place. I don't want to make a very clean or very dirty car, so it turned out something in between. We will assume that they have recently left) Coloring - traditionally AKAN, a little Hansa (supermetallics top). AK oil, pigments - strategic reserves of masterpigment) Enjoy watching, thank you for your attention)
-
 This a model of the Saunders Roe SR-53 mixed jet and rocket aircraft from the recent cast resin 1/48 kit. Something many of us thought was in RAF service in the 1960's thanks to Airfix releasing their kit in the 1950's. Well that was in 1/72 but we had to wait another 60 years for a kit in 1/48. The real aircraft survives at RAF Cosford. So here it is, my model of the SR-53, a key British Aircraft of the 1950's. I have never heard of the manufacturer before, 'Simian Stuff', but first impressions are good. The kit comes in a stout box with the resin parts sealed in plastic. The main parts are individually sealed with the smaller parts in groups. A good, strong looking undercarriage and nose weight are cast in white metal. Detail in the cockpit and wheel wells is excellent and the nose probe is fine and beautiful. I replaced mine with a needle set in Milliput though as I cannot trust myself not to knock the resin one off. There are 2 vacformed canopies and a set of decals for both planned aircraft. These have no white printed, which is fine on a white plane but will be problematic if building an in service scheme! The kit has what appears to be the best set of instructions for a resin / limited run kit so far Thanks to @BritJet. Heres whats in the box There are some good alignment tabs on this kit but a jig is still a good idea to get everything square Some filler required as well as a bit of fettling but less than most resin kits. Heres the finished model Who wouldn?t want red missiles with blue fins? Yes, well maybe as it was in the 1950's! This was a great little kit and cudos to Simian Stuff/ Herritage Aviation for making it. A few minor improvements could be made but right now its already very good. This was built in the Group build section of Britmodeller under the 'Experimental, Prototypes and Special Schemes Mega Group Build' Build Thread here Colin
 -
 While waiting for suitable weather conditions to paint my entry in another GB (it's cold and humid), I was seduced by this excellent GB topic. Will you have me in your ranks? Drawn like a moth to light, I thought I might have a crack at my first resin kit, the Commonwealth Aircraft CA-15 by Planet Models. Looks great in the box, I do like a low parts count and ...oohah... the parts are SOLID. Let's see how it builds. I'm claiming a tenuous connection with this aircraft. It was designed and constructed at Fishermans Bend, downriver from my home in Melbourne. In addition, Dad worked as an engineer at Commonwealth Aircraft Corporation, albeit not in the 1940s. I guess the brand loyalty lingers regardless 🤓 I've known about this aircraft since early teenage years when I worked as a volunteer with the Australian Aircraft Restoration Group. I somewhat dismissively thought of it as a souped-up Mustang. Wrong! It is primarily influenced by the Focke-Wulf Fw190 and was initially designed around the massive radial engines thought to be available in 1943. CAC didn't begin assembling kit Mustangs until early 1944 and commenced manufacture in late 1944.
- 12 replies
-
- 11
-
-
- Planet Models
- Resin
- (and 1 more)
-
The Boeing YAL-1 was converted from a freighter 747-400F and used to test laser weapons that could destroy incoming missiles. This was done in the years 2001 to 2012. The aircraft was scrapped after the end of the test flights. I have built this model using the kit by Anigrand. They produce resin kits of very rare aircraft. The fuselage consists of two halfs and is hollow as it would be as a normal plastic kit. The engravings are very very sharp but way too deep. I have tried to fill most of them but it was very hard to achieve a nice result. I have added the fuselage strengthening stripes around the rear freight door and used spare decals to show the door. As the landing gear was not very convincing to me I decided to display the aircraft in flight. Meanwhile the model had got the nickname "Ed" for obvious reasons. Ed was put into storage in the basement and Joe, a friend and fellow modeller kept asking what had happened to Ed. So, Finally I found the motivation to finish him and display Ed in Telford next to the An-225. Would I build another YAL-1 by Anigrand? No, it is very expensive and of course very big. But bext I would consider using only parts of the kit and parts from a Revell -400 and 747-8F. That would definitely make a better result. Again...very expensive and a lot of work. But it is unique... Being a resin kit, it could be expected that at least one part would be warped. Here it is the left wing that points downward but should of course be bent upwards. A treatment with heat helped only for a short time. So this flaw has to be accepted. I hope you that you enjoy the fotos inspite of this flaw. greetings from Germany and see you in Telford! Norbert
-
Well it’s finally done. It’s taken a while for me , mostly reshaping and rescribing the head. The 3D printed canopy is beautiful too. I have built a lot of Y-wings in my time , but this colour scheme is my all time favourite. The model is old and not accurate to any particular y-wing studio model , but I did the colour scheme as close as I could to Gold 5. There’s been times when I have hated this model , and it spent a few days on eBay unfinished , but I’m glad I saw it through. It was good to do an old skool resin kit again.
-
Hi all. While I'm flitting about with builds in another GB, I thought I'd start this as a 'slow burn' until the others are complete. I have a number of subjects that could fit into this GB, so I thought I'd start off with this Guy Armoured Car Mk. 1/1A by Milicast in their 1/76 scale. The obligatory stuff: The box. The resin parts...with breakages . The instructions. According to the above, the only difference between the Mk. 1 and the 1A is the weapons. Clean up time I guess. Stuart
- 36 replies
-
- 14
-
-
 Time for a new build. Cropdusting in the 1950's in Australia (& NZ) largely consisted of ex military aircraft - lots of Tiger Moths, and conversion of others such as the CAC Wackett (into the Cropmaster), and the CAC Wirraway (into the Ceres). The Ceres, whilst based on Wirraway 'bits' had a myriad of changes - all aimed to improve low and slow performance. New wing centre section and longer wings, leading edge slat, larger slotted flaps, new hopper and higher mounted cockpit position. Etc! As a taster - here's a Geoff Goodall image of a Ceres in operation on a fishlings drop[!] (VH-CEX in Victoria in 1961). From a modelling perspective - there have been a number of kits of the CAC Wirraway across various scales (the Special Hobby 1/48 was a most welcome addition) - and a handful of modellers have undertaken the Ceres conversion. I've previously done a 1/48 conversion. A relatively recent release (2020) is a delicate 1/72 resin kit from Lift Here models of Serbia. Google says it's still available from Aviation Megastore, and I guess other suppliers may have stock. The boxtop looks like this And I HAVE to give a plug to the definitive tome on the Ceres - which is the book from Derek Buckmaster released in 2017. You'll find the book at the URL listed on the box top (top right) - and the book instigated the model. Not often a model company would have THIS sort of reference available for tooling their kit. Note I have no relationship with either Lift Here or Derek (although Derek is known to frequent Britmodeller as @Derek_B ). So what's inside? The main parts are packed in a 'split-sealed' plastic bag - which successfully stops the big bits rattling round with the little bits. - there are TWO vacform canopies provided and what serves as a canopy master providing packing to stop any crushing. - Instructions are simplistic, but sufficient. Every part is clearly identified and named. - and a front 3/4 view of the aircraft indicates positioning of parts. - oh, and a nice set of decals for one colour scheme (per the box art) of VH-SSZ Certainly a case of 'some modelling skills an advantage' for this one - but I've seen worse instructions from mainstream manufacturers. Below is a closer shot of the main fuse and (single piece) wing - very delicate detailing - fine resin moulding - fuse resin is as thin as you'd see in an injection moulded kit (and light in weight accordingly). - there's not a pin hole in sight. The dots you can see around the nose are the fasteners for various panels - wings are single piece but have a beautifully sharp trailing edge (better than you get from many an injection moulded kit) - and everything matches the plans in Derek's book impeccably. This is going to be fun... First task is a bath in strong dishwashing detergent. It's recommended in the instructions and an early dry fit with tamiya tape (which wouldn't stick!) proved there was some mould release agent that needed releasing... And here are the parts laid out more carefully. Everything looks entirely usable. The only things I might look at replacing are top right which includes - rollover framing for cockpit. - instrument panel and tailwheel - rudder pedals, shock absorbers etc. It's all there... That'll do for an introduction. - I haven't settled on a colour scheme yet (might well be some surgery involved if I decide on the 2-seater version). - there are some really nice schemes on this from operations in Australia and NZ. - and there's a couple in museums, and one or two still flying.
- 40 replies
-
- 23
-
-
 Lets see if I can visit some more of my "X's. In this corner we have.... Collect-Aire's 1/48 Bell X-2. I'm not sure how much extra added detail will be achieved with this build, but is a Collect-Aire kit and that means some rein wrangling will be necessary. My little X-4 that I just finished was unique in that the resin had NO pin holes in it! I don't think I'll as lucky this time. But no matter a good time will be had by all. No matter what transpires, a good time will be had by all. Unless it don't, then the sloppy beat downs will commence until morale improve But as always all comments, suggestions, musings and cheer leading are always welcome. So let's see what my X's have provided me today shall we?
- 28 replies
-
- 7
-
-
- 1/48 Collect-Aire
- Bell X-2
- (and 1 more)