Search the Community
Showing results for tags 'italeri'.
-
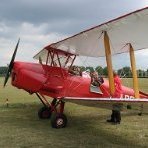
Ok so not the Tamiya one, which means you have to put a lot of work in to completely eliminate those upper wing joints, but that aside it's not a bad kit; although I chose to close the canopy as it isn't very detailed/interesting under there. Built in Beast mode as I couldn't resist tooling it up - not sure if RAF/FAA planes will ever carry so much ordinance though. Thanks for looking, J.A.
-
I needed to call into a local model and kit shop to pick up a couple of paints for an ongoing (forever pausing) build and during my wander around the store i came across this boxed set from Italeri. The store owner said he was selling them on for a customer that simply wasn’t going to build it and for a measly £3 they were mine. I don’t need another kit to build, I’ve more than enough either in my stash or being built to keep me going but for the bargain price of £3 (labelled as £25 from the same store!) I thought it would make for a good side project and diorama. I’ve not built anything like this before and so for I’m liking the scale and detail. Let’s see if I can do it justice!
-
 FLASH!, AHAAAAA!! Well, it was inevitable, really... In my defence, I already had the airbrush out, I had no idea when the weather would be nice again the next few weekends, my compressor purred away real horrorshow... So, I started another one. This isn't madness, this is Britmodeller! Since the kit is well known (well, it should be, after nigh fifty years!) I didn't bother with sprue shots. Here are the already joined (seperate recce nose to common F-/RF-84F main fuselage part) sprayed (DGG pit, Burnt Iron exhaust area and NATO Black nose compartiment) fuselage with the box top to give an indication of the boxing: Nice decals, although I am not going to use them (there's a clue in the thread title to which colours she'll wear!), and some Gunze Mr. Masking thrown onto the clear parts: Aluminium intake areas and Chromate Green gear bays plus other bits: Also, since we do have some standards here, the very basic Italeri stock office simply would not do. So, out with the Evergreen for the basic tub and a quick & dirty Green Stuff clone of the Sword RF-84F dashboard for at least somewhat in there to view through the to be closed canopy: This since received some Dark Gull Gray as well - pics to follow! Cheers, Andre
 -
 I would like to enter with this please; As well as the Eighth Air Force, I have a very big interest in USAFE, especially those aircraft based in the UK, and in particular the 81st FBW/TFW at Bentwaters/Woodbridge. Must have had something to do with all those A-10s we saw flying over our campsite in Suffolk in the 80s and early 90s! Between diecast and plastic kits, I'd like to get a model of each of the main types operated from the twin bases. Regarding the Thunderstreak, they weren't actually flown by the 81st for that long, from 1954 to 1958, but their introduction brought a change of role to the 81st from air defence to tactical nuclear strike. They were replaced by F-101 Voodoos. My kit was bought, appropriately enough, from Bentwaters Cold War Museum in 2017, on their 10th anniversary open day. A couple of years ago, I finally managed to get a set of Microscale decals for Bentwaters Thunderstreaks, which came from France and cost more than the kit! So, here are the sprues. Some pieces have become detached, but they are all there; Instructions; And here is the Microscale decal sheet. They look very eye catching, although that is a lot of stencils too! I think I will be going for the red markings from the 78th Fighter-Bomber Squadron "Bushmasters". The decal instructions aren't great; So, I had a look on Scalemates, and downloaded the instructions for the Hobby Boss 1/48 version which has the same markings; I quite fancy picking up a cheap Airfix F-84F, which would enable me to do a double build, and compare it directly to the Italeri kit, and it would also let me use the 91st FBS markings too! I'll see what I can find, but I'd like to get some progress on this one first!
 -
Hello everyone Considering that I am a fan of the movie and series M*A*S*H, it was logical to make a model of the medical helicopter from this series (movie). I did a lot of digging and research and came across various information, so in the end, based on screenshots from the series and comparison with information about the variants of this helicopter, I came to the conclusion that the D variant was used in the series/film (1 central fuel tank, 1 controls, the lack of the horizontal tilt rudder, a different tail fin and some other small things). Italeri's kit represents the OH-13G in 2 (sub)variants (I didn't go into further research on the later models) so a conversion had to be done. As it is my first time to do a conversion and with a limited source of references, I did what I could and knew how. Due to the large amount of different information on the Internet, I mostly stuck to screenshots and clips from the series as references. What I specifically changed: - removed the controls on the right side - removed the horizontal rudder on the tail - removed some other small things that were not on this variant - refined the lower tail fin (scratch built) - made a new central tank instead of 2 (modeled and printed in 3d) - stretcher and stretcher supports made (scratch built) - engine protective cover made (scratch built) - pilot found a 3d model on the internet and printed it (yes, in the series the pilots wore caps and not helmets) the 3d model of the tank that I made can be downloaded for free here https://www.thingiverse.com/thing:6593209 or here https://www.tinkercad.com/things/ckljrVEJs77-bell-47-fuel-tank When printing the tank, I accidentally screwed something up in the settings, so it was printed reversed (mirrored) and the tank cap is on the right instead of the left. Unfortunately, I only noticed this when I glued the painted and varnished tank to the model. I missed a few more things, but I only noticed them when it was too late. The biggest of them is that I didn't correct the cabin opening, which is different on this version (marked what I should have cut off): don't have decals... they don't exist, but I'm trying to think of something. For now, it will be like this As for the Italeri kit itself, it's not great, although it's not too bad either... it can be fixed. The biggest complaint goes to the terribly soft plastic... I haven't come across a softer one yet, it bends very easily and the scalper goes through butter, so you have to be careful.
-
 After the A & B variants, Italeri is to release in 2024 a 1/72nd Lockheed Martin F-35C Lightning II kit - ref. 1469 Source: https://www.italeri.com/uploads/news/0hFsarN8VqpofmHNCQiD0phaHkvlSZQY30JTdrFK.pdf V.P.
 -
Republic RF-84F Thunderflash AG52, 1 Staffel (yellow trim), West German Air Force Erding Air Base,1963 Many years ago I bought 2 Italeri 1/72 RF-84F kits. They came to life recently after I came across a German ‘F-40’ publication that I had forgotten about, while sorting a stash of reference books. They were decent kits in their time, but they are of that 70s or 80s period when all kits had raised panel lines and minimal detail so would need some work to bring them to a passable standard. Thing is, though, I just wanted to see what one of these would look like built up, so I took the decision to build the first one old style, straight from the box, including the weird interior – pilot and all – and kit decals. I used the Italian markings provided. I’m glad I did that because a) it provided a good reference for what needed working on and b) I probably wouldn’t have wanted to done all that work twice! Should I have just bought the recent Sword kit? Probably, but what would I do with two Italeri kits if I didn’t build them? Anyway, I decided to build this one, from the F-40 book: A couple of pictures of the finished model before I write any more words: Here are the two models together: This is a summary of what was needed to turn the Italeri kit into something acceptable: Panel line rescribe Addition of spoilers to the wing top surface just ahead of the flaps, which I cut off and repositioned in the down position. Italeri had completely ignored the complex spoilers – I used a photoetch set from Airwaves designed for the Airfix F-84F. New wing fences added from thin plasticard. The marked positions for the fences on the kit wings were far too outboard. Air intake reshaped in plan view – see photo: Machine gun ports added to the front of the reshaped air intakes (something else ignored by Italeri). Cockpit detail scratch built and resin Martin Baker seat fitted (German RF-84Fs had their early Republic seats replaced sometime before camouflaging) Airbrakes replaced by the Airwaves photoetch set for the F-84F. They really didn’t fit the Italeri kit so I was pleased to find photos with airbrakes slightly open. Drop tank pylons shortened and rebuilt to give a better sit to the drop tanks. Tailplane hinge added to show the drooped position with hydraulic power off. Nose camera windows increased in size – see photo for comparison: Wingtip pitot tube replaced with a sewing needle (I did this on the Italian one also as the kit version is ridiculously fragile). Paint was Xtracolour enamel over Tamiya acrylic primer, then Klear coat before and after decals and Xtracrylic ‘Matt’ varnish (Matt in inverted commas because it actually gives a semi-gloss finish, which looked just right in this case!) Decals came from some old Superscale sheets for German F-104, RF-4C and G-91s, with stencils from some Modeldecal RF-84F and F-84F sheets. An enjoyable project but I would go for the Sword kit if I wanted another one….
-
My entry for this group build, the Martin B-57B Canberra operated by the 8th Bomb Squadron out of Bien Hoa AB and then Da Nang AB in 1964/65. It didn't take the Canberra long to become well-known on the tactical scene and they picked up the call sign 'Yellow Bird' based upon the squadron colours (the sister13th BS were 'Red Bird'). I am building the 1/72nd Italeri B-57B Canberra OOB and it will be finished in aluminium. I will be using the decals from the kit. I will also 'ghost' build a second B-57B which will be in the later SEA camouflage scheme coded as 'PQ'. I am looking for a straight forward build of these kits which I have had in the stash for many years now. Michael. Canberras2 by Ghostbase, on Flickr
-
My latest effort - am quite happy how it turned out. I decided to do a little ekstra in the cockpit area and to dress up the turret a bit. The build was quite uneventfull, allthough the decals was a bit 'challenging'! Thick and demanded a lot of decalsoftener, but it looks alright now - as you would say - a good 3-footer! A couple of things: My reference (B-25 Mitchell in Action and Google) Didn't show any ventral turret on this one. I couldn't find any pictures of the top turret, and Google provided a lot of different types of B-25 turrets, so I went with the - to me - most interesting one, which wasn't painted. I hope you will like it anyway! Cheers Hans J
- 14 replies
-
- 55
-

-

-
Here is the (more or less) final version of the Schnellboot. It does not show any boat in particular, but rather a typical boat of that class in the Black Sea around 1943 in the process of resupplying after the nightly sortie. I took some (artistic) liberties (e.g. no green deck, mines and torpedoes loaded parallel, etc.) but otherwise tried to be as accurate as possible. Crew is Miniart and Tamiya, folks on the dock are some 40 year old Tamiyas and Italeries repainted, dock, crane and building scratch build, supplies Miniart and scratch, the mines are from AFV, the rails scratch. The Oerlikon on the dock was surplus in the kit. The barge is 1/87 from my farthers train set, repurposed I am still fantasizing to produce some kind of water surface to give it a more diorama like look, but am not sure exactly how I want to do that. Give it some time ... Also in the works: a Miniart A400 Tempo 3 wheel truck for delivering more supplies to be added at a later time. This was my first serious try at 1/35, but now that I tasted blood (and as long there is room on the same shelf!!!), there is of course a Italian MTB that was also used by the Germans at the same port, there a the mini subs like the Biber etc., and maybe a plane buzzing overhead? Thanks for looking and reading, comments of course always welcome! Work in progress was posted here: My other maritime subjects are here: Deutsche Marine https://photos.app.goo.gl/Yn65LrC4H3Xv2qmx5 Battle of the Atlantic (Very loosely named ) https://photos.app.goo.gl/ejKuxEzNpACkLhwr8 Cheers
-
Italeri kit with 'no additives' unless you count the outstanding Sky decals. Paints are Mr Color lacquers and Tamiya acrylics all mixed until 'they look right' - no exact formulas here. I temporarily tack-glued the ventral gondola section into place for the painting sessions, then removed it so I could add the beam position Lewis gun. It was a calculated risk but seems to have worked-out for me. As for the kit - IMO, one of Italeri's best. The fit is generally very good, the internal details, whilst basic, do come alive with some careful painting and dry-brushing. I wouldn't recommend opening the large dorsal hatch aft of the 'hump' unless you're willing to go all-in with the etch & resin interior sets. The open side door and especially the built-in air-stairs are a bit clunky and maybe one day I'll replace that with some etch (yeah right). Not my best work by a long shot, but looks very cool in my cabinet. Please go-ahead and make any comments or ask any questions. Cheers from NZ. Ian.
- 18 replies
-
- 59
-
-
 I've not been idle for the last 6 months or so: this has been on the bench, and now it's finished. Here are a few photos until I get out and do some "beauty shots". The model is Italeri's 1/32 GR4 in one of the box schemes, the Tornado retirement scheme for IX(B) Sqn. This squadron was the first RAF operational unit to be equipped with the Tornado GR1. IX Sqn flew several types in WWI, and was briefly disbanded in 1919. It reformed as a bomber unit in 1924 - hence the "(B)" in the title - and starting with the Vimy, flew Virginias, Heyfords, Wellingtons, Lancasters, Lincolns, Canberras and Vulcans, before reforming on the Tornado. Italeri's GR4 builds up quite well: it needs a little work to make it fit, but in the end it is a solid construction. I did use rather a lot of aftermarket, to whit: Eduard canopy masks; Bandit Resin Factory empty Sidewinder rails; HGW safety ("RBF") flags; Jet Passion 1500 litre tanks, exterior detail set (partly not used as not needed imo) and replacement back seat monitors (scrapped and reverted to kit parts for reasons I won't bore you with); Master pitot tube; Scale Model Developments (SMD) seats; Tradewind67 (eBay trader name) intake and Jet pipe covers, other covers, and back seat grab handles); and home-cut masks for the roundels and serials. And until I get what I call the "proper camera" out, here are a few quick post-finish bench shots. Comments and feedback welcome, thanks for looking.
 -
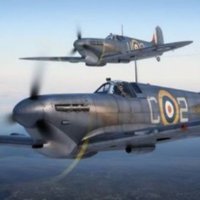 Supermarine Spitfire Mk.Vb Trop EP341, 126 Squadron, Lt Ripley Jones, Malta 17th October 1942. Subject; Supermarine Spitfire Mk.Vb Trop, x2 Hispano Suiza 20mm cannons and x4. 303 Browning machine guns and overpainted squadron codes. This was a an aircraft flown by Lt. Ripley Jones, which fatally collided with a II.KG77 Ju-88 A-4 on 17th October 1942. Manufacturer; Italeri Scale; 1/72 Kit number; 001 Aftermarket; Kitsworld serial codes. Paint; Upper, AK Real Colour RAF Extra Dark Sea Grey and XF8 Flat Blue mix over RAF Dark Earth and RAF Middle Stone. Lower, AM Sky Blue mix using XF23, XF2 and XF19. Interior Hataka C025 RAF Grey Green. Various Tamiya X and XF and Posca pens for detailing. Primer; Mr Finishing Surfacer 1500 Grey. Varnish; AK Gauzy Shine Agent and Tamiya X35 Semi-Gloss. Weathering; Flory Dark Dirt and Grime wash, Abteilung oils and Tamiya weathering palettes. Ammo North Africa pigment. Extras; Prym Knitting Elastic for the antenna wires.
- 5 replies
-
- 21
-
-
-
- Italeri
- Spitfire Vb Trop
- (and 1 more)
-
A good few years ago whilst on an outing to the Vale of Glamorgan, I wandered into a "Toy Shop" and saw this. Having already built a Lindberg kit and then replaced it with a not particularly good Airfix version, I thought I would buy it, particularly as it seemed rather cheap for a Tamiya kit. It was not until I got it home that I noticed the "Plastic parts and decals made in Italy, other items made in Japan" on the box. In fact it is a reboxed Italeri kit with resin extras which I don't remember buying myself and rather think were made in Eastern Europe so what exactly was made in Japan I have no idea, but not to worry! The instructions are in Japanese only, so I will have to do a little research before deciding what exactly this is, but it seems to have a ventral fairing for a 37mm cannon. The colour of the plastic suggests that a desert version was planned at one time but the markings all seem to be for Russia. Looking at Scalemates Italeri did release it several times and it was also reboxed by Revell. One of the Italeri boxings did indeed included markings for a desert version and it has been sold as HS-129 B-1, B-2 and B-3. Pete.
-
Hi All, It's January, so it must be time for a heavy! This time last year I completed my Lancaster B.II, so I figured it was about time I got another 4 engine beast on the go. Italeri's Stirling is oft-built on this site, and it is well-known for its cavernous panel lines. I actually started this kit about 4 years ago, so it's a long-time shelf-sitter - the WIP is a way of motivating myself to get on with it. Here's the box art: And here's where the build is at the moment, and probably the reason it stalled: It's not that clear from the photo, but the interior grey green is a most peculiar hue of my own concoction, before I settled on my 'go to' IGG, which is Vallejo 71.305. So I'm going to start it again, and do it properly this time! When I first started the kit I'd intended to complete it as the boxart scheme, 'McRobert's Reply', but the boxing also has decals included to complete as BF372 of 149 Sqn RAF, based at RAF Mildenhall in 1942. This aircraft was flown by RAAF Flt Sgt (later P/O) Rawden 'Roy' Middleton VC. On 28th November 1942 his aircraft was badly damaged on a raid to the Fiat aircraft works at Turin. Despite suffering multiple grievous injuries, including the loss of his right eye, Middleton managed to complete a 4 hour flight to bring the stricken aircraft back to the English coast. Five of his seven crew then baled out (the front gunner and flight engineer remained aboard to try and persuade Middleton to carry out a forced landing). Following his refusal to do so, the remaining crew baled out but did not survive the night in the English Channel. Middleton stayed with the aircraft, which ditched into the Channel, his body not washing ashore until February 1943. Middleton was posthumously awarded the Victoria Cross and promoted to Pilot Officer. Here's a picture of Middleton during his flying training: And here's the scheme as presented: I feel compelled to complete this scheme now it has an RAAF connection. Now I know that this aircraft has been modelled before, including this lovely 1:48 Sanger vac form by @woody37: I will be delighted if mine turns out half as well as this, but I'm not holding my breath! At this stage it will be mostly OOB, albeit with the addition of an Eduard mask set. I'll see how I go with the infamous panel lines - watch this space! I have not yet found any photos of BF372, but there are a number of other 149 Sqn aircraft which are relatively well photographed. Wish me luck! Thanks for looking, Roger
- 162 replies
-
- 19
-
-
Hello all, A, hopefully, easy question, though I have not been successful finding the answer... Can anyone tell me if the Italeri 1/72 SM.81 Pipistrello kit is the same as the Supermodel offering? If so, has Italeri improved the kit at all, or just repackaged it under their label? Thank you.
-
 No secret that this is my favourite aircraft, and the IDF operates probably the most advanced and combat capable variant currently flying. 1/32 is 'my scale' and we are currently spoilt for choice with four great kits of the various marks of this 5th Gen jet. Italeri got there first with this fully licensed kit and I snapped one up as soon as they were available. I started it back in 2021 but it soon got lost amid the wreckage from covid but I was able to complete it for the Go Large Or Go Home GB this year. The GB just finished so go grab yourself some big-scale goodness over in the gallery and build threads! So, here she is! The pilot represents 'Captain Shin' or simply Captain S., the Deputy CO of Sqn 116 'Lions Of The South' based at Nevatim in the Negev. Tricked it out in full Beast Mode IDF-style, with Python-5 missiles and Spice-1000 guided bombs plus GBU-39 Small Diameter Bombs, GBU-38 laser JDAMs and AIM-120D AMRAAMs. Cockpit details were Eduard panels, Metallic Details wiring and upgrades, and Anyz knobs, placards and switches. The decals were a mix of kit, IsraDecal's set for this squadron plus the incredible 1-Man Army stencil set. I made two pilot figures which came from an Etsy seller, so they're probably knock-offs of a more reputable producer (sorry!) The 1-Man Army stencils were astonishing - everything here is painted on. I used Colourcoats FS36170 enamel paint for the main colour, with MRP FS36170 Camouflage Gray lacquer for the panel joins. The enamel was applied over an Alclad aluminium base to provide the slightly reflective sheen. The weapons bays were the biggest challenge - I used Metallic Details upgrade set to add detail. I'll never build open weapons bays again in this scale!!! They look great with the Eduard GBU-39s and kit AMRAAMs plugged in! Pleased that everything fitted! All the bombs are attached using small neodymium magnets for ease of transport, if I should ever need to transport it! The entire canopy section is also detachable for protection when transporting. The entire nozzle and engine section is a resin replacement from Metallic Details. I also used Reskit wheels. This kit goes together very well, unless you want to try an drop the flaps or do anything else not in the instructions! It all looks very symmetrical and balanced out of the box. The wonky bombs are just because of the magnet attachment points and they got a bit knocked with me handling the model for photos! The armament was a big part of the build and came from Academy (Python AAMs), Eduard (GBU-39 SDBs), IsraCast (Spice-1000), Wolfpack (GBU-38s) and the kit (AMRAAMs). I called this a bit of a kitchen sink build, (in that I threw every bit of aftermarket I could stash bar the kitchen sink) and I'm really pleased it turned out more or less how I'd hoped. It's also a big ol' beast in 1/32! Here's how it measures up against its predecessor! Anyway - the GB is finished, and this goes back on the display shelf - hope you enjoyed a potted tour of the build and I wish you all a very merry and happy Christmas break All the best and happy 2024, Alan
- 37 replies
-
- 79
-
-
-
Hi everyone, I never have done WIP reports, mostly because a) I don't have the time in between modelling to take pictures and b) I don't want any pictures of my work bench, too much of a mess But, as it probably takes me some time to build the Schnellboot and everything around, I thought I share some of the stuff, while I am doing it. It did build a little diorama like background, but I am not sure yet if there will also be water (gets too big alltogether, I am not sure I want to hide the below waterline part of the kit and not sure if I could pull of such a large body of water). That will be decided at a later state.... So a started with a small bit of a pier and a building. Most is scratchbuild (including the birds nest and bird und the roof to the right and the seagull on the dolphin) out of card board, wood, plastic profiles, metal and PVC foam boards (is that the right name in English??). The street light to the left is Tamiya. (The board that the pier is sitting on is only for the photos) Cheers Oh, I forgot to mention that I tried to make the building as it could be standing anywhere in the world. However, right now I am thinking of a boat from the 1st flotilla in the Black Sea. Reason: I don't like the crew members you can buy. I want a "crew at rest" (well, at least "in harbor"), so I decided to use available kits in khaki/DAK outfits. Pictures from the Black Sea show crews to be wearing those (at least in summer).
-
 Here's Italeri's 1/72 Sea Harrier FRS1, which I built a little while ago - I didn't post it at the time but have recently printed a new diorama backdrop image, and wanted something different to park in front of it. It's been sitting in the loft for quite some time and is a bit dusty... didn't see that at the time but those close-up photos are brutal! I think it was mostly built OOB although that pitot probe is aftermarket (Mastercasters IIRC), as are the Sidewinders and RBF tags. I think the decals were aftermarket but can't remember which ones, sorry. Scratch built FOD covers, pinched from my recent T.4 build. Paint was Xtracylics and I seem to have been far too subtle with the weathering - not sure why, as most Harriers were somewhat dirtier than this example. Not the tidiest build ever but I'm still impressed at the sharpness, and lack of paint bleed, on the fuselage masking line between the DSG and the white!!! As usual with these diorama shoots of such small models, the above three shots are focus stacked from about 10 shots each (this creates the illusion that your eye is looking at something which is larger than it really is) and, coupled with a large photo print in the background, gives an effect which I love, especially as it's just a 6" long model after all. Thanks for looking.
- 12 replies
-
- 59
-
-
- 1/72
- sea harrier
- (and 1 more)
-
 Hi! Here is the second kit I finished this year - 1:72 Northrop/CASA SF-5A Freedom Fighter, serial C.9-048, 464 Squadron Spanish Air Force, Gando AB, Gran Canaria, ca.1980. This particular plane can still be seen today at the Gando AB next to Las Palmas airport. All F-5s from Gran Canaria were entirely painted with aluminium paint (it`s not natural metal finish). Italeri kit, which is actually rebox of 40 years old ESCI. It's still quite good, but the mold wear is really noticeable. Model is "out of the box" except for Master Pitot tube and cannon barrels + antennas and gunsight from scratch. Nothing special, very quick project - simply to add to the collection on the shelf. Thanks for watching!
- 11 replies
-
- 52
-
-
-
Italeri is to release in 2022 (?) a new tool 1/32nd Macchi MC.202 Folgore kit - ref. 2518 Source: https://www.italeri.com/uploads/news/v3MVLXcbbQoOMhc7K6EQf04r6mGnCp3M2cEDY6a6.pdf V.P.
- 55 replies
-
- 13
-
-
-
I'm looking for some opinions as to which 1/72 kit has the more accurate propeller blades, Heller or Italeri? Going a step further, what about the Airfix kit? It's the props themselves that I am interested in. I do not think that there are any other 1/72 kits out there (or real life aircraft) that used the same prop as the Ju.52. TIA.
-
 Second build for this GB will be this kit. Bought at Lyneham in 2023. Unsealed the box today, I gather this is Academy reboxed - and the best of the bunch! I'm building this unusually coloured option. Decals, looking good. And a description of the Forked-Tail Devil.
 -
Hello everyone, I'm venturing into uncharted waters here, normally being a landlubber over in the AFV section where I'm half through a Mercedes-Benz L 4500 truck build. While mulling over cargo options, I briefly considered a S.L.C. "Maiale" as 'somethings a bit different' but thought it would be too long and too, well, 'torpedoey', to be feasible. But then I stumbled across the following which got the old cogs turning... Early in the video we see a 'truncated' "Maiale" separated from it's warheads... The warheads subsequently being bolted onto the 'nose'... Hmmm, interesting. The "Maiale" sans warhead would probably fit onto the truck bed quite nicely, and the detached warhead(s) could then sit alongside, something like this with some rearrangement... It's a total flight of fancy with no evidence that they ever put one of these things on a truck, but why not? The decision was made, let's have a "Maiale" cargo! I knew that Italeri did a nice 1/35 Siluro a Lenta Corsa (S.L.C - Italian, Low Speed Torpedo) also known as "Maiale" (Italian for pig, hence the topic name). I didn't know, however, that the kit is discontinued and so a bit tricky to get hold of. I did eventually managed to acquire one... I won't go into too much detail on the kit contents as there are several reviews available elsewhere. Suffice it to say that the kit is quite simple, being contained on a single sprue, with the warhead(s) already separated from the main body of the Pig (which needless to say is very useful for what I plan to do - result!)... The kit also contains a small etch fret, some diver figures (probably won't be used), and a booklet giving additional information and a pretty comprehensive set of photos (which is a very nice touch)... I've made a cursory start on the build by starting a tidy of the welders mask front shield. Holes were drilled in the shield roof as indicated in the instructions, using small moulded depressions as a guide. The shield walls are far too thick, looking like they are fashioned from substantial armour plate. Some thinning will be needed here, which will unfortunately result in the shield interior detail being lost (not a bad thing given the ejector mark and general untidiness of the interior)... The shield should be thin plate similar to this photo grabbed from the kit booklet... After some scraping, sanding, sanding and scraping things start to look a bit better. I'll leave it to you to work out which side has been worked on in this before/after comparison shot... I need to be a bit wary though as the plastic is starting to get a tad thin... A quick word of warning before I sign off - there may be the odd truck picture appearing in this thread! I'll try to keep these to the minimum, but if you want to venture over to the 'dark side' and see more, the parallel truck build can be found here.,.. Cheers, and thanks for looking, Paul.
- 57 replies
-
- 12
-
-
- S.L.C. Maiale
- Italeri
- (and 1 more)
-
After the A & B variants, Italeri is to release in 2024 a 1/48th Lockheed Martin F-35C Lightning II kit - ref. 2833 Source: https://www.italeri.com/uploads/news/0hFsarN8VqpofmHNCQiD0phaHkvlSZQY30JTdrFK.pdf V.P.


.thumb.jpg.ad2b820bfdebfdb8541e9255a05f38c7.jpg)