Search the Community
Showing results for tags 'TAMIYA'.
-
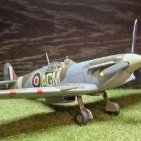
 Hi all, With the hope of getting a more simple and swifter build under my belt before tackling a SH F-84F I have embarked on another Tamiya Mustang! Many of you have built them and so I wont labour it with repetitive posts but I will post things that are particular to this build. My subject is a post-WW2 machine that served with the Nevada ANG while detached to Iceland in 1952-53. It is the second in this row - '474482' seemingly called "Nancy". So far the build has been pretty much standard fare for a Tamiya Mustang kit, particularly the flaps. This time around, though, I am using a set of Armycast resin items. Other aftermarket will be the canopy (Falcon), although if it ends up looking wrong, as I am no good at vac form stuff, I will revert to the kit parts. Also I will use resin exhausts, PE seat belts and a Yahu IP. The cockpit needs a bit of modification to accomodate what I believe to be an ARC-3 radio set up behind the cockpit. However, while my drawings show these as fitted horizontally these seem to be vertical. My efforts are a bit of guesswork but I think it will look okay 🤞. You can see this a little better in the following image: Today I am at the fuselage half mating stage. The following are some build shots: The internal parts painted Dry fitting I'm feeling better already! Martin
- 55 replies
-
- 22
-

-
Hi all, Here's my just finished 1/72 Tamiya F-84G Thunderjet. I originally wanted to build this for the F-84 Group Build that is currently going on here on BM, but I never bothered to take in progress photo's. I decided to build it as a Taiwanese Air Force one. You don't see many builds from that part of the world, despite having a quite a big range of aircraft they have operated over the years. I used a Bestfong sheet, with mixed results, because they are from two different printers. The roundels and tail stripes are like Cartograf or Microscale, while the rest is more like classic Academy decals. Thick and plastic-y. Some DACO decal solution did the trick, though. I had some trouble with the primer (Alclad grey gloss), not wanting to stick to the plastic, causing cracks in the metallic paints, but in the end it looks alright. Painted with various metallic lacquers from Mr. Color, MRP and Alclad. Thanks for looking, Pete
-
Kit - Tamiya Paint - Mr Color & Tamiya lacquer for camouflage, Tamiya acrylics for internals, W&N oils for weathering, SMS lacquer for clear coats. Decals - RoG Extras - Yahu IP, Eduard type specific seat harnesses, Owl ASV aerial (modified) Bristol Beaufighter TF.X 489 (NZ) Squadron RAF Langham June / July 1944 Been planning (an putting-off) this build for longer than I care to recall. No problems with the actual construction, it's a Tamiya kit after all so nothing to report there. It was always going to be as weathered as possible without looking like a flying wreck, I went as close as my skills allowed to the photo, and I think I did OK - pleased for any comments or criticisms on that - I used a little pre & post shading to get the basic 'tones' then a lot of time with various Windsor & Newton oils to filter, fade and bleach the paintwork. Extended the weathering to the engine splatters on the nose and all around the nacelles - in the old Ian Allen 'At War' book (my primary reference) you can see Beaufighters in general were filthy machines - and 'ground-in' lots of dark tones again around the nacelles to simulate burned and dried leaks. Scratchbuilt the wooden torpedo glide wings from plastic-card, then a little pastel work on the tires and it was done. I love the irony of building the Tamiya kit using Revells decals, I eMailed RoG as soon as I saw that they'd done P6-S as one of their kit options and they sent the sheet out to me within ten days... just brilliant. Very happy with how it looks, double win as it's D-Day anniversary this year AND another NZ build to keep the locals smiling !. Please feel free to ask any questions, make any comments or post any criticisms. Cheers Ian.
- 16 replies
-
- 35
-
-

-
My take on a Marder II in Afrika Korps service. Built OOB, with only additional figures. The usual Tamiya quality and build (apart from locating the gun - for some reason it just wouldn't site correctly with hole/poly cap, despite my cursing and desperate filing). This is my first effort using pigments and fixer to finish off weathering - it's not perfect I know (the wheels especially).....and I know about the join lines on the figures too.....
-
 Hello all, Here is my entry for this GB - Tamiya's 1/48 A-1H Skyraider marked as BuNo 139768 of VA-25 'Fist of the Fleet', flying off the USS Midway during the Vietnam war in 1965. Delivered to the Navy in 1956, this Skyraider served with VA-42 and VA-122 prior to being transferred to VA-25 in July 1964. On the 20th June 1965, this aircraft was piloted by Lt Clint Johnson and was credited with downing a North Vietnamese MIG-17 along with Lt Charlie Hartman. 139768 was passed to VA-115 in 1966 and forced to ditch in the Gulf of Tonkin due to battle damage in March 1967. Kit: Extras: I'll be adding a Quinta cockpit set, Quickboost resin cockpit piece, New Ware masks and Aeromaster decals. I've seen a few images of Spads carrying MK.81 250lb bombs, so I retrieved a few old Hasegawa examples from the spares and will add these to some the kit supplied ordnance (of which there is a lot!) Reference: Been wanting to do this one for a while so looking forward to getting started (need to get that Catalina under way first though!). Dave
- 80 replies
-
- 17
-
-
A real swerve from 1/72 aircraft, I picked this Tamiya bike kit up from Hobbycraft a couple of years ago with another Tamiya 1/12 bike, a Honda CB 750F, for £20 each, I think, Here's the box art for those unfamiliar with the kit. This kit has shown me that I've a lot to learn still about model making - who knew, for instance that tamiya tape will peel the chrome plating off a part? You all did? And no one told me? Guess how I found out! If you know the kit, then I suspect you'll be familiar with what I perceived as flaws. Instructions that were somewhat vague. Chrome plating that was too susceptible to tamiya tape. Vinyl tubing - aka electrical leads - started off somewhere, couldn't always find where they ended. Some very tricky elements of construction that needed 3 hands when using one to glue something together. Some poor decision making by Tamiya making the front mudguard and fuel tank - moulded in two halves and hence seams - compared to the rear mudguard a single piece moulding, and no seam. I couldn't see why each of the front mudguard and fuel tank had to be moulded in two halves, and they were some very difficult seams to remove, both front mudguard and fuel tank. You're thinking "aah, he didn't like this kit at all" Actually, no, I quite enjoyed making it, especially as the kit did tend to come together pretty nicely. Just those few tricky bits. Which I did manage to overcome, even if it looks a bit ropy. Although OOB, I did use bare metal foil (chrome) in a few places. This was a 7/10 kit for build fun, a 4/10 for my work - and here are some photos. Thanks for looking.
-
 Hello all Tamiya Hetzer with numerous self-printed details, such as tracks, MG, tool clamps, etc. Figures from Alpine, bridge from Styro. Water effects with wood glue, lamp post made from barbecue spit with self-designed signs. Painting and weathering was the most fun and felt like it took months 🤪 I hope you like it! MD Cheers!
- 15 replies
-
- 34
-
-
-
This Tamiya 109 is my latest build, and I have to say one of the nicest kits I have ever built; the fit is perfect and no modifications or putty were needed. This was also my first time doing mottling, I had to redo it at least 3 times but, I am pleased with the result. I used Ak real colors acrylics. The only aftermarket items used were Eduard Photo-etched in the cockpit, a master pitot tube and cannons, and Decals from Aeromaster, Eduard and Italeri. The sand filter, which wasn't included in the kit was taken from an Eduard 109. I used Abteilung 502 oils to wash the model and Tamiya weathering powders for the exhausts. Happy modelling! Anna
- 23 replies
-
- 57
-
-
 My second entry from my three-build challenge is going to be a very well-known Tamiya kit that I plan to do as a Yugoslavian aircraft. Here is what I have: Not huge amount of aftermarket bits. However that box of resin is really full of goodies - I'll show its content later in this thread. Decal provides markings for a very non-standard Yugoslavian camouflage scheme of grey aircraft with dark green spots. I do not really like it to be honest. My intention is to make a natural metal bird with red arctic tail and tanks - I have references to at least two such aircraft with Yugoslavian serials 10600 and 10620 which had the same large size roundels (normally F-84G at that period had smaller sized roundels). I'll need to source serials and large nose numbers which I do not think should be a problem because at early stage of F-84G career with RV i PVO they were of typical USAF font. Eduard masks hopefully will save me an hour or so for masking the canopy.
- 57 replies
-
- 5
-
-
- F-84G
- Jugoslovensko Ratno Vazduhoplovstvo
- (and 1 more)
-
#9/2024 After a longer pause, my dad finished another race car. Tamiya kit, first released in 1978, this is the 2010 edition with Cartograf decals. Sadly they didn´t perform as used to, so painted all the gold on the main body with Gunze H9 Gold. For the blue my dad used Mr Paint Sea Blue. Didn´t add much detail, only some lead wire for tubing and wiring in the engine area. Well, the kit shows its age regarding engineering, molding and fit and my dad didn´t finish it glitch-free. Build thread here https://www.britmodeller.com/forums/index.php?/topic/235136624-fast-canis-lupus120-wolf-wr-1-1977/ Walter Wolf Racing, a British-Canadian team with roots in the Williams team, active from 1976 to 1979, lead by Austrian-Canadian businessman Walter Wolf Japan GP 1977 (therefore the Tamiya add on the engine cover), piloted by South African Jody Scheckter DSC_0001 by grimreaper110, auf Flickr DSC_0002 by grimreaper110, auf Flickr DSC_0003 by grimreaper110, auf Flickr DSC_0004 by grimreaper110, auf Flickr DSC_0005 by grimreaper110, auf Flickr DSC_0006 by grimreaper110, auf Flickr DSC_0007 by grimreaper110, auf Flickr DSC_0008 by grimreaper110, auf Flickr DSC_0009 by grimreaper110, auf Flickr DSC_0010 by grimreaper110, auf Flickr DSC_0012 by grimreaper110, auf Flickr DSC_0013 by grimreaper110, auf Flickr DSC_0014 by grimreaper110, auf Flickr
- 13 replies
-
- 14
-
-
Hello folks Preview of my next project: Hetzer of the 272nd Volks-Grenadier-Division in the battle for Kesternich. See you soon! MD
-
 Hi everybody, calling all Corsair maniacs experts for this build, such as @corsaircorp and @Corsairfoxfouruncle just to name the two I'm more familiar with I always loved the Corsair, but know very little about it, so any help, hints, tips, references and pointers will be greatly appreciated This is more of a bookmark than an actual start, I still need to study some proper documentation about the subject, anyway here are a few pics. The kit: It's the well known Tamiya 1/48 box - I don't think there's much to say about it, anyway here are the sprues: The second pilot figure, in the "jumping on board" pose, is very tempting... Clear parts Decals (as usual, I plan to use very few of them ) and the scheme I want to reproduce, Jolly Rogers' BIG HOG Actual works to start soon-ish, I may venture into a foray in another field of modelling before/along this, we'll see. Meanwhile, I'm all ears Ciao Edit: I almost forgot to add that my friend @corsaircorp had sent me some resin bits to tart up this build: I'm not sure if I'll be using the whole engine or just replace the crankcase of the kit with the resin one - definitely going to use the resin seat, though
- 169 replies
-
- 19
-
-
-
 Hi all, Here is my Tamiya 1/72 Thunderbolt Razorback, a kit that requires little introduction I guess: great fit, with lovely detail all around. I just added a few details (PE seat belts in the cockpit, brake lines on the main landing gear, vacform canopy, brass gun barrels and DF loop antenna on the spine). The drop tank is from a Pavla armament set. The model represents an aircraft from the 1st ACG, that provided close air support and resupply operations to British troops (the so-called "Chindits") that were dropped behind Japanese front lines in Burma. For this "Operation Thursday" aircraft, I used the DP Casper decal sheet. The sheet provides fuselage stripes and theater bands in both dark blue and black. Reading through Squadron's "Thunderbolt in the Pacific Theater", the fuselage stripes are described as dark blue and the bands on wings and tail surfaces in black, so I settled for this combination. First time I used DP Casper's decals: these are very thin and break easily, so care is needed in handling them but they give a nice result. For the NMF I used a few Alclad shades, other paints are mostly Tamiya acrylics. Weathering was done with oils and pigments. Here is a Wikemedia picture of the real thing: United States Army Air Forces, Public domain, via Wikimedia Commons Credits background picture: freepik, https://www.freepik.com/free-photo/beautiful-scenery-green-tree-forest-cloudy-sky_9185373.htm Hope you enjoy the pictures, thanks for looking! Best regards, Patrick
- 20 replies
-
- 62
-
-
-
Hi all! I have the Tamiya 1/35 Pink Panther Landrover and was wondering if I could use a Firing Line British Soldier w/Wollen Pullover as crew? The instructions says it was in use from the Korea War up to the mid 90'es. Would a SAS soldier use it? Cheers Hans J
-
Hi, I would like to start and share my new build of a De Havilland Mosquito 1:48 scale. The kit is the old, but still very nice Tamiya of the FB Mk VI. I believe that neither a presentation of this aircraft nor of the kit is necessary. Since long, I wanted to build a model of this aircraft because of its fame and because of its remarkable design. For me, this is the first mosquito build as a grown up modeller if I exclude the ancient Revell 1/32 kit that I built when I was a kid. To start my build, I followed to the letter the Tamiya instructions which called the engine nacelles as a first step: I just thickened the frames for added 3-D effect and added few interior details. The white panel shown on the inside of the walls is an artistic license of mine having used a piece of thin styrene to hide annoying ejection pin marks which I didn't want to fill and sand. In the following, the nacelles are shown completed: Finally, they are test fitted with the wings and the main undercarriage struts to check that no interferences with the new parts are present: That is all for this first instalment, I hope you will enjoy following it. Best regards, Dan
- 10 replies
-
- 17
-
-
-
THis is my attempt at the excellent Tamiya Panzerkampfwagen IV Asf G early production kit. Superb value at around £35 and includes the tank + 6 figures and a motorcycle (used already elsewhere by me!). Usual Tamiya brilliant fit etc, although on the fence with their link and length tracks that just make painting a bit more difficult. Depicted in an eastern front autumn just as the Rasputitsa season starts (season of mud), I have shown it with an early grey turret and later camo chassis to show it was put together from parts in a field workshop to get it back in the fight. It may be historically incorrect by I liked the idea). I also added most of the extra stowage supplied by Tamiya designed for their other variants, as well as a large oil drum and unditching log with field made brackets. Figures are as supplied by Tamiya and unusually didn't feel the need to swap heads for a change!
-
 Lets see how this goes........ The kit does not have the side camera window... i am wondering if i'm brave enough to drill a hole and give it a go ..... Anyway started ... with a few other things... lights under the wing. painted silver apart from the centre. Filled that with ""Looks like Glass" ..seems to look like a bulb a drop of "Looks like Glass" on the front. Part II soon......
- 25 replies
-
- 17
-
-
- De Havilland Mosquito
- Tamiya
- (and 1 more)
-
 Tamiya is to release a new tool (?) 1/72nd Lockheed Martin F-35A Lightning II kit. Source: https://www.facebook.com/photo.php?fbid=615777313890734&set=pb.100063754112187.-2207520000.&type=3 V.P.
- 44 replies
-
- 6
-
-
- F-35A
- Lightning II
- (and 1 more)
-

Lockheed Martin F 16 C . 22nd FS USAFE Spangdahlem
wellzy posted a topic in NATO 75th Anniversary GB
Hi Guys here we go. This is why Im building the F16 RIAT July 2017. Happy days Wellzy -
Hi Guy`s here`s No two . other decal sheet only half used , P51B ,363FS 357FG .RAF Leiston 1944 Well that`s my second U.S.8th A.f. Build .Cheers Wellzy.
-
I would have swore I started a post on this but could not find it to save my life. This is Tamiya's 1/48th P-47 I'm planning to use Cutting Edge decal sheet. I've been wanting to do a P-47 marked as Eileen since seeing the Academy box art years and years ago on the store shelves. Doing the checkered nose had been giving me anxiety so in a rush of inspiration, I paused another build to tackle them back in June 2022. The Cutting Edge sheet provided the checkers but so did Tamiya and I felt I was going to have better luck with Tami's decals. They were in three parts compared to CE's 2 piece. I started out painting the cowl gloss white as a base. Then came the moment of truth.... There's some wrinkles but I got them mostly out with a healthy dose of Solvaset. Not too shabby, and I like that some of the black squares "chipped" as I'm sure they wouldn't have stayed perfect with use. From there, I started in the normal spot, the cockpit. Paints are Model Master, the green is Euro Green which I like as a match for "P-47 cockpit green". The black is just MM black. I did lay down a base of Alclad aluminum before the green for the chipping effects. I used the kit decals for the instruments and I'm very happy with the way it looks. They conform really well considering Tamiya's decals reputation for being thick, same with the cowl checks. There's some wrinkles but they're really only visible in this photo. I also added some aftermarket cockpit stencils which aren't really visible in these shots. I used a resin seat with molded belts from a company whose name escapes me, but I didn't manage to get a shot of it. 🫤 That's all for now, more to come.
-
 This is the Tamiya 1/48 P-51D Mustang, marked as John C. Meyer's "Petie 2nd". Typical of Tamiya, easy assembly and a nice fit. The only weak points are the wheel well not going back to the spar, and a prop that is too wide and tapered at the cuff (easy to correct). I used an Ultracast seat, and the sliding canopy is a spare from an Airfix kit (suitably reshaped). Wheel well was opened to the aft spar, brake lines added, and the radio, battery and drop tanks wired, and plumbed. Decals are the kits (works well with VERY hot water), and the paints are all Tamiya acrylic. Thanks for looking, Colin
 -
After some pause, my dad started another F1 car. this time a Wolf WR1 from the British-Canadian team, owned by the Austrian-Canadian Walter Wolf. It´s the 2010 kit edition, including decals by Cartograf, PE and metal parts. DSC_0008 by grimreaper110, auf Flickr engine block painted with Tamiya XF-16 Flat Aluminium DSC_0009 by grimreaper110, auf Flickr DSC_0010 by grimreaper110, auf Flickr DSC_0011 by grimreaper110, auf Flickr DSC_0012 by grimreaper110, auf Flickr
-
 Hey all, This is Tamiya's P-47D 'Razorback', an instant classic from the early 2000s. Like many others, I've had a strong affinity towards this aircraft for a long time. Somehow, the brutal look of the aircraft is met with some amazing lines, to create what in my eyes is a true thoroughbred aircraft. I've always had an interest in the Eighth Air Force during the Second World War as I live in East Anglia and have a number of former airbases right on my doorstep. Additionally, with my job I'm constantly all over the six traditional counties that make up the East of England. To be able to step out of my door and be right in the history has always driven an obsession interest with the 'Mighty Eighth'. The aircraft I've depicted is from the 355th Fighter Group, based at RAF Steeple Morden, which is just on the outskirts of Royston, sort of close to the borders of Hertfordshire and Bedfordshire but in fact in Cambridgeshire. The air base was originally a satellite for RAF Bassingbourne before being handed over the the USAAC in mid-1943. The kit fell together, as do Tamiya kits, so no need to cover already well documented ground. The only thing i did add was an Eduard LooK set which includes a drop in resin instrument panel and seatbelts, the only two additions really needed IMO. I painted the aircraft with Mr. Colour Acrylics, and weathered with oils. The decals are from Furball Aero-design, of which their 'Colors and Markings of P-47s Part 1' includes 20 different schemes for the P-47 in the ETO and MTO, and though the stencils are included, I used the kits stencils and national insignia. This means I can use the decals again for later projects! Thanks for looking, Sam
 -
Hi all I've just started to build the Tamiya 1:48 Vought F4U-1a Corsair #61070. Among the list of suggested Tamiya paints are: AS-8 Navy Blue (US Navy); AS-19 Intermediate Blue (US Navy); and AS-20 Insignia White (US Navy). As I don't use spray cans for painting, I'm trying to find the equivalent paints as either acrylic or enamel. So far, I've come up with Tamiya XF-17 (Sea Blue), Tamiya XF-18 (Medium Blue) and Tamiya XF-2 (Flat White) respectively. AK do an Insignia White, AK1101(FS37875) -(a comparison chart gives Tamiya XF-2 as a 'suitable' alternative to this). Is there an actual comparison chart anywhere of Tamiya AS Paints to Acrylic/Enamel (for future use), or has anyone done their own comparison chart or can give me alternatives to AS-8 and AS-19? Thanks in advance.