Search the Community
Showing results for tags 'Navy'.
-
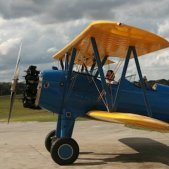
This is the Hasegawa/Minicraft 1/72 P2V-7 Neptune boxing from 1972 or 1973. I bought this second hand along with the Eduard PE and Mask set for it. Other than adding the PE, this will be an OOB build of the generic post WWII U. S. version in Navy Blue. I am hoping this to be an easy build as I need one after a couple of trying ones. Here is the box art and collection of sprues loose in the box It appears the fuselage halves have been taken off of the sprues and for some reason the locating pins have been sanded flush. I wonder if original owner didn’t realize what they were and thought they were sanding off sprue attachments? So, the prior owner has turned this into a short run kit without locating tabs, wonderful. So work begins with the cockpit. The kit is very basic with 2 seats, a floor and 2 bulkheads. There are also the pilot figures to help jazz it up, but I am totally rubbish at figure painting. So, I am hoping the Eduard PE set will help jazz this area up. I am not sure how much can be seen once the canopies are on, but looks to be very barren inside. First step is to locate the minimal floor console instrument panel and sand the detail down so the Eduard PE part can be attached. Next looking at the seats, there are some quite lovely and large injection marks that need to be dealt with. Next up the base coat of grey for the interior parts including the nose gear bay housing. I tried to come close to the colour on the PE and think it will blend in nice once a weather finish has been applied. A little bit of dirtying up and scuffing . . . Now to work on the PE stuff. There is a little box that sets at the rear of the seats on the rear bulkhead that has to be painted and bent into place. That fuzzy thing above it is the tip of a microbrush to give a sense of scale of this huge item. Why at my advanced age am I doing PE work on a 1/72 plane? I need magnifiers for my magnifier. Onto constructing the two control columns out of the PE. It consists of two pieces, the control column that has to be folded and the circular yoke. I have completed one and you can tell the size by the tweezer tip in the picture. Next up are the rudder pedals. Here is the PE part after painting, but prior to being folded. And here it is all folded up; only 3 more to go, yippee!! And all four looking somewhat uniform Now this is what the kit cockpit would look like if built straight out of the box. (Please ignore the center control PE part and imagine a really crappy, raised, blobby, plastic detail area.) No wonder there were figures to put in here. Otherwise, there would be nothing to see. I put the PE control panel in the starboard fuselage half and it fit quite nicely and jazzes the area up a bit. Now here is where I ran into problems. There are two PE side instrument columns that run between the fuselage wall and the cockpit seats. When I dry fit them, there is not enough room between the seats and the fuselage wall for them to fit. My choices are to cut down the instrument panel and lose some of its detail, or sand down the chunky seats to allow more room for the side control column. I decided on the latter. Did I dry fit prior to installing the seats and begin work on the seat belt placement; of course not. I didn’t get the prudent idea of checking the fit until the seats were firmly in place. So, I pried off the port seat and sanded both sides of it down, trying to not mess up the seat belts. I then placed the seat back and you can compare the size of the sanded seat to the original kit seat. The seat appearance is improved I think. The side console will now fit. I just have to pry up the other side and do that seat too. But, it is time to go to work to pay for my plastic addiction, so I must stop. All comments always welcome.
-
Hallo After a short while I finished this FF 33 E. The kit was fair. Not good and not bad. The etched parts were a certain thing by itself. Read my WIP, and you learn more. Well, the rigging was not so difficult. It was just two mornings. After this model I jump in deep water. With my Su-27 K from Minibase. Happy modelling
-
In hindsight a lot of work scratchbuilt interior, prop and undercarriage. New clear windows and homemade decals. But I think it’s turned into a great little model so worth it in the end
- 7 replies
-
- 12
-

-
- 1/48
- enhanced kit
- (and 1 more)
-
Morning all, May I present my 2020 yearbook. Obviously it's been a mostly dreadful year in so many ways, but one positive I've taken away from it is a renaissance in my enthusiasm in modelling. I had rediscovered my mojo before lockdown hit, but being furloughed for two and half months, and subsequently working reduced hours has meant I've been able to dedicate so much spare time to the workbench. As such, I've managed 26 completions this year, a personal record since I got back into the hobby properly in 2008. I've found building to themes has helped maintain the enthusiasm; the 80th Anniversary of the Battle of Britain was my main priority going into the year, but it turns out my naval theme contributed to the bulk of my builds. I do love naval types! As ever for me, all are 1/72, and posted in chronological order. More images and details of the builds can be found by following the RFI links for those interested. Bandai's superb A-Wing. (Obviously, this didn't fit either of my themes, but it had been sitting on the shelf of doom for two and a half years so I pulled my finger out and got it done!) 1/72 Bandai A-Wing Starfighter by Shaun Schofield, on Flickr Hasegawa Su-33 Flanker 1/72 Hasegawa Sukhoi Su-33 Flanker by Shaun Schofield, on Flickr Tamiya Spitfire I 1/72 Tamiya Supermarine Spitfire I by Shaun Schofield, on Flickr Airfix Ju-87B-1 Stuka 1/72 Airfix Junkers Ju 87B-1 Stuka by Shaun Schofield, on Flickr Trumpeter Su-33UB Flanker 1/72 Trumpeter Sukhoi Su-33UB Flanker by Shaun Schofield, on Flickr Airfix Buccaneer S2C 1/72 Airfix Blackburn Buccaneer S2C by Shaun Schofield, on Flickr Arma Hobby Hurricane I 1/72 Arma Hobby Hurricane I by Shaun Schofield, on Flickr Hobby Boss Rafale Marine. This was the first of three models built as a mini French Navy theme within the wider naval theme 1/72 Hobby Boss Dassault Rafale M by Shaun Schofield, on Flickr Academy F-8P Crusader 1/72 Academy Vought F-8P Crusader by Shaun Schofield, on Flickr Eduard Hellcat II 1/72 Eduard Grumman Hellcat II by Shaun Schofield, on Flickr Tamiya Bf109E-4 Tamiya 1/72 Messerschmitt Bf109E-4 by Shaun Schofield, on Flickr Academy Super Etendard Academy 1/72 Dassault Super Étendard by Shaun Schofield, on Flickr Airfix Hurricane I Airfix 1/72 Hawker Hurricane I by Shaun Schofield, on Flickr Academy F-14A Tomcat Academy 1/72 Grumman F-14A Tomcat by Shaun Schofield, on Flickr Arma Hobby Wildcat VI Arma Hobby 1/72 Grumman Wildcat VI by Shaun Schofield, on Flickr Hasegawa Avenger II Hasegawa 1/72 Grumman Avenger II by Shaun Schofield, on Flickr Tamiya Corsair IV Tamiya 1/72 Vought Corsair IV by Shaun Schofield, on Flickr Academy Helldiver I Academy 1/72 Curtiss Helldiver I by Shaun Schofield, on Flickr Airfix Do17z Airfix 1/72 Dornier Do17 by Shaun Schofield, on Flickr Revell Ju88A-1 Revell 1/72 Junkers Ju88A-1 by Shaun Schofield, on Flickr Eduard Hellcat II 1/72 Eduard Grumman Hellcat II by Shaun Schofield, on Flickr Revell Tornado IDS Revell 1/72 Panavia Tornado IDS by Shaun Schofield, on Flickr Tamiya Corsair II Tamiya 1/72 Vought Corsair II by Shaun Schofield, on Flickr Academy F-4J Phantom II Academy 1/72 McDonnell Douglas F-4J Phantom II by Shaun Schofield, on Flickr Airfix Sea King HC4 Airfix 1/72 Westland Sea King HC4 by Shaun Schofield, on Flickr Fujimi A-4E Skyhawk Fujimi 1/72 Douglas A-4E Skyhawk by Shaun Schofield, on Flickr Thanks for looking, hope they were of interest. Merry Christmas, Shaun
- 18 replies
-
- 29
-
-
- 1/72
- Battle of Britain
- (and 1 more)
-
Hallo again Here is my F-35B. The kit is from Kitty Hawk. Scale 1/48. The etched parts are from Dreammodel. These are the finest etched parts I ever worked with. Highly recommended. All masking was hand done. Happy modelling
- 15 replies
-
- 38
-
-
 Hi All! This is my latest finished build in 1/144 scale. Why ”NOTSnik”? Because of the Sputnik. In 1956 US Navy Naval Ordnance Test Station was developing various unmanned vehicles. One of them being air launched vehicle propelled by motors from SUBROC antisubmarine missile. Following Sputnik launch this idea was successfully sold to high authorities as simple and low-cost way of achieving satelite orbits. Originally known as ”Project Pilot” it quickly gained nickname NOTSnik. Douglas F4D-1 Skyray was assigned as a carrier, effectively acting as missile ”first stage”. Under a lot of political pressure, in summer of 1958 six launches were attempted. All of them failed due to technical difficulties. The program was classified until 1994. The model depicts early aerodynamic test vehicle, later missile would be much larger, consisting of four SUBROC motors wrapped together, somewhat similar to first stage of Nike-Hercules SAM. I used Miniwing kit upgraded with Shelf Oddity photoetched details and decals.
 -
Hello mates! Here is one of my Tiger Twins built 2004. These old pictures were on film and i apologize for the tarmac from the middle of Ural . That early dayglo VT-23 training Tiger 331 is converted with a selfmade short nose, IFR receptacle and no LEX as pictured in Detail and Scale. Don Hinton helped me a lot with great walkarounds shot by himself. Thanks, Don! Decals were custom printed by my Epson (RIP). It is an old kit, not with the resin nose Hasegawa added later on some. This resin nose is wrong (too short), because fuselage is sleeker from front LG on. Cheers, Thomas
-
 I have always wanted to build the RMN Super Lynx. The Malaysian Navy owned 6 of these. They are of the 501 Squadron based in Lumut, Perak, Malaysia. Started this little project over the lock down period and voila it is now complete. As you can see, there have been many add ons, through scratch buildings. The base was additively manufactured (white pla) using Ender 5 pro. The frigate base was from coastalkits (bonded and blended with the base). The base kits were 1x HobbyBoss 1/72 Super Lynx (RN) and backed with a Mk88 (German Sea Lynx) to give me the 2 Sea Skuas/to create the folded tails. The engine bay for mk100 conversion was from a Malaysian company (named Naza Model Art). I used a lot of Tamiya epoxy putty for the scratch build. Enjoy! Shakir (Southampton)
- 9 replies
-
- 23
-
-
- Super Lynx
- Navy
- (and 1 more)
-
Finally done. I see I started this around Christmas 2017, so it's been over three years in the making. There are lots of scratchbuilt mods and replacements, most of which are covered in the WIP, which can be found at: Just some are: Modified the main and tail rotor gearboxes and drives to more accurately represent their appearance Modified the attachments for the main rotor grips to give a more realistic appearance and provide a droop to the blades Removed the weird hump from the engine deck and scratched a tray in lieu Cut the engine up, placed joiners in the sections and added almost everything else you see from scratch Modified the oil cooler to look a bit more like the real thing using plasticard and wire mesh Scratchbuilt the hydraulic services on the forward left side of the deck Added hoses/wires/pipes to the engine, main transmission and hydraulic services Completely scratchbuilt the landing gear Scratchbuilt most of the interior and instrument panel Removed the Wasp bulges on the fuselage and added Scout ones, where applicable Scratchbuilt the horizontal stabiliser and attachments Removed the Wasp fin and scratchbuilt a Scout one in lieu Scatchbuilt the tail stinger and supports Cut open the steps in the fuselage and blanked them off Added landing, nav and anti-collision lights from sprue/spares Scratchbuilt the cargo hook and attachments Added/made all antennae (except the two on the nose which are kit items) Made the ground handling wheel mounts from scratch and modified the donated wheels to suit Painted with Humbrol enamel Oxford Blue, Tamiya acrylic Clear Blue and Modelmaster enamels flat black and silver. Clear coats of Future (gloss) and sightly flattened Future using Tamiya X-21 for the top coat. Modelled as N8-102 earlier in her career and before she was painted in the high-vis dayglo orange colours prior to her loss and subsequent recovery overboard from HMAS Moresby using the Hawkeye Models decal set (which was great) and some of the kit decals for the rotors (which were absolute rubbish but sort of worked in the end). Lots of faults but it'll do for me. I'll add the windscreen wipers after I retrieve them from my other workbench back in Adelaide as they're on the Fujimi Kiowa sprue I used for some AH-1P Cobra its in a previous project. Lots of frustrations along the way and there are still a heap of issues but I'm happy enough with it in the cabinet. Someone's sure to release a good 1:48 injection-mouilded Scout now but I won't be buying it as this will suffice.
- 8 replies
-
- 17
-
-
- Navy
- Westland scout
- (and 1 more)
-
@Hi All. Now the title may give this away but let me expand! I was driving home last night and thinking about FAA (Tony sea venom started this actually, so this is your fault Tony) and how many great subject there are and this made my thoughts turn to the tiny walrus's on my airfix HMS Belfast (that i haven't built).... this than made me think about a navy GB.... I cant remember on being done or put forward, but then i haven't been here that long. So the parameters of the GB: ANYTHING that has or is under the command of A NAVY....anywhere.... To clarify, it has to be real, no what ifs (there's a GB for that :)) and you can prove that it is under the command of a navy, the navy has to be real as well! the world is your oyster (see what i did there) really, figures of armed forces in the navy, aircraft, boats, veihcles, subs, the funny russian jet boat planes (were they in the navy) seal team 6 fast roping from a helicopter even.....as long as it served in the navy. Fully away this will miss the next vote, but at least that gives it time to gather any intrest. Please let me know your thoughts Rob 1. @Rob85 2. @theplasticsurgeon 3. @vppelt68 4. @modelling minion 5. @helios16v 6. @NotDaMama 7. @Corsairfoxfouruncle 8. @Romeo Alpha Yankee 9. @trickyrich 10. @Valkyrie 11. @Paul Bradley 12. @Beazer 13. @Col. 14. @Grandboof 15. @Jb65rams 16. @Grey Beema 17. @TEMPESTMK5 18. @Ray S 19. @jrlx 20. @CliffB (sorry) 21. @DaveyGair 22. @825 23. @Dansk 24. @zebra 25. @Paul821 26. @dnl42 27. @exdraken 28. @theplasticsurgeon 29. @Stew Dapple 30. @Jabba 31. @Ernie
-
Newbie here (to the forum that is). Signed up on the forum last year with the intentions of trying to spark the building again........but my lack of motivation over the past year or so has done me in. Modeling and Photography have been no existent. Woodworking has been a little here and there. Been playing a little World of Warships here and there and decided to get a kit, well actually a couple, and see if I can get motivated a bit. So I am going to be building this kit........guess it's a 1942 version. The kit instructions call out Mr Hobby Aqueous and Mr Color. They call out Mr Color 14 for Navy Blue and Mr Color 365 for Deck Blue. Looks like 365 is Gloss Sea Blue (USN Fighter)..........which seems odd to me, but then again I build planes. I primarily use Tamiya or Mr Color. No longer have a local hobby shop so I'll have to order all my paints. Anyone have any Tamiya Formulas for those two colors...........or any other suggestions? Not worried about accuracy kit wise, but would like to get colors close. Might try to do an in-progress build along just to motivate a little. Thanks! Hope you don't mind a Yank hanging out and asking questions! 🤣
-
http://www.historichelicopters.com Take a look at the link XT761 ground running first time in 32 years. Fab stuff....not a sea king but close😂
-
Hallo again This is Helldiver from ACC. With some etched parts from Eduard and masks from Montex, I did it. The ordinance is from aftermarket, but I had big troubles to get the HV rockets in a proper position on the wing. The key is the Wolfpack wing fold set. It is wonderful. Really a great design but not so easy to get along with it. This model was the star at our exhibition of: Naval Aviation at the IPMS-Austria model show in Vienna in 2014. Happy modelling
-
The Barracuda Actually, it was the type of RAF a/c, which caught my attention early. No kit was available. At the beginning of my scale modeler’s second life, 25 years ago, the RAF was my focus. When Special Hobby released the High Tech version, so I wanted to build it. My wife got additionally the Mk. V and so a third kit of the early version shifted to me. Three kits I had. The target was the Tirpitz. By some asking, I got in contact with a person in New Zealand, whose father was part of the striking team. Therefore, I got access to operational data and original bomb loads. These models are as authentic as possible. The build was at this time the absolute maximum of my level and skill. You may see something interesting. These models are not perfect at all. The entire resin undercarriage was done with steel pins, to get a correct and stable fit. Happy modelling
-
Hi guys, i am in need of a decent 1/48 US Navy "shooter" for an upcoming tomcat diorama. does anyone know where i can get just the one figure, or a set of deck crew
-
...and here I go with my recently finished Corsair, from HobbyBoss. Really great model kit ( but some exaggeration in the rivets ) , and a great fit. Have added a PE set from Eduard, and some scratch for the cockpit and the tiny antennas from the nose. And for the heavy weathering I used oils. Really happy with this one Ricardo.
- 10 replies
-
- 36
-
-

-
Hi, Yet another newbie question Can somebody please point me to a place where I can find more information about the name, size and construction of this antenna type used by the Russian Navy, as shown below? I would like to scratch built it for my next project. In case you have more information about how to build it, that would be even more helpful. Thanks! Cristian
-
 1/72 Airfix Lynx built as the HAS.3 special fit as flown from the type 22 frigate, HMS Brave; along with a Bedford Tactical Refueller in Royal Navy Scheme. Some decals were poorly printed but overall not a bad build.
 -
 Hello Britmodellers; here's my new project, the probably well known 1 72 Hasegawa F4-J Phantom II. I'm moving out of my comfort zone here, as I normally build in 1 48 scale, but I got this kit at bargain price and I decided (after a very challenging RE2002 from Italeri) to try with this. I intended to build this OOB, but then I got tempted along the way ... and I ordered the Eduard Pre-painted zoom set for the cockpit (hasn't arrived yet). Plus I sourced an old Eduard PE detail set at my local shop (sorry, forgot to take pics before starting cutting out pieces..) So I started with a quick dry-fit of the main parts: Fit is pretty good, a breath of fresh air compared to my previous build ... Probably a couple of tricky points from what I can see now: main fuselage to wings join and main air intakes to fuselage. Then it was time for som PE parts: first of all the speed brakes The moving part is made of two pieces, and you have to conform it to the kit parts before proceeding Then I removed the corresponding section on the wings The third PE part (sorry, I wouldn't know how to call this in English): Other side, this shows a bit how I did it I've also added some PE details in the wheel bay area Tail chute cover PE detail Next, it was time to start gluing the fuselage main section; I've added a reference tab to the lower part, to allow for a better alignment ..which turned out to be useless, as I had to enlarge the first pin hole towards the front (you see the corresponding pin on the above pic, top right corner) to have a good fit, so the tab isn't touching the opposite fuselage half. Gluing this per sections, trying to achieve a stronger adhesion: That's it for now. Comments, suggestions and any kind of tips are more then welcome. Ciao
 -
Ok, my first attempt here… maybe complete nonsense to show the British one of the most British helicopters. But I'll give it a try. Part of Italeri's Falkland's war anniversary kit was this Westland Wessex HU.5. Scale is obviously 1/72. The decals came out of 5 different sheets, two were old Modeldecal ones… Vallejo and Alclad provides the colors, Eduard the PE-parts. To be honest, it was the first time I used that amount of aftermarket parts. I hope You like it despite my very modest skills… and the fact, that details are presented here in more than twice the original size…
- 41 replies
-
- 55
-
-
I don't do RFIs very often but I'm pleased that I've finished this and its turned out not too bad. A couple of Airfix 54mm figures, some scratch building and some parts from the spares drawers. A Royal Marine Sergeant, circa 1805
- 2 replies
-
- 6
-
-
- Royal Marine
- Navy
- (and 1 more)
-
First one off the bench for 2016, Airfix new tool Wildcat. I waited for the Starter set as I preferred the colour scheme and markings in this boxing. A lovely wee kit to put together, the only fiddly bit being the gear on the gear down option, but well thought out by Airfix. Paints were Tamiya White and dark sea grey (slightly lightened) for the main scheme, and Vallejo and Humbrol for the detail bits n pieces. Decals were straight out the box, there's only about 18 of them. Weathering was with Flory's dark grey wash, acrylic washes and then pastels after the first Matt coat, these were sealed in with another light Matt coat. Only thing I'm not 100% happy with was the canopy framing, some of the paint chipped off when removing the masking, but in 1/72 I ain't going to try and touch this up! Photo's are off the iPhone so not the best, but hope you like it, it's one slightly (very, very slightly!) closer to clearing my stash! Rgds, Eng
-
Finished this a few weeks ago but only just got arounbd to uploading pics. Not quite the correct grey (which was totally my fault) but still looks ok. An enjoyable build, so much so that i have also bought the F version.
- 19 replies
-
- 45
-
-
So I was in Westfield Shepherd's Bush and saw the modelzone corner in WH Smiths which I had forgotten was there! Needless to say I went in, had a look, and got the new tool AV8 which I had been intending to get around to building, being a big harrier fan. I liked the look of the Spanish scheme so ended up doing that. I used Tamiya XF-55 Deck Tan for the upper side and XF-2 Flat White for the underside. I brush painted using the thin paint-large brush-lots of coats method and I think it turned out OK. I went for a clean job to bring out the transfers which I thought were rather nice!
-
Lynx HMA.8 XZ719 pics from Richard E