Search the Community
Showing results for tags 'tamiya'.
-
Hi all, I just finished my build of the Tamiya Morris Mini Cooper 1275s on 1/24 scale in a diorama. It cost me more than 300 hours to complete this! I hope you like it and for those interested in how I built this, a comprehensive how to is shown on my video channel. All the best! Rob
- 18 replies
-
- 47
-

-

-
- diorama
- Mini Cooper
- (and 1 more)
-
 Hello guys I would like to show you my model F-15C National day 91 special livery the kit is Tamiya F-15C 1/48 the decal is custom made I hope you like it ˆ_ˆ real photo for the aircraft
- 12 replies
-
- 37
-
-
 Now what would be an airfield scenery without some GSE. As i mentioned in the main part of this project, i almost went for the full set to sort of speak, with tanker-trucks, towing-tractors and so on. But i managed to knock some sense into myself and decided to go for something nice and simple instead. And what could be better than a beautiful piece of French automotive history in some German grey. I was kinda debating whether to do a WIP post for this at all, since it's likely to be a one day build, but why not. Would have probably included some WIP shots to go along with the finished product anyways. And here are some links to the rest of this nightfighter project of mine.
 -
After having finished my wildcat I immediately started on my next FAA project. I enjoyed making the Martlet and its camo so I decided my next project would be a birdcage corsair (Tamiya 1:72 specifically). I got printscale decals ready and it will most likely be Corsair F.Mk.1 JT150. Cockpit Should be quite a quick build, similarly to the Martlet which I finished in six days.
- 9 replies
-
- 11
-
-
- Tamiya
- Fleet Air Airm
- (and 1 more)
-
 Hello Dears, Did I have mentionned this building ?? The Monogram Dash F has been started in 1988 or so.. Will search where the Bushmasters are stationned at the time, but I think it was Bentwaters... I read a book about the projected nuke war, they told about the Squadron, There was a Mk 7 nuke for each bridge of the Vistule river, would have 3 or 4 eyed fish For god's sake they both stayed quiet or almost, no mushrooms Modifications on the pylon for the Mk 7 The Tamiya one is a more recent start, 6 or 7 years ago I think. She is retro modified, from a dash G to a dash E. Goog kit, I used parts from the Verlinden kit, this kit is just a copy from the original parts, there is a slight difference, almost not noticeable. And some parts from a Heller X-kit, so I believe resin parts are from Renaissance.Don't Know, More to come soon. Thank for watching. Sincerely. Corsaircorp
 -
My Tamiya Marder I is finally completed! I started it a couple of years ago but couldn't motivate myself to actually finish it. Somehow, last week, I sat down and got it done. Tamiya's Marder I is a nice little kit. Everything went together flawlessly and it was a joy to build. I added a few small improvements, including ammunition containers and tarps in the fighting compartment. Nanond
- 16 replies
-
- 41
-
-
 The Komatsu light armored vehicle (Japanese: 軽装甲機動車; (kei-sōkō-kidōsha) is a Japanese military vehicle first produced in 2002. Currently used exclusively by the Japan Self-Defense Force (JSDF), it has seen use in the Iraq War. It is built by Komatsu Ltd. Defense Systems Division in Komatsu, Ishikawa, Japan. Komatsu's factory designator for the vehicle is KU50W. The exterior resembles the Panhard VBL, used by the French army, but the LAV has 4 doors and a large cabin for carrying soldiers. The LAV can also be transported by air in vehicles like the CH-47J and the C-130H. The Tamiya kit comes with a die-cast chassis, which will be a first for me. I'll probably go for the Armour School Regiment option, complete with machine gun and rear equipment racks.
 -
Hello guys I would like to show you my model F-15C National day 91 special livery the kit I use is Tamiya F-15C 1/48 the decal is custom made I hope you like it ˆ_ˆ real photo for the aircraft
-
 So for my first GB anywhere I have gone all in and will build a pair of Tamiya 1/48 P-38s. The first will be the P-38G-15-LO, s/n 43-2475, 'Babe' complete with the Eduard gun bay set and some other AM that is on route from Hannants along with the Decal Sets Secondly then I will tackle the all metal finish with the P-38J 42-67408, 42-67408 'Double Trouble' - This will be a more OOB build So plenty to keep me working on as the dark nights draw in Kom
 -
Dear Friends, Allow me to share the build history of my Tamiya Type 10 Tank. I started this project many months ago, but I joined Brit Modeller too late to participate in the "Turning Japanese" Group Build. Here's what it looked like on Day 1: Tamiya's kit with Passion Models PE set. I thought this was going to be a quick and easy build, but I was dead wrong. I thought this was another "patriotic masterpiece" like their Type 90 or Type 74 back in the days. But instead it was sub-par to the kits they released in the past decade. It felt like they really rushed to get this one on the market. Most details are excellent, but many corners were cut 🙄. The Passion Models PE had a lot of errors too. But most importantly, my project was stalled by a series of unfortunate events in life, but that's a long story... Things were so bad that I hesitated posting WIP here, because I had doubts about finish it. Well, with the build close to the finish line, I'm finally comfortable sharing it here. As a teaser, here's what the main body looks like dry-fitted with tape: (p.s. Some of you may recognize the photos from my post in Armorama... Yes, I decided to jump ship! 😎)
- 24 replies
-
- 11
-
-
My first WIP, and I’m stepping in the ring with this, Tamiya's brand new P-38G Lightning. Inside the beautifully designed box you get a sumptuous kit without a fussy mix of materials - just plastic, all of it crisply moulded and finely detailed. I don’t think I would’ve chosen to build a P-38 without all the superlatives being thrown at Tamiya’s new tooling. However, it’s a fascinating subject, and part of the fun of building kits is the research it can lead you to. I’m going for the P-38G, Rex Barber’s legendary ride in Operation Vengeance, one of the longest interception missions in WWII. It seems to be widely accepted that he was the one who shot down Admiral Yamamoto’s Betty, although the controversy surrounding this is worth reading about (https://modelairplanemaker.com/2019/08/09/tamiyas-1-48-p-38-lightning-and-significance-of-miss-virginia/). Not only is it a compelling story, but the plane itself offers so many opportunities for weathering - a fun part of building Pacific theatre subjects (I sound as though I’m talking from experience, although I only have a Corsair under my belt so far). I'm hoping to get close to the beaten look of Barber's plane, complete with its lattice of marks left from the packing tape it was shipped in. I'll be building this OOB, apart from an Eduard seatbelt that might arrive one day (how about it, 1001modelkits?). The cockpit has a wealth of detail, and slips together with the kind of fit for which Tamiya are rightfully celebrated - ie. perfect. I've heard that a more authentic colour for the interior would be closer to RAF Interior Green, but this is art and not life, and I wanted the punch of the yellowish green called out in the instructions. All the details were painted by hand. I gave the IP decal blobs of gloss coat over the dial faces - a nice pop against the Nato black of the panel. The tub sits in the fuselage snuggly; every part of the build reminds you of the level of engineering in this kit. I just hope I can do it justice. Thanks for your time!
- 53 replies
-
- 27
-
-
My first new kit of 2021. When I heard Tamiya would release Marder 1:35, I was very excited. The kit arrived to me at the end of 2020 and I wasn't disappointed. I spent a few evening with it and most of the construction was done, including a few bits of improvement. Soon to painting. Nanond
-
My version of this iconic little wonder. Very popular here in Finland at the -80's. all chorme removed with Mr Muscle drain opener and then painted with alclad products. Engine, forks, exhaust and mud guards are all bolted with M1 to M1.4 bolts.
- 3 replies
-
- 9
-
-
- motorcycle
- Tamiya
- (and 1 more)
-
 My next quarantine build is Tamiya's Beaufighter TFX. I'm starting to add some details, and corrections ... The engines with the exhaust pipes, cowl braces, cleaning up the exhaust ring and the flame damper exhaust with the cabin heater pipes (a detail that seems to get missed) Correcting the balance and trim tab linkage, and dropping the elevators ... Adding some detail, brake lines, axle pillow blocks and pivots to the gear. Also flattening the tires and drilling for axles. Rescribing and correcting the wing panel lines, adding the gun close off patches, opening up the oil cooler outlet etc ... and I'm just starting to add fuselage and cockpit dtails ... It should be a fun build, the Tamiya kit is a very nice starting point. The machine I'm building will require stealing the armor piercing rockets from a Mosquito kit for use on the Mk 1b rails from the kit.
- 54 replies
-
- 19
-
-
- Tamiya
- Beaufighter
- (and 1 more)
-
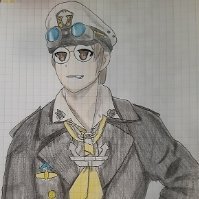
Hello all, i hope everyone is well This is titled as a belated birthday wish as it was the P-51's 82nd birthday on the 26th October. This is my 1/32 Tamiya P-51D done as 'Glengary Guy' and this kit is just dream to build and after the tornado build....it was a great mojo rebuilder. This aircraft was piloted by Capt. Glenn Martin Webb. Glenn Martin Webb flew P-51D Mustang with the MC-Z lettering and was named 'Glengary Guy' using his name (Glenn), Gary (son), and Guy (son). The right side cowling read Jackie (Wife) This is the info I have found so far as I thought maybe he was born in Gleengary or something haha! (This is the info i found, but not 100% and would be very interested if others have some info) Paints were Tamiya and i was very impressed with the new lacquer paints in their range, the LP-11 (Silver) is tough as old boots and was a great base for the main colour and the chipping, the standard Tamiya paints were durable but could easily be chipped over the tougher lacquer paint. Red Fox Studios cockpit set was also added to the kit. Anyway, over to you :-)
- 16 replies
-
- 52
-
-
-
 Lt. Gerald Anderson RCNVR was the last Canadian to die in the Second World War and while being the first, last, thousandth, or ten thousandth to die makes no difference to the individual, it carries a poignancy for the rest of us that resonates three quarters of a century later. Anderson died the same day as Lt. Robert Gray VC. Robert Gray’s sacrifice is widely commemorated in Canada, and even in Japan - and rightly so; But Anderson also gave his life that day, and like Gray didn't get the chance to enjoy the peace for which he had fought no less courageously. As there's already plenty of model KD658 X/115's out there, my Corsair is marked as KD456 X/127 (the #127 of which is probably/possibly how his aircraft was marked) in remembrance of Gerald Anderson who died aged only 22 years old, also on 9th August, 1945. The kit was Tamiya's 1/48th which I modified to FAA spec but clipping the wings and adding the fuselage vents. I didn't do much else though I am sure there are a few other mods that could have been incorporated. The kit lived up to its reputation and my experience in being largely simple to build. I painted all of the markings, and am indebted to @iang in particular for help in deciding to mark the airframe X/127 for Anderson's aircraft that day. We don't know for sure it was 127, but it's a strong possibility - stronger than any other we could come up with. I based the weathering on two main influences. The first is the excellent walk around pics of KD431 in the Walkaround section here at BM. I learned that KD456 was issued to HMS Formidable only a few days before 9th August but that it wouldn't have necessarily been new at the time, it more likely was back from a major service. Additional to that, and somewhat tenuously, the S/N would tend to suggest similar ages between KD431 and KD456 so I based my weathering on the assumption that both would have similar wear and tear. As it was just returned from maintenance I weathered mine to about 50% (so to speak) of KD431's weathering. If you have an hour or so, the whole story is laid out in the WIP; The photos; Cheers.
- 19 replies
-
- 60
-
-
-
- Tamiya
- 1/48 Corsair
- (and 1 more)
-
So, new day, new project. Since i'm still waiting on aftermarket parts for my Tiger project i decided i want to do something completly different. A Sherman.... I got this kit from Tamiya for a very good price and i thought i could give it a go. The M4 early type is a tank i know little about. After reading the build guide i decided to get me some information. So i downloaded a couple of usefull photo's on details. i know there are a lot of experts here that can provide me with additional tips on building this model. Also i want to state that this will be a ootb build, no PE or aftermarket parts. This means that there will be historical inacuracies regarding some bolts, hinges, thickness of certain parts etc. For me this is no problem. That beeing said, i want to do this iconic tank justice so i'll take it slow going over every step. No heavily damaged tank this time. I want to tone it down, focussing on a good and tidy build, work on my airbrush and paint skills and do some very light chipping and weathering. Can't blame a guy for trying 😁😉 The kit comes with figures and they look fairly descent so i might add them ( the KV2 project was a real eye opener regarding figures ) On to the build itself. Beeing a Tamiya kit i expect no major issues, however, the fit of the front hull plate seems a bit off Also, i need to close the gaps above the tracks because otherwise it will be a see trough model. Nothing that can't be solved with plasticard. the lower back plate is finnished and fitted, no issues there. I'm off to a good start. Enjoying myself wich is the most important part of modeling. I want to thank you guys in advancement for all the tips, tricks, technical details and words of encouragement. Feel free to tag along. I'll keep you guys posted. Cheers! 👍👍👍
- 74 replies
-
- 11
-
-
Hi, This is my recently completed Tamiya 1/48 US 2.5 ton 6x6 Airfield fuel truck (32579). A very nice kit though I also added the Hauler photo etch set. The figures come with the kit. Not much scope for stowage and accessories but a very enjoyable build nonetheless. Painted with Lifecolor acrylics and weathered with oil paints and a light dusting of Ammo Mig pigments. The base was made with AK concrete effects. Best Wishes Stuart
- 15 replies
-
- 45
-
-
-
 Good evening, just finished the Tamiya Zero (short wing version) in 1/48 as a very quick build. The kit is stil the old one dated back to the seventies with a lot of rised panel lines so I had to do a bit of rescribing. The kit is basically OOB with just few sratchbuilt details in the cockpit and on the engine. Painted as ususal with airbrush using Tamiya stuff. Despite the age of the kit and the "quick build approach" I'm quite happy about the outcome. Enjoy pictures and please feel free to comment. Cheers Andy
 -
After being bummed about trashing my last simple Bf109F-4 trop build near the end of completion, I got back to the bench with this Mustang. I picked another simple to build kit, a Tamiya 1/48. This time around I went with a little more challenging paint job. God willing it's gonna finish as "Berlin Express" Other than adding a flat cockpit floor and gun blast tubes it's gonna be OOB. I'm really happy with it so far. The paint job should be fun. Thanks all for your support. Ron
-
Newly completed the 1976 vintage Tamiya 1/48 Lancaster B1 Special with Grandslam Bomb. Had quite a few issues with this kit which surprised me with it being a Tamiya although I've never made an old Tmiya til now. The main issues being with poor fit of parts requiring lots of filler. Also didnt help with the vintage black plastic not really interested in being glued and staying glued. (didnt seem to melt together like modern plastic/glue) Shes a big bird being 1/48 and a nice change being in daylight bomber scheme instead of the normal black. As always thanks for your comments and suggestions/tips. So here she is. PD133 YZ-P of 617 Sqn 1945 RAF Woodhall Spa.
-
Hi all, I am trying to find a paint colour as close as possible to what NASA used to call International Red. This is the colour of the booster gantries used in the early Mercury and Gemini launches. I am gonna build the old Revell/Atlantis Mercury Capsule & Atlas Booster kit. The closest I can find is Tamiya's LP-42 Mica Red. Does anyone have any better recommendations? Thanks Steve
-
 Hi All, My latest completion is Tamiya's superb P38F/G, finished as an F-4-1 aircraft of No.1 PRU RAAF in 1943. A limited number of P38s were supplied to the RAAF for this capability, and they were converted by the RAAF to approximate F4 standard. This is my entry to the 'Forked-Tailed Devil: P38 Lightning STGB', which can be found here: https://www.britmodeller.com/forums/index.php?/forum/773-the-fork-tailed-devil-p-38-lightning-stgb/ Here's the WIP if anybody is interested: The kit itself is superb - state of the art in terms of fit and engineering. I used a Red Roo set for the conversion - this set is intended for the Academy kit, so there were a few fitment issues to be overcome. Despite this the conversion kit can be made to work (although you may judge differently for yourself!). The aircraft I have modelled is A55-2. Although I cannot find any photos of -2, here are a few photos of A55-3, a sister aircraft (copyright Australian War Memorial and RAAF - photos for discussion only and will be removed on request): These aircraft had their Neutral Grey undersides oversprayed with RAAF Sky Blue to remove the 'US ARMY' markings. A disruptive pattern of Foliage Green was then applied over the existing Olive Drab. I have chosen to colour the spinners black, as I felt there was sufficient contrast with the Foliage Green to warrant this. The interior was completed in Interior Grey Green, as there is evidence to suggest that earlier P38s used this shade in common with the Hudson, the only other contemporary military aircraft Lockheed was supplying to the RAF and RAAF. Anyway, on with the pictures! Finally, here's a couple of shots with some RAAF contemporaries showing the variation in camouflage schemes apparent at the time: Thanks to all that have offered kind words and encouragement along the way - it has been sincerely appreciated! I've also enjoyed my first GB, and it surely will not be the last! Thanks for looking, Roger
- 28 replies
-
- 60
-
-
-
 The Tamiya P-38H kit, fortunately, contains a complete P-38F/G kit in addition to the few parts needed to build the H version. I wish that Tamiya included both rear canopies, internally framed and unframed. For this project, the use of aftermarket items will be limited to decals and a set of the curious flexible seat belts marketed long ago by Cutting Edge. In preparation, I have been gathering information about the P-38H. The project notes, now in the reference sectipn, list the minor changes to build a more accurate H model. The information was gathered primarily from posts to Hyperscale by John Clements and others with a little input taken from my period radio manuals and slim P-38 reference materials. All errors and omissions are mine. I plan to start with the experiment to install the flexible seat belts onto the kit seat. More to follow. Don
 -
A place marker to stake out my place in the GB, if I may . My build will hopefully compliment @trickyrich and @Dunny's builds as the thuird of the RAAF P-38's used in the PR role. They've both done an excellent job of introducing the topic that my own effort would only pale next to theirs. Suffice to say I hope to do the topic justice, I've been looking forward to attempting a Haze scheme for a while. I won't get stated for a little while though - that way I get to see their progress first - as I've one project to finish and one more I'd like to do before starting this one. We'll see about the extra one, that might be ambitious. Cheers.
- 8 replies
-
- 7
-
-
- Tamiya
- P-38 Lightning
- (and 1 more)