Search the Community
Showing results for tags 'Wildcat'.
-
Ok time for a quick relaxing build (lol). After the spitfire I'm back off to 1:72 land. I was hoping to build one of my nice Tamiya or Eduard kits but the paints I need are taking their sweet time to cross the Tasman sea... Anyway rather than waiting I've decided to get through a quick OOB build from my (tiny) stash. I've had Airfix's new tooled 1:72 Wildcat F4F-4 kit staring at me forlornly for ages and I decided to put it out of it's misery. I know... another Airfix kit but the plastic on this one especially on the wings and fuselage looked suspiciously smooth and had nicely refined details . I tentatively cut out a few bits and test fitted, and everything seemed to be in order. It's got a nice easy camo scheme to boot. Time to crack on then, Started with the cockpit bits. All seemed to fit, though there was some of that soft Airfix moulding on show on some bits. Nothing major though. I'm not going to spend weeks detailing this little office, looks good enough out of the box. Got some Gunze H58 Interior Green on, and sprayed some H51 Light Gull Gray around the wheel well bits. Annoyingly enough the H51 is a gloss paint so takes ages to dry and is very prone to acquiring fingerprints. I'll have to be super careful. Especially when I get to painting the underside Also had to do a bit of early glass masking with the underside windows but it wasn't too taxing.
-
Hi all First post here, I've been building armor for the last 10 years but after having my eyes opened to the turn around from airfix in recent years I have bought a whole load of planes that I forgot I loved and with that have found a new fondness for the application of decals, in some cases I've spent two days applying decals to a 1/72 plane! (a nice change from 3 crosses and two turret numbers!) I've also found that I can get models finished in good time and don't seem to get bogged down with the inaccuracies of a kit (due to lack of knowledge). Not to mention kits are £5 each not £50! Anyway hope you like one of my first planes in 20 years.
- 16 replies
-
- 31
-

-
 From my reference material, this is my understanding ... France and Belgium ordered an export version of the F4F-3, designated by Grumman as G-36A, powered (because of an export embargo on the P&W engine?) by a Wright Cyclone with a single stage two speed supercharger. These were taken over by Britain when France (who had taken over Belgium's order) fell. It was to have six 7.5 millimetre Darne machine guns, with two in the nose cowling and two in each wings. The French had sought some refinements to the G-36 design: A reflector gunsight was fitted and some armour and fuel tank protection was installed. In British service, the aircraft were known as the “Martlet Mk I”. The few which had been built before France’s defeat, were retrofitted to RN standards, including switching out the French radio and throttle. The armament was also changed. The engine cowled guns were dropped and two .50cal (12.7mm) MG fitted in each wing, although the gun positions were uniquely different to that in the F4F3 and other two gun winged variants. The remainder would be completed to the RN's modified specification. Otherwise, these Martlets were similar to F4F-3Bs. However, I can't find an official reference to a F4F-3B variant. I know there's the F4F-3 and F4F-3A. Can someone enlighten me? Also, any idea why the F4F-4B “Martlet Mk IV” reverted to the Wright Cyclone engine? Was it an attempt to improve the performance of folding wing, six gun Wildcats, by using a lighter single row engine than the usual two row Pratt & Whitney Twin Wasp? If so, I gather it wasn't entirely successful In trying to improve performance further, Eastern reverted to four guns in their FM1 development of the six gun F4F-4 and then took it further by also using the Wright Cyclone engine in the FM2. Thank you in advance
 -
Hello All, I am wanting to buy a few of the Airfix 172 F4F-4 Wildcats, as I see them pretty cheap at the moment. I would like to backdate/convert one to a -3 variant in British markings. I read that some had folding wings, some didn't. All had the two-flap cowl and 4 guns? On converting one to a Gloss Sea Blue late variant, say a FM-2, too much surgery and best to buy a whole different kit? Thanks for any advice/light you can shed. Jeffer
-
Good day, gentlemen. It's my next model. Kit from Airfix is clever but not perfect. Etched parts from Eduard were useful. Set offers several options to make. Including with folded wings. I did not want to completely break the geometry of the airframe. So I made a kind of intermediate option, which could not be. Please be indulgent to this.
-
Starting this kit is an attempt at regaining my interest in modeling. Lost interest due to the mad cow attack and my father having a heart attack. His time is up, he is 82 smoked for 70 years, but has excellent lungs. According to Admiral's instructions you can build an F4F-3, F4F-3A, F4F-3P and a Martlett Mk III and I think if you don't cut the fuselage you can build a Martlett Mk I. This is the first step - cut the fuselage. I am not so sure of the second cut though. I am wondering if these instructions a for their FM2. Thanks for looking. Stephen
-
Hi everyone, here's something slightly different. I work at a hobby shop on my days off from school and we often buy collections of model kits. A few weeks ago, we bought a bunch of kits from the family of a modeller that had recently passed away. In his collection was this Tamiya Wildcat that he had nearly finished. As the kit had been started, we could not sell the kit in-store. Therefore I took the kit home with me to finish what he started. I don't know anything about the modeller, his name, age, occupation, etc. All I know is that he was male and that he must've been a very good modeller. I'd really like to finish up this kit not only as a tribute to him, but to the many friends in this community that we've lost over the years. We may not have known anything about them apart from a username and their models, but they were family to us. Here's what I've inherited: some nicely done subassemblies. My portion of this build will be mostly assembly, plus painting and attaching smaller bits like pitot tubes, gunsight etc. He did a particularly nice job on the cockpit: And here's what I've managed today. I glued in the cockpit and the rear control surfaces. The rudder needed some touch ups and the stab had to sanded (carefully not to lose his finish) to get it to fit snugly. More to come.
- 28 replies
-
- 32
-
-
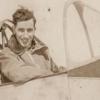
 1: Introduction/Justification For a long time now I have limited myself to building only aircraft from the mid-1930's to the early 1940's; partly because the colour and marking schemes interested me more, partly because that is the period of aviation and of the war than I find most interesting, and finally partly because time and money do not permit me to build models of every single aeroplane ever built and flown. I have noticed over the past year or so a change in my modelling habits, in that the construction of the kit has become as great a source of enjoyment to me as the painting and finishing and I think this has been largely due to the new releases by Airfix this year - I know that some of my forum-peers have had various issues with some of the kits and in particular the quality control (or perhaps lack of it) regarding the clear parts, but either I have been extremely fortunate or the majority of kits sold do not have these problems, in any event I have not had any cause for complaint. I recently found myself buying and building a couple of the new Beaufighters (even though I had made blood sacrifices to the Dark Lords to get a Mk.1 made and not a TFX) just because it looked like it would be a really nice, interesting kit to build, and it was. Around the same time I wandered even further from my usual areas of interest and got the Wildcat/Kate Dogfight Double set for the same reason, because the kits look interesting. Here's the box: ... here's what you get in it: ... instructions and transfers: 2: Mission Creep As usual rather than do any actual work and risk making a mess of it I'd rather get someone else to do it right. Not having any Pacific War colours in the paint stash - despite its embarrassing and ever-spreading bulk - I put an order in with Sovereign Hobbies for the relevant Colourcoats paints - n.b. do not use this picture as a guide to what the colours actually look like, they don't, the picture was taken under very bright lighting. In the instructions Airfix specify the Kate interior colour as '86' which is 'Light Olive' and is included in the little pots of paint that come with the set; however I was sceptical and ordered a set of AK Japanese Aircraft colours which includes one specifically named as Nakajima Interior Green: On opening up the box and shaking up the paint in question it reveals... ... actually a pretty close match to Humbrol 86 Light Olive. I regret nothing. Paint doesn't count as stash anyway. 3. Constructus Interruptus As the instructions start with the Wildcat, so did I. Here's the bits: I did some basic assembly, most of the parts just click together so I sprayed them assembled but unglued with US Interior Green: Then I read this... So Interior Green is probably not a good choice for a Midway-era Wildcat... fortunately Sovereign Hobbies do include both the Dull Dark Green and the Bronze Green 9 amongst their US colours so I put another order in and will have to do a respray when it arrives. On the plus side, slightly irritating though it is, at least I didn't read up on the colours just after I closed up the fuselage. 4. Displacement Activity In the meantime I have time to devote to painting the crews; here is the Wildcat pilot: I modified his footwear a bit by scraping off as much of the boot detail as I could; US Navy pilots wore shoes, boots being of questionable value on an aircraft carrier deck or if you are shot down into the sea. The rest of the painting was cobbled together from a google image search for USN pilots. Hopefully I'll start on the Japanese crewmen tomorrow. Cheers, Stew
- 268 replies
-
- 17
-
-
First one off the bench for 2016, Airfix new tool Wildcat. I waited for the Starter set as I preferred the colour scheme and markings in this boxing. A lovely wee kit to put together, the only fiddly bit being the gear on the gear down option, but well thought out by Airfix. Paints were Tamiya White and dark sea grey (slightly lightened) for the main scheme, and Vallejo and Humbrol for the detail bits n pieces. Decals were straight out the box, there's only about 18 of them. Weathering was with Flory's dark grey wash, acrylic washes and then pastels after the first Matt coat, these were sealed in with another light Matt coat. Only thing I'm not 100% happy with was the canopy framing, some of the paint chipped off when removing the masking, but in 1/72 I ain't going to try and touch this up! Photo's are off the iPhone so not the best, but hope you like it, it's one slightly (very, very slightly!) closer to clearing my stash! Rgds, Eng
-
Morning all, Sneaking over the line just before new year are my final two completions, the Airfix Wildcat and Tamiya Corsair. Both in 1/72 and completely out of the box. Two very neat little kits. Thanks for looking, comments welcomed Happy new year Shaun
- 17 replies
-
- 41
-
-
Hello All, Here's a new Airfix Wildcat with folded wings: Build thread here. Thanks for looking, Adrian
- 19 replies
-
- 34
-
-
Hello All, I bought the new Airfix Wildcat the other day from the model shop in Formby. I had dropped in to have a look, as model shops are a bit of a rarity these days, and bought something on the basis of "if you don't buy stuff from a shop, it can't stay open for you to look around". When I finished my Airfix Gnat, this kit was sitting on top of my modelling box, so I started it instead of picking up one of my long term projects. You know how it is... Now I know that Stew has been showing a Wildcat here as part of his DFD build, but I think I can sneak this in before he resumes his build. Get well soon Stew! The cockpit is a little gem in itself. I painted it in Humbrol 102 with a dark grey wash. I have some Humbrol 226 but I couldn't find it at the time and prefer the 102 anyway. The instrument panel decal looks more realistic after I gave it a dark wash too to tone down the bright white dials. I added some tape-and-fuse-wire seatbelts and a throttle, and replaced the gun sight glass with transparent plastic (later in the build). The engine comes up nicely too, although I had some issues with the propeller shaft: This not-rectangular window is my second short shot out of the two last kits I have picked up. Quality control, Mr Hornby!! I left the windows out and added them later using a film of Clearfix. Back to happy thoughts. The fuselage joined up without needing any filler at all, and it just needed a slight touch up to the scribing to carry it under the fuselage: I did do a bit of fettling though, just to ease off the stub wing attachment: Airfix have you bury the prop shaft in the engine, then add the propeller later on. I can see why they do this, but it doesn't make for a freely spinning propeller. In this case I drilled out the back of the engine, took out the kit part and replaced it all with a longer shaft running though an additional bearing at the back. Propeller blows round like a dream now! I also added some faked-up auxiliary equipment at the back of the engine and a tank (oil? petrol??) at the top of the fuselage. You can't really see either in the finished model, so it was a good call by Airfix to leave them out: I had bought the recommended Humbrols 125 and 129 in the old-style acrylic pots. The 129 tin was half empty and very thick, but usable if diluted suitably, and the 125 was a blue-black half-empty gloopy mess which went straight into the bin. More quality control issues... I used the Humbrol 129 underneath and mixed my own topside blue-grey from a mix of Humbrol 64 (aircraft grey) and 96 (RAF blue). I made several batches and the slight differences help to break up the surface. From there it proceeded disconcertingly quickly to the finish. Here it is with decals on (I use Humbrol Decalfix directly over paint) and the weathering started: I had a pile of fun making this kit, much more than I anticipated. The folded wing option is well engineered (although that lovely rib detail at the end of the stub wings is all but hidden) and the whole kit more of less falls together, even the undercarriage! Finished pictures in RFI. Thanks for looking, Adrian
-
Evening all, Having run out of steam a little with my Battle of Britain project, I've switched my attention to my main area of interest, naval aviation. I started a Hobby Boss F9F last week, but couldn't resist making a start on another couple of classic fighters whilst the Panther trickles along in the background. Having been o impressed with the Defiant, I wanted to crack open another of Airfix's recent toolings, and having picked up the Wildcat and Kate dogfight double, the F-4F seemed an obvious choice. My pair of Tamiya Corsairs have been screaming at me from the stash for some time now too, so I thought, given the similar schemes worn by the Wildcat and the Birdcage variant of the Corsair, I might as well crack open the latter at the same time. Both seem lovely kits, the Tamiya especially, though I guess that's to be expected. So, first progress, and after a bit of construction the cockpit interiors have been sprayed. Whilst not altogether interesting in itself, the answers to my questions in my other thread, and the IPMS Stockholm website proved to be fairly enlightening regarding the colours. The IPMS Stockholm page contains information regarding these colours specific to the types, revealing that my usual go-to colour of interior green was not accurate for either of these aircraft. For the Wildcat, and indeed most Grumman types it seems, a darker, Bronze green was used, whilst the Corsair had a dark dull green interior, as confirmed in my question thread. The latter is a little less clear cut it seems, but images posted by LanceB in my question thread of a recovered wreck seem to match with this green rather well. For the Wildcat, the Stockholm colour charts recommend Hu 75 plus a touch of other greens, which I was happy to ignore, as the neat 75 looked reasonable to my eye, whilst Hu 149 was suggested for the Corsair. This seemed a little bright straight out of the (very old!) pot so I darkened it a little with some of the Hu 75 and some black. Neither are 100% perfect, but not too bad I reckon, and lets face it, it'll be pretty difficult to see inside either cockpit once everything is closed up. Next step will obviously be to detail paint and weather the interiors, and I shall also set about getting the remainder of the interior colours laid down, notably that wonderfully garish pink in the corsair tail Thanks for looking, comments welcomed Cheers Shaun
-
Evening folks,with the 1/72 stash reduced to the being built Halifax and Lancaster and a yet un-started Boston I was perusing the hallowed pages of King Kit,s sale items and picked up a Trumpeter Il 28 Beagle(I know) ! for the silly sum of six quid,I normally order at around the Twenty quid mark so after Airfix's Widcat build thought I would give the Hobbyboss easy kit a go in the early yellow wings scheme so to make up the rest I ordered the Little Buffalo also in a pre-war scheme.Now I know these kits get some stick but for ease of building and general quality they're not half bad and quick to go together which suit;s me as that;s the part I like! So here's the boxes and tomorrow when I get the light I will post the sprue's etc. And for six Quid the Trumpeter Beagle is a cracking kit too!
-
 We've just this week received our stock of the 1/72 Grumman F4F-4 Wildcat Plastic Model Kit from Airfix! This detailed, new tooled model kit, based on the WWII era American carrier-based fighter, comes with a choice of 2 sets of decals! For more details, check out our newsletter here.
 -
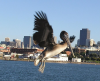
Operating from Newquay for the last couple of weeks has been this AW159 Wildcat Mk.210; 15-0603 wearing the UK serial ZZ543 prior to delivery to the Republic of Korea Navy. It appears to have been 'christened' Pepsi Wildcat by locals, can't think why?
- 5 replies
-
- 5
-
-
- Agusta Westland
- Wildcat
- (and 2 more)
-
 All, Just noticed that the Airfix website is now displaying the paint guides for the following new tools - (some with new boxart as well) AW Whitley - http://www.airfix.com/uk-en/shop/new-for-2015/armstrong-whitworth-whitley-mk-v.html Beaufighter - http://www.airfix.com/uk-en/shop/new-for-2015/bristol-beaufighter-mk-x.html Heinkel He111 - http://www.airfix.com/uk-en/shop/new-for-2015/heinkel-he-iii-p2.html F4F Wildcat - http://www.airfix.com/uk-en/shop/new-for-2015/grumman-wildcat-f4f-4.html Battle of Britain Set - http://www.airfix.com/uk-en/shop/new-for-2015/battle-of-britain-75th-anniversary-gift-set.html This should start off a few new discussions one would think!! Cheers.. Dave.
 -
Grumman Martlet AL246, pics thanks to Merlin 101. AL246 was subject to restoration at the Fleet Air Arm museum. This involved removing the finish it was painted in the 1960's to reveal the original WWII paint. This has revealed the upper surfaces are two-tone green and the lower surface of the aircraft duck egg blue.
-
Grumman F4F-4 Wildcat BuNo 5093, Lt. Cdr. John S. Thatch, Officer Commanding VF-3, USS Yorktown, Midway, 1942-06-04 Kit: 1/72 Hasegawa F4F-4 Wildcat Afermarket parts: True Details #72455 resin cockpit and wheel well detail set Squadron #9105 vacu canopy Decals: Aeromaster #72-093C F4F-4 Wildcat Aces Pt.1 The following improvements made to this kit were: Inner surfaces of wing halves and rear fuselage halves (rudder) were thinned down to obtain sharp trailing edges. Some panel lines were filled and some added according to reference photos. In addition, the overlapping panels (for example, on the rudder) were represented using thin metal foil. The cockpit was replaced by the True Details resin parts. The canopy was replaced by the Squadron vacu formed item. Since the Squadron canopy is designed to fit the Academy kit, some adjustment work was required for mounting it on the model. The canopy replacement forced widening the fairing above the control panel in the cockpit, which have originally had rather wide margins for placing the thicker kit canopy. This fairing was also thinned down for correct scale representation. The most serious flaw with this kit is just an empty space where the landing gear bay should be. This problem is partially solved by inserting the True Details tub, however some extra work was still required. For instance, the recesses to accommodate the main wheel are just repeated in full size on the resin tub and, since it is designed to fit the kit fuselage having rather thick plastic, these recesses turned out to be much deeper than they should be. Some filling and re-scribing was required to fix this problem. Some additional detail was also added to the rear bulkhead and to the engine compartment interior partially visible in front of the wheel bay. In addition, the fuselage walls around the front of the wheel bay were partially thinned down for the correct skin representation. The air intakes in the forward engine cowling ring were deepened and thinned down to scale. Some detail was added to the rather basic kit parts for the reasonable representation of the Wildcat’s complicated landing gear. The aileron, elevator and rudder hinges molded as solid pieces were improved by cutting out their inner areas. The missing central elements were also added to the fairings covering the hinges of the landing flaps. Too shallow kit exhaust stacks were replaced by scratch built parts and the fuselage panel around them was also somewhat refined by making extra steps, holes etc. A new rounded propeller hub and the visible part of the arrester hook were made from scratch. A larger pneumatic tail wheel provided with the kit was replaced by the solid smaller one which is correct for this particular a/c. The replacement wheel was the part left unused after building the F2A-2 kit as a Dutch Brewster Model 339C. Some further minor improvements made on the model can clearly be seen on the photos.
- 20 replies
-
- 15
-
-
I'm very close to finishing my 1:32 Trumpeter Wildcat and just dry fitting the canopy I found that it doesn't fit very well when it's shown in the open position. It's fine closed but I've put a lot of effort into the cockpit and want to show it off! Any tips to make it fit? There doesn't seem to be a 3rd party vacform alternative and I really don't fancy making my own.
-
 My latest project is finished.. This is my rendition of Lt. James Elms Swett Wildcat as flown on his famous Medal of Honor mission on 7 April 1943. This was his first combat mission and he became ace-in-a-day on that flight, shooting down 7 Japanese airplanes before being hit himself.. Not bad on your first day on the job.. He would end the war with 15,5 confirmed victories in 103 combat missions. He earned two Purple hearts, 8 DFC and of course the MoH.. The kit used is Tamiya. With Quickboost engine, Eduard Zoom set, CAM 48-111 decals, Ultracast wheels and seat (should have been with shoulder belts which I found out one day after I had the fuselage glued together..). Scratchbuild open cowl flaps, improved cockpit (no floor), gun sight, improved gun ports and metal tubes for guns. Paint used was predominantly Mr. Color and Gunze with clear lacquers by Future and ModelMaster. Eduard's color zoom set is wrong in color and so are the CAM insignias. The Tamiya insignia are of the wrong size as well.
 -
Pics thanks to Tim Burgess
-
- 2
-
-
- AugustaWestland
- AW159
- (and 1 more)