Search the Community
Showing results for tags '1/200'.
-
 ANA invited elementary and Junior school children to design a theme to celebrate ANA carrying their 500th Millionth customers (that's a big milestone number) which was won by Ms Yukie Ogaki from North Tokyo. Her winning theme represented a large Blue Whale as the main theme with several fish and other aquatic creatures swimming alongside. The livery was a one-off them and flew from 1993 on ANA's domestic routes with a capacity of 570 passengers fully loaded. Now over 25 years old, the decals for this kit proved virtually unusable which resulted in the majority of the kit being painted and hand decaled. This was a one-off design for ANA back in 1993 for their short range internal operations around Japan. Hasegawa released this kit moulded in blue (for those that don't like painting and was their first 747-400 model. Although very old, it was only the decals that were a pain and cost me weeks of extra time and pin stripe hand decaling challenges but I am pleased with the end result given the problems I encountered. It was also a good reminder of the fun I had back in the 80's and 90's when I used to focus on the Hasegawa Love Liner 200 series and has prompted me back in that direction once again. The photo below of the box contents shows the decals I could not use due to them being cracked and crazed, so I had to hand paint and improvise. Thanks for looking in, it may be small in 1/200 but these kits are great fun John
 -
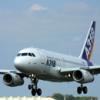
 Between my renovation projects and other builds, I decided to do something easy. Hasegawas 1/200 LoveLiners are a perfect diversion from nerve shredding projects... Built straight out of the box,Hasegawa's Boeing 727 kit is still one of the best ones there is. Despite being in the tiny 1/200 scale, its probably the most accurate representation of this famous classic that is available as a plastic moulded kit. The fit is also perfect and adds for a fun and quick build. Painted with Revell and Testors enamels. Hope you like it For better viewing,Hasegawa provides a display stand,this way its also possible to place more models in the vitrine....
- 17 replies
-
- 30
-

-

-
- BOEING 727
- HASEGAWA
- (and 1 more)
-
Tiny Gooney Birds! The American bird represents a C-47 of 317 Troop Carrier Group (TCG), 55 Troop Carrier Squadron (TCS) Mindoro, 1944. The Japanese plane is an L2D2 type Zero transport (“Tabby”) of the Yokosuka Naval Flying Group, 1945. Both models are 1/200 scale.
-
Hasegawas LoveLiner Series was quite popular back in the 80s and 90s and they still are today. Sadly Hasegawa has limited their range significantly with only a few airliners remain. The older ones,such as the Airbus A300 have become collector's items and some LL200 airliners change hands a rather silly prices. My stash of Hasegawa airliners grew a lot when I was able to obtain many of those from a colletor who was selling his stocks. Among those kits were a bigger number of A300s,two of which came now off the assambly line. The Thai Airways version is straight out of the box while for the Air Jamaica version I used the excellent decal set from Liveries Unlimited.The coroguard panels are from Liveries Unlimited as well. I had this sheet for many years,but I was never brave enough to use them.I was always unsure if these decals would conform without issues around all curves on the model. But to my surprise they worked superbly.Except the yellow roof,all other colors are decals The builds,like with all Hasegawa airliners,is straight forward without issues.They are nice build for in-between. Hope you like 'em
-
 Hi All, I'm taking a bit of a break from my Thunderbirds project to work on a new game I just received in the mail (ordered last September)! I now have as the titles says 27 very small aircraft to paint, and this is a scale unlike anything I have ever attempted before. I began by giving them all a nice hot bath as some of the aircraft had slightly misshapen wings. The soak soon sorted that with very little effort. I took the opportunity to give them a ll a bit of a wash as well, to make sure there was no residual mould release agent or other chemicals. Once dry, I cleaned up the surprisingly few mould lines, took some time to admire the details and then got them under the airbrush for a coat of light grey primer. Here are the Spitfire mkII and BF-109E after their primer was applied. and the Boulton Paul Defiant MkI Apologies for the photo quality. I then flipped them all upside down and gave the RAF aircraft a coat of Vallejo RAF Sky, and the Luftwaffe got a RLM76 I've now masked the undersides of all the RAF aircraft in preparation for a coat of RAF Dark Earth. This is where your help comes in, please! I know very little about Luftwaffe camo schemes, and even less about year specific patterns. I have begun researching, but my goodness the rabbit hole appears to be extremely deep, and wide, and oh so very dark! So any diagrams/patterns etc that are simple to follow would be appreciated. In addition to this, I want to get a standard camo pattern across the Spitfires as I do know enough about them to know they ran either the Pattern A camo or Pattern B camo, applied using rubber mats as stencils. My research here seems to suggest that the same pattern was rolled out across multiple squadrons at the same time, so the chances of my aircraft sporting different patterns seems to be slim. Is that correct? If so, does anyone have any tip, tricks, advice or suggestion on the best way to do this? I was unable to find masks in the correct scale, which leaves me either attempting to make 13 of my own using tamiya masking tape, or finding another method, perhaps brush painting would be the best way forward? If it is of any help, the markings I will be using are: Spitfire Squadrons 19 and 609 and BF109 Schwarm Gruppe I, II, III and IV All help and suggestions are greatly appreciated and needed.
 -
 Hi Everybody! Seasons greetings to All! New Year,New project, first on the Martime Build Forum. I've been modelling for a good while,but this is My first major warship build,and My first intensive use of photo etch,and I would like to share the step-by step triumphs and tribulations in a full build log to show My attempts and welcome constructive remarks on. First step is to constuct a base to work on the model,that will be the eventual core of the display case. Mounting hardware consists of metal pedestals,spacers,bolts and captive nuts (to allow the model to be removed once the decks are fitted):- Base cut to size from 15mm Contiboard,hull and board drilled,and mounting blocks and nuts fitted and hull bolted to base:- Deck beams fitted,and decks test fitted-all good! :- As this will be a fairly lengthy project,I decided to construct a dust-cover 'tent',which will be also used to finalise the size of the final dislay case (cover made over-height as a do not know the finished height of the model):- That's all for now! Keep Sticking! Cheers, Pete
- 107 replies
-
- 14
-
-
- Royal Navy
- Battlecruisers
- (and 1 more)
-
The last of the Hasegawa bunch off my production line for the moment... This 747 sat on the shelf of doom very long.Actually planned as British Caledonian 747-200 with General Electric engines,it ended up back in the box when I realized that the Caledonian decals were impossible to apply. A few months ago I found the nice Liveries Unlimited decal set for the Air China 747 fleet,so I decided to save the Jumbo and redo it as a Cargo 747. In my spare part box I had a complete set of Pratt&Whitney engines and so the project was on. I repainted the fuselage and put all the pre-build parts together,decals on and the refurbished 747 will now find its place as a frighter version in my collection. Unfortunately,Liveries Unlimited missed to include the side cargo door on their decal sheet,so I had to find one in my spares.Help came in the shape of an 1/144 DC-10 cargo door which fits surprisingly well... Hasegawa's Boeing 747s are very nice and detailed. They produced the 747-100/200,747-300 and the 747-400 and also added individual engines depending on the airline markings they had included. I still have a larger number of Hasegawa 747s in my stash waiting to be built. Cheers,
- 4 replies
-
- 14
-
-
- Boeing 747
- Hasegawa
- (and 1 more)
-
My recently finished builds are mostly Hasegawa 1/200 kits,and these are the first that came off the assembly line. This was one of Hasegawa's 2in1 kit releases and offers to build 3 ANA versions to be build,although you have to decide which one of the Triton Blue version you want to build. The bare metal underbelly or the all grey underbelly, like the TriStar was before retirement in 1995. I opted for the very first TriStar in the "Mohican" scheme as they were delivered in 1973 and the "Triton Blue" last flight livery with the all grey underbelly As for all Hasegawa LL200 airliner kits,the build is straight forward with no issues at all. I really love those kits as they offer easy,fun builds with quick results. The only thing I changed were the engine exhausts on the Triton version,which had to be shortened to match the later version engines. The Mohican version was left with the longer exhausts as offered in the kit. Painted entirely by airbrush using Revell and Testors enamels and coted with my Media Range Color protection spray. The windows were filled with Krystal Klear.The cockpit windows were painted inside black as the empty cockpit looked a bit off through the clear cockpit windows. Thanks for looking.... And group shots of the 2 TriStars...
- 12 replies
-
- 33
-
-
- 1/200
- Lockheed L-1011 TriStar
- (and 1 more)
-
This was a sideproject that I had built on and off between other builds for over a year. The Hasegawa LL200 airliner series contained many popular airliners such as the Boeing 747 in almost every version,DC-10,MD-11,DC-9 and among many others,the Boeing 767. Sadly,most of these airliners from this famous series are no longer produced by Hasegawa and also the 767-200 is unlikely to appear again as Hasegawa modified the molds for the 767-300 which is still available. These models are very accurate and easy to build and in their 1/200 scale also not too big and vitrine friendly. My Hasegawa 767-200 kit was actually the Japan Airlines issue,but I once bought a larger number of decal sets for Hasegawa airliners on ebay,among them this nice Delta Airlines set. It was in pretty good condition despite its age,research showed that the original Delta 767-200 kit was released back in 1982. Some small details such as the cockpit windows come from a newer Boeing 777 Hasegawa set and the coroguard panels are from a detail set.Apart from that its completely OOB built. Paints are the usual Revell and Testors enamels,the whole model was then sealed with MicroScale Gloss clear. The Boeing 767-200 in the depicted "Spirit of Delta" scheme can be seen at the Delta heritage museum in Atlanta where it is preserved. Enjoy
- 10 replies
-
- 19
-
-
Avro Vulcan B.2 Scampton Wing 1970's This is the 1/200 CyberHobby 'Blue Steel' boxing of the Vulcan B.2, recently completed for the 70's NATO v Warsaw Pact Group Build. There was a small amount of scratch building to make some bomb bay doors to turn it back from Blue Steel to a Free Fall B.2, but apart from that it was built OOB. I hope that you like it. This was the conversion work carried out to switch back to a more conventional role. And a final shot to give some idea of the size.
-
I've been struggling with motivation lately so I thought I'd try something different......... I've long been inspired by the work Bob Wilson aka ShipbuilderMN Latest post http://www.britmodeller.com/forums/index.php?/topic/235016920-berwick-law-steel-barque/ Plus Ray S & now Murdo entering the arena I have long had it in my mind to build a series of British Coastal Trading/Fishing craft. Being realistic I'm not going to live long enough to build in what I would normally call a reasonable scale. At this stage I've also got it in my head that I want to build showing the full hull to demonstrate the many varied hull shapes. So the chosen starting point is the 'Clyde Puffer' a more basic shape I can't imagine.... but good to learn the ropes in this scale. I photocopied the plan and stuck it on plastic card 'bread & butter' style Brass sheet was cut out and let in for keel Bulwarks planted on outside, to be faired in, supports added on inside and the signature picture of the Parker pen That's it for now Kev
- 399 replies
-
- 20
-
-
- Scratch build
- VIC
- (and 1 more)
-
 Friends, After hitting a rough patch with my 777 I wanted to hammer out a quick build to get some mojo back and try out a few new ideas related to paint and finishing. I have a dozen or so 1/200 Hasegawa kits ready for paint, so I grabbed this 737-800 and a set of appropriate decals. The paint job wasn't much of a challenge, I admit, but I've been wanting to practice polishing my clear coat to get a really deep, smooth gloss finish so it was preferable to keep it simple. Also, I had never used Rib Hobby decals before, but I was very impressed with how well they went on the model... Anyway, I just applied a coat of Future to seal the model, and I will attempt to polish the finish once the clear cures. So, for now, I'm not ready to call it finished... Thanks for taking a look!
 -
Another airliner off my production line is the very nice Hasegawa Boeing 777. As with all of Hasegawa's LL200 Airliners, they are easy to build and very acurate in shape. I really like those kits and I have quite a number of different types in my stash. Sadly that Hasegawa seem to reduce their range every year,now only a small number of types are still in their catalogue. This kit I bought around 20 years ago...how the time flies...and it sat in my stash ever since.End of last year I finally decided to get it started and now here we are. Built straight from the box,no changes made. The decals were still in very good condition,which is a surprise as one never knows with Hasegawa kits.This is in fact the only fault,at least with airliner kits of them,that the decal sets vary greatly in quality.Some are pristine after many years while others seem to become unusable only after a short time already. In this case everything was fine and they went on beautifully and matched the model perfect. All paints are Revell and Testors enamels applied with my airbrush. The old Thai livery is one of my favourite ones and it really suits the 777. One of my cats lurking in the background...
- 13 replies
-
- 9
-
-
- Hasegawa
- Boeing 777
- (and 1 more)
-
 My entry for the group build is going to be an OOB build of the Cyber-Hobby's Vulcan based at RAF Scampton in 1970 and here are the box and contents shots. I am looking forward to starting this soon and I hope that this will be the build that lifts the modelling mojo. I should have done this earlier, but I will check references to make sure that the subject falls within the scope of the group build.
 -
This is the only thing I finished in 2016. I had a very slow year. I’ve always wanted to build a CP Air 747, I just think the colours look cool. It just catches the eye. And that is why I like building airliners. I have to say I think the Hasegawa kit is a nice kit. It does not need too much work done to it. I rescribed the panel lines and replaced to apu exhaust with some metal tubing. I planned to have a chrome finish. That plan changed. I had applied gloss black and chrome alclad but I could not find any way to seal the chrome Alclad with out dulling it down. I wanted to seal it so I could mask off for the orange. I decided chrome was going to look too much and was not going to work. So I went back to my way of doing things. I sprayed the orange and grey, then masked off for the alclad silver using the orange & grey as a base coat. (Rules are made to be broken). After the decals were applied I hand painted Winsor & Newton Gloss Varnish to seal everything. I prefer to hand paint gloss varnish. I get a better finish. I know some people think everything has to sprayed, but I can get a really good finish hand painting. I have been building airliners for years and before the airbrush I had to hand paint, so you learned how to paint without leaving brush marks. The decals are from TwoSix Decals. As always they are good. Work first time. Thank you for any comments. Regards Ken
-
Another Hasegawa airliner from their famous "Love Liner" Series. Well a good 30 years old,this kit ,and most surprisingly the decals as well,where still in good condition. Thats not always the case with Hasegawa decals. I worked on this kit on and of for some years and last week I finally finished it.Its a complete out of the box build,except for the cabin windows.They come from a Hasegawa KLM 747 kit. I had to use those as back in the 80s,Hasegawa airliners usually came without separate window decals.The ANA decal set provided only windows where the blue lines went over the windows.The rest would have been holes only.This would have looked odd and also I was not able to source an aftermarket ANA decal set for this aircraft,and I had to use what I had. I really like those Hasegawa kits.They are easy to build and the scale allows them to be placed in vitrines.The optional display stand that is provided with every kit makes it easy to put more models in the same place. Painted with my usual mix of Tamya spray cans and enamels from Testors and Revell. This model represents an All Nippon Airways 747-100SR that was used by ANA as well as Japan Airlines on their high density routes in Japan. Boeing especially developed these short-haul 747s for the japanese domestic marked and they had a all econmy class layout with 550-600+ seats. Later also Boeing 747-300SR and -400D versions where produced and put into service by these 2 carriers. The kittens where busy having dinner during the photoshoot,but on the last pic the lady kitten made a brief appearance... Enjoy,
- 10 replies
-
- 19
-
-
- Boeing 747
- Hasegawa
- (and 1 more)
-
This particular Hasegawa kit was bought by me as a youngster back in 1995 when I started on building it right away. During these days I still handpainted my models.Sometimes more,sometimes less successful. This kit belonged to the latter,so I stopped working on it and put it back to its box where it stayed ever since. As I really like the MD-11 and these Hasegawa kits became rarer with time,I never managed to bin it.I kept looking on the pre-painted parts and thought of a way to clean them a re-start the whole build. So,earlier this year I took it out of the shelf of doom and gave it a go. First most of the paint was carefully sanded away with a 2000grid sand paper,then all parts where washed with soap and cleaned as good as possible with a sponge. Before reassembly and the first coat of primer was applied,I rescribed the panellines and flaps on the fuselage and wings. When everything looked as desired,the new paint was put on by using Tamyia rattlecans.(Light blue and pure white).Wings were repainted with Revell enamels using my airbrush. The kits decals had yellowed over time,so I decided to buy a new set from draw decal.This also provided all the windows which were an improvement over the kits decals. After everything was put back together and all decals were on,two coats of Testors metallic sealer where sprayed on to give it its final finish. 21 years after its initial start,the MD-11 is finally done and improved. Korean Air's MD-11s didn't last long in passenger service.After roughly 4 years,all 5 aircraft where withdrawn from regular service and converted to freighters. Cheers,
- 14 replies
-
- 17
-
-
Just started my latest big Project: Trumpeter 1/200 Bismarck, before was the infamous Trumpeter 1/16 KT. I've wanted to build this model as it's a masterpiece in this scale and I've been very inspired by the impressive Bismarck and her history. Lots of people have already done some very nice builds. But here goes..... My first attempt at Naval, as everything before has been AFV, SCi-FI and Aircraft. Dry fit only....fit of parts is fantastic. More to come shortly.............
-
 In contrast to the GWH Victor kit I built earlier, this was a little bugger to put together. It was much older designed kit with lots of fit issues and the props were a nightmare as they broke as soon as you touched them. However I thought it would make a good East vs West picture with the Victor.
- 9 replies
-
- 10
-
-
- TU-95
- Cyber Hobby
- (and 1 more)
-
Hello all. It's great seeing the variety of subjects being covered, both in terms of time and geographical coverage. For my entry I'm going with this kit; Hasegawa's 1/200 B738 Yes I know, another 737, not the most original of builds. However, you may have noticed that there were very few decals on display in that picture, and that is because I'm not going for the box scheme. Instead I'm using Draw Decal's offering to build a plane in the colours of everyone's favourite South African low-cost carrier. It's educational too! Not sure when I'll be able to start, but hopefully sometime in the coming week.
- 29 replies
-
- 6
-
-
- Boeing 737
- Kululua
- (and 2 more)
-
The first delivery of Trumpeter's 1/200 scale HMS Hood model kit is due in this week! For full details, please see our newsletter.
-
Kit manufacture: Cyber Hobby Scale: 1/200 Type: Avro Vulcan B.2 Extras used: None, completely OOB Paints and colours used: Tamiya Acrylics, XF-1 Black (pre shading only), XF-2 Flat White, XF-81 Dark Green, XF-83 Medium Sea Grey, XF-85 Rubber Black (all black work), X-18 Semi Gloss Black (Landing gear struts), XF-57 Buff (pre and post shading white), X-2 Gloss White (Blue Steel), Vallejo RLM green on tail (can't remember exactly which one), Mr Metal Color Dark Iron (fan blades, jet exhaust), Flory Grime wash (over white) and Flory Dark Dirt, Alclad Aqua Gloss (decal prep) and Hannants Satin Varnish (finish). Other info: Full build is here : http://www.britmodeller.com/forums/index.php?/topic/234969240-cyber-hobby-1200-avro-vulcan-b2/page-1 Background waffle... My grandad was a Lancaster (and other) pilot during the war serving with bomber command. He also flew with Air and Sea Rescue and was very proud of the work he did during the Berlin airlift. After this he left the RAF to own a farm, thus ending our families ties with the RAF. However, my Dad always loved aircraft and transferred that enthusiasm to me. When I was a kid, we would regularly take family trips to Duxford for the airshows. During the mid-late 80s (I think) when I would have been 5-7 years old, we arrived late to the show due to a traffic jam and the car overheating. By the time the we parked in the overflow car park, the Vulcan was already tearing through the skies, her engines shaking the ground, setting off car alarms. I was terrified! Apparently I jumped back in the car for cover! She was the star of the show. Knowing time is running out to see the Vulcan fly, Dad and I went to Waddington airshow last year to see her. She was undoubtedly still the star. The engine howl on spool up and nibble leap into the air was exactly how I remember. She would look less out of place in a Star Trek movie than the skies of Britain! I LOVE this aircraft! The Kit Right, enough of that. I chose the Cyber Hobby kit for two reasons: 1. It was £9.99 in the sale at Hannants and 2. I'm waiting for Airfix or someone else to retool a 1/72 modern version, packed with detail! Build was straight forward on the whole; a bit of filler here and there and I packed out the panel to take the Blue Steel as this was a poor fit. Other than that, the fit was excellent. The detail is great in this kit! It even has a cockpit with seats and pilots, not that you'll be able to see them after it's finished. Decals are great too. I masked originally by blowing up the instructions to the size of the model and using a craft knife to cut through the instructions and tamiya tape. It didn't work great and the camo edges were very rough. I remasked most of it using Jammy Dog tape which is how I'd do it all next time. And there we have it! A great kit, go and get one! Val
- 20 replies
-
- 22
-
-
- 1/200
- Cyber Hobby
- (and 4 more)
-
 The “Bismarck” was the first of two Bismarck-class battleships built for Nazi Germany's Kriegsmarine. Named after Chancellor Otto von Bismarck, the primary force behind theunification of Germany in 1871, the ship was laid down at the Blohm & Voss shipyard in Hamburg in July 1936 and launched in February 1939. Work was completed in August 1940, when she was commissioned into the German fleet. Bismarck and her sister ship Tirpitz were the largest battleships ever built by Germany, and two of the largest built by any European power. In the course of the warship's eight-month career under its sole commanding officer, Capt. Ernst Lindemann, Bismarck conducted only one offensive operation, in May 1941, codenamed Rheinübung. The ship, along with the heavy cruiser Prinz Eugen, was to break into the Atlantic Ocean and raid Allied shipping from North America to Great Britain. The two ships were detected several times off Scandinavia, and British naval units were deployed to block their route. At the Battle of the Denmark Strait, Bismarck engaged and destroyed the battlecruiser HMS Hood, the pride of the Royal Navy, and forced the battleship HMS Prince of Wales to retreat; Bismarck was hit three times and suffered an oil leak from a ruptured tank. The destruction of Hood spurred a relentless pursuit by the Royal Navy involving dozens of warships. Two days later, while heading for the relative safety of occupied France,Bismarck was attacked by obsolescent Fairey Swordfish biplane torpedo bombers from the aircraft carrier HMS Ark Royal; one scored a hit that rendered the battleship's steering gear inoperable. In her final battle the following morning, Bismarck was neutralised by a sustained bombardment from a British fleet, was scuttled by her crew, and sank with heavy loss of life. Most experts agree that the battle damage would have caused her to sink eventually. The wreck was located in June 1989 by Robert Ballard, and has since been further surveyed by several other expeditions. (source: www.wikipedia.com) 1/200 - Trumpeter's big Bismarck Several time ago, Trumpeter released the Bismarck as 2nd kit in their big 1/200 scale series (after the USS Arizona). Later, several more kits were released until today, and more future kits were expected. The kit of the Bismarck consists of more then 1.700 parts, 13 plates of PE-parts. The total length will be about 125cm. I already built one of the big Trumpeter kits with the additional parts by KA Models / MK.1 design (and more) several time ago. This time… I will do it in a different way.... First of all… what parts will be used to build the Bismarck as detailed as possible? This time… I will use the big “Advanced set” by Pontos Models which includes a lasered wooden deck, 318 turned brass parts, turned gun barrels for all guns on deck, 15 plates of PE-Parts, 27 resin parts, 25 life rings, dry transfer decals. Additionally used are some resin parts by CMK which were very high detailed. Further PE-Parts by Modellschlachtschiffe.de (which I still have on my stock from last Bismarck project). Fabric flags and EZ-line for rigging, decals for the big markings on the deck by Blue Ridge Models, and the wonderful 3D figues by North Star Models. Brass lamp risers for the display of the kit are ordered and needed before starting the project finally. Right now I am waiting for these to start the project. The painting of the kit will be done mostly with colors by Lifecolor in the camouflage 1941 scheme with the white/black stripes and the painted waves at the bow/stern. Weathering will be done with several oil colors, pigments, and other stuff. I hope that you would like this new project and that it will be of interest for you! Starting soon, as soon as the parts for the display arrived! I think it will become a long lasting project again..... and a lot of patience Cheers. Michael
 -
 Source: http://www.ipmsdeutschland.de/Ausstellungen/Nuernberg2015/Bilder_AT/Hasegawa_15.htm Andrew
 -
"It was winter 1962, the worst of the Cuban Missile Crisis was just past, but everyone was still on edge. I was standing near the runway at RAF Scampton, home to the Vulcans of 617 Squadron amongst others, and I heard the unmistakeable howl of four Olympus engines at full power. A Vulcan had just taken off in a hurry, and as it passed I could see that it was carrying a Blue Steel nuclear missile - the training rounds were light blue, but this one was white, so I could tell it was live: It was taking off west, but as soon as it was airborne it began to swing around, trailing smoke from those massive engines: It banked around hard, and I could practically see into the cockpit, it was so low: It skimmed along low, and then suddenly pulled up into a steep climb which it continued until it was lost in the overcast: I realised it was now heading East, and my first thought was that the balloon had gone up and it was heading for Russia. I was a worried man until I saw it return later that day from what turned out to be a training flight. They were tense times..." This is the CyberHobby 1/200 Vulcan B2 with the Blue Steel missile underneath. It was supposed to be a relaxing and quick build, but this one fought me all the way! Firstly work commitments took away most of my modelling time which meant it took me four months to finish this. The intakes were a right pain to eliminate the seams from, and it was putty sand repeat ad infinitum. Then there was a terrible gap between top and bottom halves which refused to disappear no matter what I did with it.The primer I was using was Halford's white primer, and for some reason it went on so thick that it obscured most of the detail on the underside, meaning that copious amounts of rescribing were needed to restore it. And then when I thought it was all over, the decals were on and the final satin coat was drying, it took a nose dive from it's stand and snapped the IFR probe off and fed it to the carpet monster, so I had to replace it with a scratchbuilt one. All in all, it didn't want to be built, but as I've never scrapped a model yet, I was determined and won out in the end. Yay me. I put it on a stand with a picture of RAF Scampton on it, as this aircraft was based there in 1962. Hope you like it: Tiny little things, aren't they? Right, what's next...? Dean
- 20 replies
-
- 25
-
-
- 1/200
- CyberHobby
- (and 1 more)