


johnny_7713
-
Posts
133 -
Joined
-
Last visited
Recent Profile Visitors


johnny_7713's Achievements
")
New Member (2/9)
201
Reputation
-
1/72 Chinese Fishbeds do Africa
johnny_7713 replied to johnny_7713's topic in Work in Progress - Aircraft
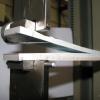
Welp, had to dig deep to find this thread again, but I'm happy to report progress has been made! I started out with painting some of the smaller bits, as well as testing out some paint colours for the camo schemes. Next up was painting the pilots and applying nose weights In all their wisdom Hasegawa decided that having a whopping big hole in the tail-pipe would be a good idea. I disagree, so I stuk some Evergreen sheet over the hole The 'lets put huge gaps in' philosophy was also applied to the design of the cockpit. I have zero scratch-building skills, but leaving a huge gap on either side of the cockpit floor was too much even for me, so I built some very crude side-walls out of sheet styrene again. With that done the fuselage could be closed up and I moved on to the next challenge: This 'slight gap' between wing and fuselage. I've partly filled it with a shim (Evergreen sheet again) and will do the rest with putty. Current progress is shown below: all the major parts are assembled, but still quite some filling and sanding left to go before we can move to painting (not to mention there's also the second fuselage to do).- 4 replies
-
- 1
-

-
- Chengdu J-7
- Hasegawa
- (and 2 more)
-
It isn't easy being green. 1/200
johnny_7713 replied to johnny_7713's topic in Airliner III Group Build
Trim away as much of the film as possible before applying, and try to get the decal directly into the right place would be my main advice. My usually strategy is to get the decal onto the model in roughly the right location and then nudge with a paint brush, but that doesn't work well with Draw Decals. -
I've no idea how variable the mix is depending on brand, but section 3 of this H&S sheet http://www.axminster.co.uk/media/downloads/400120_HealthAndSafetySheet_1.pdf lists ingredients for one type of 'cellulose thinner'
- 278 replies
-
- 1
-
-
- grumman EA-6B prowler
- Airfix
- (and 1 more)
-
It isn't easy being green. 1/200
johnny_7713 replied to johnny_7713's topic in Airliner III Group Build
Yeah it is the Revell kit in 1/200. Also I forgot the nose-weight on the -200, so it's sitting on it's tail in that shot, which distorts the length. -
Airliner GB Gallery and Poll
johnny_7713 replied to Enzo the Magnificent's topic in Airliner III Group Build
Haswegawa 1/200 737-800, with decals by Draw Decal for the Kulula Airlines "Flying 101" scheme.- 44 replies
-
- 32
-
-
It isn't easy being green. 1/200
johnny_7713 replied to johnny_7713's topic in Airliner III Group Build
And calling the build officially done now. Here's a size comparison with the -200 model. More pictures of the finished build can be found in the gallery. Thanks for all the encouragement along the way! I'm staying in Africa for my next build, which you can find here- 29 replies
-
- 1
-
-
- Boeing 737
- Kululua
- (and 2 more)
-
With my Kulula 737 nearing completion, I'm embarking on my next project, which again has an African subject. As part of my overview of the Rhodesia / Zimbabwe air force I wanted to build a Chengu J-7 in Zim colours. Looking for kits I came across the Hasegawa boxing, which contains two kits (quite possibly for the price of two ). I really like the colour scheme of the J-7s in Namibian service, so I decided on that for the second model. Pictured below is the box top, one set of sprues (the box contains two), the decals (from Mavdecal) and my reference material.
- 4 replies
-
- 5
-
-
- Chengdu J-7
- Hasegawa
- (and 2 more)
-
It isn't easy being green. 1/200
johnny_7713 replied to johnny_7713's topic in Airliner III Group Build
Had a lot of time this week, so I've actually managed to get her finished! The first order of business was to spray the de / anti-icing strips. I used Revell Aqua 90 and I think I thinned it too much because some of it managed to creep under the masking tape. Next came the process of decaling. It was my first time using Draw Decals and they definitely take some getting used to. The decals are covered with a very large film, which means that the decals like to stick in place as soon as they hit the model, rather than float. This makes it difficult to get the larger decals positioned correctly, and I was unable to avoid the film wrinkling. Keeping the finished model out of direct lighting and not observing too closely is advised After that it was on with the wheels and the go-pods, and this model is ready for the gallery! Actually, just realised there a couple more antennae that need sticking on, so not quite gallery material yet.- 29 replies
-
- 5
-
-
- Boeing 737
- Kululua
- (and 2 more)
-
It isn't easy being green. 1/200
johnny_7713 replied to johnny_7713's topic in Airliner III Group Build
Made some more progress with a couple of rounds of painting. Mr Hobby Aqueous 315 in the role of Boeing Grey \ An undercoat of Nr 4 Yellow And the final act: Nr 16 Yellow Green Plan for tomorrow is to do the anti-icing strips and then it's decal time.- 29 replies
-
- 4
-
-
- Boeing 737
- Kululua
- (and 2 more)
-
1/72 AMT Kamov Ka-52 "Hokum B"
johnny_7713 replied to Nigel Heath's topic in Work in Progress - Aircraft
Amazing work as ever.- 114 replies
-
- 1
-
-
- Nigey Build
- Soviet Helicopter
- (and 2 more)
-
I had good fun building this kit in the scheme shown on the box art (including doing the paint-by-numbers bit on the lozenge decals), but I must say your scheme looks good as well.
-
It isn't easy being green. 1/200
johnny_7713 replied to johnny_7713's topic in Airliner III Group Build
Slow but steady progress. Wings & winglets on, followed by Citadel Skull White primer. Put a yellow base coat on the engine nacelles in preparation for the green, as recommended in a build report for this livery I found floating around the internet.- 29 replies
-
- 3
-
-
- Boeing 737
- Kululua
- (and 2 more)
-
Wow, that's some big gaps at the wing root there. Other than that, coming together nicely!
-
Excellent painting on that fuselage, and as everyone else has also said, those engines look great!
-
It isn't easy being green. 1/200
johnny_7713 replied to johnny_7713's topic in Airliner III Group Build
Yeah, probably my fault rather than the kit's, knowing my limited skills.