Search the Community
Showing results for tags 'Revell'.
-
Hi fellow modellers Here is Revell’s 1:48 Mosquito B MK.IV well the less said about this kit the better poor fitting parts and vague instructions and please don’t get me started on the undercarriage absolutely awful. this model nearly ended up in a bin on more than 1 occasion, anyway I’ve not let a kit beat me yet and I’m certainly not going to start now. hopefully I’ve done it some justice Finished as DZ415 of 627 Squadron RAF Woodfall Spa in early 1945 Tamiya paints used throughout thanks for looking and happy modelling
- 12 replies
-
- 38
-

-

-

-
I started this model in 2022 and after applying the decals I lost a bit of interest. The decals were home made but I wasn't able to print decals for the slime lights. Then I came across a sheet of decals in the spare box that looked useable. Think they were from a Sikorsky S-64 Skycrane. So today, I cut them to size and applied it to the model. I think it looks great. Tomorrow I will give it a clear coat and start the weathering process. Also busy with a base to mount it on.
-
I read somewhere Revell is planning a C-17 in 1/72 scale. Is there any news on this project? Thanks
-
 Revell: "(...) We have an announcement on Friday so keep your eyes on the socials(...)" Source: https://www.facebook.com/Revell/posts/pfbid02uB1eZuFKkf2Uu3D4HqcnQkPXHdg7WX9ttS5DQgj9zwqsp29j7xEWHKFC9PSifoxCl UPDATE Release expected in 2025 - 1/32 - ref. ? - Hawker Hunter T.7/T.7A Source: https://blog.revell.de/2024/modellbau/scale-modelworld-reveal-hawker-hunter-t-7-t-7a-in-132/ Maybe in connection with the Revell still future new tool 1/32nd Gloster Meteor F.Mk.8 ? thread To be followed V.P.
 -
It has been a while since I had a crack at a Festive Blitzbuild so I thought that I would enter this as my effort. My success at completing a model within the timescale isn't that great and has taken more of a battering this year, but I am always up for a challenge, let's see how things go. by John L, on Flickr by John L, on Flickr That's all for now. John
-
Taking advantage of the start of the year being relatively free of group builds, this is another kit that’s been starting at me from the stash for a bit, Revell’s F-84G Thunderjet: I picked this one up from @modelling minion for a very nice price, so I thought I’d treat it to a couple of additions in the form of some Hi-Decal markings for a Yugoslavian aircraft and a Quick Boost bang seat: This is my first experience of building a Pro Modeller tooling (though I also have their Ta 154 in the stash) and I’m really enjoying it. The surface detail isn’t up to the same standards as the latest Tamiya or Eduard kits (but it is a 25 year old tooling), but more than acceptable, and it all fits together beautifully. So far I’ve got the cockpit tub assembled and painted in interior green: The bang seat has also had a coat of that: As has the equipment tray that will fit under the canopy: Detail painting is next on the cards for all of those. I had some trepidation about the drop-in panels on the nose, as I’ve had them leave big gaps that need lots of filling & sanding on other kits. I needn’t have worried, these dropped in perfectly and will only require the tiniest bits of filler in one or two local spots that have shown up under primer: And yes, I will sand off the dust that was caught under the primer. The last bit of progress (other than a multitude of smaller parts that have been primed that I’ll spare you the photos of) is the assembly of the wings. Slightly unusually, the smaller gear doors are moulded as part of the side panel of the bay. The nose gear doors are similarly moulded as part of the bay as well. Not a big issue, I’ll just need to do some careful masking at paint time: James
- 23 replies
-
- 13
-
-
- 1/48
- Pro Modeller
- (and 1 more)
-
Well after a long finish, the Tornado is finally done. I made the base mounting process very complex by including some orange LEDs in the base to simulate an afterburner plume, you can sort of see the effect in the bottom photo. I brushed some clear gloss acrylic medium to simulate the wavy heat haze and airbrushed on some thinned clear blue and clear orange. I'm not normally a huge fan of 'special effects' in models but wanted to try something like this at least once. The black 'housing' on the base covers where the LEDs sit in a recess on the base and shine up through through the perspex tubes. Annoyingly one of them is not now giving out much light, probably a result of my hamfistedness with electronics! The Tornado itself is pretty much OOB, built using kit decals in the IX squadron markings based at RAF Bruggen. Slight niggle with the decals is that I got quite a lot of silvering on the walkway line markings and some of the larger decals such as the ones on top of the intakes. I added some basic Eduard PE for things like cockpit mirrors and the pilot and nav were from PJ productions. I replaced the pitot tube and AoA sensors with metal items from Master. Build thread here if you are interested. Hope you like the pics.
-
Another old one from the stash. It's pretty much all OOB apart from the odd tweak. I'll be doing the CAG version from the box artwork. So, the cockpit is done. Drybrush, Posca pens and transparent green with PVA over the top. This must of been an old 'B' version that got upgraded as the screen is round. Or Revell fluffed it... The seats are in as a dry fit. The Dspiae clamp is great to work with. I like their kit. And a bit of weight in the nose to make sure it won't try to sit on its tail.
- 17 replies
-
- 10
-
-
 Had this one for a while, and thought I would run it up so I could practice an NMF before tackling a more serious build, the Hasegawa Ki-61 (which I have failed to take many pictures of, so no WiP there). Only AM additions are belts and some QuickBoost radio boxes, though tbh you could add some wires to the kit versions and they would look pretty much as good So bear with me on this one...as with all kits there are two basic elements to the manufacture, the design and the mould-making. On the former, Revell have done, I think a fine job; the designer (Radu Brinzan?) has done some really clever stuff with the internals to ensure a good level of detail with no ambiguity in the fit, and each section locks into the other with no simple butt joins to spoil things with their sloppy fit. So Revell played a blinder in the first half. Where it goes wrong is with the mould itself. I would be fairly sure that Revell contract out the mould-making, and my advice - find another company. The similarities with Airfix of a couple of years ago here are notable, nice design but slightly rough moulds coupled with soft plastic result in a slightly disappointing build given the initial promise of the parts. Recently, Airfix have taken steps to resolve this - I don't know if they have changed their mould-maker (though they definitely did for the 1/24th Spit as the moulds were done in the UK not India) but the plastic in recent kits is definitely harder resulting in crisper detail. And this is where Revell have their problem: the detail has been designed in, but comes out rather soft, and there are prominent mould lines everywhere, and some small amounts of flash. Joining edges can be a bit rough and need a light pass just to improve the fit, indeed every part needs a bit of fettle, and after a while this becomes a bit wearing, not to mention the amount of plastic dust and scrapings being generated. Some examples: - soft detail and mould seams on the side consoles (I have already scraped the seams off the tops of the knobs in this photo) - seams on the gear legs - soft detail on the pedals and steps inside the frames - and after clean-up This is not say everything does not go together well - it does, it paints up nicely, and Revell have provided plenty of decals for the cockpit to spice things up (albeit they are a bit bright); as mentioned I only added belts and the radio boxes, and the odd wiring loom. Pleased with the wood effect I must say. Now the instrument panel; I did buy the Eduard LOOK panel, but the white elements were really not well printed and the whole thing did not look good as a result, so I used the kit part with decal, and after a fair amount of setting solution and careful touching up it looked OK - better than the LOOK panel anyway. Then it's on to construction - no impossibly major issues here just some fettling. I did opt to add the tail sections to their respective fuselage halves to try and reduce the step that is apparent here, but it will need some sanding out. There is also a step between the intake lips and the main cowling, and the red glazing putty comes into it own here. Some shims reduce the step for the cowing underside I opted to paint the framing in the wheel well i zinc chromate as per some references And I decided to commit fully and do some rivetting (not on the wings you will be pleased to hear) I do think rivets add something to a model, even if you then choose not to highlight them too much in the painting and weathering; just compare the unrivetted and rivetted fuselage sides to see how it is brought to life Yes the wash (so I could see where I had done) does help, but when there are a few layers of silver on there it will look less blank than would otherwise be the case. Now the wings and the tail feathers are on it is ready for priming; I will be likely doing the box art scheme Lou IV, or maybe Jolie Helene if I can pick up some decals. I am afraid I do not subscribe to the "blue camo" theory arising from the famous colour picture, rather as a former printer I see an old Kodachrome transparency where the dyes have deteriorated unevenly. Classically in older transparencies certain dyes will deteriorate ahead of others, usually greens followed by reds; as any colour in the picture comprises more than one dye, the remaining colour then dominates. I think what we are looking at is a bronze green, possibly a dark green, in which the green dyes have faded leaving a more blue appearance. Hence also the olive drab doesn't really look right, and the landscape below is blue not green, the yellows are a bit washed out, and even the red of the nose art is a bit dull. So I will be doing a bronze green/olive drab mix on the upper fuselage, and dark green/olive drab on the wings/tailplanes.
 -
2022 Corvette C8 Coupé (07714) 1:25 Carrera Revell After WWII General Motors subsidiary Chevrolet developed a sports coupé concept into a production car following a good reception at their 1953 show, with solid sales ensuring its continuation. Each year subtle changes were made until a new generation was ready to supplant the ageing design. By generation three, referred to as C3, which was made from 1968 to 1982, the look of the car had changed substantially to a smaller, sleeker two-seater, about which Prince was probably dreaming about when he wrote Little Red Corvette, a song released in 1983. The C3 was based on their concept car, utilising many of the internal components of the C2, but replacing the engines with a slightly larger unit pushing out the same BHP, which gave additional leeway for tuning. Engine sizes and output changed as the years went by, with optional small- and big-block engines, plus a host of other options such as power windows and side exhaust options, while the introduction of unleaded fuel and catalytic converters put a bit of a crimp in their performance for a while. We’re currently on C8 at time of writing, introduced in 2020 with a rear-mid engine layout in a choice of 5.5L or 6.2L in V6 or V8 forms and a variety of outputs in each production year. Price increases came along with the new product years, reflecting “supplier cost increases”, although sales of the unusual Right-Hand Drive (RHD) variant have been strong regardless, but folks with Corvette type money are seldom affected by financial crises. In addition to the standard Coupé bodyshell, a Targa and retractable hardtop are available, offering plenty of choices to the discerning sports car enthusiast, along with many trim, and accessory options to push the price further north. The Kit This is a new tool from Revell in their more US-centric 1:25 scale, which may lose them the occasional sale in other territories, but will doubtless compensate with sales in the US where the Corvette is produced. The kit arrives in an end-opening box, and inside are eleven sprues of various sizes and a bodyshell in white styrene, two sprues of clear parts, a cruciform sprue of flexible black tyres, decal sheet, and instruction booklet printed in colour on white paper, with colour profiles on the rear for the decal option. Detail is good, the 144 parts should result in a level of realism, and the holographic GM Official product sticker on the box should help in that regard, as well as keeping you transfixed for a few seconds while you move it around admiring the apparent depth. Construction begins with the engine, starting with the combined block and transmission, which is formed from two halves, adding detail parts top and bottom to hide the seams, plus the end of the transmission, building a three-part assembly with serpentine belts moulded-in to hide the front seam. Ancillaries and drive-shafts are fitted to the sides, mounting two four-part cylinder head banks with exhaust manifolds to the diagonal surfaces of the block, putting the motor to one side while building the front axle, which consists of three-part hubs with brake-discs and callipers moulded-in, plus a steering linkage that is pushed into position without glue, leaving the glue off the centre part on each hub if you wish the wheels to remain mobile. The front arch liners have a two-part strut inserted in a recess during detail painting, and both assemblies are mounted on the floor tray along with the front axle and two swing-arm covers on the underside. The rear arches are built in a similar manner but without the linkage below the struts, installing the motor on pegs at the rear of the floor, fixing the exhaust muffler to the very rear, then mounting the hubs and arch liners over the moulded-in swing-arms and locating the drive-shafts in the rear of the hub assemblies. The split radiators are located in the front of the floor tray on lugs, forward of the front arches, making the steering column from two corrugated halves, and the underside of the air intake manifold that is laid between the twin cylinder banks, adding a two-part box to the front, which has a scrap diagram showing how the hoses mate with the engine. Heat-deflectors are installed over the manifolds, following which attention turns to the interior of the car. The two seats appear to be based upon those fitted in the GT2, and are made from front and rear parts, but you’ll need to fabricate your own belts if you feel the need. They are installed in the interior tub along with a centre console and rear detail insert, choosing the appropriate console part depending on whether you intend to build the LHD or RHD variant of the car. The decals applied to the console are identical, as are those of the floor mats and central parcel shelf stowage bin, detail painting the interior as you go. The dashboard choice requires different parts with their own instrument binnacle coaming, but uses the same decals, and three-part steering wheel with paddle shifters. The door card parts are the same for both options, swapping the decals for each side as appropriate after more detail painting. The two-part scuttle panel has holes drilled at opposite ends for Left- or Right-hand drive options, and the two wiper blades are reversed, ensuring that you remove the overflow tabs on each one before painting. Your choice of scuttle panels, door cards and dash assemblies are installed in the tub, and the purists may decide to fabricate some foot pedals if they think they’ll be seen from outside. Painting of the bodyshell is shown being completed before adding any of the detail parts, following which various trim parts, two-layer front light clusters and intake trunks are applied to the shell from the both sides, which includes the sun visors and rear-view mirror, rear window in a fairing, and a cowl that covers the dirty parts of the engine compartment. The completed cab is inserted from below, the location points noted with large red arrows on the instruction step, followed by lowering the growing assembly onto the floor tray in the next step. The rear bumper has two-layer light clusters and grilles inserted, adding twin pipes below each cluster, and a choice of square or rectangular number plates, depending on where your Corvette will live. The completed assembly is fixed to the rear of the vehicle, mirroring the number plate installation at the front whilst adding more grilles below, covering the headlights with clear lenses, and installing the windscreen from the front. An insert that is painted body colour is inserted over the rear roll-over bar, painting the verge of the rear windscreen before installing it, and adding two-part windows on both sides. The targa roof panel is also painted body colour, while the splitter under the front bumper is painted black to match many of the other trim parts such as the spoiler over the rear, and the supports for the twin door mirrors that have separate mirror parts that you’ll need to paint with your preferred chrome paint, doing the rear-view mirror at the same time. The top cover of the air intake manifold is also painted body colour, as are the wing mirror shells, adding decals to the former, and applying some decals to the right side of the engine bay during installation. Your Corvette isn’t going anywhere without wheels, which are separate pairs of different sizes, painting the rims gloss black and detailing the studs in silver. Each one has a flexible black tyre flex-fitted over the rim, applying a decal to the centre boss to complete them, gluing them into the relevant arch carefully to leave them mobile… for no reason of course, as it would be childish to brmmmm your model around your desk after completion. Markings There is only one example shown on the profiles, but you can build your ‘Vette any colour you like, but there are a number of real colours that were applicable to the 2022 variant if you intend to go for realism. Bright red appears on the profiles, and there are number plate options for several countries including Germany, Netherlands, UK, Belgium, France, Austria, Italy, Switzerland, and of course America, with a Hawaiian plate that has a rainbow background. From the box you can build the following: Decals are by Cartograf, which is a guarantee of good registration, sharpness and colour density, with a thin gloss carrier film cut close to the printed areas. The carbon fibre decals for the roof have a more matt carrier film however, so check your references to establish whether they’ll need a coat of gloss to finish. Conclusion A well-detailed kit of this American Muscle Car that can be seen elsewhere in the world with the appropriate steering wheel location. 1:25 isn’t too far from 1:24, so it shouldn’t put off too many buyers, as it’s an attractive car. Highly recommended. Carrera Revell model kits are available from all good toy and model retailers. For further information visit or
-
Revell version of the Matchbox Jagdpanther Sd.Kfz. 173. I last built one of these almost half a century ago......................... After many trials and tribulations, mainly due to being hugely out of practice, I have got the kit almost to what I aimed at from the start. Huge thanks to various Britmodellers for their input and help. The Work in Progress is at So, without further ado: Camouflage is Humbrol enamel with acrylic "mud" colours on the running gear to avoid melting the tracks. New to acrylics for a final wash I added a second coat before the effect of the first coat was clear and everything went a bit too dark. One lives and one learns, hopefully. Learnt a lot from this little exercise. 🙂 All comments and advice welcome.
- 14 replies
-
- 12
-
-
- Sd.Kfz. 173
- Jagdpanther
- (and 1 more)
-
Afternoon all. I'd like to join the fun please. This is my chosen victim, I mean subject. I did remove the the main airframe components from their runners last night, mainly due to Revell's shipbuilding-style gates. I'm at work at the mo but home time is approaching. I think The Great Escape method is the one for me so we'll see how it goes. I can't live with the kits early rear end in later markings so Xtradecals or Modeldecals will probably come to the rescue for a wraparound camo TWU machine with early bang seats from a 70s Airfix Hawk. Phil
-
 Hi all! First post here and I thought I'd start off with probably my biggest build of last year (I'll do a WIP post soon as there's a ton of pics to go with these two builds. The B-17f is the Revell 'Memphis Belle' kit, upgrades include scratchbuilt cables, pipework and airframe parts, Legend Productions resin crew, Eduard Big Ed upgrade set for the interior and Kitsworld Decals for the Pub (Took no less than 4 sets to get them done -.-)) The BF109G-6 is a Tamiya kit, built out of the box, Kitsworld and Tamiya decals with a pilot from my spares box. Paintwork and weathering is all done by hand with Revell and Humbrol enamel paints. Hope you guys like these builds, feel free to comment ^^
- 9 replies
-
- 41
-
-

-

-
- Revell
- Ye Olde Pub
- (and 1 more)
-
 OK. Great idea that this BB is going ahead 'cos I spent Christmas looking in at the previous one and feeling thwarted. But not anymore!! I have a Revell boxing of what I take to be the old Lindberg kit of the Heinkel He 162. I found this out by accident when I was looking for things to “look out for” here on BM and wondering who had done this kit previously. I came across this Lindberg build by @CedB. https://www.britmodeller.com/forums/index.php?/topic/235060496-heinkel-he-162-lindberg-172/ In his starting pic, I thought the sprues looked familiar although in a different colour. CedB’s pic My pic Looks pretty similar to me! It says copywrite 1984 on the box and is probably when I bought it and put it in the loft. I checked Scalemates which confirmed my suspicions. CedB’s build seemed to engage a lot of nostalgic support for the Lindberg He 162 although I have never built one of their products at all! Anyway, armed with all this knowledge and info from other BM builds, I have a cunning plan (cue Blackadder comments …). The aim is to help improve my laying down of paint. This simple kit shouldn’t cause me too many assembly problems. If I can also minimise the temptation to “improve” things then I should get to paint fairly quickly ……… famous last words. The build will be (says he portentiously) mostly OOB and wheels up. BUT I will do something about the cannons and maybe add a pilot – which I don’t normally do. Hmm. Just got to check the Spray Shop (aka grotty cold and damp garage) and then looking forward to the start ! Good luck everyone! cheers Rob
- 15 replies
-
- 13
-
-
The Beast is done - for a long time now. The slender two engine is racing gracefully to completion. Work-from-home is was fun, then it was gone and now back again. Bench time was ample, then gone, and maybe coming back. It time for the next one: This one comes with a whole lot of plastic: So, frets cleaned up, transparencies soaked in future and drying, workbench is being organized. Hope building will start soon. Ran
-
A-Wing StarFighter (01210) 1:72 Carrera Revell/Bandai The A-Wing was a minor character in the original (and best) Star Wars trilogy, appearing in the background in some of the large space battles. It has since gained a little more prominence in the new films and the cartoon spin-offs, which are numerous. It’s a small one-seater twin-engined ship manufactured (in a galaxy far far away) by Kuat Systems Engineering, and somehow finds its way into Rebel hands. Its speed and pivoting main cannons make it a useful tool that is suited for rapid interdiction and lightning strikes. The Kit This is a licensed reboxing by Revell of the excellent Bandai kit that was released in 2016, which was available only by personal import or from a grey-import box-shifter until now. This is the most minimalistic reboxing from Revell, with a sticker placed over a portion of the box showing Revell’s logo and their product code along with a few European-style descriptions of what it is – a self-assembly model kit. If you’re a Star Wars model builder, you probably know what to expect inside, and I’m one myself so I’ve already got one of the Bandai kits in my stash. Bandai have an incredible team of engineers creating their kits, who achieve amazing detail, simplicity and cleverness of construction, and skill of tooling the most stunning injection moulded kits around. They regularly inject several colours and types of styrene into one sprue with their kits that Western companies could only aspire to, which cuts down the sprue-count and makes for a less messy desk during the build. They’re also snap-together kits in essence, with pre-coloured parts that don’t require painting if you’re either a beginner, a child without the facilities or just don’t want to get the paint out. If you aren’t familiar with Bandai’s style of snap-together kits, you probably think that this renders them simplistic and toy-like. Get that mindset right out of your mind right now, as these kits couldn’t be further from that type of product. The box is pure Bandai with a black glossy surface to the top-opening box, with five sprues in cream; dull red, cream, black and clear; grey; black and finally clear red. Because the A-Wing is a compact fighter, you get the ship itself, plus a base with a Turbo-Laser Turret on a section to one side, which gives that frissant of Death Star to accompany your model. The decals are duplicated as stickers for the younger or less skilled builder, and the package is rounded off by the inclusion of a concertina-fold instruction booklet in colour. Originally, the instruction booklets were written almost completely in Japanese, but as time went on they have included more English, which is helpful to augment the visual instructions and icons that appear throughout the booklet. Construction begins with the A-Wing, which first has its cockpit made up from six highly detailed parts plus a decal or sticker (whenever I say decal, also think sticker from hereon in). The lower hull is next, adding inserts into the weapons mounts and their rear, after which the hull topside is clipped into place, with the cockpit dropped in from above. The red section of the topside is separate due to the self-coloured parts, with a separate spin behind the cockpit and the tapered apron toward the front. The spine has a three-part cream insert at the rear, then it clicks in place along with the apron into the upper hull around the cockpit tub, locking it in place. A similar red insert is fitted to the underside, and clear side panels smooth out the joint between top and bottom halves. The nose cone is red, as are two panels in the underside wings, and another red insert fits behind the tapered section under the hull. Flipping the hull over, a roll-over hoop is added to the rear of the cockpit, and a pilot figure with two small decals is popped into the seat before the clear canopy and a snap-on curved frame part. The engine nacelles project from the rear of the arrow-head hull, and have fins at an angle top and bottom of the exhausts. These have clear engine inserts with stoppers behind them for painting a fiery colour or lighting, and a two-part trunk is clipped to each side of the fins with a tiny part with two angled pipes/hoses coming out of the sides. At the rear are a pair of oval fairings with four more exhaust cups inside, the shape of which is akin to a pair of F-16 intakes, which given their kit-bashed heritage they very well could be just that. Having a second look, I seriously think they are! The twin ovals are attached to an insert with the four exhausts and are fitted together with the main engines and their fins, then are offered up to the rear of the hull to be clipped into place. The pivoting guns at the wingtips are each made up from three parts with hollow muzzles, then the three gear bay doors are clipped into place if you are depicting your A-Wing in flight on the stand, or in the open position with three two-part gear legs if you are putting it on the ground. There are plenty of diagrams to show you where the various parts should fit, so don’t concern yourself about making a mistake. That’s the A-Wing finished and now it’s time for the base and turret extension. The base has a greebly-filled surface to its single part, with an angular diagonal riser that has a jointed tip to allow the modeller to adjust the pose of their model at any time. The bases are able to be linked together by the included clips, which leads us nicely to the bonus Turbo-Laser turret that can clip onto the base, as its footprint is the exact same size as the base itself, and it also has the cut-outs for the clips. The tapering base is a single part, which is extended upward by another dual taper section that is made from four parts inserted into its flat top, and is joined by the turret at the top, which is three parts and builds up around the gun assembly. This begins with two hollow-tipped barrels that have toothed quadrants fitted on their outer edges and in between them, after which the barrels are raised to the vertical and bracketed by a two-part assembly that holds them in situ. The barrels are then returned to the horizontal and surrounded at the sides and on top by the turret shell. The turret clips into place on the top of the base, and can be rotated and elevated as you see fit – just so long as you enjoy playing with it Oh, and no, I couldn’t resist building the turret. Markings The kit is self-coloured, so technically you don’t need to paint a thing, but the back page of the instructions give you a six-view look at the model as per the box art, with colour and decal/sticker call-outs along the way. The pilot figure is also shown painted with the two tiny decals on the helmet, and there is some weathering that has been applied around the cockpit and the rest of the hull to give you an idea of what to aim for. There’s a lot of pictorial evidence out there for any other markings and schemes that you might wish to portray though, and we often see some adventurous schemes here on Britmodeller.com. Conclusion It was a gorgeous kit in 2016 when it came out, and it’s just as good now. If you’re a Star Wars modeller and want a well-detailed model of an A-Wing, this is the kit to get. Very highly recommended. Currently, Revell are unable to ship to the UK from their online shop due to recent changes in import regulations, but there are many shops stocking their products where you can pick up the kits either in the flesh or online. Revell model kits are available from all good toy and model retailers. For further information visit or
-
Started about an hour after the RAF announced the scheme, not my strongest build but for something I did with a deadline of today, I'm quite happy with how it's turned out! Photo quality isn't great, will start using a real camera after this one I think. Looking forward to seeing more builds of this stunning new typhoon scheme to pop up! Kit is Revell, decals are a mix between Revell, Mark 1 Models and Platz from various kits and sets. Decals aside this is just the base Revell kit, not much additional work other than the scheme. There's definitely a fair few inaccuracies, mostly down to the small number of reference photos I had to work with at the time but regardless I'm glad it turned out the way that it did.
-
Hi folks. I've finished this today having started it on the 19th June. It's OOB with the exception of a couple of wires here and there and mesh for the open apertures around the boom area. The seats were give sheep skin effect by using a sponge when it was tackle. A fire extinguisher from the spares box for the rear of the RHS. I edged the cabin wooden flooring with tamiya clear red, which worked quite well. I didn't want to load up the aircraft with a full load, so just chose the gun option only as I quite like the clean look. I scraped out the ammo box holder so it looked more like the real thing and opened up the moulded flash eliminator on the barrel. The stretched wire is a EZI line alternative. It's a single piece and with my razor saw I cut a groove and ran the wire through those antennas and filled the fillet afterwards. Now those pesky intakes. The kit clear parts are the best they could do I suppose with the budget. I tried mesh but it still looked way oversize to thee real thing. Which unless you're up close it melts away. So I've used a cut up tea bag, yep you read right. Up close it does have the holes. Now I know it's going to be marmite but unless I take the notion to make paper machè for guards, it'll do. The rear wheels were set at 27.5 degrees. The blades are correct as I used to overhaul them so have done both variations of the colours and stripes etc.... Not overly weathered. Tamiya paints for the main colours and kleared halfords primer for the darker/shiney head. Followed by a Windsor & Newton Matt varnish. I used Tamiya clear blue for the tints and tonned it down with smoke, but I think it could go darker. The blades are correct and I've done the 2 main differences as they went out of Bay maintenance. The biggest gripe is the instructions. They refer to different number on the sprue, but picture the bit to be assembled and would have you try to fit the orange crop parts on opposite ends to where they should be. So if you have the kit dry fit and check references!. So during this build one of our labradors (Finlay) lost his life to liver cancer aged 8. He'd lie down beside my modelling chair every time waiting for me to move. So he was alive when I started but gone at the end. The modelling was a bit of medicine whilst my wife and I adjusted but equally its not my usual standard as at times I couldn't be bottomed. So a few photo's. This last photo is on my Boscombe Down base. Both the sandy and grey are to 1/32 scale. Steve.
- 14 replies
-
- 44
-
-

-
I'm going to (try and) join this years Blitzbuild GB with a Revell B-17F Flying Fortress in 1/72 scale. I built this kit when I was a teenager and when I got back into the hobby I thought I'd try building it again. Unbeknownst to me when I bought it Revell had since released a new tooled version of the B-17 to replace this 1960's vintage kit. I'd rather build the newer tooled kit now so this relic was unwantedly shoved to the back of the stash. For a Blitzbuild GB tho this kit's undesirability is its strong point, its a simple kit with not many parts so it shouldn't take that long to put together. I also dont mind rushing though the build and possibly making mistakes, because if I completely mess it up I can bin it without much remorse and then in the future take my time building the newer tooled kit instead. I'm going to take advantage of the GB's rule stating that you can remove the parts from the sprues before the start of the GB I'll pre-prepare the parts for the interior so I can then paint them as soon as the GB starts and then quickly move on to other parts of the model while the paint drys.
- 39 replies
-
- 20
-
-
-
-
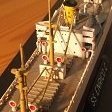 This little 1/144 scale armed fishing boat is probably the most pleasurable of the dozen or so builds I've done during 2024. It appears to be a re-boxing of the ICM kit and it still shows Made in Ukraine printed on the Revell packaging. Everything fitted together nicely with only a little filling and smoothing required along the hull seam, and a tiny bit of flash needed to be smoothed off some of the railing posts. This was built sporadically over a fortnight - most of the work being applying various MiG Ammo acrylic paints and shaders. This is pretty much built out of the box apart from some ad libbing around the mast where I drooped the ensign and added some halyards. Some other points to note: The stand is a bit wobbly so I re-based the hull on four short struts (see stbd side view photo below). The finished model only just fits inside the Trumpeter 09817 display case. There is only 1mm clearance between the top of the mast and the cover with the keel on the base. There is some ambiguity in the colour guide: My Norway version shows a black underside on p.19 and red on p.7. As the stand is black I went for red for aesthetic reasons. There should be lots of conversion possibilities for this kit as many found their way into post-war use as trawlers, drifters, tenders, etc. If you can't make up your mind what to put on your Santa list ask for this. I wish everyone a peaceful and relaxing holiday and a healthy 2025 Note five attachment points to the base: four short struts and a spot of superglue at the stern end of the keel. Blast ... forgot to paint the gun handles. The kit comes with two name plaques (one for each side, note well Tamiya, et al) which is a nice touch, although they are quite small and written in Frakturschrift, so tricky to read according to everyone in my household.
 -
Joining in with a 1999 1/72 Revell Spitfire V. a recent charity shop find - partially started. I've cleared the partially started bit with @Enzo the Magnificent, it needs a KUTA. Plan is to complete in black as a nightfighter. Boxart. Parts, cockpit is partially started. Kit decals.
-
First serious bit of modelling I've attempted in about forty years – so guess that makes me a newbie! My first experience of photoetch, acrylics, airbrush... you name it. So I wanted to do a subject I felt a connection to, and something that would stretch me to the max. So it's Revell's 1/32 Schnellbomber which will assume the guise of 4D+DH 'Dora Heinrich' of 1.KG30. This Ju 88A-1 fell to the guns of 603 (City of Edinburgh) Squadron on 16/10/39 during a Luftwaffe raid on RN ships in the Firth of Forth. 'Dora' was the first enemy bomber downed by the RAF over the British mainland in WWII, and was on the receiving end of the first ever Spitfire victory. I was born by the Forth, and have lived half my life on its banks, my family have worked for generations on its waters and in its docks and I live just a few miles from where 'Dora' ditched almost eighty years ago. So I thought I'd make her the first half of a 1/32 'Dogfight Double'. Eventually I'll get around to tackling her nemesis – XT-A 'Stickleback' a MkI Spit of 603 Squadron. Over a year in, having too much fun, here's some (unfinished) pit shots. Apologise for quality – taken with an iPhone4 Cockpit side walls, still needs wiring/some piping added Eduard PE, Aims and homemade decals Floor and curtains printed on inkjet Pilot seat, control column and BZG2 Bombsight
- 57 replies
-
- 30
-
-
HMS Beagle (05458) Darwin’s Historic Discovery Barque 1:96 Carrera Revell HMS Beagle was originally laid down in 1818 as one of the Cherokee Class of 10-gun Brig-Sloops that were designed in 1807 by Sir Henry Peake, a fleet that eventually extended to 100 vessels. The design of the Beagle was changed slightly after her plans were completed, raising the height of the bulwarks slightly, possibly to improve safety of her crew. She was launched in 1820, and lay at anchor for some time without masts or rigging until she was re-tasked and adapted to be a survey barque with three important and lengthy survey missions ahead of her. Her first voyage began in 1826 under a Captain Stokes to carry out a hydrographic survey of Tierra Del Fuego and Patagonia, accompanied by HMS Adventure, whose captain Philip Parker King was in overall command. Captain Stokes began suffering from mental issues during that mission and shot himself, dying soon after, to be replaced by his First Lieutenant, then Robert FitzRoy for the remainder of the voyage. After a brief hiatus, Captain Fitzroy returned as commander of the Beagle and in 1831 she was taken into dry dock for substantial alterations to cure an issue that plagued the Cherokee class of vessels that made them prone to capsizing under certain circumstances. Her refit was comprehensive and included a newly invented lightning conductor, a raft of chronometers, and a particularly accurate mercury-free barometer. The captain used his own money to replace the iron guns with brass cannonades on turntables to reduce the magnetic signature of the ship, something that the Admiralty had refused to fund. She left Devonport in the UK in December of 1831 with Mr Darwin onboard as part of the second expeditionary crew on a mission that would see her away from port for five years and eventually revolutionise our outlook on mankind, the world, and its other inhabitants after some early push-back, and a few who still beg to differ. She returned in 1836, and after some minor repairs was back to sea again for her third voyage in 1837, tasked with surveying much of the coast of Australia. She returned home in 1843 and lay idle until 1845 when she was re-tasked as a static coastguard watch vessel with a crew of seven and their families living aboard, ending her days sold to a private contractor in 1870 for breaking up. A sad end to a world-renowned vessel. The Kit This is a reboxing of a 1961 tooling from Carrera Revell of this classic ship, and it arrives in a medium end-opening box with a painting from one of the more recent boxings on the front. Inside are six sprues and the upper deck in brown styrene, a black sprue, plus a vacformed sheet of white styrene in a separate bag with two rolls of black cotton, one of light gold, and a short length of braided cord. The paper flag sheet, and instruction booklet that’s printed in colour complete the package. Detail is good for its age, and although the planking is rendered as raised lines, it is well done, and has an organic look to it that should come up well under paint. The shrouds are moulded in black styrene, and whilst a little overscale will make the task of completing the model an easier job for anyone not a hardened sailing ship builder, with just a little flash here and there. Construction begins with the deck, which has steps up to the quarterdeck and the fo’c’sle, with the bases of skylights and other features moulded into it. The skylight tops are separate parts, hiding the blank interiors, the rigging cleats around the bases of the masts, the bosun’s wheel on a pair of trunnions, bilge-pumps and steps between the decks, which also have decorative inserts applied with planking and balustrades at the top. The deck boat is made from hull and an insert that includes the seats for the crew, plus a pair of stowed oars and a pair of lifting eyes, one at the stern, the other at the bow, locating the finished assembly in two cradles moulded into the deck. The bowsprit is mounted in a notch in the deck, the base glued under the deck, held in place by a cross-brace for a secure join. The two halves of the hull are joined around the deck, taking care with alignment and remembering to drill some holes in the bulwarks and gun deck around the quarterdeck, using the combined detail painting guide and scrap diagrams to assist with their location. A detail insert is fitted to the stern, with railings around the three remaining sides, plus an optional two-part cannon on the main deck, and extra yard arm stowed on deck. Three sets of chains at the base of the shrouds are applied to each side of the hull, mounting it on the included pair of cradles that have a rustic wooden texture moulded into them. The bowsprit is lashed to the bow with a length of cord, adding detail parts around the beak, then making the two main anchors from two parts and using two lengths of cord to create a loop through the head ring at the centre of the stocks, and another loop just above the flukes. three lifeboats are made in the same manner as the deck boat and suspended from a pair of davits on the sides of the quarterdeck, the third over the stern, adding stowed oars across the benches of the two slung from the quarterdeck sides, and using more lengths of cord to secure them all in place. The forward and main masts are built similarly to each other, the lower section with a top platform with separate futtocks (I love that word), extending the mast upward with another length, securing the top shrouds to the crosstrees and bringing the mast up to full height with a final mast section. The mizzen mast on the quarterdeck is a smaller mast that has just two sections, plus a horizontal boom and angled gaff ready for its sail later. The masts are glued in position in the holes in the deck, adding a martingale beneath the bowsprit, then fitting the shrouds to the newly installed masts, which includes a smaller set for the mizzen mast. Once the glue has set thoroughly, three yards are mounted across the two main masts, and a rigging diagram guides you through the process, with a separate diagram for the mizzen mast, including how to secure the cord on the cleats at the base of the masts. The next few steps involve adding the vacformed sails to each of the masts in turn, after cutting them carefully from the sheet of white styrene that has been moulded with details of the sails in a realistic manner. The mizzen mast is first, secured in position by several loops along both booms. The two main masts first have rigging added to the ends of the yards in duplicate, using rigging blocks where necessary, then the three sails are cut from the sheet and secured to the yards via the same style of loops used on the mizzen mast. The two jib sails are rigged to the bowsprit and attached on the cord loops again, ensuring that the rigging lines are taut, using blocks and tying them off on the cleats at the base of the forward mast. More rigging is looped around the sides of the ship and the yards, with yet more bracing the yards and masts together, again using rigging blocks and tying them off on the cleats around the deck. Markings The Beagle wore one scheme during her second mission, and painting call-outs are made throughout the build. The final diagram on the back page of the booklet shows the ship from the side, complete with rigging and sails, and shows where the many paper flags should be fitted and their locations. It also shows the name plate that is included with the model, which has the name HMS Beagle in relief with a raised surround that should make painting it suitably contrasting colours a little easier. Conclusion The Beagle’s second mission was undoubtedly her most important due to the eventual effects it had upon our way of looking at the world around us, thanks to biologist Charles Darwin’s world-shattering Theory of Evolution of the Species through natural selection, sometimes simplified to ‘survival of the fittest’. Despite its age, the kit is well-detailed and should build into an impressive model with the application of care and some modelling skills. Highly recommended. Carrera Revell model kits are available from all good toy and model retailers. For further information visit or
-
Leopard 2A7V (03355) 1:72 Carrera Revell The Leopard 2 is the successor to the earlier Leopard Main Battle Tank (MBT), and was developed in the 70s, entering service just before the turn of the decade. The original had a vertical faced turret front, while later variants had improved angled armour applied to the turret front that gives the tank a more aggressive look and more importantly provides enhanced protection, with a higher probability of deflecting incoming rounds harmlessly away. It has all the technical features of a modern MBT, including stabilised main gun for accurate firing on the move, thermal imaging for night-fighting, and advanced composite armour, making it a worthy contender as one of the best tanks in the world today. The original Leopard 2 has been through several upgrades through its service life and the current production variant is the highly advanced 2A7 and 2A7V, all of which have been re-manufactured from earlier models, with the designation 2A8 being given to a tranche of newly-manufactured tanks that utilise 2A7 technology. The 2A7 is not intended to be used in a close-quarters or urban environment, and is different from its stable-mate, although both are derived from the 2A7+ demonstrator. Most of the improvements of the 2A7+ were incorporated into the 2A7V, which has extensive modular armour, advanced technology and anti-mine packages fitted to improve crew survivability. It sports the Rheinmetall 120mm smoothbore gun with a longer barrel than the A5, which results in a higher muzzle velocity, thus improving penetration power over its predecessor, allowing it to reach targets at a greater range, and hit closer targets harder. It also has an armoured ammunition storage space in the turret that is engineered to blow outward in the event of a detonation of munitions, which again improves the crew survivability further. For close-in defence they can be fitted with a stabilised FLW remote weapon station instead of the usual MG3 machine gun, and appliqué armour is installed to give an arrow-head front profile to the turret, as well as several more subtle upgrades that follow on from the 2A5 and 2A6, such as all-round protection from incoming RPG rounds, a common weapon encountered in asymmetric combat such as the Middle East. Sales of the Leopard 2 have been good overseas because of its excellent reputation, and Canada, Turkey, Spain and many of the Nordic countries use it as well as many other smaller operators. The Kit This kit is based upon a tooling that was initially released by Revell in 2011, and has since been re-released several times with additional parts. The kit arrives in a deep end-opening box with a painting of a 2A7V ploughing through heavy snow in an alpine environment, and inside are a surprising eight sprues of various sizes in grey styrene, a small decal sheet, and the instruction booklet, which is printed in colour on matt paper and has the painting profiles on the rearmost page. The high sprue count is due to the distribution of the required parts across the sprues, leading to a relatively high number of parts that will be left on the sprues after the build, for example two turret-tops and an upper hull will be left over, plus a substantial number of detail parts. Detail is good, and it should produce a creditable replica once completed after careful painting and weathering. Construction begins with removing three strakes under the rear of the hull floor, then gluing the sides to the underside and supporting the structure by adding an internal T-shaped bulkhead within the hull at roughly the engine firewall position, adding an extra part to the right side vertical, and closing up the rear with a well-detailed bulkhead after removing the ends of the same strakes removed from the floor, and fitting an armoured panel beneath the crew compartment floor. Much of the suspension is moulded into the hull sides, adding extra parts to enhance this, then fitting the swing-arms, stub-axles and inner return rollers to the sides, then making two drive-sprockets, two paired idler wheels and fourteen pairs of road wheels to complete the running gear ready for installation of the tracks, which are moulded in two lengths per side in styrene. After gluing the four parts into two lengths, the instructions advise heating the tracks in hot water so that they will bend around the rounded ends of the runs, of course taking care not to burn or scald yourself in the process. You are advised to wrap them around the upper run first, hiding the joint on the lower run, cutting superfluous links from the tracks to keep them taut, and fixing the outer return rollers in place against the outer face of the guide-horns. A riveted appliqué panel is mounted under the glacis plate, fitting towing eyes, brackets and spare track links to the rear bulkhead, and making up two towing cables with moulded-in eyes. Once the tracks are in place, the upper hull is mated with the lower, installing the towing cables over the rear of the vehicle, followed by a four-part appliqué armour package over the glacis, with moulded-in light clusters, and a pair of mudguards at the front, plus a sensor package in the centre at the very front of the vehicle. The glacis plate has the driver’s hatch installed, more towing shackles under the front, plus more lights and their protective cages. three-part side-skirts with appliqué armour blocks are next, attention then turning toward the massive low-profile turret. The turret is started with the floor first, adding a bustle plate at the rear, and cheek panels to the front, then the barrel body is inserted into an internal mantlet block, bracketing it with side plates, the port side having the coax machine gun moulded-in. A long narrow top plate is then fitted, and the completed assembly is inserted in the lower turret on separate trunnions, using no glue on the pegs if you wish to leave the barrel mobile. The turret roof has an insert added from inside under the TV sighting box, then it is glued over the lower turret, and the side detail panels are fitted, adding appliqué armour panels to the sides of the mantlet, including an arrow-head part to the sides of the similarly-shaped mantlet armour, adding surrounds to the commander’s cupolas, inserting a trio of lifting lugs around the turret roof, and a large bustle box at the rear. The TV sighting box can be posed with the doors open or closed by either placing the single door part over the opening, or cutting it in two, positioning the two doors on either side of the box, as per the scrap diagram nearby, then mounting two aerial bases on cylindrical pedestals near the bustle, plus a sensor in front of the commander’s hatch. The rear of the bustle is enclosed by adding a panel with two racks of track grousers moulded-in, plus an L-shaped side panel on the right side, and a shallow box on the rear left of the turret roof. The smoke grenade barrels are mounted on a shallow shelf, making two pairs that fit in the space between the bustle and frontal armour, adding an MG3 mount to the gunner’s cupola, and a two-part 360° periscope to the commander's, then fitting the two-layer hatches, with a choice to pose them open or closed. A triangular railed stowage area is fitted to the roof behind the gunner’s hatch, a lid for a stowage box behind the sighting system, and a cowl over the system itself, fixing a ring around the gunner’s hatch, extra stowage boxes and grab handles around the sides of the turret, and the afore mentioned smoke grenade discharger assemblies. A fire extinguisher and long narrow box (for cleaning rods or aerials) are attached to the bustle, then the turret can be twisted into position in the ring on the hull and locked into place, deciding whether to position the travel lock flat on the engine deck, or by using a different part that you slide over the barrel first, the turret can be reversed and secured in place facing backwards for travel, fitting the muzzle portion to the end of the barrel to complete it. The final parts are two wing mirrors that can be deployed, or folded flat out of the way for battle or operations in cluttered areas. Markings There is a single option included on the small decal sheet, which is painted in a three-tone NATO camouflage that consists of wavy-edged areas of green, black and brown. From the box you can build the following: The decals are printed using a digital process and have good registration, sharpness, and colour density, with a thin gloss carrier film cut loosely around the printed areas. This means that the carrier film on their decals can be coaxed away from the printed part of the decal after they have been applied, effectively rendering them carrier film free, making the completed decals much thinner and more realistic, and obviating the need to apply successive coats of clear varnish to hide the edges of the carrier film. It’s a great step further in realism from my point of view, and saves a good quantity of precious modelling time into the bargain. Conclusion A well-appointed 1:72 kit of this effective Main Battle Tank that is amongst the best in the world. While there isn’t a plethora of decal options, almost all Europe-based Leopards would be painted in the same scheme. Highly recommended. Carrera Revell model kits are available from all good toy and model retailers. For further information visit or
-
 This project took a very long time to process. It sat on my shelf since 2012,but I never found the time to actually start it until early 2020. I actually planned it for my 2020 747 anniversary builds, but I never managed to find the motivation to continue the build. I regained the motivation in 2022 and started to handpaint 350+ tiny seats... I wanted it to be as much 70s style as possible,so a lot of research was done to find pictures of actual cabins or mock ups. As I have a lot of 747 books,they were really helpful for this task. I also reproduced the cabin walls and modified the first passenger door on the inside, to get a more realistic look.Sadly,not much of it is visible now...😳 I should have known better... To get the whole cabin into the fuselage and everything closed up and painted,without destroying the interior was a major task that took many weeks/months of careful masking and painting. The engines were also modified. I created new inlet rings to get a seamless intake and cutted off the rings in front of the engine cones,glued the halves together individually and glued them back on to make them sit more accurate. Its a real eye catcher in the cabinet but I would not want to do another... Cheers Alex
- 15 replies
-
- 35
-
-
-
- Boeing 747
- Revell
- (and 1 more)

.thumb.jpg.282a1640ebf3331372afcd753baefd3b.jpg)