e8n2 Posted March 10, 2014 Share Posted March 10, 2014 I noticed a couple of weeks ago that both Hobby Terra and Models UA (both out of the Ukraine) had the new Roden 1/72 C-123B in stock. I took the plunge and ordered it from Hobby Terra. It is in the states and I am just now waiting for it to make it here to California. I found a preview of the kit on the IPMS Deutschland web site at the following address: http://www.ipmsdeutschland.de/FirstLook/Roden/Preview_C-123_Provider_72/Rod_C-123_Provider.html I also did an image search on Yahoo and came up with some ideas involving day-glo stripes and NMF. Later, Dave 1 Link to comment Share on other sites More sharing options...
eng Posted March 10, 2014 Share Posted March 10, 2014 Nah, gotta build an Air America machine surely! http://images4.fanpop.com/image/photos/15300000/Air-America-Promos-robert-downey-jr-15352047-1300-938.jpg Seriously, would love to see some pics of the kit when you get your hands on it, and initial impressions. Rgds, Eng Link to comment Share on other sites More sharing options...
modelldoc Posted March 10, 2014 Share Posted March 10, 2014 Saw it at the toy fair in Nuremberg. Pocketbond Ltd. told me, it comes in the second half of the year. modelldoc Link to comment Share on other sites More sharing options...
Julien Posted March 10, 2014 Share Posted March 10, 2014 How is you polished NMF technique? 2 Link to comment Share on other sites More sharing options...
e8n2 Posted March 11, 2014 Author Share Posted March 11, 2014 How is you polished NMF technique? I was thinking something more the way like this: http://www.theaviationzone.com/images/vintage/c123/provider/c123b-679.jpg I imagine that in no time though somebody (like Hannant's) will include the Thunderbird scheme on a decal sheet. A white over gray MAC type of scheme, if any were ever finished like that, would also be interesting. Later, Dave 2 Link to comment Share on other sites More sharing options...
Jennings Heilig Posted March 16, 2014 Share Posted March 16, 2014 (edited) Nothing to see here Edited April 3, 2014 by Jennings Heilig 1 Link to comment Share on other sites More sharing options...
e8n2 Posted March 17, 2014 Author Share Posted March 17, 2014 I've got the Thunderbirds scheme just about finished for the Roden kit Stand by! I just noticed on Julien's photo that the drop tank (except for the scalloped stripes), the tank pylon, and some of the underside of the wing between the spars appear to be aircraft grey (FS 16473 or what ever ANA number it was at the time). Are my eyes deceiving me or what? Later, Dave Link to comment Share on other sites More sharing options...
Jessica Posted March 17, 2014 Share Posted March 17, 2014 I wonder how difficult it would be to convert it to this? 1 Link to comment Share on other sites More sharing options...
Jennings Heilig Posted March 17, 2014 Share Posted March 17, 2014 Not mind-bendingly difficult, but then again, why? Link to comment Share on other sites More sharing options...
Julien Posted March 17, 2014 Share Posted March 17, 2014 I've got the Thunderbirds scheme just about finished for the Roden kit Stand by! Damn, I might have to buy it now then! Link to comment Share on other sites More sharing options...
Jessica Posted March 17, 2014 Share Posted March 17, 2014 Not mind-bendingly difficult, but then again, why? Well why not? It's not as if everyone else and their dog is going to build it so there's a large chance to have something unique in the collection. 3 Link to comment Share on other sites More sharing options...
Jennings Heilig Posted March 17, 2014 Share Posted March 17, 2014 Indeed. Whatever in the world floats your boat (or tugs your glider in this case) Link to comment Share on other sites More sharing options...
gingerbob Posted March 25, 2014 Share Posted March 25, 2014 (edited) I wonder how difficult it would be to convert it to this? Having just discovered the existence of this [edit: this meaning the Roden C-123], after a second's "Hey, that's neat!" My mind flashed on that glider, and the hypothetical process began... strange as it may seem, you're not alone, Jessica! I'm not really likely to build... uhh, I mean buy... this kit, but I still think it's great that they did a C-123. bob Edited March 26, 2014 by gingerbob Link to comment Share on other sites More sharing options...
Jessica Posted March 26, 2014 Share Posted March 26, 2014 Actually it's the other way around. The Chase XCG-20 became the C-123 in a roundabout way. The -123 retained its glider heritage in the fact that there are actually no fuel cells in the wings. All the internal fuel is contained in the rear of the engine nacelles. Link to comment Share on other sites More sharing options...
Jennings Heilig Posted March 26, 2014 Share Posted March 26, 2014 Yep, AFAIK the C-123 is the only instance of a combat glider design being converted into a successful powered aircraft. I think it would have been a pretty lousy glider, but with a pair of R2800s, almost anything looked good Link to comment Share on other sites More sharing options...
Whirly Posted March 26, 2014 Share Posted March 26, 2014 I wonder how difficult it would be to convert it to this? And why not this? If you have some spare B-47 engines... Seriously, it shouldn't be overly difficult and I've considered it before for my 1/144 Amodel kit: the cockpit windows are a small change and you only need new tail empennages. The big problem is finding a plan view of the early tailplanes, you could make a guess from the fin shape but I'd rather have some drawing to trust... Fabio Link to comment Share on other sites More sharing options...
AWFK10 Posted March 26, 2014 Share Posted March 26, 2014 Yep, AFAIK the C-123 is the only instance of a combat glider design being converted into a successful powered aircraft. I think it would have been a pretty lousy glider, but with a pair of R2800s, almost anything looked good There was also the Messerschmitt Me 323 and (if you're prepared to be generous in your definition of 'successful') the Gotha Go 244, which could at least fly and which was built to the tune of 130 or so examples. 1 Link to comment Share on other sites More sharing options...
Jennings Heilig Posted March 26, 2014 Share Posted March 26, 2014 BTW, I haven't seen much about the Roden kit. It's quite nice! Nicely detailed interior, well done detail parts like wheels, gear, engines, props, etc. J Link to comment Share on other sites More sharing options...
Robin-42 Posted March 26, 2014 Share Posted March 26, 2014 (edited) I would do the Air America scheme. If you take out the intro and driving the Porter into the C123 it's a pretty realistic movie. When you read the true stories, they were that messed up. The CIA actually had some C130's built with no serial numbers on anything so they could deny they were theirs. Since virtually every part of an aircraft has a serial number on it. It was a monumental and ridiculous task,and made maintenance a nightmare. I have never read a Vietnam novel. You could never make up the truth! Edited March 26, 2014 by Robin-42 Link to comment Share on other sites More sharing options...
e8n2 Posted March 27, 2014 Author Share Posted March 27, 2014 BTW, I haven't seen much about the Roden kit. It's quite nice! Nicely detailed interior, well done detail parts like wheels, gear, engines, props, etc. J And wouldn't you know I still have NOT received mine yet! The "wonderful" USPS sat on it in New York for nearly two weeks for who knows what reason. It finally left out of there the end of last week but still no idea when it will arrive. And of course now Squadron has it for just a few bucks more than I paid and a lot less for shipping. Fargin Iceholes at USPS! Link to comment Share on other sites More sharing options...
Jennings Heilig Posted March 27, 2014 Share Posted March 27, 2014 It's not the USPS. It's the ICEholes at ICE who sit on things Link to comment Share on other sites More sharing options...
MikeR Posted March 27, 2014 Share Posted March 27, 2014 Hannants are listing it as future release, priced £42.99: http://www.hannants.co.uk/product/ROD056 Hope the upheaval in Ukraine doesn't cause Roden to go out of business - I think one of their tie-ups with Eduard's been put on hold because of it. Mike. Link to comment Share on other sites More sharing options...
Jessica Posted March 28, 2014 Share Posted March 28, 2014 Hope the upheaval in Ukraine doesn't cause Roden to go out of business - I think one of their tie-ups with Eduard's been put on hold because of it. Mike. This was covered over at Aeroscale. Roden is in Kiev, which is far enough from the Crimea that very little upset's been felt. Link to comment Share on other sites More sharing options...
e8n2 Posted March 28, 2014 Author Share Posted March 28, 2014 Well it finally showed up today! The regular mail carrier couldn't believe or understand why New York sat on it for so long. A few quick impressions. It is very nice and has some good detail in it. The inside of the side fuselage door jambs seem a little deep but I figure that is probably in case you want to open up those doors it would make it easier to cut out. The instructions show the aft cargo door being assembled in the open position, however both the front and aft cargo doors are molded as one piece but can easily be cut out. I did see several sink marks on the inside of the fuselage, but those should be easily filled. There is also a little bit of flash, but nothing serious. The nose cap is a separate piece so I would tend to think a K version could be in the offing sometime in the future. I'm not sure what exactly to call them but on the inside of the horizontal stab there are numerous "eruptions" coming up from the sink marks that will have to be cut out and sanded down to ensure a proper fit. Hopefully over the weekend I can find time to take some pictures of the trees and the "eruptions" on the stab. Overall I am very pleased with it. Really it is about time somebody released this. Italeri had announced one 20 some odd years ago and we all know how that turned out! Not sure when exactly I will be able to start on this thing, but should get it going sometime this summer after I get moved into my new house. Later, Dave 1 Link to comment Share on other sites More sharing options...
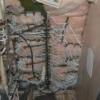
e8n2 Posted April 1, 2014 Author Share Posted April 1, 2014 As promised I now have some photos to go along with my first impressions of the kit. This is an upside down view of the Side Door showing the deep scoring that should easily serve as a guide to cut the door out if desired. Also notice two small "eruptions" from the sink marks. These are not too bad and should clean up easily. https://www.flickr.com/photos/104292885@N04/13549556153/ Here is an inside (not normally seen) view of the cargo doors, again showing the deep scoring for separating the cargo doors if you want them assembled in the ope position. https://www.flickr.com/photos/104292885@N04/13549556703/in/set-72157643237722593/ These next two shots are of the "eruptions" from the sink marks on the inside of the horizontal stabilizer pieces. They actually are quite tall, but can be taken care of without much problem. https://www.flickr.com/photos/104292885@N04/13549455815/in/set-72157643237722593/ https://www.flickr.com/photos/104292885@N04/13549775014/in/set-72157643237722593/ Later, Dave Link to comment Share on other sites More sharing options...

Recommended Posts
Create an account or sign in to comment
You need to be a member in order to leave a comment
Create an account
Sign up for a new account in our community. It's easy!
Register a new accountSign in
Already have an account? Sign in here.
Sign In Now