Search the Community
Showing results for tags 'conversion'.
-
With all the chatter about building a B777-300 in kit form I thought I would show you what I have been up to. This one has been on the bench for a while as I get distracted easily with other projects. I thought I had a thread going but can't find it. I started with a new Minicraft kt and one that I was recycling. I used the Contrails GE90 engines and wing tip extensions. The engines needed some work to refine the shapes. The lips were uneven and were squared up and thinned. The outer diameter of the cowl was also sanded down to reduce the overall size and get rid of uneven surfaces. This was all usingthe TLAR principle so the shapes may still not be that accurate. I have slowly been adding appropriate antennas and drain masts and finally added the the tail bumper that is common on the -300 I have been using 1/72 antennas form a trashed P-3 Orion kit. I glue them onto the fuselage with a glue/sprue mix into pre-drilled holes to give them strength. When set the oversized antennas are cut down and reshaped to something closer in shape and size on the real thing. I am using RichW Virgin Australia decals for this build.
-
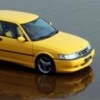
Hi This is a conversion of the Revell CB750 kit to a CB750KZ and is the first motorcycle conversion that I have attempted. I used to own one when I was younger and it was my pride and joy but, alas, I sold it so that I could get married (yep, it was worth it - but I kept all my gear just in case). It is not perfect by any means but gave me ideas for when I have another go at some point. Those in the know will notice that the real one had twin exhausts each side but I was not clever enough to attempt scratch building those yet. And, for a change, I did not add any lights........... For more pictures please click on this link: More Photos Kevin
-
 OK, this is is my first foray into the odd world of airliner modellng, so be gentle! This year I've been introducing my lovely girlfriend Louise to aviation history, bit by bit. Among other things we've been to Duxford for a look round, and enjoyed a couple of Shuttleworth shows and Flying Legends together. ] Anyhow, for no reason that I can determine, the two aircraft she has most taken to, out of all the things we've seen, are the DH Comet and the Fieseler Storch. She's also shown quite a bit of interest in my modelling, so I bought her the Academy Storch for her birthday (very much still a WIP) and agreed to make her a Comet for Christmas! So here's the result. From the start I wanted to convert my 1:144 Airfix kit into a Comet 4 of BOAC, as well as improve the detailing. Changes to the base kit are was follows: Cut 1.99 scale metres (two windows) from the fuselage length-this was tricky as the fuselage tapers subtly outward towards the nose! Cut off the wingtips, and added new carved from scrap plastic to reach correct wingspan for longer-winged Comet 4. Wing pinion tanks from 1:72nd Vampire T.11 drop tanks (they're an amazingly good match) Tank fillet fairings from scrap resin and filler Re-profiled fin tip Detailed exhaust cans Added rudimentary cockpit including floor, instrument panel, seats and yokes. Cut out near-nonexistent nosehweel bay, built new to appropriate depth with plasticard, detailed with more plasticard. Thinned out nose and main u/c doors and added extra struts to legs Replaced cockpit glazing with individual windows from CD case Cut out underside thrust reversers and various vents etc. Lined intakes and added rudimentary compressor faces. Drilled out auxiliary intakes between main ones Drilled out landing lights outboard of intakes and replaced with shaped clear sprue Plasticard aerials, intake scoops, anti-collision beacons added to added to fusleage and centre section Plasticard fuel dump pipes added to wings and tanks, hinge actuators added to aileron trim tabs, and wing fenclets added to leading edge. Scribed majority of panel lines, filled and re-scribed double joints between control surfaces The model is shown below before painting with Halfords Appliance White and Hunbrol Metalcote rattle-cans. I used the S&M sheet for Comet 4 to represent G-ADPC, one of the two aircraft which flew the first scheduled transatlantic jet service in 1958. The decals were of very good quality but rather over-sized, for example the tailfin decal was much too big, and the fuselage stripe needed cutting down to fit the kit windows better. The bit where the stripes widen and join around the nose was a nightmare, especially as I had to cut around the cockpit windows. In the end I mixed paint to as close a match as possible for BOAC blue, and had to touch up! It doesn't notice too badly under a coat of gloss varnish though. Hope you like the results! Horrible flash shot shows up all sorts of nightmares, but it's the only way to see the intakes properly: U/C bay. Just noticed the ruddy stripe isn't central. Grrrrr! Happy customer.
- 34 replies
-
- 34
-

-
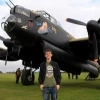
Hi all, I'm wondering if anyone knows of 1/72 scale decals and a conversion set for Canadian Avro Lancaster KB976 in MK10 AR condition as delivered to Lynn Garrison in 1964 or in her final transatlantic flight condition to Strathallan in 1975. I'd be looking at using Airfix's excellent new tool BI / BIII as the basis for the model.
-
 Well I've been making the most of being stuck inside because of the rain... This is the obsolete Airfix Spitfire Mk.I (old tool ofc) and I had a bash at converting it. I admit, it is some what crude, however, it looks the part Modifications; Sanded all the raised panel lines and filled the panel trenches around the engine, The curved front canopy came from Airfix's XIX, the "un-blown" slidey bit and the rear bit (very technical) were thermoformed, The two blade prop was built from scratch, The rudder was altered, Undercarriage legs from the Heller XVI and the wheels had the spokes filled in, Scratch built tail skid, Cockpit interior had a control column and belts added, Pitot tubes came from bit of metal. Paint; Overall Hu90 after which I blended in various shades of greens and yellows to give the dirty zinc chromate look, Control surfaces painted with Hu11 for aluminium dope, The airscrew was painted with Citadel Snakebite Leather and given and oil wash, The cowl was painted with Citadel Chainmail Decals all came from spares other than the exhausts which were printed by myself (My thanks to Rick Brown for the jpeg). I think thats enough talking... Cheers, Ben.
 -
Hi all, Found this Spitfire half built in a tin... Seeing as the old tool is so naff I thought I'd have some fun with it. Would anyone like to guess what I'm doing? What I've done so far is sand off all the rubbish panel lines and fill in the the huge panel lines as well as the exhaust. The Rudder is being reshaped too. Ben.
-
I have just acquired the Academy Mash Sioux bell 47 and I was wondering if there were any after market conversions for the fuel tanks and hopefully the cockpit tub. The kit has the saddle tank and I was looking for the far more common twin tanks. I cant find anything on Google. I know that the boom is to small to make a UK chopper but there are loads of colour schemes out there for this lovely little helicopter. Any hepl appreciated Rodders
-
 Hiya Folks, Here is my second finished Italeri 1/48th scale Hurricane Mk.IIc converted into a Sea Hurricane Mk.IIc using the hook parts from the Italeri Sea Hurricane Mk.Ib kit. As my old Hasegawa kit of an all white 835 NAS Sea Hurri was looking a bit sad and wore the wrong markings care of an incorrect aftermarket decal sheet I decided to replace it with this new kit, finished as NF700, 7-T which hit the round down of HMS Nairana on the 2nd March 1944, snapping the rear fuselage; I`ve managed to accumulate quite a few photos of 835 NAS Sea Hurri`s including those wearing D-Day stripes (NF698, 7-D was one of these and I was sorely tempted to do this one,..maybe next time?) and these came in very useful for reference. According to these photos NF700 had a feathered airbrushed edge around the anti glare panel in front of the cockpit which was a section of the original Temperate Sea Finish, but as I don`t have an airbrush I tried using a rattle can and the blue tak sausage method, but this was a total waste of time! Reverting to type, I attempted to replicate this feathered edge plus some overspray on the propeller blades and exhausts using some careful brush work, .......hope it looks OK? Cheers, Tony O
 -
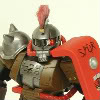
If you opened this with thoughts of Fokker Scourge and Pour le Merites and Immelmann turns and such, something may be starting to strike you a bit strange, oddly out of proportion, about the aeroplane displayed, which indeed lacks a gun. For this is not an armed Eindekker, but a Fokker A.II, the long-span version of the Fokker M.5 in military service. Strictly speaking, it is not the sire but the uncle of the armed monoplanes, which were direct descendants of the short-span M.5, but without it, the armed Fokker monoplanes would never have appeared at all. For the long-span M.5 was the design which saved Herr Fokker's aviation concern from failure and impending bankruptcy. By 1913, Fokker's trade-mark Spinne design was on its last legs. Its primitive means of control made it daily more unsuitable as a school machine, and less attractive to a sporting gentleman of means in the market for a flying machine of his own. An attempt to modernize it, and a new pseudo-Taube design, proved extremely poor flying machines. Herr Fokker knew he had to strike out in a new direction, one with an aura of modernity and a promise of prestigious achievement. He made a close study of products of Morane-Saulnier, a leading producer of racing aeroplanes. Fokker designed a machine which strongly reflected the lines of a Morane-Saulnier, but differed greatly in its construction. That design was the M.5 monoplane. The fuselage of the M.5 replaced wood with welded steel tube, achieving similar strength with less weight. That saving went into making a stronger wing, and both its airfoil section, and the action of its warp-control, were improved over the original Morane patterns. Fokker projected the design to be built in two forms. One, with a longer wing span and so a lighter wing loading, would be apt for aerobatics, and safer for the gentleman pilot to fly; the other, with a shorter wing span, and so less drag and weight, would have a better turn of speed, and be suitable for use as a racer. In the spring of 1914, Herr Fokker himself began to put on aerobatic displays flying his new long wing M.5 machine, and achieved a sensation in German aviation circles. In the audience for one display at the end of May were several leading lights of the General Staff, who were sufficiently impressed that Fokker was once again in the running for army aeroplane contracts. The M.5 itself, however, with its poor downward visibility and offering such cramped accommodation for two men, was not considered particularly suitable for observation use. When the Great War commenced, Fokker received orders for many aeroplanes, which he did not have facilities to construct in a timely fashion. The German army wanted a version of Fokker's monoplane offering better visibility and accommodations for two men; this, the M.8, went into production off the drawing board, as the A.I. A few M.5s in civilian hands were impressed, or donated, into military service, and a handful were built under contract in 1914, receiving the designation A.II. In January of 1915, a more substantial contract for long span M.5s was let (for just how many is unclear, it was at least 15, and possibly as many as two dozen). These were being delivered by late February, with one of the first coming down intact shortly afterwards in French territory. This build was inspired by this photograph: It shows a machine from the latter portion of the 1915 contract, as can be discerned from the reduced angle of attack of the wing, relative to earlier examples. Late production machines typically had a smaller portion of the nose panelled in aluminum as well. Feldfliegerabteilung 21 was attached to X Corps, part of 11th Army. This was shifted from Flanders to the east in April, 1915, to take part in the Gorlice offensive commenced in May. This produced a breakthrough, and an advance of a hundred miles into Galicia during the summer, retaking Lvov, and forcing the Russians to withdraw from Poland by September. In such a fluid situation, amid a country poorly served by roads and poorly mapped, fast aeroplanes would prove invaluable for liaison and scouting. The serial of the machine in the photograph cannot be discerned, so the most I can say is that this model represents the FFA 21 example. Fokkers with Oberursel rotaries notoriously became badly oil stained, and the hot oil generally 'ate' the paint of serials (as well as the varnish on the fabric), and so I was careful to put on oil stains in a typical pattern down the lower longerons, then laid on decals for a conjectural A14/15 serial, and scraped them away where they overlapped onto the oil stains. This is a conversion, employing two Eduard 1/72 scale Fokker E.III kits. Main points are: increasing wing span by two rib spaces, trimming chord and rake of tips, and putting cut-outs in the wing roots; shortening the fuselage slightly, extending the cockpit opening, altering the curve at the underside of the nose, and the shape of the cheek-pieces; reducing the span of the elevators by one rib space each. A seven cylinder motor must be swapped in for the nine cylinder one in the kits, and a taller cabane mast must be constructed. I want to close by thanking Mr. Josef Scott, who was kind enough to give some advice and share some materials that were of tremendous help. I would not have got this even close to right otherwise. His 'Fokker Compendium', published by Windsock, is heartily recommended to anyone interested in details of the Fokker monoplanes, from the early unarmed sorts to the late fighter types. Course of the build may be followed from here: http://www.network54.com/Forum/644810/thread/1375539842/Fokker+A.II+%28conversion+from+Eduard+Fok.+E.III%29+---+Revived+W.I.P.+%285%29
-
This has probably been asked before, but is there a simple RLM conversion chart for us simple ones Preferably to Humbrol enamels as that's all I have. Probably because I don't do a lot of Luftwaffe, I find the correct colours harder to fathom than Sabre wings and quantum mechanics. Cheers Chris
-

That 1/72 Italeri C-130E/H With FlightPath T56-A-15 Engines
DaveCS posted a topic in Aircraft Modern
After hitting up my local to grab a Hercules (I was considering the 1/144 Minicraft offerings but for a little less than $20 I could scale up to a bigger kit) I decided on the C-130E/H 1/72 Italeri kit. I know they make a C-130J too (but I've read some issues surrounding the nacelles and props) which would have been "neat" but opted for the "older" Herc version. I was aware that the nacelles, even on the older version, were too short (Italeri just re-using the old "A" nacelles based on my reading) but that FlightPath had produced some replacement resin T-56-A-15 engines for this kit to bring it (partially) up to date to a more recent E (and H if other mods are made). That said, what I'm curious about, before spending the coin on the Flightpath engines is: Has anyone here actually used these on this kit? I noted a few threads online via ARC that had used them and some comments on their review via CyberModeller that there is a bit of a "step" that will need to be filled/sanded/filled/sanded/etc. in order to make them fit appropriately but I was hoping for some first hand experience from folks here. Any input is welcome Thanks a ton. Cheers, Dave -
 Ok, all this talk about A318s has got me thinking.... something my wife tells me I do far too much of anyway. Having done some research (with a view to converting the Revell A319 - yes I know there are other options) the differences between the A319 and A318 I can find are: a. 1.5 frames shorter at the front (~79cm) b. 3 frames shorter at the back (~160cm) c. Tail fin 75cm taller d. Cargo hold doors narrower (1.33m vs 1.82m). e. Increased wing camber (might give that one a miss) Is there anything else that I need to consider? I assume the fin is just extended along the existing taper? Is the rudder the same height at on the A319? Being a bit of a stickler for these things, I'd like to preserve as much of the kit detail as I can, like windows and stuff, which will no doubt make the whole thing a lot harder to do.... (Before anyone else says it: The 737-600 is obviously inestimably better in every conceivable way ) All pertinent thoughts welcome! Thanks, Andrew
 -
 Oookay then.....everything lined up, thumb out of bum, camera charged, off to the races! First up, the components of the build; kit, decals, reference..... And the kit parts..... And l' object d' desire.....funny how the artworks match......must be authentic then.
 -
Would it be possible to create an AH7 from the Revell mk88 or does any body know of any conversion for it ?
-
 The Russian AF has just taken delivery of the Su-30SM - to be used as a lead-in trainer for the Su-35S. Here's my conversion of the Trumpeter 1/72 scale Su-30MKK into a Su-30SM. It involved adding canards and their mounting shoulders, modifying the rudders and making Thrust Vector Control (TVC) nozzles..... I also added two pilots plus the prominent blind flying curtain over the front students cockpit.... Closeup of the TVC nozzles..... The blind flying curtain and holographic HUD..... The model is finished in the latest dark grey camo scheme now being adopted by the RusAF - together with red/white/blue stars and 'VVS Russia' titles on the fin.... Ken PS - If you ever wondered where your BBC licence fee goes - it funds the Russian Air Force......
 -
Hi all, Well half term means a week off school, means a a week modelling. Anyway, I brought AZ Legato Spitfire XIV and Freightdogs XIV (same kit), but I thought I could do the same for half the price. So here's the basic concept... Airfix's 1/72 XIX; remove high back, replace with low back, fill d wing panel lines, scribe e wing panel lines, add e wing armament. I've ordered bubble canopies aswell so that'll complete it. Anyway, here's some pics. First line indicating where the low back spine should be, Lower line is where the cut will be, Wax spine made by taking a negative mold of my existing XIV before filling it with wax, Wax spine glued on and filler applied, It's not pretty, Updates should come every evening... Ben.
-
Apologies if this topic has already been covered. I want to build a 1/72nd scale RAN Douglas A4G operating from HMAS Melbourne in the early 1970s and have the Modeldecal sheet that includes this scheme. As the new Airfix A4B kit is readily available and reasonably priced what are the main differences between this mark and the A4G? i.e. Is it possible to build the A4G more or less from the box or is there extensive re-modelling/converting to be done and where? I have searched the net but have not been able to find a definitive list of differences. With thanks in advance. Tim.
-
 Buccaneer S1 Conversion 1:72 Heritage Aviation Models Ltd The initial version of the Blackburn Buccaneer, the S.1, was something of a flop in squadron service thanks to its De Havilland Gyron Junior turbojets. These engines could not produce enough power to enable to aircraft to fulfil its potential and as a result the S.1 was quickly replaced with the S.2, fitted with much more powerful Rolls Royce Spey turbofans. Perhaps as a result of its somewhat short and unsuccessful career, the S.1 has been rather less well represented in kit form compared to the S.2. Nevertheless, the S.1 is an interesting subject to model, not least because some of the aircraft sported a rather fetching anti-flash white scheme in squadron service. Heritage Aviation Model’s conversion set is comprised of replacement engine air intakes and exhausts as, well as the low pressure turbine blade faces that form the rearmost extremity of the Gyron Juniors. The parts are very nicely cast in a smooth, cream-coloured resin and are free from bubbles or other flaws. There is no engraved detail on the outside of the parts, as befits the rather smooth exterior of the Buccaneer, but you may well want to add a little surface detail here and there. By necessity this conversion involves cutting away the corresponding parts on the Airfix kit, but clear, full-colour instructions are provided which should simplify the process somewhat. I’m sure some filling and sanding will be required in order to make everything blend in, but seeing as you’ll probably be breaking open the filler for the rest of the kit, this shouldn‘t be a big deal! Conclusion Whilst it’s a shame that there is no modern, mainstream kit of the early Buccaneer available, at least building such a machine is now relatively straightforward thanks to this conversion set from Heritage Aviation Models. Recommended. Review sample courtesy of Ian at
 -
Alright, after a protracted build, here she is: Comments welcome! Mike.
- 10 replies
-
- 10
-