Search the Community
Showing results for tags 'TAmiya'.
-
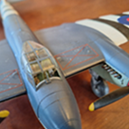
Hi guys, it's been 8 months since I last finished my model which was the Chinese J-7B. Not very productive during these months, huh? Ok, here is my Tamiya's latest brand new 48th scale kit. What is special to talk about this kit is the details. Tamiya has done a very good job putting in more details while not compromising the ease of building in their later kits. Engineering and parts breakdown are excellent. Of course there are many aftermarket detail up parts released in the market lately but the detail level out of the box is pretty acceptable especially in the weapons bay. I scratch-built the seat belts as Tamiya provided only the decals. The only drawback of the kit is the decals. They are thick and need a lot of decal liquids to soften and set. Otherwise it would be a perfect kit. This is a commission build and my client wanted me to do the Italian Air Force so here it is. Hope you will like it. I willbe building more as I am settled at the new place and have set up the workbench. See you next time, thanks. #tzwf35
- 18 replies
-
- 77
-

-

-

-

-
Hi, I would like to start and share my new build of a De Havilland Mosquito 1:48 scale. The kit is the old, but still very nice Tamiya of the FB Mk VI. I believe that neither a presentation of this aircraft nor of the kit is necessary. Since long, I wanted to build a model of this aircraft because of its fame and because of its remarkable design. For me, this is the first mosquito build as a grown up modeller if I exclude the ancient Revell 1/32 kit that I built when I was a kid. To start my build, I followed to the letter the Tamiya instructions which called the engine nacelles as a first step: I just thickened the frames for added 3-D effect and added few interior details. The white panel shown on the inside of the walls is an artistic license of mine having used a piece of thin styrene to hide annoying ejection pin marks which I didn't want to fill and sand. In the following, the nacelles are shown completed: Finally, they are test fitted with the wings and the main undercarriage struts to check that no interferences with the new parts are present: That is all for this first instalment, I hope you will enjoy following it. Best regards, Dan
- 40 replies
-
- 24
-
-
-
He is my second Mosquito build. I bought this in error for my Mosquito Racer build and some smarty-pants suggested that I build both, so that's what I'm going to do. This will be an OOB build of a FB Mk VI using the 1/72 Tamiya kit and will be built in flying mode with wheels up, fitted with a crew and will be destined for my ceiling. The box. The plastic. See you soon. Stuart
- 23 replies
-
- 14
-
-
After WW2 ended, the Chinese Nationalists ended up with a few Ki-61s in their inventory. From what I can tell, it was at least four Tonys (Tonies?): three Ki-61-Ic's, and at least one Ki-61-Ib. This build is a mostly out-of-box build of Tamiya's excellent 1/72 Ki-61-Id. While I can't verify that the RoCAF ended up with any Ki-61-Id's after the end of the war, I also can't verify that they didn't, so this build is what could be considered a semi-historical "what if." The decals were from Mark I Models, and the only extra addition to the Tamiya plastic was a set of Eduard photoetch seatbelts. The paints were a mix of Tamiya "acrylics" and AK Real Colors. I'm not too happy with how the Tamiya XF-16 Flat Aluminum turned out - I have a hard time spraying it in such a way that it doesn't appear grainy. The build thread is here.
- 11 replies
-
- 23
-
-
Hi All. Here is my recently completed build of a DH Mosquito FB VI using the Tamiya 1/72 kit as part of the DH Mosquito STGB. From the start, I decided that this would be a wheels-up project destined for the mancave ceiling. Built OOB with the only additions being a couple of figures for the crew. No real problems but the undercarriage aren't designed to be shut and are bit small plasticard was used to fill the gap between the doors. A little filler was needed for the nacelle/top wing join and was easily sorted. Painted with AK Real Colors paint. Kit decals were typical Tamiya, don't like to conform and took numerous applications of Sol on the radiator decal. Build log here: Thanks for looking. Stuart
-
Gene Hunt's Audi Quattro from Ashes to Ashes Tamiya, 1/24 "A word in your shell like, pal." It's pretty self explanatory, I'm aiming to build the red Quattro as featured in the BBC's Ashes to Ashes, the 2008 time-travelling cop drama set in 1981-83 and sequel to Life on Mars*. I preferred Ashes over Mars because a) I'm an 80s child, b) Keeley Hawes, c) it had a bolder aesthetic, d) great soundtrack, e) Keeley Hawes and f) the Quattro. The Audi Quattro itself needs little introduction. Iconic gets overused, but in this case entirely justified. Launched in 1980, it was a game-changer and is the granddaddy of every rally car that followed in its tyre tracks. There's one small snag - I'm waiting for a kit. Tamiya are quite fortunately repopping their classic kit (which has got to be better than the Esci/Italeri offering) this year and it's meant to land in April. I've got one on pre-order with my local model shop, so until then I'll just sit tight and maybe occasionally post stuff in the nostalgia thread No doubt there will be Quattro related content and quotes from the Gene Genie and Bolly Knickers to follow. *There were jokes at the time that a 90s series would follow called Hallo Spaceboy. A third part in the trilogy called Lazarus was muted by the creators post-Covid, but it got shelved in 2023.
-
Here is my entry for this GB, a Mosquito Racer using the Tamiya FB Mk VI/ NF Mk II 1/72 kit and Thunderbird Models decal set. Don McVicar purchased KB377, a Mk 25 from the RCAF for $1500 with the intention to race her in the Bendix Race. Before the race started there were certification issues and a lack of major sponsorship, then the mechanical problems started enroute to the race start; a flat tyre, carburettor problem, an exhaust stack fire and the coup de grace, a conrod failure on the starboard engine. Firstly, the compulsories: The box. Bags of intact plastic. Decals. There will be a slow start as I need to get my Norseman in another GB nearer the finish line before I can put more effort into this. Stuart
- 39 replies
-
- 17
-
-
-
Somewhat out my normal comfy chair with this, but may I present my recently finished Tamiya 75mm PAK 40. I've depicted this holding position on a well trodden road, and down to the last few rounds. The kit is Tamiya classic that cost all of £5.50, the base is pre-cast from Fields of Glory, vegetation came from a wood in Cornwall and the 'logs' are from my local park. Painted with Vallejo and Ammo acrylics, weathered with oils and pastels. Thanks for looking and comments are welcome. Keith ☺️
-
First in! My entry will be this Tamiya FB.VI/NF.II which I will be building as an NF.XII of 85 Sqd Using a Quickboost resin radar nose. I will be building this aircraft, flown by the Mosquito ace Branse Burbridge: The sprues: As with my AV-8A in the 80’s GB, as I will be away on holiday and miss the start and first couple of weeks of the build, I have jumped the start by priming some parts and shooting some interior green on the cockpit and aluminium on the undercarriage, but kept well below 25%. I’ll pick this up again around Easter and get on with build proper. Looking at the parts, I can’t wait! AW
- 49 replies
-
- 20
-
-
This is a really excellent kit from Tamiya, the 1/35 M10 U.S. Tank Destroyer with additional stowage from Def Model and the a few extra's from Miniart like the 50 cal. My first time with the correct olive drab, well XF-62 which seemed too dark to my eyes but the weathering toned it down a little phew. Anyway thanks for looking. Regards Trace
- 10 replies
-
- 31
-
-
-
Hi All. Here is my recently completed Mosquito Racer KB377 as part of the Mosquito STGB. The kit used was the Tamiya B IV kit in 1/72, Humbrol, AK and Vallejo paints were used with decals from Thunderbird Models. Typical Tamiya quality, the only filler required was the top wing to nacelle join. Tamiya's mounting system for the undercarriage doors makes the door openings to wide, doors should be much closer to undercarriage. I don't like colour matching to decals but I was lucky to find a near perfect match to the green by using Vallejo Deep green. Slight issue with the long fuselage decal as it broke at the narrowest point across the top wing. Build log here: Thanks for looking. Stuart
- 11 replies
-
- 47
-
-
-
-
My first entry for this GB is the Tamiya 1/72 kit of the F-16C Block 50. Just look at all the Tamiya loveliness here! There are two of these sprues. The kit was marketed in two boxings, one with "full equipment" i.e. stores for the SEAD role. The other didn't have the stores. I find this rather bizarre as the stores seem to be moulded onto the same sprues as some major airframe components such as the tailplanes. I wonder if Tamiya moulded a seperate sprue with these parts for the second kit. If so, that seems a little counter-intuitive. Why not just mould on the stores together on one sprue and leave it out of the second kit altogether? It also seems as though Tamiya originally had the intention of producing a T-bird version and versions with the earlier smaller intake. I wonder why they didn't. I will be building this one in the current Have Glass V scheme, in the markings of 148 FW of the Minnesota ANG based at Duluth AFB. The Have Glass scheme will be far easier to replicate on an F-16 than an F-35 as there are no RAM tapes to laboriously mask. I think the model will have a lot of contrast and vsual interest as the nose come, pylons and stores are all in their original colours. The decals will be from FabScale, a company which is new to me.
- 24 replies
-
- 11
-
-
This kit has been in the stash since 2013...Time to build it 🙂 This one will be a lovely and interesting GB, thank you!
- 19 replies
-
- 13
-
-
 Here's my second GB entry is this tiny (especially in 1/24th) Fiat/Giannini with a KMP transkit... I've already started but hopefully not crossed the 25% mark... The work so far has been to fit the even wider arches from the transkit (I had to sand down those on the shell a little first), add in the firewall, attach the 2 engine halves and gearbox halves together, glue the inner wheel parts to the outer rim tube and attach the new hub parts to the kit parts with the polycaps inside. Body inner and outer parts have had an initial primer coat but could do with another to hide the contrast in the green 3D printed resin colours and I need to add some filler around those arches. Oh and the rollcage has had a first primer coat too. Here are the rest of the transkit parts - thankfully they've included spares for lots of parts (wheel pins, the fragile looking engine/boot lid supports, etc. The transkit is a bunch of 3D printed parts, decals and a rather limited instruction pamphlet (double sided) and paint/decal diagram. Here's an image of the car with the arches on, pre-primer... Here's the rest of the Tamiya kit pieces... And the Tamiya instructions... This is an older boxing of the kit, it looks like Tamiya have re-released it (hence the yellowed plastic). Here's a link to a YouTube video of the cars in action:
 -
First post in this Group Build, and first Group Build. I had the Tamiya Mossie in the shed for a couple of years. I'm just researching at the moment. So far the build looks like this - I still haven't finalised a subject... leaning toward a Banff Strike Wing 235 Squadron plane, now diving into reference material as I couldn't find decent images on line. In an ideal world, I want the EDSG upper colour, with half invasion stripes... still looking.
- 76 replies
-
- 10
-
-
- Mosquito VI
- Tamiya
- (and 1 more)
-
 Hi everybody, long overdue RFI for this model, completed last February: it's the well known 1/48 Tamiya kit representing Capt. Blackburn mount, "BIG HOG", an F4-1a as seen in Ondonga, Solomon Islands, in November 1943 (according to the kit instructions). The WIP thread has seen the usual participation of the BM hive with lots of great tips and pointers, and even donation of parts and bits, so many thanks to: @corsaircorp, @Corsairfoxfouruncle, @Cookenbacher, @VT Red Sox Fan, @72modeler, @steh2o, @Troy Smith among many others, apologies for not remembering all. Here's a brief summary, before showing other pics (there's plenty of them, so beware 😞 - Kit: Tamiya no.070, typical Tamiya of that era, nicely detailed from the box and good fit overall - a bit tricky on the outer wings, TBH - Aftermarkets: the seat is a resin one, kindly donated by Alain @corsaircorp, I think it comes from an Aires set. The pilot standing on the ground is also a resin one, again donated but by @Cookenbacher this time, made by Plusmodel (CZ). The pilot on the wing is supplied with the kit - Scratch building/Improvements: I scratch built the framing inside the engine cowling, cutting the frames with my Silhouette Curio from styrene sheet; the engine was detailed with various wires, and the same goers for the cockpit and the main wheel wells and main struts. I also scratch built a gun camera for starboard wing and its clear cover, although only the latter can be seen. Cowling flap actuators were reproduced using plastic rod and copper wire; the antenna wire insulator was scratch built form brass pipe, while the wire itself is AK elastic wire. I replaced the kit exhausts with brass pipes. I replaced the kit gunsight with a completely scratch built one, made from CD cover plastic, clear acetate and brass sheet. The gun through patches and the tape stripes covering the spent shell cases holes were made from the white paper used as protective sheet on top of the kit decals (hanks to @Cookenbacher for the tip ).The base is an MDF square cutout, with some real sea sand sprinkled over it and glued with PVA glue - Decals and markings: the insignia and numbers were all airbrushed using masks I cut with my Curio, the rest are the kit decals, including the friendly fire damage patches on port side of the fuselage. Following @steh2o hint, I also reproduced and additional damage patch, from the same incident, just aft of the engine cowling, using a punched out circle from a spare decal. I also printed an additional set of kill marks, as during the build it turned out that on the real AC those were painted also on starboard side of the fuselage - Painting: hairspray technique was used for the chipping, so I airbrushed decanted spray can Tamiya Gloss Aluminium as a base coat for the main AC, then a hairspray coat, then YZC (a concoction of Tamiya Flat Yellow and Flat Black), more hairspray and then the final camouflage, airbrushed freehand using Tamiya Flat White for the bottom and Lifecolor paints for the rest. Details on the chipping and painting can be found in my WIP thread. The figures where brush painted with various Lifecolor paints. - Weathering: a mix of tempera washes and oil dotting The WIP thread is here: Now on with the pics! Engine and cowling details can be spotted in the next pics Gun camera detail The scratch built gunsight Some interiors details, apologies for the overexposed pics The resin pilot and plastic Capt. Balckburn more details on chipping, fading ad markings Here you can just about see the cowling flaps actuators Antenna wire Now, a few pics without the base Bottom side (or "a dead one, according to @CedB ) Scratch built exhausts detail: more underside details All comments welcome! Ciao
 -
Being a long way unto the build of the Tamiya FB VI (see below) i wanted another crack at the Tamiya Mosquito, knowing I could do better. So it will be largely OOB, with AM seatbelts and some cockpit scratch build. So this will be my second entry in the build.
- 6 replies
-
- 8
-
-
- Mosquito B IV
- Tamiya
- (and 1 more)
-
Having become bored with my more elaborate builds, I thought it might recharge my modeling mojo to take on a simple Japanese destroyer – and perhaps actually finish it! Tamiya’s of the 1/350 scale IJN Kagero seems like a perfect choice. If it lives up to the Tamiya reputation of great fitting parts, assembly should be a snap. Just to keep things interesting I picked up the Infini brass upgrade set for it too. I’m hoping to complete this one fairly quickly with a minimum of the scratchbuilding which tends to bog down my projects. We’ll see, but this should be a fun, straightforward build! True to form, Tamiya’s Kagero hull parts fit beautifully and the hull went together quickly. My only quibble here is the split hull design. While the waterline/full hull option here is nice, molding the lower hull separately builds in a bit of extra effort to integrate the lower and upper portions. I definitely prefer the simpler single hull approach of their earlier USS Fletcher kit. That said, the join was pretty good and only a little Mr. Surfacer 1200 was needed to blend things.
-
 I'll be building the Tamiya boxing, with Eduard "Space" cockpit details and wheels: Probably to be finished as per the box art but I may choose another option from the kit decals. Mike
- 16 replies
-
- 11
-
-
Greetings everyone, started this couple of weeks ago, usual AA quality 😂 boiling water and hot air has come into play, quite a few poorly cast parts with bits missing as well, but moving along, a few areas have me stumped, especially the cupola parts for the GPMG mount, trying to work out how it goes together as instructions are the AA picture assembled and not the side needed. so far this is the state of play cheers all Mark
-
 This kit is my first real attempt at an aircraft model, after the horrendous disaster that was my rendition of Airfix's Messerschmitt Bf-109E-3 in 1/72 scale. The kit is not exactly up to modern Tamiya standards but is not bad either. There was quite a bit of flash, particularly on the single cockpit piece, and the fit wasn't perfect in places but the main problem was that one of the wings was stuck at an awkward angle, but I managed to fix this with some pressure and Vallejo putty. I later found out that if you build the aircraft with the landing gear down, the doors stick out and prevent you from attaching drop tanks to the inboard pylons, much to my disappointment. Knowing I would need to paint and attach the cockpit before painting, I began to paint the cockpit, which was lacking in any real detail, so I did my best to replicate some reference images with a paintbrush, though this was difficult with a cockpit as big as a five pence piece. I was then confused as to where the decal for the instrument panel was, as I could not find it on the sheet, so I asked Blanketyblank where he had found his, only to find out it was made from the instruction paper, which I then cut out and stuck down with a bit of Markfit Extra Strong. Once that had been done I sealed up the canopy , masked it, and began priming the rest of the aircraft. When I have finished painting I will probably leave the bombs and drop tanks separate, and I will post the final product here on Britmodeller.
-
- 1
-
-
- 1/100
- A-6A Intruder
- (and 1 more)
-
Yep, I couldn't just watch you enjoy your Mosquito builds, after I had finished mine. So... I just placed an order for a Tamiya FB Mk.VI / NF Mk.II kit + Eduard canopy masks I also have the Xtradecal X72091 sheet for RAF 23 Sqn History (Maltese YP-A already used) and the X72232 for various Mosquitos (The Spook already used), to pick a subject from. V-P
-
This is the Dominomodel rebox of the Tamiya classic. The eBay prices for the original are crazy and the Dominomodel one is far more reasonable. I like to build my kits in alternative markings where possible. These decals from Rejimodel are for the Fortuna sponsored car driven to second place by Bruno Tiery. i added some weathering to cover up a yellowing gloss coat. the escort kit is quite simple but I am looking forward to building another one in the future.
- 4 replies
-
- 17
-
-
-
- Tamiya
- dominomodel
- (and 1 more)
-
I have long wanted an Escort Cossie in my collection but have been put off with the prices on EBay. When Domino model issued their latest re-box at a reasonable price I took the plunge. Over the last week or so I have been preparing the body - if this stage goes badly I rarely get to the rest. Although I don’t have too many cars in my collection of finished models, I do like to build versions that are different to what comes in the box. With rally cars there seems to be a vast selection of interesting schemes for most cars. This version uses decals from Rejimodel to create the car driven by Bruno Thiry in the Canary Islands rally from 1997 i am not a quick builder (or I have lots on the go at one time) so there might be some delays in updating although I intend to follow the process through here
- 24 replies
-
- 14
-
-
- tamiya
- dominomodel
- (and 1 more)
-
Done and Dusted. The earliest photos were taken in October, 2021 and i'm calling it finished as of February 27, 2025. It was a protracted build that could have been done faster, but in some ways i'm glad i didn't rush this thing. Let me begin with the Executive Summary. Kit: Tamiya F-4B Phantom II, kit no. 121 Markings: VMFA-115, Chu Lai/ Da Nang AB, Vietnam, 1970. Scale: 1/48 (because...Merica, yada yada yada) Aftermarket parts used: Eduard Martin Baker Mk 5 resin seats; Eduard F-4B Phantom Wheels and Brakes; Eduard Brassin Triple Ejector Racks and Mk 82 500 Lb "Slick" Bombs". Hypersonic resin centreline stores adapter; Reskit Multiple Ejector Rack; Flying Leathernecks Mk 77 Napalm Canisters; MASTER model brass Angle of Attack probe. Decals: Combination of AoA decals and Furball. Paints: Combination of Tamiya Decanted white surface primer (lacquer), Tamiya acrylics and GSI Creos Super Clear gloss and semigloss finishes. Build comments: This model was built for my former boss at Gulfstream, H. Lee Logan who spent an entire career in the Marines. He flew just about every Marine Corps version of F-4, made the transition to the F/A-18 and served as CO or assistant CO of VMFA-115 at MCAS Beaufort SC. The original plan was to build this aircraft as "CHIVAS REGAL", but right before decals went on, a last minute change was made to Bu Aer No. 151498, previously named BUTTON MAN. This plane began its career in the Navy with VF-96 but was eventually passed on to VMFA-122. The plane was passed back and forth between VMFA-122 and VMFA-115. Lee says the plane acquired the reputation of a hangar queen, but it had a comparatively long life. It was re painted in the "New" Silver Eagles scheme, it spent time deployed at Iwakuni Japan, before returning stateside where it underwent rework to F-4N standards. It was supposedly "ditched" off Point Mugu CA. Whether it was shot down as a drone, or lost due to mechanical failure i don't know. For the step-by-step, play-by-play, mistake-by-mistake narrative on the build, it can be found here: A lot has been written about this kit, and most of it is complimentary. Bottom Line at the Top: it's the best 48th scale Phantom out there, bar none. It does come down to which version you prefer, but if you're variant-agnostic it's the one to build. Let me expand on the good features: 1) Excellent cockpit: Using decals on the instrument panel bezels is a bit of an adjustment but the end result is good. Ejection seats are very good, really only needing a little "Help" in the set belts department. Since i was building an earlier F-4B with the Mk 5 seats, i had to replace those with Eduard ones. Remarkably, with the cockpit canopy deck/ sills in place it's hard to see a lot in the cockpit (aside from the ejection seats) but for the most part the fit of the components is very good. I evaluated the Hypersonic Models Mk 5 seat and the Tamiya kit seat with Eduard harnesses added, before i settled on the Eduard Brassin Early style Mk 5 seat. 2) Horizontal Tailplane: Easily the best thought-out and engineered tail in the business. A very robust carry thru structure with limited pivoting, sharply cast with no flash and good fit and easily integrated late in construction. It slots into the lower fart of the aft fuselage in front of the "Grasshopper Butt". No problems with alignment, seam-filling, or painting. Everything just fits. Designing the fuel dump as a separate drop-in piece, as well as integrating the vertical fin as a separate assembly was brilliant thinking and made construction a lot easier. 3) Clear Parts: I think Airfix figured this out slightly before Tamiya did, but the one piece integrated windshield and surrounding sheet metal fits very well and it drastically simplifies painting and masking. The canopy attachment infrastructure is very well thought out and canopy attachment is more robust and positive than any other 48 scale Phantom out there. 4) Intakes and Exhausts: Full length intakes all the way down the throat to the compressors, and full depth afterburner cans right up to the turbine wheels and flameholders. Excellent fit in all aspects. The multi piece afterburner can construction intimidated me at first; i was not looking forward to putting it together, but everything fit perfectly. I was pleasantly surprised with how the nozzles turned out. 5) Pylons/ Drop Tanks: The best in the business. Robust attachment points with very little likelihood of screwing up the alignment. Nothing vague, nothing wobbly. 6) Wings: Wing engineering is not terribly different from its peers with the exception of the folded wing option. Again, i think Tamiya examined the Airfix Phantom and borrowed ideas from it. The biggest difficulty was not with the wings, per se, but rather getting the decals to bed down in the complex surface details. Masking and painting the Corogard leading edges (Tamiya LP-11 Silver) had its challenges but it was worth it. Reading the above, you can surmise that the kit is somewhat modular in parts breakdown. Just not to the same degree as the Tamiya F-14 Tomcat kits. It's important to identify the tricky areas of the model. No Phantom has 100% perfect fit, although this kit comes close. 1) Forward fuselage: The fit is good, not brilliant. Specifically, the fit of the radome to the forward fuselage. You have something like 5 parts all coming together and it's unrealistic to expect perfection here. It's a by-product of the engineering, and some had better luck than me- it could be down to operator error. The rest of the fuselage fit is very good, to include the unusual split on the right hand fuselage half. 2) Boundary Layer splitter plates: Beautifully molded, but integrating them with the inboard intake ramps makes painting and decaling behind them inconvenient, not to mention the masking and painting of the Corogard areas on the intake leading edges. Hasegawa definitely had the better mousetrap here. Not insurmountable, but annoying. 3) Landing Gear: This was a surprise. Tamiya elected to break down the construction of the gear struts so the struts attached at the upper trunnions which is a place where loads tend to be concentrated. I snapped my nose gear strut clean off the locating pin less than a minute after i installed it for a test fit. I almost used the Eduard Brassin struts, but i reverted to the Tamiya struts. I didn't think the Eduard parts were worth the hassle. However, I replaced the locating pins in the kit struts with K&S aluminium tubing. I don't understand Tamiya's reasoning behind this, but they created unusual , conical axle stubs to mount the wheels onto. This "may" have been to allow the builder additional flexibility in terms of getting the alignment right; Phantom builds tend the have inward-leaning struts and tyres.... which does not inspire confidence. Viewed head on, the Phantom legs should have a perfectly vertical, positive stance. However, it made gluing the wheels on and adjusting the alignment an angst-ridden event. However, the side braces and gear doors fit brilliantly. 4) Intakes: Historically, this has always been a problem area on the Phantom and this kit is no exception. The fit wasn't terrible per se, just not perfect. A certain amount of super glue, accelerator and muscle was needed to get the intakes in place but once they were sanded it was all fine. What were the things that slowed down the build? 1) The decals. While i think the AoA decals and stencils were excellent, there were just a LOT of them. The placement and location guidance was good, but not fool proof. This is not a fault of the kit, rather McDonnell's perverse fetish for putting servicing instructions all over the plane. It is literally death by servicing stencils. 2) The ordnance. Again, this is not a fault of the kit, rather the integration of the aftermarket add on. Adding sway braces to racks, rack to pylons and then adding bombs onto that makes for a very fiddly operation, hard to align properly, and tricky to install. Plus, it's delicate. For example, the Muliple ejector rack from one aftermarket company attaches to an adapter from another aftermarket company which then attaches to the Tamiya auxiliary Air inlet "box" (great thinking, BTW). Onto this monstrosity attaches some rather weighty resin Napalm canisters. It reminds me in some ways of an old, rickety roller coaster one step away from shaking apart. CONCLUSIONS Would i build the kit again? Absolutely. However, i'd simplify the ordnance and cut back a bit on the aftermarket because IMHO it doesn't really need much. It's an enjoyable, rewarding kit to build, but it won't be fast. You need to pace yourself on this one. I *have* managed to save a little bit of time by painting up some ejection seats earlier on in the build, so i could repurpose the Hypersonic Models Seats or the Tamiya ones. It comes down to the time frame that i choose. The Mk 5 seat, while accurate is frankly not very colourful and it just disappears into the surrounding cockpit. The later Mk 5/7 has more colour with that big green parachute pack. I would recommend replacement resin wheels, just so you can preserve the tyre tread that gets destroyed in the gap filling process. Aside from the seats and the wheels, you could add the rear-view canopy mirrors but beyond that its case of selecting a weapons load and picking your aftermarket battles carefully. Adding Afterburner cans from Reskit *may* be an incremental improvement but it may also make the model more tail heavy. I will probably take some more photos and post them when the display base arrives, so watch this space. For my next trick- Hand-Carrying it to South Carolina. And now, back to the shelf of doom along with mystery guest. FLY NAVY!!


Wedge-TailedEaglePortraitRaptorDomains.thumb.jpg.41a306d3445a68f0f2df773e01776ea6.jpg)