Search the Community
Showing results for tags '3d printing'.
Found 19 results
-
Hello all, I'm taking a little break from my other builds to start another. I'm mostly using it as a tooth sharpening exercise in 3D printing and learning how to print photoetch. I thought a 4 post lift would be quite a good one to do as I can use it to display cars in a fun way. I started out scouring the web for a 3D model of a 4 post lift to save some time which I found here: https://grabcad.com/library/4-post-lift-1 The model is fantastic, if a little different from it's renders. But as I say, it's a super piece of CAD work. I had originally thought to change it somewhat and block parts of in order 3D print the lot, since the wall thickness would only be 0.17mm at scale But then I figured that it'd be more fun to try to engineer it from 3D printed bits as well as photoetch. The first thing to change on the model, apart from scaling it, was to make a barley pattern on the ramps which I did by making one barley, laying out a single row of the pattern and then using the Flow command in Rhino to effectively distort and wrap the pattern around the component. Here are the 3D printed parts laid out, I drew custom supports for the micro parts and then used Chitubox to generate supports for the larger parts. I was going to try to print the ramps in one go, but I think on balance it's be better to chop them in half and print it that way as it'd be much faster. Here are some bits I printed already I'll be using rod and pipe quite a lot in this as it's strong and convenient. Above will be a test in PE for one of the upright posts. I'm basically trying to work out how wide the score lines need to be and how much to scale the part in order to get the accurate size and it'll need to interface with other components. I'm going to do everything in brass for the PE as it's easy to solder together. I'll try to up my photo game a bit as I'm aware they're pants! Anyway, thanks for looking. If it comes out nice I'll make the files available for remote printing or something. My next step is to get my hands on some etching chemicals! Cheers, J
-
 Many months ago I picked up a Tamiya William FW07 kit on ebay fairly cheaply as a spare or repairs job. I actually want an FW07B from the end of the 1980 season rather than the FW07 from 1979 and early 1980 season. Fortunately at 1:20 the difference is very minimal, with the exception of the front wing, which as the ground effect was so good on this car they decided they didn't need and they removed it - so will too. The shape of the leading edge of the nose was marginally reshaped but nothing more than a sanding stick won't achieve. On closer inspection of this kit I was pleasantly surprised to find it mostly complete and un-started... The decals are very old and are shot and it was missing a set of parts mostly associated with the right side: front right wheel rim right rear wheel rim right rear tyre right drive shaft right rear top suspension arm right rear upright 1 engine intake trumpet All of these have the left side version present as a template and as I have a resin 3D printer now, this just offers an opportunity to use it! 🙂 Whilst I wait for the weather to warm up a touch more for painting on the other cars and aircraft that are mid-build, I thought I'd crack on with replacing these bits. Started last night with the drive shaft modelled in Fusion360 after copious measurements with my digital calipers etc. on the Left side parts. Whilst it is only the right side of this that is missing I am probably going to print both to ensure they are exact matches (and because the 3D print won't have seam lines to clean up!) More as it happens FB EDIT: For comparison here is a picture of the kit part for the left side:
- 68 replies
-
- 2
-

-
- 3d printing
- 3D CAD
- (and 1 more)
-
 I started the design of this boat this morning for a friend, it will be finished probably tomorrow. Once printed it will be 60 mm long, but can be declined in different sizes. Here is the model on the plan which is almost generic for the time. The boat is covered here, not with a boat cover, but with removable sheet metal plates. The material is more durable and waterproof. This is not the final model because there are still some details to be rectified and added, pulleys etc..
 -
A few weeks ago I purchased an AFV Club 35th scale Centurion from a forum member from the for sale section and very happy I am with it. In preparation to start the build I decided to 3D model some individual link tracks and Road Wheels as I don't like the idea of the AFV Cllub wheels and print out my own. Thanks to Kingsman previous post on the Centurion Wheels I used the cross section wheel image and drawings to draw up the Wheel CAD models. After I printed the grills for a customers railway project I printed a test print for the track. Wheels next time I have the printer fired up I will test print some wheels. Should be fun. Pete
-

Boeing 747SP - NASA/DLR SOFIA - Welsh Models 1/144
zebra posted a topic in Anything But Injection GB
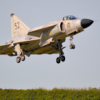
I've got a few entries in this GB in mind and haven't entirely decided on the others yet, but the first one is definitely going to be the Welsh Models 1/144 vacform Boeing 747SP converted to the NASA/DLR telescope-carrying aircraft N747NA. I'll post a pic of the kit later, but here's the 1/1 version in flight: I've been doing some CAD work on the telescope and fairing: and done a test print of the parts: This was my first attempt at a print with my Photon Mono printer. Some of the parts came out fine, some of them will need to be printed again with the supports in a different place or in a different orientation, and a few of them (particularly the rear parts of the fairings) were too thin and didn't come out well, so will need to be redesigned (but I have a plan for that). Also needs to be test-fitted to the fuselage so I might need to tweak the design for a better fit. It's going to be displayed in flight (probably) as the door to the telescope cavity wouldn't usually be open on the ground. I'm currently on the lookout for a suitable base for a stand. V1 decals produces some good-looking laser-printed decals for N747NA - I've got 2 copies just in case (if you want two copies of a sheet in case you need spares they sell the second one half price). Can't wait to get going. Might start cutting out the vacform parts a bit early - it'll be well below 25% when we start. thanks for looking Julian- 19 replies
-
- 20
-
-
- 3d printing
- Welsh Models 1/144th vacform
- (and 1 more)
-
 Hi all, Here is another Blackbird topic from me. In this WIP I will present the improvements/modifications I am planning to do on recently released 1:48 Revell SR-71A using the 3D printed parts I modeled for my other ongoing Blackbird/Oxcart projects. I will not go in detail for the kit review because recently @Mike posted an excellent review here: and @Alan P did a great WIP and RFI here: Here are some pictures of boxart and the sprues: The built Blackbird is the 1:48 Italeri/Testors kit which is used currently for 1:48 A-12B "Titanium Goose" conversion reported here: I hope you will enjoy this build. Serkan
- 263 replies
-
- 11
-
-
 It took me 2 years, give or take 4 days, with many interruptions along the way, to assemble this very difficult Heller kit. Everyone here and elsewhere who assembled it has experienced mishaps, disappointments, and probably some anger too, and has solved or tried to solve, each in his own way, the major problems of body parts adjustment, especially the bonnet. 2 kits were needed to make one, because of broken or damaged parts during assembly, as usual. This kit includes 160 parts, I replaced some of them, and added probably as many, both scratchbuilt from various metals, plastics, fabrics, UV resin, and modelled with Fusion 360 and 3D printed with an Elegoo Mars Pro. The windows were shown open, the bonnet was articulated in 4 parts with 3 functional hinges, the bonnet retainers when open, as well as the bonnet latches to close it were added, and the engine compartment was highly detailed. The spoked wheels themselves are 3D printed. I tried to take the utmost care in making the smallest exterior details, the ones that make the model look bad when they are roughly made or not added, but that bring the model to life when they are right (I'm thinking in particular of the front and rear lights, the side indicators, the bonnet clips, the exhaust line that has been redone in aluminium tube). I was greatly helped by the abundance of documentation that can be found on the Internet, sometimes by searching a bit for precise details... and even more by the appreciations, advices and encouragements of all my followers. May they be warmly thanked here. And now, a flurry of photos, some outside in day light and others in my spray booth with additional lights: You can see more following my thread in WIP section:
- 17 replies
-
- 26
-
-
- Delahaye 135
- Scratch
- (and 1 more)
-
 SR-71 Blackbird Exhaust Nozzles & Wheel Set (3DF48003 & 3DF48004 for Revell) 1:48 3DF via Hobby Colours Revell released a brand-spanking-new kit of the magnificent SR-71 Blackbird in my favourite scale, 1:48 recently that made a lot of campers very happy. New Greek company 3DF have not been idle, and released these two sets to enhance the detail, using the latest 3D Printers that use SLA processes to create highly detailed resin parts from UV-curing liquid resin. The finesse of SLA printing has improved immensely of late, and this has led to companies creating 3D printed parts that are ready for market without any further preparation, which saves time and gives the modeller the sharpest replica possible, which thanks to the method used in printing means that the part count is reduced without affecting the detail. Each of these sets arrives in a compact cardboard box with a push-through tray, with the parts cocooned in bubble-wrap inside, and further padded by the folded instructions within. Exhaust Nozzle Set (3DF48003) Comprising just two parts that are separated by sheets of foam to protect them from each other, the exhaust parts are just incredibly detailed, and supported on a ring-shaped base with short fingers supporting it from beneath, giving it the look of a squat cooling tower in miniature. The detail on the inner surface is stunning in its complexity, and although the outer surface is simpler, the quality is just as crisp. Other than cutting it free from its supports, they’re a drop-in replacement for the kit parts, bringing a huge increase in detail to the rear of your Blackbird. Wheel Set (3DF48004) This set has a larger number of parts due to the fact that the Blackbird had eight highly specialised wheels in total, all of which were impregnated with aluminium powder to cope with the extremes of heat that were encountered when the aircraft was flying at speeds in excess of 3,000mph where the passing air created huge quantities of heat through friction. There are eight cloud-shaped printing bases that each hold three parts, and are of four different types as shown by an embossed A-D letter on the base of each one. The nose gear has two wheels, which are each made up from the tyre and two hub parts, while the main gear legs have a triple-layer of wheels that are slightly larger than those of the nose. There are two each of inner, mid and outer wheels, which have different hub details as befits their position in the pack. The tyres each have those strange depressions at regular intervals on their contact patch, plus infinitesimal maker and data stencils in relief, into which the hub parts fix, sharing the same level of detail throughout. The attachment fingers have been carefully placed away from the detailed surfaces, appearing inside the carcass of the tyre, and on the back of the two hubs, so that cutting or sanding them flush is all you need to do. There is a small flat-spot on each wheel, and the opposite surface has a few visible layers where the printed finished them off, but under primer and paint they should just disappear, possibly with a few swipes of a fine sanding stick if they persist. Conclusion The detail is eye-popping on these parts, and their ease of integration with your model should make them even more appealing to your average modeller with a soft-spot for the old Blackbird, which still hasn’t been bettered in aviation terms, that we know of. The price of the parts is also appealing, so they should sell extremely well. Very highly recommended. Review sample courtesy of
 -
Hi all, Here is another candidate of my "Never ending projects" collection, a whatif conversion based on Testors F-117A model with 3D printed parts. I found this kit in my kit junkyard while I was looking for some parts. I decided to convert it to F-117N which looks to me nicer than the original F-117A. Although some parts are missing the main parts are there to launch this conversion: As usual I started with the drawings: The conversion looks not so complicated as I will not modify the lower side shape. Next step is to start the butchery... Serkan
- 33 replies
-
- 12
-
-
- F-117N
- 3d printing
- (and 1 more)
-
Hi guys. I have been around BM for a few years now but am super new to 3D printing. @hendie and @TheBaron made me do it. 😱🧐😂 I do know 3D modelling (3D studio Max) really quite well but have a few questions I hope the hive mind might help with. I set my max units to CM as this is the scale I’ll work with on most projects. My work setting is in M. I build a test cube to the correct scale of 1cm and brought it into Chitu box. ( I have a Mars 2 pro ) on import the file was called out for being too big and I had to re scale. This can be done in chitu box but surely the scales should be in sync? I reset transforms on the asset before exporting to an .OBJ. Also is .OBJ the best file format to move between programmes? Thanks for any help. Johnny.
-
I have been working on a 1/16 Boxer 8x8. As the Lance turret won’t be delivered until later this year, I’ve decided to move my CAD learning on to a new subject, the Bushmaster Protected Mobility Vehicle (PMV), in-service with Australia, Britain, The Netherlands, Japan, Fiji, and Indonesia. Measuring up a museum example, I’ve started drawing up & 3D printing the stowage bins. Drawing on lessons from printing Lance turret, I’ve decided to skin the most prominent surface with 1mm thick styrene to ease clean up & detailing. Part of the detail to be resolved was the exhaust grille - 40 slots on top & 36 triangular holes. After finishing the CAD, I asked a mate to print it on his resin printer. Turned out pretty well: Compared to the 1/1: Now on to the rest of the beast:
-
I'm going to have to try very, very hard not to overcommit to this GB since so much of my stash qualifies. I've got a lot of ideas for builds and there's no way they're all going to make it, but the one at the top of the list is an Il-76LL of the Gromov Flight Research Institute - specifically this one: This is RA-76529, which has been used to test a few engines - it appeared at Farnborough in (I think) 1994 with a propfan engine intended for the Antonov An-70 in the no.2 engine position. It was wearing a more traditional Aeroflot-style colour scheme back then. This incarnation has the Aviadvigatel PD-14 engine for the Irkut MC-21 airliner in that position. The Zvezda Il-76MD is the base kit. I've had this since it was first released so it's about time I built it. I've always been surprised we don't see more of these built. Here's the box shot: Obviously it needs a PD-14 engine, so I've drawn one up and printed out a test print on my 3D printer: Obviously I've printed two sets here - it's good to have a spare - and I just realised I forgot to print the heat exchanger intake for the rear fuselage, but there's plenty of time for that. I've broken the engine down into 8 components - the fan, separate fan spinner, engine core, nozzle centre body, nacelle in 3 parts, and pylon. Looking forward to building it up. I've also designed decals and had them printed by Dr Decal and Mr Hyde in Sydney, who always seem to do a good job. Looking forward to getting into this. If I can make quick progress there will be another Gromov aircraft to follow - a Tu-154. thanks for looking Julian
- 25 replies
-
- 17
-
-
- zvezda 1/144
- Il-76
- (and 1 more)
-
Hello All, A Kiwi company Micromaster produces these exquisite vehicles in 1/144. Happy Modelling All Ian
- 4 replies
-
- 17
-
-
- 1/144
- 3D printing
- (and 1 more)
-
Hi all, Its time for me to stop lurking and come out from behind the curtains and create a WIP thread. I started a thread for an AA Stolly a few years ago but it sort of stalled. You never know I may pick it up again one day. Anyway, having been inspired by the quality of work I am seeing on here I've decided to take the plunge and start another thread. This time I've decided on something a bit simpler and more straightforward with no conversions, aftermarket, extra details etc. (Hmm, we'll come back to this in a bit...) I am going to attempt to build (and complete!) the Tamiya 1/35 Austin Tilly 'Out of the box' which I received as a Christmas present last year. This one 'ere... First thing I did was to see what aftermarket was available, yeah, I know, that plan didn't last long! (it's the natural course of action isn't it, everyone does it, it's perfectly normal? please tell me I'm not the only one...) and decided to invest in a set of these... You know I said we'll come back to this being a 'simple and straightforward build'.... Well... I took a deep breath, put away the plasticard and strip at the back of the darkest cupboard I could find and carefully took the lid off the box and started to examine the contents... Things were going well until I had a look at the bonnet sides and thought to myself (Which as I'm sure you will know is a very, very dangerous thing to do) "Oh I don't like the look of those, you can't see through the bonnet louveres loovers luoveers them vent things... Several experiments followed involving the use of tin foil, lead foil, thick plastic, thin plastic, crash molding and flames (always the fun bit) alas each time the results were decidedly sub par and not worthy of display. It was while I was waiting for the burns to heal (I'd tried crash molding remember,) that things began to get out of hand, and I mean really out of hand after looking on other forums and getting drawn into TheBarons outstanding Sea Vixen build I slowly came to the conclusion that to get them there venty things you can see through I am going to need a bottle of this... and one of these to put it in... Oh and not forgetting a quick download of Fusion 360 (how on earth does TheBaron do what he does? It took me three weeks just to be able to draw a square, never mind create an accurate fuselage and a RR Avon to go inside it!) and some experimenting with Tinkercad. I can see interesting things on the horizon... Wish me luck all, "I'm going in (headfirst with no safety net)"
-
So I'm a bit unsure about this 3D printing ... exactly what is the state of the art in terms of producing usable items. I've seen plenty of hype, and also real examples (which don't really match the hype!). Are we yet at the point where a 3d printer is available which - is suitable for home use without any special installations - is affordable - OK, that varies for everyone, so let me set 2 price points - sub £500 and sub £1000 - can be used by the average person without special training (I just mean the printer - design software is a separate issue) - can produce parts on a par with, say, resin aftermarket items Perhaps the last is the key point for me ... I'm interested, but only if I can get a level of quality which can match what I can buy. I'm also concerned about the 'workability' of the materials - can finished items be cut/sanded like polystyrene or resin? Cheers Colin
-
 This is the MQ-1C Gray Eagle and completes my series of large US Military Reconnaissance Drones starting with the RQ-2 through the MQ-8C. As the few of you who have been paying attention might remember I have in the past complained about the lack of a 1/72 kit for the MQ-1C. Italeri made a die cast model that they called am MQ-1c, but it looks like they based it on their MQ-1B Predator kit and it has no resemblance to the Gray Eagle which is larger, has a very different engine housing and carried more ordnance. . However in my searching for something I came across this web site; https://3dwarehouse.sketchup.com/model/288eda09ce849054c00d89a3d1c6a249/Aircraft-General-Atomics-MQ-1C-Sky-Warrior that has a 3D model of it, and since I had previously purchased from Shapeways at https://www.shapeways.com/, so I figured I would give them a try . I should note here that none of my following trials and tribulations are their fault and they did an excellent and quick job. The first issue I had was that the rendering I downloaded is in Sketchup format and Shapeways doesn't handle Sketchup. Luckily I was able to convert it into .dae (COLLAborative Design Activity) format which Shapeways does accept. So I uploaded it to their website. Next I had to choose which of their many plastics to print it is. Here I made my first mistake and chose their Strong and Flexible Plastic, which is also their cheapest. They immediately notified me that due to the thinness of the tail and other surfaces that the model would not survive the printing and finishing process, but that I could choose the "Print it Anyway" option and they would do the best they could and would skip the finishing and polishing. I should have tried the HP Plastic instead, but it was twice as much money so I went with the Print it Anyway option. A week later I had my model on the door step. With the exception of the landing gear all the other parts were there, but everything was pretty rough and I ended up discarding the ordnance, props, and tail surfaces. I also wan't happy with the sensor turret and cut it off. Expecting that I would have to replace some parts I had purchased a Platz MQ-1B kit to act as a donor. This was my second mistake. I chose the MQ-1B because it was close in size to the -1C, but I would have been better off choosing the Skunkmodels MQ-9 Reaper kit, also the MQ-9 kit would have cost me 3 times the price. . They landing gear would have been closer in size, I could have used the ordnance and pylons that came with it and I could have used the props and spinner. As it was I used the landing gear, tail surfaces, weapons pylons and front turret from the -1B kit and the props and Hellfire missiles from spares. The main lading gear is turned out to be a bit too short, but I used it anyway. The unpolished model was very rough; and it defied my efforts to get a smooth finish. I finally was able to smooth it out after applying several coats of Mr. Surfacer, and thin CAA glue. Again this was not Shapeways fault but my choosing the wrong plastic and the Print it Anyway option. I ended up separating the wings from the fuselage so I could polish them separately. In anticipation of having problems gluing parts to the plastic I had ordered several epoxies and glues for "problem" plastics but Zap CAA+ worked fine and made strong joints. Tamiya lacquer primer also seemed to work well and from there it was just using my usual Humbrol enamel paints. US Army marking are pretty minimalist so that made decaling sinple. So now on to the pictures. and here is the whole collection From left to right and in chronological order of first flights they are MQ-8C Fire Scout, MQ-4C Triton, MQ-1C Gray Eagle, MQ-9 Reaper, MQ-8B Fire Scout, RQ-4B Global Hawk, MQ-1B Predator, RQ-7B Shadow, RQ-5B Hunter, and RQ-2A Pioneer. Next up is the Heller E-3 Sentry. Enjoy.
- 6 replies
-
- 17
-
-
- 3D Printing
- 1/72
- (and 1 more)
-
This is a conversion of the IBG Bedford QLD to a twin boon refueller. The cab, chassis and running gear are from the donar kit whilst the majority of the refueller parts have been 3d printed, the finer detail was then added with scratch building.
-
I was chatting with an acquaintance the other day combining my twin passions of modelling & technology! He mentioned how 3D printing was coming on leaps & bounds and how it would find its way into the home before too long. Having seen for myself at CES 13 in Vegas (the massive annual consumer electronics show) & in TV reports from CES 14, it's clear this area is one to watch. Are they any views how this would impact on the accessorises/after-market market for modelling? The clever bit will be doing the design work on CAD and then selling the files as downloads that can be 'printed' remotely. Perhaps your 'Local Model Shop' (if you have one!) would be able to justify investing in a printer, which would also help bring people to the store. No mucking around with casting - just 'print' on demand. No stock holding. From what I understand the detailing is pretty good nowadays, the materials pretty workable and you can even 'print' now in different colours. Thoughts?
-
A very very long time ago I started on a B737-200 I wanted to set myself a challenge so I decided on a project to build a B737-200 Combi fitted with a gravel kit etc. and with all the doors open being loaded up in the snow of the Canadian north....... Over a few weeks I collected together a kit, some AM stuff etc. as a starting point: The Airfix engines are known to be a poor representation of the -200 engines (narrow pylons being the first issue!) hence the braz resin engines. All was well until I looked at the Braz engines in the above shot.... which had degraded silicon bits from the mold down their tail-pipes... not good! but Hannants were their excellent selves and we quickly determined that all 2 of their remaining stock had the same issue so they went back for a refund. A bit more online retail therapy and I had some Nazca decals and the authentic airliners resin engines (lovelly things): I know the extratech PE is for a different model of B737 but I was using it for the common parts.... A few weeks later after some scratch interior building, cutting a cargo door opening and I was thinking about the cargo door itself: But in the end the windows just didn't look right and the internal detail on the whole aircraft was poor, the windows are in the wrong place on the model, the doors are wrong and the nose shape and cockpit windows are also way off..... Skip forward 3 years and I started using 3D printing at work to build replicas of skulls (useful for teaching anatomy). I've been modelling aircraft in 3D programmes for years (used to sell them for flight simulators) and remembered I had a 727 model somewhere.... the fuselage isn't that different so it might be easy to adapt it to make a 737-200. Skip forward another year of messing around in Blender, 3DStudioMax, ZBrush, Polyworks, Rhino and all manner of other 3D programmes I work with and I had a set of STL models that I was happy with. So this Christmas I borrowed our newest 3D printer from work and this is what we get: These are my external shape masters.... but there was a problem. It was cold the day I went out and left these to print (18hour print time at 40micron layer size) and I wasn't thorough enough with the glue (pritstick) on the glass build plate so I ended up with the left side's nose lifting off the build plate and warping (bugger!): Now printing a new left side wasn't an issue but it takes a lot of plastic and 9 and a bit hours! so a quick edit in blender and I printed off just the nose section from just forward of the left door: Might have been a bit OTT with the glue this time as it took 3 hours soaking in warm soapy water to get the damn print off the glass! Next up: how to perform rhinoplasty (nosejob) on a 737.... Marked up and chopped off the dodgy nose: Lined up and glued the new nose on using the right hand side as a guide: A bit of Perfect Plastic Putty (wonderful stuff!): Have just sanded off the excess filler and it all looks spot on. Next up printing the internal details masters, molding them all in silicon and then casting the rough resin detail masters from these molds. I'll then add all the small details, panel lines etc. on those resin casts as the 3D printer plastic is very hard and therefore difficult to sand etc. More later. FB
- 17 replies
-
- 5
-
-
- 3D Printing
- Scratch
- (and 3 more)