Search the Community
Showing results for tags '1/350'.
-
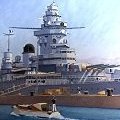
 I finished this one a few weeks ago, just now getting around to an RFI. Here’s the WIP The was my second ship build, my first of a big ship with Eduard PE, Pontos deck and 3D printed weapons. It was a great learning experience and I thoroughly enjoyed it. I’m very happy with the result; it’s not a perfect model and it’s not a perfect HOOD but I like it
- 31 replies
-
- 65
-

-

-

-
Next in line for me to build is the JoyYard USS Missouri Limited Edition. I haven't seen many builds of it. This will be a manufacturer only build, as I have bought the upgrade kit also from Joy Yard. The base photo etch is part of the kit and doesn't need modification of the plastic pieces compared to say a Pontos kit. So I hope it will be a slightly quicker build. Narrator voice: It will not be. The base kit has 6 slide moulded sprues including a one piece hull and one piece deck 41 traditional sprues (some are very small) 10 sheets of photo etch. Brass Barrels. Blue wood deck. Deck masks The upgrade kit has 4 more photo etch sheets, 262 scribed brass pieces Resin gun covers. Opening the package it has by far the most premium feel I've seen from a model. It is also huge. There are styrofoam grooves for each sprue, as well as a box for the photo etch (and decals) lined with more styrofoam and each photo etch piece attached to cardboard. The booklet has been updated since publication in a pdf but the Joy Yard Website seems to no longer work. The level of moulded detail is truly stunning. I don't know how it will fit together but it looks impressive. One odd thing is that the booklet has photos of it in its 1944 Measure 32 camo. While the paint guide is only for Measure 22 - as it was when the Surrender was signed in 1945. For those who want to compare it to the Tamiya and Very Fire models: https://tieba.baidu.com/p/6293196197 Some sprue photos: https://modelshipworld.com/topic/23403-uss-missouri-or-any-iowa-class-1350-by-joy-yard/ I'll take some sprue photos as I work through it. My plan is broadly: Super structure, hull, large weapons, paint, small weapons, tidying up. I think I plan to paint Measure 32. But it also depends on my sanity.
-
Here's my first ship build, something I thought would be a quick easy ish build in between several aircraft kits. I start this RFI by standing, bowing, and intoning "oh those who make 1/700 or 1/600 scale ships, I salute your extraordinarily acute vision, tremble free hands and 20/20 hand eye coordination" Because goodness me, 1/350th very near wrecked my modelling spirit completely! It was all fun putting the hull together, then the various diving planes, then the propellor supports; then I saw the instructions say put part numbers 11 on part number 9 and 10. I looked on the sprues for parts number 11 - couldn't find them. Then looked at the part numbers on the sprues and found them. Uhh? I exclaimed, those are propellors? They looked like two of the little bits of deformed plastic after you'd cut a part off! Gulp - proceeding with extreme care, and resting on some blue tack, I managed to cut the tiny propellors off without losing them. And managed to stick them on without losing them. I know that back in my mid teens I made Airfix's HMS Tiger, which I think is 1/600th scale, and given I was probably about adult size then, I have no idea how I coped with the tiny - incredibly tiny parts there must have been in 1/600, because I sure as hell haven't coped well with some of these parts in 1/350th! I bought this kit on a whim at Hobbycraft; marked up as a tenner, I actually paid £7 for it. Now those of you who have built this kit, will probably say "You wuss, it was a lovely build, and easy peasy!" I repeat, until I got the propellors and conning tower it was a bit of fun! Trying to put the gun together; even with a steadying reverse tweezers that hold pieces I found it hard work. And then the gun platform rails; oh boy, I couldn't get these to stick to the gun platforms until I used a toothpick with a dab of superglue on the end. Except that one such piece of railing pinged off into the maw of the kraken * never to be seen again. (* Nautical name for the carpet monster) You'll notice the gap on the photos. Then painting. Oh dear, you need steadier hands and better eyesight than I have - even with my magnifying headset on! I did start to do some rust marks - then stopped very quickly because they don't look very good. The other paint masking at this scale was a touch difficult! However, I have chanted the phrase I now chant at the conclusion of a build - copied from a Britmodeller sage whose name I don't remember - "Finished is better than perfect"! So here are some photos of my completed U Boat in minature scale ! Thanks for looking.
-
I heard from an internet Modelling friend in China that the announced 1/350 Joy Yard USS Missouri - which was to be superior to the Tamiya and even the 1/350 state of the art new tool brand-new Very Fire Missouri is dead in the water - the reason is that the moulds were made wrong, and then the mold factory did not agree that it was at fault. Both sides blamed each other and were unsuccessful at a compromise. This Chinese mould manufacturer has a reputation for being unreliable. Joy Yard then tried to get the police involved but it became counterproductive and they cannot continue to push them. Unless JOY boss comes up withs $700K, they cannot continue the project. Right now there is no way to create all the parts needed.
-
 Some time ago (scarily, well over 6 years) I broke my wrist, so while I couldn't model I compiled some drawings of HMS Fearless as she was in 1982, when I served in her as a baby Sub Lieutenant during the Falklands War. For those who are interested and/or don't remember this endeavour, you can find it here: At the time I thought these drawings were going to be used to help me scratch build a Fearless, since the only modern kit available was the 1/700 L'Arsenal job [which I have & is OK, but still needs a lot of work to make it depict her as she was in 1982]. Definitely a build for my retirement, says I. But then about 18 months ago Peter Hall of Atlantic Models contacted me & asked whether he could use my drawings & photos (in addition to a lot of other reference material), because he was working on ... a 1/350 Fearless / Intrepid! I hasten to add that all the kudos should go to Peter; my drawings helped him to answer a couple of questions, but he has done all the hard work. A couple of weeks ago the kit arrived. I actually have 2 of them; one will be built for myself and will depict her as she was in San Carlos Water on around 24 May 1982, docked down with the stern gate open and the LCUs & LCVPs busy, Antelope's Lynx on deck in Fly 1 and a Sea King in the process of spreading (with a tiny me as FDO). Something like this: That is for the future. This build, however, will depict her as she looked when we sailed back into Pompey in July 1982, looking battered but proud - out of shot on the left of this photo are 3 x LCU in a "missing man" formation, denoting the fact that F4 had been sunk on the same day as the Sir Galahad / Sir Tristram tragedy at Bluff Cove. This is being built as a present for our Captain during the war, Jeremy Larken. [Apologies for the quality of the photo, which is taken from a 1983 desk calendar my Dad bought at the time & which is framed on my wall - but I have never seen this excellent photo reproduced anywhere else]. Anyway. The kit. It's bloomin' lovely; a hulking great piece of resin (& I haven't even bought the full hull version, which must be even heavier), which was one of the reasons Peter gave for not producing this earlier; I discussed it with him 3 or 4 years ago at Telford, and he said he reckoned it was on the edge of what is possible. But the casting is of the highest quality, and I reckon it shouldn't require too much additional work (famous last words, given my well-known propensity for detailing...). Here is the whole thing: the ridged piece on the left is the underside (deck-head of the dock) of the flight deck part; you can see that we get 1 x Wessex 5 and 1 x Sea King 4; 2 x LCU (the big landing craft carried in the dock) & 4 x LCVP (smaller landing craft carried on davits). I will use 1 of the LCUs from the other kit to give me 3 (which will be fine, because I only need 1 for the San Carlos scene). Here are the LCUs: the thin casting at the sides is superb, but he also provides PE to replace that section (which I will be doing); the bow door is scored underneath so you can remove it and attach it in the closed position (which I will also be doing). Here the LCVPs & the 2 helos: Here the masts, upper superstructure parts and radars: Here the flight deck underside & stern gate - some stunning casting: Funnels, crane cabs (FS & ID had slightly different flight deck cranes, but they both had the same crane on the port quarterdeck), & "Wendy House" next to the funnels (the shelter for flight deck crew): Extensive PE sheet of Peter's habitual high quality Decals: The kit 40mm Bofors Mk 7s are white metal and perfectly OK, but I already had some beautiful Black Cat Models 3D printed jobs, which I will almost certainly use: The only other after-market will be these Swordfish Models life raft canisters - the kit's are again white metal, and past experience suggests they aren't the easiest to clean up convincingly. All of this means that my never-ending Ark Royal 5 build is going on the back burner - not for the first time. I am comfortable enough with this; I have made substantial progress with Ark since I picked it up again in 2024, but there's still a long way to go. Jeremy isn't getting any younger, so I cannot leave this present indefinitely! More soon Crisp
- 214 replies
-
- 47
-
-
-
- 1/350
- Atlantic Models
- (and 1 more)
-
Well as part of my Re-hab after my stroke in January apart from making up paint mixes and shaking tins to an inch of their lives. To get back into building and help my left hand fine motor movement I have started on this small project nice simple build not may parts and one colour black or is it. First job is to waterline it where the red line is so out came the dremal multi tool and cut out 3mm from base. Base is already being made up from King-span insulation Stay Safe Keith
- 30 replies
-
- 19
-
-
This is the 1/350-scale MikroMir USS Growler, an early attempt by the US Navy to field a cruise missile submarine in the nuclear deterrence role. This is a styrene kit with a couple PE details. Detail is good, fit is satisfactory. A small but persistent amount of flash makes working with some of the finer pieces difficult. Base coats are Mr Color and Tamiya lacquers, following by an enamel pin wash and some weathering with oils. Fun little kit, but a little more involved than it looks! Thanks for taking a peak.
- 8 replies
-
- 20
-
-
-
- 1/350
- USS Growler
- (and 1 more)
-
Having become bored with my more elaborate builds, I thought it might recharge my modeling mojo to take on a simple Japanese destroyer – and perhaps actually finish it! Tamiya’s of the 1/350 scale IJN Kagero seems like a perfect choice. If it lives up to the Tamiya reputation of great fitting parts, assembly should be a snap. Just to keep things interesting I picked up the Infini brass upgrade set for it too. I’m hoping to complete this one fairly quickly with a minimum of the scratchbuilding which tends to bog down my projects. We’ll see, but this should be a fun, straightforward build! True to form, Tamiya’s Kagero hull parts fit beautifully and the hull went together quickly. My only quibble here is the split hull design. While the waterline/full hull option here is nice, molding the lower hull separately builds in a bit of extra effort to integrate the lower and upper portions. I definitely prefer the simpler single hull approach of their earlier USS Fletcher kit. That said, the join was pretty good and only a little Mr. Surfacer 1200 was needed to blend things.
-
Needing a change I made a sub for the first time - HMS Vanguard. Try as I might I couldn’t get it looking particularly interesting (see pics at the end) but I’d also bought HMS Astute and was determined to make something a bit more dynamic. I used the foam base with epoxy resin sea method, and found a ridiculously detailed SeaHawk helo resin kit on eBay (extreme decaling!) I probably should have had the copter approaching from the rear but thought the relative movement looked more interesting with it meeting head-on. I had many many goes at weathering it as seen in reference pics returning from patrol filthy but I was never happy so toned it all down. Hope you like it. and this is my build of HMS Vanguard, same scale and make, which inspired me to do the dip to get something a bit more interesting.
-
 Hi guys, welcome to my proposed build for 2021, after I have finished my tug that is. As the title says, this will be a scratch build of the Japanese steam ship, Fushimi Maru. She was laid in 1913, launched in 1914 and her first voyage in 1915. Built primarily for the NYK’s European Routes with a typical routing in the 1920s were Yokohama, Kobe, Moji, Shanghai, Hong Kong, Singapore, Malacca, Penang, Colombo, Aden, Suez, Port Said, Naples, Marseilles, Gibraltar and London. Why may ask, why this ship? It’s a family history connection where sometime after WW1, a Spanish ancestor of my partner, travels from Gibraltar to London. I suggested ‘would you like me to build your Grandma’s ship and here I am, albeit a few years later? Anyways, the Fushimi Maru sailed her European routes until the outbreak of WW2, where upon she was pressed into military service as a troop ship. Unfortunately for her, she was sunk by the submarine USS Tarpon in 1943. Searches found little, most being postcards that show very little detail and images that tend to be from the 1930’s, neither showing the detail needed to reproduce a model of the 1919 era. I did come across this photo a couple of years ago: Once a museum exhibit at the Mariners Museum, Virginia, USA of all places. I approached the museum with the view of getting more details about the model and maker but at the time, my request fell on deaf ears and the project went on the back burner. I tried again a year later and must have contacted the right person at the right time, put my questions forward and to my surprise, the museum sent me a copy of a publication 'International Maritime Engineering' Vol. XX No. 7 and dated July 1915. Struck gold is all I can say, a very useful document indeed containg descriptions of things ranges from berths, holds, engines, boats, winches, etc and also had a Profile and deck plans. Brilliant! Further requests were made about the model or its maker but nothing could be found. I asked about the possibility of photos of the model exhibit and to my surprise, a member of staff was asked to liaise with myself about photos. In the end, I got about 20 images of the exhibit from stem to sten, both sides, with some nice close-ups…and they didn’t ask for a dime and declined a donation. Why can’t more places like this exist? I will be building a waterline model and I don’t think I’ll have any problems with the mid-section or the bow but the stern under section leading to the rudder is problematic to someone who doesn’t have a clue, unclear images or lack of profiles to get the curves. I’m thinking plastic but would wood be a better option for the hull? I chose the scale of 1/350, hoping to find generic offerings to make things easier but it doesn’t seem to be that easy as yet. Later on in the build, I'll be looking at possible cutom 3D options for the winches, custom PE for the davits and as for the boats... Until then. Stuart
 -
My first surface ship and first go at an ocean. I'll be doing more, a nice break from a lifetime of aircraft. White Ensign PE set. Inspiration for ocean and technique credit to "Studio Blue Ocean" of Youtube Things I have leaned from this project 1) rigging is hard 2) I still hate photoetch 3) creating the sea was as satisfying as the ship, but I unsealed her, ripped her out and repainted the hull and the entire sea 3 times before I was happy. I know she is supposed to fly a black flag from the rear mast but I forgot. I will get around to it! Shot against white card outside with sun dipping in & out of cloud, the white balance was doing odd things but you get the gist. Thanks for looking!
- 35 replies
-
- 81
-
-

-
-
This is the Iron Shipwrights 1/350-scale USS Triton SSN-586. It is a cast- and 3D-printed resin model with some optional photoetch railings for in-port configuration. The hull of the submarine is one large, heavy, solid piece of cast resin 15" long. The conning tower, dive planes, rudder, and scopes & antennae are 3D-printed. This kit is pricey (around $100 in 2024) and honestly the quality didn't blow me away. For example, the cast resin body has a considerable field of air bubbles on the bottom, This can be dealt with without too much trouble, and once everything is puttied and smoothed, we give it a black base coat. Weathering included a light gray enamel pin wash to bring out recessed features, and then light gray, white, and black oils were used to create some streaks and fading around the hull. Decals included generic numbers and draft markings appropriate to a 1/196-scale ship; these were close to the correct size but not quite. Nits aside, she builds up nice and stands out as a unique subject among my more pedestrian submarines. Thanks for looking.
- 8 replies
-
- 27
-
-

-
- 1/350
- iron shipwrights
- (and 1 more)
-
My next warship to build, as I wait for upgrade kits to arrive, is SMS Szent Istvan, the fourth and final Tegetthoff class dreadnought built by Austria-Hungary in the 1910's. Szent Istvan was a product of the unique circumstances behind the dual-monarchy and the KuK Navy. The Tegetthoff class and Szent István is famous for being amongst other things: Designed by a nearly blind man who later got hit by a tram he didn't see or hear coming, The first triple gun turrets on the water, Possibly too light for their calibre of guns, Supposedly the only battleship class in history to have ventilation problems. Probably consuming too much of the military budget for a mostly land locked empire. Undoubtedly the most beautiful class of battleship ever created (albeit Szent Istvan may be the ugly daughter of the class), Szent Istvan being built at a yard which three years earlier had rejected even applying to build a theoretical ship the size of Szent Istvan. Szent Istvan being the first battleship to sink on video (one of maybe two in total? I think Barham being the other?), The kit is Trumpeters update of the Viribus Unitis - the first of the Tegetthoff class - both released in 2019 according to Scalemates. The first model I built was Viribus Unitis so it will be interesting to see how/if I have progressed technically. https://www.scalemates.com/kits/trumpeter-05365-sms-szent-istvan--1197838 I've got the Big-Ed upgrade kit for it, but a fair amount of PE comes included. Additionally I have a Wood Hunter deck for the Szent István, and a scale master mast upgrade set. The Trumpeter paint guide is probably incorrect and I have yet to find a KuK Navy paint set so some improvisation will be needed. Photos of the spurs will follow in the next post, but I'll leave this photo taken around 1915 of what I hope the end result will look like possibly with more colour.
-
 Hi, It's my old Big-E, that I'd built twenty years ago, I have removed the planes and the island, changed the aircraft, rebuild the island, and applied the wheathering... It's the Enterprise in 1986-88 (Carrier Air Wing 11). . . . . . . . . . . . . . . . . . . It's the last aircraft carrier I built...
 -
Hi, And another Submarine I've finished more recently, it's the Hobby Boss Golf in 1/350: . . . . . . . Chris
-
Hi all, Now the New York is finished, on to my coming year's project - to build all the models I've been bought as Christmas and birthday presents by my dad! He's been an excellent supplier of some truly awesome kits and (morbid, I know ) is probably not going to be with us much longer. Spurred by this reality, I am committing to build the five large kits he has gifted me over the past years, including one he has bequeathed to me early as he knows he won't be able to make it. This excellent kit is from Atlantic Models - a multimedia resin and white metal marvel that should create an eye-catching model of these attractive and iconic ships. Dad also got me the Ikara conversion which wasn't in my original plan for the build, but it's going in! It's also suitable for the kit which represents the original Batch 1 ships of the class. I'd previously bought this lovely 4.5in twin mount from Micro Master in NZ but I'll hold onto it in case I score another one of these kits sometime! The casting quality is superb, with crisp details and no warping. I'd already removed the second breakwater in front of the gun before I took the photo to prepare for the Ikara mount (I can't stop calling it IKEA!!!!) Limbo mortar and the VDS wells are again crisply represented. The superstructure is presented in one piece with excellent casting again - the upper bulkeads are almost see-through they're so thin. The other resin parts are equally well done, with some stubs and scurf to remove. The white metal parts span different generations of the ship, so not all will be used. I won't be needing the rudders and propellers etc. for the waterline build. And of course there is the sumptuous Peter Hall photoetch sheet, absolutely top drawer as usual. The Ikara (not IKEA! NOT IKEA!!!) conversion has its own resin and metal parts, but the required PE is thoughtfully included on the main ship set already! This includes SeaCat launchers and satcom domes plus the relocated Bofors mounts with new hangar roof. The instructions are included on a CD-ROM along with the decals. There are names and numbers for all 26 ships, plus the fictional HMS Hero from Warship! I'm certainly looking forward to this - seems like it will be a pleasant build. The next project will be a 1/350 USS Nimitz, so best to start small! All the best, Alan
-
 Hi all, Managed to get some half-decent photos of the finished kit, the build thread is here: The finished kit and diorama I used the Pontos Super Detail set which included loads of PE, Veteran Models resin accessories, decals and dry transfers (which didn't work) Paint was a combination of acrylics, lacquers and Colourcoats enamel. Mostly airbrushed but also a lot of hand painting. It includes over 100 figures which all came from the Tamiya naval figures set. Some vehicles and aircraft were included in the kit, but I added some additional vehicles and MV-22 Ospreys from the Gallery Models add-on sets. The CH-53E came from the kit, but the AH-1Zs were aftermarket 3D-printed from HS-Model of Korea, really exceptional pieces. The flying helicopters are just stuck on gardening wire and superglued into place! The diorama base is made from polystyrene block, wave textures made from artist' modelling medium, paint was plain old artists acrylic, with cotton wool waves and spray, all sealed in with Acrylic heavy gloss gel. The flight deck decals came from the kit after the Pontos dry transfers failed to transfer the entire flight deck is a replacement nickel-silver item from the Pontos set. The LCAC hovercraft were included in the kit but the Pontos set added a lot of excellent details. The flags came from the Revell USS New Jersey kit. The big national flag was in the kit, transferred to metal foil so it would crinkle convincingly! All the figures were handpainted to reflect US Navy uniforms, role colours and Marines. The well deck interior was fully detailed and populated with crew and vehicles, with LED lighting enabling it to be seen. That's the five-month adventure complete! I really enjoyed the build, trying to recreate what I'd imagined the finished product would look like, and I'm pleased to say I think I managed it! All the best, Alan
- 25 replies
-
- 36
-
-
-
-
- Pontos Model
- Trumpeter
- (and 1 more)
-
Those of you who know me (largely from prolonged builds in the aircraft section - notably a 1/48 Seaking HAS5, as yet unfinished) will know that I recently got a new job after 2 very frustrating years of unemployment. Though this is a Very Good Thing by any standard, it has meant that I have not touched a model of any sort in about 2 months - also partly because of the hot weather, which made my man cave barely habitable. The job is in London, which means that I am staying up here 2 or 3 nights per week. Aha! Modelling time. The Seaking is much too delicate in its current state to be moved up to the Smoke, so I have decided to start something new. I joined the RN in 1978, straight from school, but was lucky enough to get a university cadetship (paid to be a student; what’s not to like?). In the long Summer holidays you were sent to sea for about 8 weeks - I assumed that we’d be doing fishery protection in a Ton, or similar (which would have been fine), but for some reason best known to the Admiralty, even my Summer 1979 training came into the Jammy Sod category; I joined HMS Dido. In Perth. As in Western Australia. She was part of a task group (I think led by Norfolk, and I remember a Type 12 and a Tribal being with us, among others) that deployed for 7 months - I joined her in Fremantle and left to fly home from Sydney in mid-trip. It was rough, I tell you (actually it really WAS rough crossing the Australian Bight, but that’s another story). So Dido was my first ship, and since I have a long term plan to build every ship in which I served (Dido, London, Norfolk (both DLGs, not the later 22 & 23), Fearless, Boxer, Ark Royal, Broadsword & Blackwater, in that order), she wins. The kit will be Peter Hall’s (Atlantic Models, for those who don’t know him) 1/350 resin, white metal & PE kit - and if you have never built an Atlantic kit, do yourself a favour and do so, because they are stunning. In due course, Norfolk & London will also be from the same stable. While I was away from the forum, Flickr seems to have followed Photobucket into oblivion / flithy lucre (it won’t let me in without signing up for Yahoo, and since I’d rather poke out my own eyes than go back to Yahoo, I’m looking for my 3rd picture host in 9 months). I seem to have settled on Village.Photos...but have yet to work out how to post from there onto here using an iPad... [Any tips gratefully received!] So pictures will follow in due course. Thus far nothing much to see anyway; just cleaning up parts and poring over references. But it is nice to be back. @perdu, @Martian Hale and my other friends, you’ll find me over here in the watery section for a while. More soon Crisp [Test photo - showing the work done to remove the 4.5” turret base and 2nd breakwater, and fettle the Ikara handling room etc to fit onto the front of the bridge screen. Plus the Jecobin plns of Euryalus, Dido’s sister. This is all dry fitting at the moment]
-
USS Gambier Bay is best known for her action during the Battle off Samar as a part of Task Force 77.4.3. On the morning of October 25th 1944, Vice Admiral Kurita's center force, consisting of 4 battleships (including Yamato), 8 Heavy cruisers and 11 destroyers broke through the San Bernardino Straight and were in a position to threaten the American landings at Leyte Gulf. All that stood between Kurita and the landing force was Taffy 3; 6 escort carriers, 3 destroyers and 4 destroyer escorts. In what is possibly the greatest naval mismatch in the history of warfare, Taffy 3 managed to halt, then turn back Kurita's ships despite their overwhelming superiority. Almost all of taffy 3's ships suffered damage, with 2 destroyers, 1 destroyer escort and 2 escort carriers sunk, this included Gambier Bay. It's thought she was sunk by a combination of 14 and 18 inch main battery gunfire from Yamato and Kongo and was the only carrier sunk by surface gunfire in the Pacific. The kit looks quite nice and I've wanted an escort carrier for some time, but the price was always very high here, around 200 dollars. However last year I happened upon a second hand one for less than half price and well I had to have it! As you can see I've made a bit of a start on it today, fit thus far seems pretty nice. I will add a little photo etch to it to spruce things up.
-
As I sit here waiting for the final bits of glue to dry on my 1/48 Gazelle, I have decided what the next project will be. I've gradually been assembling the bits I need, and I have a 4-5 week window without too much work, so can make a decent start as the Autumn draws on. If you follow aircraft WIPs, you might already know me from the Gazelle in the Helicopter 2 GB, and a long-running (and ongoing) 1/48 Barracuda III. But this will be my first ship since building the Airfix 1/600 Fearless about 45 years ago... This is going to be Ark Royal (5) as she was when I served in her in the late 80s, on my first front-line tour on Sea Kings (820 NAS). Based on the Airfix Illustrious, obviously, but there are quite a few differences to be adapted / reworked / scratched. In no particular order: - Different shape to the ramp; Ark's was built at 12 degrees right from the start, whereas the other 2 were modified, so Ark's was a different shape underneath as it faired into the hull; - Ark had Phalanx as her CIWS throughout her life, rather than Illustrious' Goalkeeper. I have acquired some Veteran Model 1/350 Phalanxes, so that's sorted - but I need to modify the sponson on the port quarter, which is not as deep as Lusty's; - Similarly the bow CIWS deck, and a much smaller one on the starboard side of the island; - The port quarter of the flight deck is a different shape; my Ark didn't have the "bulge" alongside 8 spot; - I have to reinstate the Sea Dart installation, which means completely re-working the starboard forward flight deck; no Spot 0, as in Lusty, different profile, visible fo'c's'le, capstans and other Fish-headery, DF aerial on a pole, rather than (as later in her life) up the mainmast; - Speaking of masts, the mainmast needs major rework to reinstate UAA1 and the 992 aerial, and lose 996; the mizzen is much smaller, without the large radome she acquired in her later life; - SCOT terminals further aft, just by the mizzen mast; - Two 909 domes to reinstate, though at least the superstructure beneath them doesn't appear to have changed much; - Different catwalks - the excellent WEM PE set includes the earlier catwalks, thank goodness - and Ark didn't have a stern catwalk at all at this stage; - A Cheverton in the port midships davit (just aft of the SRBOC sponson); - Different deck markings; I will be able to use some of Airfix's decals, but there will need to be some serious maskery later on in this build - at least the lines were all straight on the flight deck I knew, unlike these semi-circular things later on! - A few other more minor differences to do with 20mm placement, configuration of liferafts etc The CAG has been assembled; some extra Airfix aircraft sprues, 8 WEM Sea Harrier FRS1s, half a dozen Trumpeter Sea Kings a plus the WEM conversion kits, plus a couple of the WEM Air Group PE sets - the aim being to have 8 SHARs, 9 Sea King 5s, 3 AEWs & 2 HC 4s, which was what we carried for the trip to Australia in 1988. I know how I am going to do the HAS5s and the AEW2s; still working out how to get the HC4s right. So lots of work to do! I have made a start; the hangar deck is built, and I have cut off a) the stbd aft flight deck "bulge"; the forward area of the flight deck; c) the port aft CIWS sponson. I'm working from a lot of reference photos, a couple of books, plus the excellent Jecobin plans (suitably reduced in size to make them 1/350). More soon (including pics of the destruction); pull up a chair!
-
 Following on from the Fujimi Fuso c.1944, I present the Fujimi Kongo - also at 1/350th size also of 1944. I'm nearing the end of another ship and starting to look at what is next. I haven't seen a build log of the Kongo here - if anyone has recommendations to read please let me know! It will likely be a bit of time before I get my teeth into this. Planning will be important. The kit will be a hopefully straight forward out of two box build: Fujimi 60049 sometimes 600499? nominally October 1944 - 38 part build sequence with 22 sprues no photo etch apart from a chain. Pontos detail set 35020f1 with 10 A3 pages of instruction, 309 pieces of brass, 134 pieces of resin and 7 sheets of brass plus a wooden deck. But looking through the details I see some steps are marked x28 (!?!?) so my sanity may extend far enough and it is possible aftermarket guns may be acquired. Anyway here is the kit: stand and 1:1 paint scheme taken out. It looks not dissimilar to the Fuso which is good - i.e. very well engineered compared to Trumpeter or Tamiya from what I have seen. The paint scheme suggested is the same as for Fuso i.e. H17 Hull and H83 structure. Which would mean two models with the same paint jobs which I'm not super keen on. Kongo is the last of the foreign built Japanese capital ships built in Barrow in Furness in the UK. Roughly analogous to the battlecruiser HMS Tiger, the class had slightly larger (14inch vs 13.5 inch) guns, and by WW2 was almost unrecognisable compared to her 1912 launch. The debate about are they battlecruisers or fast battleships appears ongoing. More history will come but this is kept here for my memory. http://www.combinedfleet.com/kongo.htm
- 99 replies
-
- 12
-
-
 For several years I searched for the kit of the HMS Västergötland and finally found one. But I needed two to be able to convert one to the extended submarine as well. Considering how difficult it was to find a kit, I had no great hope of finding a second one so I tried to make a silicone mold of the bow and aft and trying to scratch build the rest. A plastic tube was mounted between the polyester castings and Magic Sculp was used to build up the hull. One year later I was lucky enough to get a second kit so the project started was scrapped and the new kit was cut into two parts instead. This is how far I can go before I found the kit. Having thoughts about scratchbuiling a couple of earlier submarines I have come to the conclusion that I can use parts of my discontinued project for an HMS Sjöormen. I removed the bow and will use the stern with the plastic tube. It will be a minor reshaping of the part but it will probably work even if the polyester part is very hard. Sadly the plastic tube was a little too short for this boat so a piece had to be added giving an extra joint to hide. A new nose in Magic Sculp has been started. It is a bit sad that there is a kit of this subarine but it is in 1/700 scale and that is not what I build.
 -
 Hi All, Any of you fly boys need somewhere to land? This will be my attempt for the group build, its a big one and i put my chances at completing it on time at slim but I'm going to try. As much as the kit is the Yorktown, I'm planning to build her as USS Franklin. From what i can tell there is essentially very little between them anyway and I think Big Ben deserves the spotlight as she was very lucky to survive the war, more on that later! The box: I bought the kit 2 years a go and have put a few bits together but its well under the 25% allowed. I'm a spreadsheet nerd so i keep track of my projects with completion %'s agasint components each with a weighted value, against the work I'm expecting i reckon she's about 4 or 5% done, The kit is early for Trumpeter and so the fit is um, .... interesting! Over the past couple of years I've got the hangar deck on and a bit of the hanger bulkheads, and sprayed it grey, An arch enemy on the hangar deck for scale, The hangar interior areas are completely devoid of any detail and will require a lot of work as I plan to open up the doors and lower two of the three lifts, lots of surgery is required and lots of making good there after, And that's where she's at, hasn't really moved forward in a long long time, To make things more interesting I'll be using the Pontos upgrade set as well! Aim for the skies I guess, Thanks for stopping by Sam
- 30 replies
-
- 19
-
-
I have had the “I Love Kit” boxing of HMS Ark Royal III in the stash for a little while. After struggling to finish my build of the KGV, I had planned to leave it there for a couple of years and focus on clearing some of my aircraft backlog, but my unexpected success at SMW has given the motivation needed to make a start on it. Unlike my previous build on this site, I am starting this log at the very start of the project. So far I have the model, and the Tetra Model Works detail up set and aircraft detail set. I am of course looking at other aftermarket from Micro Master, Black Cat, and others. I did use quite a few items from North star on the KGV, but they seem to no longer be active, which is a shame. I have not yet decided when or where I will be depicting this ship, though I am leaning towards depicting her as she was towards the end of her life, the worn paint scheme seems to be an interesting challenge. As far as can tell, there were not many significant changes to her through her short life, so I will get on with the build and hopefully when I know a bit more about her, I will be able to nail down a date and configuration. Here are the obligatory box shots. In terms of references, I only have the British Warships of the Second World War by John Roberts and a copy of the Profile Morskie plans at the moment. I have of course also searched IWM for every picture they have along with scouring Google for anything else available. Detailed photos do seem to be particularly hard to find for this ship though. As others have said, there are some issues with this kit, some more significant than others. On the less significant end, I honestly don’t think that the level of detail is much better than the Tamiya KGV kit which is 30 years older. A lot of the parts are simplified, and will need to be replaced, and surface detail is lacking with scuttles and some basic hatches, but not much else. They also seem to mostly be in the wrong place. In terms of more significant issues, the first thing I noticed when I first looked at the parts, is the thickness of the hull pieces, which is particularly visible around the cutouts at the bow and stern. In the second picture you can also see some of the oddly shaped scuttles and one of the backwards hawsepipes. Pretty much all of these cutouts seem to be too tall, significantly larger than in the plans, but many are also not quite in the correct place. I would like to try and do something about this plastic thickness issue and the general sizes of the cutouts, and I have some ideas, but I will need to do some testing before messing up the model. I have reduced the side profile from the John Roberts book to 1/350 and made some comparisons to the kit. I believe that the length is okay, but it seems to be too tall (~4mm), and too wide (~6mm). Also, the bow profile is quite different. Interestingly though the stern is much closer. The error seems to be mostly in the top two decks which appear to have been stretched upwards, and possibly outwards as well. With the exception of the bow profile, which needs to be more bulbous and less pointy, I really don’t think there is anything I can do to correct this, short of binning the whole lot and scratch building it instead. Anyway, I doubt many people will pick up on these issues. I am sure there are various other things which I will find during the build, but for now I thought I would point out the main things which I need to think about. I don’t want to seem entirely negative, and I am happy that there is a kit of this ship, but if I can spot these issues with my relative inexperience and lack of resources, I don’t know why Merit would not have bought copies of the shipbuilders plans to get these basics correct. I suppose on the plus side, it will give me more of a challenge than if I was able to build it straight out of the box. Anyway, on that note, enough moaning, onto the build… Cheers Peter
-
 Finished the Polar Lights NCC 1701 Built this in 2020 just before my 1/1500 Star Destroyer build. Has full LED lighting - with Sequenced Strobes and Nav Lights. Built the base with 3 Switches, so Lights could be selected. Warp Drive, Photon Torpedoes, Nav/Strobe etc. Took a lot of wiring and soldering that's for sure. All ran on a plug in mains 240V 2A PSU - Used aluminium hollow tube for the stand and wiring. The Hanger deck is fully lit, just cant seem to find any pictures of it the hanger deck at the moment